520女神说她很热,我用React写了个夏日空调给她
点击上方 前端阳光,关注公众号
回复加群,加入技术交流群交流群
摘要
当520来临而又恰逢夏日时节,暗恋女神多日的我决定今晚把她约出去看电影,一想到晚上的甜蜜时光,我直接拿起手机直接给女神发消息,掘友们等着吃狗粮吧,管饱。

既然女神这么热,我身为一个react使者怎能甘心呢,不行,要给女神写个空调,说不定今晚可以出去二人世界了呢。要写个夏日空调可真难,倒不是代码繁琐,只是这夏日空调得蘸上四分春风,三分月色,两分微醺,还有一分她的眉眼才好。咱们话不多说,上号。

创建项目
> create-react-app air-condition
组件划分
无论写react还是vue,最重要的一点永远都有如何确定组件分工,组件就是分而治之的思想,它就像一个备胎,哪里需要哪里搬!因为这个React夏日空调并不算复杂,甚至有点简单,所以html、css部分不多赘述,我们直接来看怎么划分组件。如下图所示,App组件为根组件,包裹Panel、CopyWriting、Button、Audio组件,Panel组件中又包含Temp组件,我们将状态(空调当前温度)、行为(调节按钮、声音的播放与暂停)统统放在App组件中,因为Panel、Button、Audio组件之间需要共享数据,而最方便的方法无疑是将共有数据存放在其共同的父组件中,这种方式React称之为状态提升。
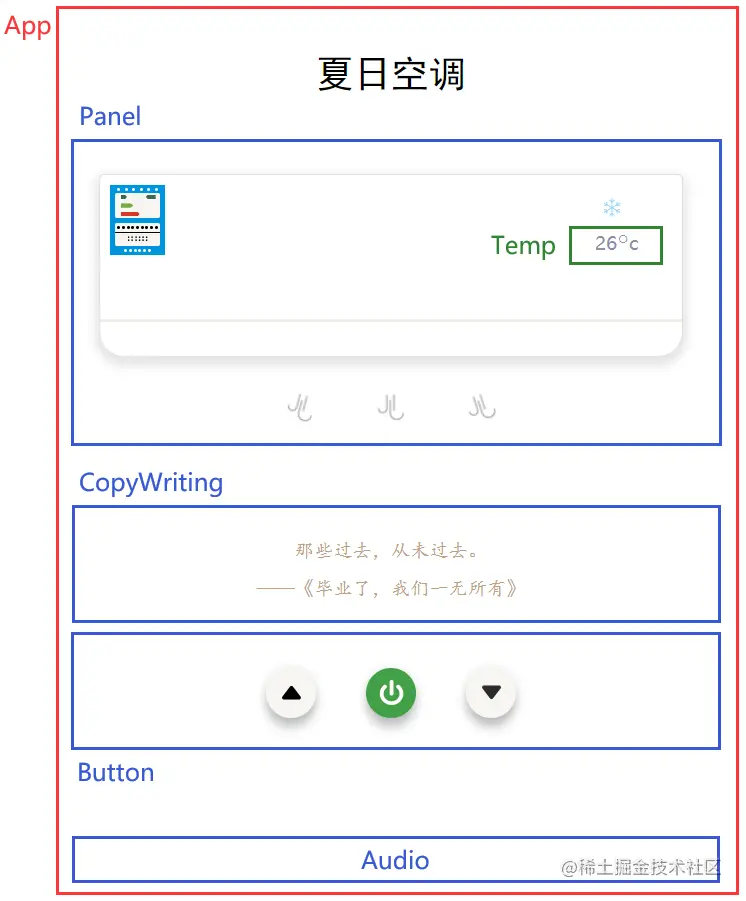
组件分工
index
import React from 'react'
import ReactDOM from 'react-dom/client'

import App from './App'

const root = ReactDOM.createRoot(document.querySelector('#root'))
root.render(
  <React.StrictMode>
    <App />
  React.StrictMode>
)
App
import { useState, useRef, useCallback } from 'react'

import Panel from './component/Panel'
import CopyWriting from './component/CopyWriting'
import Button from './component/Button'
import Audio from './component/Audio'

const App = () => {
  // 使用useRef得到Audio组件的实例
  const ref = useRef()
  // temp为存储的空调温度,默认为26
  const [temp, setTemp] = useState(26)
  // 调高温度
  const up = useCallback(() => {
    const result = temp + 1
    ref.current.playTip()
    // 温度最高为31
    if (result > 31) { return false }
    setTemp(result)
  }, [temp])
  // 调低温度
  const down = useCallback(() => {
    const result = temp - 1
    ref.current.playTip()
    // 温度最低为16
    if (result < 16) { return false }
    setTemp(result)
  }, [temp])
  // 开关按钮
  const toSwitch = useCallback(() => {
    ref.current.playTip()
    ref.current.playRun()
  }, [temp])

  return (
    <>
      <section className="title">
        <h1 style={{ fontWeight: 400 }}>夏日空调h1>
      section>
      <section className="panel">
        <Panel temp={temp} />
      section>
      <section className="copywriting">
        <CopyWriting />
      section>
      <section className="button">
        <Button up={up} down={down} toSwitch={toSwitch} />
      section>
      <section style={{ display: 'none' }}>
        <Audio ref={ref} />
      section>

  )
}

export default App
App组件中我们使用useRef继而得到子组件Audio中的方法。up、down、toSwitch方法通过props传递给Button组件,为了引起Button组件的不必要渲染,我们使用useCallback包裹住传递的方法,同时Button组件自身使用React.memo进行包裹。
### Panel
import Temp from '../Temp'

// 生成div
const productDiv = length => Array.from({ length }).map((_, i) => <div key={i}>div>)

const Panel = ({ temp }) => {
    return (
        <div className="air-condition">
            <div className="a-tag">
                <div className="a-t-header">
                    {productDiv(6)}
                div>
                <div className="a-t-content-1">
                    <div className="c-l">
                        <div className="c-l-1">div>
                        <div className="c-l-2">div>
                        <div className="c-l-3">div>
                    div>
                    <div className="c-r">
                        <p className="c-r-grade">p>
                    div>
                div>
                <div className="a-t-content-2">
                    <div className="c-2-title">
                        {productDiv(9)}
                    div>
                    <div className="c-2">
                        <div className="c-2-1">
                            {productDiv(6)}
                        div>
                        <div className="c-2-2">
                            {productDiv(6)}
                        div>
                    div>
                div>
                <div className="a-t-footer">
                    {productDiv(6)}
                div>
            div>
            <div className="a-screen">
                <div className="s-icon">
                    <img src={snowflake} className="img-100" alt="" />
                div>
                <div className="s-temp">
                    <Temp temp={temp} />
                div>
            div>
            <div className="a-line">div>
            <div className="a-wind">
                <img src={wind} alt="failed" className="img-l" />
                <img src={wind} alt="failed" className="img-c" />
                <img src={wind} alt="failed" className="img-r" />
            div>
        div>
    )
}

export default Panel
我们也可以选择不使用Temp组件,而是将温度直接显示在Panel组件中,这种方式同样可以实现效果,但是为了数据和页面更好的分离,我们的Panel组件只负责接收数据,Temp组件只负责显示数据,这样如果后期需要对Panel组件添加一些复杂交互、功能,我们只需要对Panel组件进行修改,如果需要对空调温度的显示界面进行修改时,我们只需要修改Temp组件即可。
Temp
import React from 'react'

const Temp = ({ temp }) => {
    return (
        <>
            <span>{temp}span>
            <span className="s-t-symbol">○span>
            <span>cspan>

    )
}

export default React.memo(Temp)
Temp组件只是用来展示UI,不进行其它任何操作,无论Temp组件后期修改后多么花里胡哨,温度(temp)我们已经拿到了,无论怎么修改均不影响其它功能。同样,为了引起Temp组件的不必要渲染,我们依然使用React.memo对组件自身进行包裹。
CopyWriting
import { useState, useEffect } from "react"

// 获取文案
const getContent = async () => {
    try {
        const connect = await fetch('https://v1.hitokoto.cn?c=d')
        const data = await connect.json()
        return data
    } catch (e) { return false }
}

const CopyWriting = () => {
    // 存储获取到的文案
    const [text, setText] = useState({ hitokoto: '', quote: '' })
    useEffect(() => {
        const update = async () => {
            const data = await getContent()
            const from_who = data.from_who ? data.from_who : ''
            data.quote = `——${from_who}《${data.from}》`
            setText(data)
        }
        const token = setInterval(update, 6000)
        update()
        // 组件卸载时清除定时器
        return () => clearInterval(token)
    }, [])
    return (
        <>
            <p>{text.hitokoto}p>
            <p>{text.quote}p>

    )
}

export default CopyWriting
因为本项目相对较小,无需其它复杂功能,所以getContent采用fetch获取文案,如果非要使用xhr、axios倒显得有些冗余了。我们此处将获取到的文案存放在了useState中,还有一种方式,此处并未采用。即使用useRef来存储数据,当获取到数据后,使用useState刷新页面。例如
const Comp = () => {
    const ref = useRef(1)
    const [force, setForce] = useState()
    const handle = () => {
        const result = ref.current
        ref.current = result + 1
        setForce(result)
    }
    return (
        <>
            <span>{ref.current}span>
            <button onClick={handle}>自增button>

    )
}
Button
import React, { useState } from 'react'

const Button = ({ up, down, toSwitch }) => {
    // 存储开关按钮的背景颜色
    const [bg, setBg] = useState({ open: '#f33531', off: '#43a047', flag: false })
    // 播放声音、切换状态
    const switchState = () => {
        toSwitch()
        setBg({ ...bg, flag: !bg.flag })
    }
    return (
        <>
            <div className="b-inc" onClick={() => up()}>
                <img src={upArrow} className="img-5" alt="failed" />
            div>
            <div
                className="b-switch"
                onClick={() => switchState()}
                style={{ backgroundColor: bg.flag ? bg.open : bg.off }}
            >
                <img src={switchBtns} className="img-5" alt="failed" />
            div>
            <div className="b-dec" onClick={() => down()}>
                <img src={downArrow} className="img-5" alt="failed" />
            div>

    )
}

export default React.memo(Button)
Button组件自身使用React.memo进行包裹,一般情况下,React.memo与useCallback、useMemo搭配使用,使用useCallback、useMemo的原因是无论父组件如何操作,始终保证传递给Button组件的props不变,使用React.memo是为了对props做比较,这样才不会引起Button组件的重新渲染。React.memo类似于类式组件的PureComponent。
Audio
import React, { useRef, useImperativeHandle } from 'react'

const Audio = (_, ref) => {
    const tipRef = useRef()
    const runRef1 = useRef()
    // 要传递给父组件的方法
    useImperativeHandle(ref, () => ({
        playTip: () => {
            tipRef.current.play()
        },
        playRun: () => {
            const flag = runRef1.current.paused
            if (flag) return setTimeout(() => runRef1.current.play(), 300);
            runRef1.current.pause()
        },
    }))
    return (
        <>
            <audio src={tip} ref={tipRef} >audio>
            <audio src={run} ref={runRef1} loop>audio>

    )
}

// 使用React.forwardRef将子组件ref转发给父组件
export default React.forwardRef(Audio)
Audio组件中,我们使用React.forwardRef与useImperativeHandle让父组件可以操作子组件。注意,类式组件并不需要这么做,只需要在使用子组件时直接ref即可,显然,hooks并不支持这种写法。
// son
class Son extends React.Component {
  constructor() {
    super()
    this.state = { value: 1 }
    this.inc = () => this.setState({ value: this.state.value + 1 })
  }
  render() {
    const { value } = this.state
    const { inc } = this
    return (
      <>
        <span>{value}span>
        <button onClick={inc}>加1button>

    )
  }
}
// father
// father可以是函数式组件也可以是类式组件
class Father extends React.Component {
  constructor() {
    super()
    this.ref = React.createRef()
    this.inc = () => this.ref.current.inc()
  }
  render() {
    const { ref, inc } = this
    return (
      <>
        <Son ref={ref} />
        <button onClick={inc}>加21button>

    )
  }
}
项目完成
> npm start
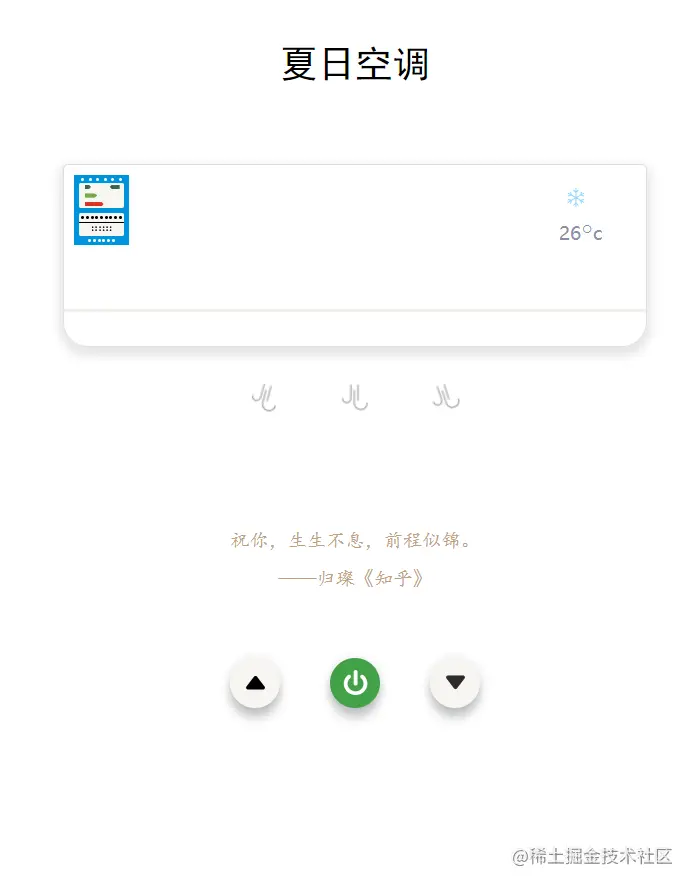
在线演示地址 1.在线演示https://link.juejin.cn/?target=http%3A%2F%2Fzhangbenjin.cn%2F
项目到这里就已经大功告成了,另外给大家推荐一下我自己写的原创文章https://github.com/Sunny-lucking/blog,我相信技术肯定会得到提升的。兄弟们回见了,我要去拿给女神看看了。

我心想,女神一定高兴坏了吧,今晚应该去看什么电影呢,听说520档期有《可不可以不要离开我》、《暗恋:橘生淮南》,我相信有她陪我,每一天都是不重复的电影。

女神为什么这样啊,难道我的空调不够好吗?思来想去,可能兔兔去睡觉了不希望被人打扰罢了。
作者:FuncJin 链接:https://juejin.cn/post/7100478900673150989

往期推荐
我组建了技术交流群,里面有很多 大佬,欢迎进来交流、学习、共建。回复 加群 即可。后台回复「电子书」即可免费获取 27本 精选的前端电子书!回复内推,可内推各厂内推码
“分享、点赞、在看” 支持一波👍
