
深入研究 CSS 中的 ::before 和 ::after 伪元素
共 5906字,需浏览 12分钟
·
2021-08-01 09:14

原文 | https://betterprogramming.pub/mastering-css-before-and-after-ecf1d59d9a3d
翻译 | 小爱
::after
::before
::first-letter
::first-line
::marker
::selection
selector::pseudo-element {property: value;}
请注意我们需要使用双冒号 (::) 而不是单个冒号 (:)。这就是 CSS3 语法。最初,他们的语法规范只有一个冒号(CSS2、CSS1)。
这种变化是由 W3C 推动的。他们旨在明确区分那些使用单个冒号的伪类。
它们之间有什么区别?简而言之,伪类用于选择非表现性特征。另一方面,伪元素使我们能够创建新的虚拟元素。
请注意,出于向后兼容性的考虑,大多数浏览器仍接受来自 CSS2 和 CSS1 的单冒号语法。
::before 和 ::after 工作如何?
这些伪元素用于在目标元素之前或之后添加内容。
对内容的放置位置有一个常见的误解。许多人认为内容将放置在选定的 HTML 标记之前或之后。相反,它将被放置在元素的内容之前或之后。
让我们看看这个例子:
p::before {content: "foo - ";}<p>text</p>
在原始 HTML 中,“输出”将等同于:
✅ <p>foo - text</p>而不是这个:
❌ foo - <p> text</p>由于 ::before 和 ::after 在元素内容之前添加内容,因此有一个标签不起作用:<img />,此标签不会在其中添加内容。它只是媒体内容的替代品。这意味着它不适用于任何伪元素。
内容属性
对于伪元素,内容属性至关重要。默认情况下,内容设置为无。这意味着如果你尝试在不添加该属性的情况下设置元素的样式,实际上什么也不会发生。
p::before {width: 100px;height: 100px;: red;}<p>text</p>Only the paragraph text will be displayed
让我们通过添加一些内容来修复上面的示例:
p::before {content: '';width: 100px;height: 100px;: red;}<p>text</p>The text paragraph + a box of 100x100 and red will be displayed
即使我们不想添加任何文本,我们仍然需要用 '' 填充该属性。这是使用伪元素时最常见的错误之一。
现在我们已经看到了内容的重要性,让我们通过查看 MDN 来准确定义它是什么:
“内容 CSS 属性用生成的值替换元素。使用 content 属性插入的对象是匿名替换元素。” — MDN 网络文档
content 属性非常强大,让我们可以添加来自许多不同来源的内容。当使用这个属性在伪元素上显示任何东西时,我们需要注意几个怪癖:
默认情况下,内容将显示为 display-inline 而不是 display:block。
如果内容是字符串,用户将无法选择。这意味着用户将无法用鼠标复制它。它应该是 atrezzo 而不是主要内容。
内容值
我们可以使用 content: 'foo' 直接添加字符串内容。如果我们希望文本可翻译怎么办?如果我们直接在 CSS 样式表中添加文本,将很难用适当的翻译替换它。
对于该用例,我们可以将翻译存储在具有属性的元素中。然后,我们可以通过引用该属性将其与内容一起拉出。这将使我们的 CSS 保持动态,而不是静态绑定到字符串。
让我们看一个例子:
<html><style>p {padding: 1.25rem;font-weight: bold;font-size: 1.25rem;}p::before {content: attr(data-before-text);background-color: aqua;margin-right: 0.625rem;padding: 0.625rem;}</style><body><p data-before-text="foo">hello world</p></body></html>
让我们看一下结果:
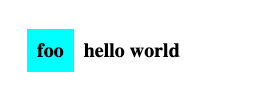
请注意,我们如何使用属性 before-text 来提取文本:
p::before {content: attr(data-before-text);background-color: aqua;margin-right: 0.625rem;padding: 0.625rem;}
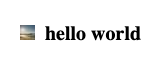
content 属性可以包含URL。让我们看一个具有该用例的示例:
p::before {content: url(https://unsplash.it/15/15);margin-right: 0.625rem;}
让我们看一下结果:
除了 URL、属性和字符串之外,内容属性还可以包含各种属性:计数器、引号、线性渐变等。你可以在 MDN Web Docs 上查看完整列表。
我们不限于使用一处。我们可以将多个内容属性合二为一。
p::before {content: attr(data-details) "- more details -";margin-right: 0.625rem;}
示例
既然我们已经看到了 ::before 和 ::after 结合内容的强大功能,让我们来看一些实际的例子。
1、化妆品
主要用例之一主要用于化妆品。你可以使用它们为元素添加一些视觉美感。
让我们通过一个例子更好地了解它:
<html><style>h1 {font-weight: bold;}h1::after {content: "";display: block;background-color: #73937e;height: 0.2em;width: 100%;}h1::before {content: "";display: block;background-color: #73937e;height: 0.2em;width: 100%;}</style><body><h1>Header title</h1></body></html>
让我们看一下结果:

只需很少的代码和额外的标记,我们就可以实现一个,否则需要大量工作的布局。
2、自定义块引用
另一个很好的用法是创建你的自定义块引用。让我们自定义该 HTML5 标记,以使用 CSS 和自定义属性创建一个可重用的组件。
让我们看看它的代码:
<html><style>blockquote {font-weight: bold;font-size: 1rem;font-style: italic;}blockquote::before {content: open-quote;font-style: normal;color: #585563;}blockquote::after {content: close-quote " - " attr(data-author);font-style: normal;color: #585563;}</style><body><blockquote data-author="Isaac Asimov">I do not fear computers. I fear lack of them.</blockquote></body></html>
让我们看一下结果:
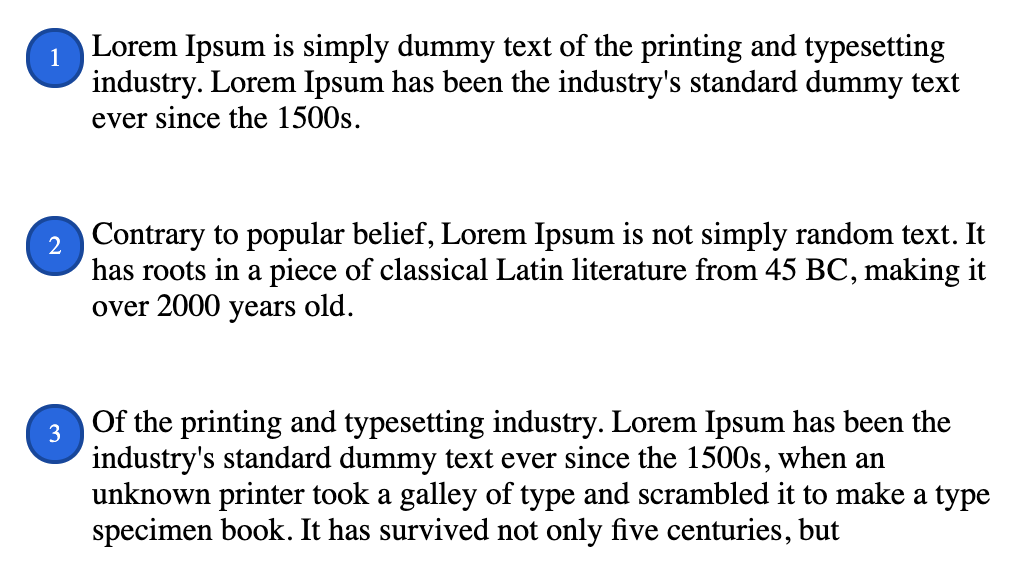
3、自定义排序列表
另一个用例是创建自定义 HTML 有序列表。这可以通过使用 counter-reset、counter-increment 和 counter(counter-name) 来实现。
让我们看看它的代码:
<html><style>ol {list-style: none;counter-reset: chapter_counter;}li {margin-bottom: 2.5em;margin-left: 2.5em;position: relative;}li::before {content: counter(chapter_counter);counter-increment: chapter_counter;position: absolute;left: -2.6em;display: flex;align-items: center;justify-content: center;border-radius: 50%;font-style: normal;font-size: 0.8em;width: 2em;height: 2em;color: white;background-color: #0566e6;border: 2px solid #0046a1;}</style><body><ol><li>Lorem Ipsum is simply dummy text of the printing and typesettingindustry. Lorem Ipsum has been the industry's standard dummy text eversince the 1500s.</li><li>Contrary to popular belief, Lorem Ipsum is not simply random text. Ithas roots in a piece of classical Latin literature from 45 BC, making itover 2000 years old.</li><li>Of the printing and typesetting industry. Lorem Ipsum has been theindustry's standard dummy text ever since the 1500s, when an unknownprinter took a galley of type and scrambled it to make a type specimenbook. It has survived not only five centuries, but</li></ol></body></html>
让我们看一下结果:
最后的想法
我们已经看到这两个伪元素是多么有趣。可能性是无止境。它们有助于减少不必要的标记并通过丰富你的元素来增加价值。
它们并不意味着被过度使用。正如我们所看到的,有一些特殊的用例确实很出色。在其他情况下,如果使用不当,它们可能会成为一种负担。
我希望这篇文章能帮助你理解它们。
学习更多技能
请点击下方公众号
![]()
