前端应该掌握的编译基础(基于 babel)
作者:陈大鱼头 github: KRISACHAN
开发息息相关
虽然 Babel 团队在各种哭穷,但是 Babel 始终是我们前端在开发中不可或缺的重要工具。 虽然我们只是 API 调用工,但是多了解一些总是会有好处的嘛 ☄️☄️☄️
什么是编译器?
编译器(compiler)是一种计算机程序,它会将某种编程语言写成的源代码(原始语言)转换成另一种编程语言(目标语言)。
源代码(source code)→ 预处理器(preprocessor)→ 编译器(compiler)→ 汇编程序(assembler)→ 目标代码(object code)→ 链接器(linker)→ 可执行文件(executables),最后打包好的文件就可以给电脑去判读运行了。
什么是解释器?
解释器(英语:interpreter),是一种计算机程序,能够把解释型语言解释执行。解释器就像一位“中间人”。解释器边解释边执行,因此依赖于解释器的程序运行速度比较缓慢。解释器的好处是它不需要重新编译整个程序,从而减轻了每次程序更新后编译的负担。相对的编译器一次性将所有源代码编译成二进制文件,执行时无需依赖编译器或其他额外的程序。
跟编译器的区别就是一个是边编译边执行,一个是编译完才执行。
高级语言编译器步骤
输入源程序字符流 词法分析 语法分析 语义分析 中间代码生成 机器无关代码优化 代码生成 机器相关代码优化 目标代码生成
V8 编译 JS 代码的过程
生成抽象语法树(AST)和执行上下文 第一阶段是分词(tokenize),又称为词法分析 第二阶段是解析(parse),又称为语法分析 生成字节码 字节码就是介于 AST 和机器码之间的一种代码。但是与特定类型的机器码无关,字节码需要通过解释器将其转换为机器码后才能执行。 执行代码
JS 执行代码的过程
执行全局代码时,创建全局上下文 调用函数时,创建函数上下文 使用 eval 函数时,创建 eval 上下文 执行局部代码时,创建局部上下文
关于 Babel
Babel ,又名 Babel.js。 是一个用于 web 开发,且自由开源的 JavaScript 编译器、转译器。
Babel 的编译流程:

图片来源:透過製作 Babel-plugin 初訪 AST
Parse
Babel 的第一步就是将源码转换为抽象语法树(AST)
const babel = require('@babel/core');
const { parseAsync } = babel;
const parseCode = async (code = '', options = {}) => {
  const res = await parseAsync(code, options);
};
parseCode(`
  const a = 1;
`)
可通过 https://astexplorer.net/ 在线查看具体结果
这一步会将收集到的的代码,通过 词法分析(Lexical analysis) 跟 语法分析(Parsing) 两个阶段将代码转换成 AST
词法分析(Lexical analysis)
词法分析会将代码转为 token ,可以理解为是对每个不可分割单词元的描述,例如 const 就会转换成下面这样:
Token {
    type:
        TokenType {
        label: 'const',
        keyword: 'const',
        beforeExpr: false,
        startsExpr: false,
        rightAssociative: false,
        isLoop: false,
        isAssign: false,
        prefix: false,
        postfix: false,
        binop: null,
        updateContext: null
    },
    value: 'const',
    start: 5,
    end: 10,
    loc:
    SourceLocation {
        start: Position { line: 2, column: 4 },
        end: Position { line: 2, column: 9 },
        filename: undefined,
        identifierName: undefined
    }
}
type 就是 对 token 的描述,如果想要查看 bebal 生成的 token,我们可以在 options 里写入:
parserOpts: {
  tokens: true
}
关于 @babel/parser 更多配置,可查看:https://babeljs.io/docs/en/babel-parser#options
语法分析(Parsing)
语法分析则是将上述的 token 转换成对应的 ast 结构
所以我们就可以看到这样的一段树状结构(过滤部分信息)
{
    "type": "VariableDeclaration",
    "start": 0,
    "end": 14,
    "loc": {
        "start": {
            "line": 1,
            "column": 0
        },
        "end": {
            "line": 1,
            "column": 14
        }
    },
    "declarations": [
        {
            "type": "VariableDeclarator",
            "start": 6,
            "end": 13,
            "loc": {
                "start": {
                    "line": 1,
                    "column": 6
                },
                "end": {
                    "line": 1,
                    "column": 13
                }
            },
            "id": {
                "type": "Identifier",
                "start": 6,
                "end": 9,
                "loc": {
                    "start": {
                        "line": 1,
                        "column": 6
                    },
                    "end": {
                        "line": 1,
                        "column": 9
                    },
                    "identifierName": "abc"
                },
                "name": "abc"
            },
            "init": {
                "type": "NumericLiteral",
                "start": 12,
                "end": 13,
                "loc": {
                    "start": {
                        "line": 1,
                        "column": 12
                    },
                    "end": {
                        "line": 1,
                        "column": 13
                    }
                },
                "extra": {
                    "rawValue": 1,
                    "raw": "1"
                },
                "value": 1
            }
        }
    ],
    "kind": "const"
}
这样与 type 同级的结构就叫 节点(Node) , loc ,start ,end 则是位置信息
Transform
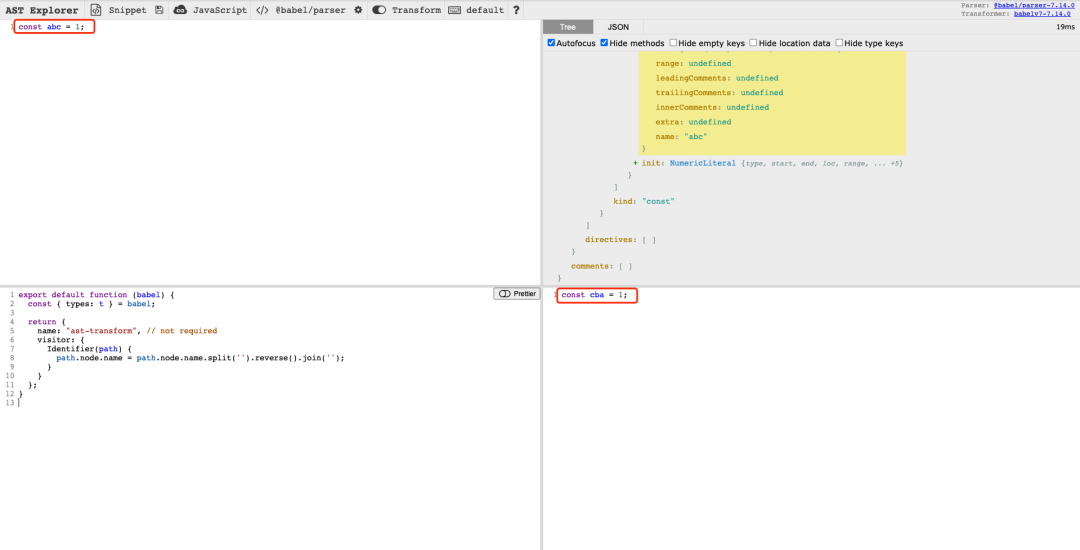
Babel 的第二步就是遍历 AST,并调用 transform 以访问者模式进行修改
export default function (babel) {
  const { types: t } = babel;

  return {
    name: "ast-transform", // not required
    visitor: {
      Identifier(path) {
        path.node.name = path.node.name.split('').reverse().join('');
      }
    }
  };
}
通过执行上述的 transform ,我们可以有:

上述功能也可通过 https://astexplorer.net/ 在线查看
Generate
Babel 的第三步就是把转换后的 AST 打印成目标代码,并生成 sourcemap
开发一个 babel 插件
前置知识 - 访问者模式
访问者模式: 在访问者模式(Visitor Pattern)中,我们使用了一个访问者类,它改变了元素类的执行算法。通过这种方式,元素的执行算法可以随着访问者改变而改变。这种类型的设计模式属于行为型模式。根据模式,元素对象已接受访问者对象,这样访问者对象就可以处理元素对象上的操作。
知道你们不想看文字描述,所以直接上代码!
class 汉堡包 {
    accept(fatBoyVisitor) {
        fatBoyVisitor.visit(this);
    }
};

class 薯条 {
    accept(fatBoyVisitor) {
        fatBoyVisitor.visit(this);
    }
};

class 炸鸡 {
    accept(fatBoyVisitor) {
        fatBoyVisitor.visit(this);
    }
};

class FatBoy {
    constructor(foods) {
        this.foods = foods;
    }

    accept(fatBoyFoodVisitor) {
        this.foods.forEach(food => {
            food.accept(fatBoyFoodVisitor);
        });
    }
};

class FatBoyFoodVisitor {
    visit(food) {
        console.log(`肥宅吃了${food.constructor.name}`);
    }
};

const fatBoy = new FatBoy([new 汉堡包(), new 薯条(), new 炸鸡()]);
fatBoy.accept(new FatBoyFoodVisitor());
最终输出结果是:
肥宅吃了汉堡包
肥宅吃了薯条
肥宅吃了炸鸡
babel-plugin-transform-object-assign 源码
import { declare } from "@babel/helper-plugin-utils";

export default declare(api => {
  api.assertVersion(7);

  return {
    name: "transform-object-assign",

    visitor: {
      CallExpression: function(path, file) {
        if (path.get("callee").matchesPattern("Object.assign")) {
          path.node.callee = file.addHelper("extends");
        }
      },
    },
  };
});
上面的就是 babel-plugin-transform-object-assign 的源码。
declare:是一个用于简化创建 transformer 的工具函数 assertVersion:检查当前 babel 的大版本 name:当前插件的名字 visitor:对外提供修改内容的访问者 CallExpression:函数调用的 type,每一句代码都会生成对应的type,例如最上面的函数名abc则对应的是一个Identifier类型,如果需要修改某一个type的代码,则在里面创建对应的type访问者进行修改即可。
具体生成的代码如下:
// input
const a = Object.assign({ a: 1 }, { b: 2 });

// output
"use strict";

function _extends() { _extends = Object.assign || function (target) { for (var i = 1; i < arguments.length; i++) { var source = arguments[i]; for (var key in source) { if (Object.prototype.hasOwnProperty.call(source, key)) { target[key] = source[key]; } } } return target; }; return _extends.apply(this, arguments); }

const a = _extends({
  a: 1
}, {
  b: 2
});
Babel 插件实战 - 清除 console 源码
先上代码:
const babel = require('@babel/core');
const get = require('lodash/get');
const eq = require('lodash/eq');

const { transformAsync } = babel;

const removeConsole = rootPath => ({
    visitor: {
        ExpressionStatement: path => {
            const name = get(path, 'node.expression.callee.object.name');
            const CONSOLE_PREFIX = 'console';
            if (!eq(name, CONSOLE_PREFIX)) {
                return;
            };
            path.remove();
        },
    }
});

const transformCode = async (code = '') => {
    const res = await transformAsync(code, {
        plugins: [
            removeConsole,
        ],
    });

    console.log(res.code);
};

transformCode(`
    const a = 10;
    console.group('嘤嘤嘤');
    console.log(a);
    console.groupEnd();
`);
输出结果:
const a = 10;
上面的功能就是我们在声明语句类型 ExpressionStatement 中实现的。
node.expression 对应的是当前类型里的子表达式,在这个场景里,它的 type === 'CallExpression'。
callee 对应的就是一个调用函数类型,在这个场景里,它的 type === 'MemberExpression'。
object 对应的就是当前调用函数的前置对象,它的 type === 'Identifier',name 则是 console。
所以我们的实现就很简单了,只要 name === 'console' ,我们就可以通过内部暴露的 remove 方法直接删除当前代码。
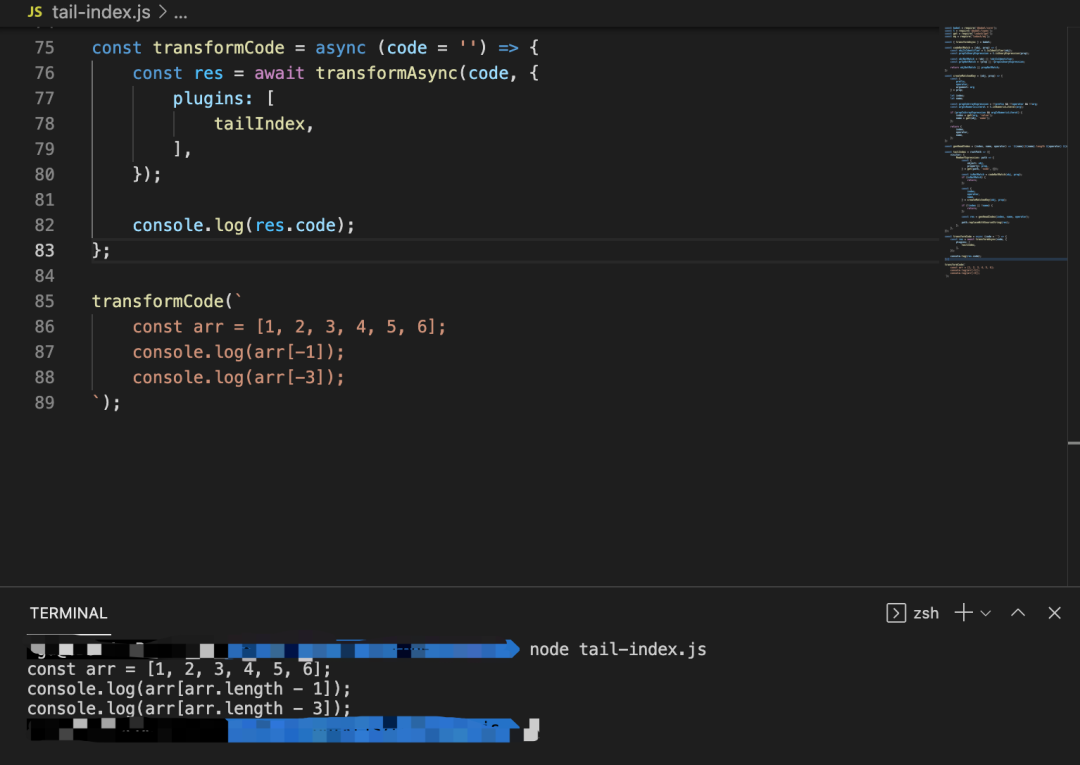
Babel 插件实战 - 新的语法
总所周知,JS 不能这么写
# python
arr = [1, 2, 3]
print(arr[-1]) # 3
print(arr[len(arr) - 1]) # 3
但是我们可以用魔法打败魔法

作为一个凶起来连自己都可以编译的语言,这有多难呢~
具体实现如下:
const babel = require('@babel/core');
const get = require('lodash/get');
const tailIndex = rootPath => ({
    visitor: {
        MemberExpression: path => {
            const {
                object: obj,
                property: prop,
            } = get(path, 'node', {});

            const isNotMatch = codeNotMatch(obj, prop);
            if (isNotMatch) {
                return;
            };

            const {
                index,
                operator,
                name,
            } = createMatchedKeys(obj, prop);

            if (!index || !name) {
                return;
            };

            const res = genHeadIndex(index, name, operator);

            path.replaceWithSourceString(res);
        },
    },
});
MemberExpression 就是当前要处理的语句类型。
codeNotMatch 是我们自己实现的函数,用于判断 node.object 跟 node.property 是否合法,具体实现如下:
const t = require('@babel/types');

const codeNotMatch = (obj, prop) => {
    const objIsIdentifier = t.isIdentifier(obj);
    const propIsUnaryExpression = t.isUnaryExpression(prop);

    const objNotMatch = !obj || !objIsIdentifier;
    const propNotMatch = !prop || !propIsUnaryExpression;

    return objNotMatch || propNotMatch;
};
这里的 require('@babel/types') 是 babel 的一个工具包,这里面我们运用了它的语句判断能力。这种 isXXX 的大体实现如下:
function isIdentifier(node, opts) {
  if (!node) return false;
  const nodeType = node.type;
  if (nodeType === 具体类型) {
    if (typeof opts === "undefined") {
      return true;
    } else {
      return shallowEqual(node, opts);
    }
  }
  return false;
}
上面的 shallowEqual 实现如下:
function shallowEqual(actual, expected) {
  const keys = Object.keys(expected);

  for (const key of keys) {
    if (actual[key] !== expected[key]) {
      return false;
    }
  }

  return true;
}
createMatchedKeys 用于创建最终匹配的字符,即需要将 -1 改为 .length - 1 的形式,所以具体实现如下:
const createMatchedKeys = (obj, prop) => {
    const {
        prefix,
        operator,
        argument: arg
    } = prop;

    let index;
    let name;

    const propIsArrayExpression = !!prefix && !!operator && !!arg;
    const argIsNumericLiteral = t.isNumericLiteral(arg);

    if (propIsArrayExpression && argIsNumericLiteral) {
        index = get(arg, 'value');
        name = get(obj, 'name');
    };

    return {
        index,
        operator,
        name,
    };
};
这里面一路判断,匹配即可。
所以当我们拿到下标 ,操作符 跟 数组名 之后,直接组合成最终要生成的代码即可,即有:
const genHeadIndex = (index, name, operator) => `${name}[${name}.length ${operator} ${index}]`;
最后我们直接替换源码即可,怎么替换呢,babel 有通过访问者模式返回 replaceWithSourceString 方法进行硬编码替换。。。
替换的逻辑就是先通过 babel.parse 将要替换的代码生成 ast,然后从 loc 到具体的 node 进行替换。
一个新语法,就这么完成啦~
参考资料
透過製作 Babel-plugin 初訪 AST 词法分析(Lexical analysis) 语法分析(Parsing) https://babeljs.io/docs/en/babel-parser#options https://astexplorer.net/ https://github.com/babel/babel https://github.com/babel/minify 『1W7字中高级前端面试必知必会』终极版 Babel 插件手册
