
还在手动启动SpringBoot项目?Docker部署不香吗?

来源:toutiao.com/i6843391272229536267
docker介绍
Docker 是一个开源的应用容器引擎,让开发者可以打包他们的应用以及依赖包到一个可移植的镜像中,然后发布到任何流行的 Linux或Windows 机器上,也可以实现虚拟化。容器是完全使用沙箱机制,相互之间不会有任何接口。
docker的核心思想是通过对应用的封装、分发、部署、运行生命周期进行管理,达到应用组件级别的“一次性封装,到处运行”。这里的应用组件,可以是一个web应用,也可以是一个环境,更可以是一个数据库等等。
安装docker
既然docker这么神奇,那我们如何安装docker呢?我们一起来走一下吧。
Ubuntu安装docker
由于本人的系统是CentOS,所以这里就只展示一下CentOS的安装方式,Ubuntu以及其他系统请自行百度。
CentOS安装docker
docker要求CentOS在7.0以后的版本,如果你的系统版本还在7.0以前,请先升级一下版本在进行安装,同时不支持32位的系统,内核版本至少3.10。
请先确保没有安装过docker,否则有可能会导致安装失败,如果之前安装过,可以尝试直接yum isntall -y docker
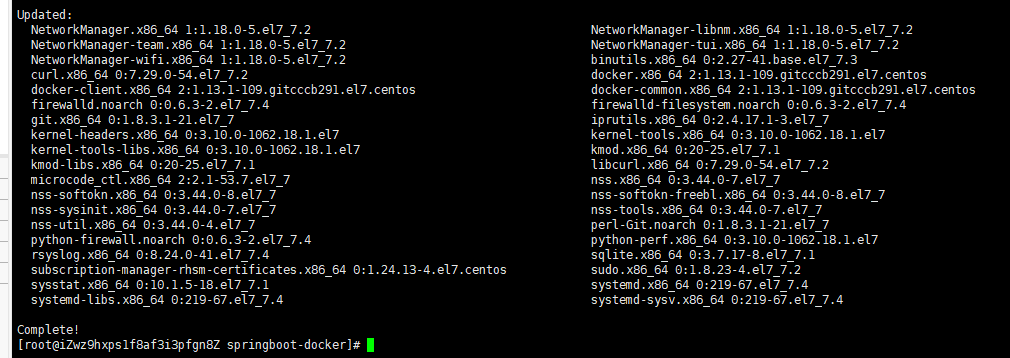
1.更新软件源第一个命令
yum update

遇到他输入y,然后回车,看到下面信息表示更新成功:
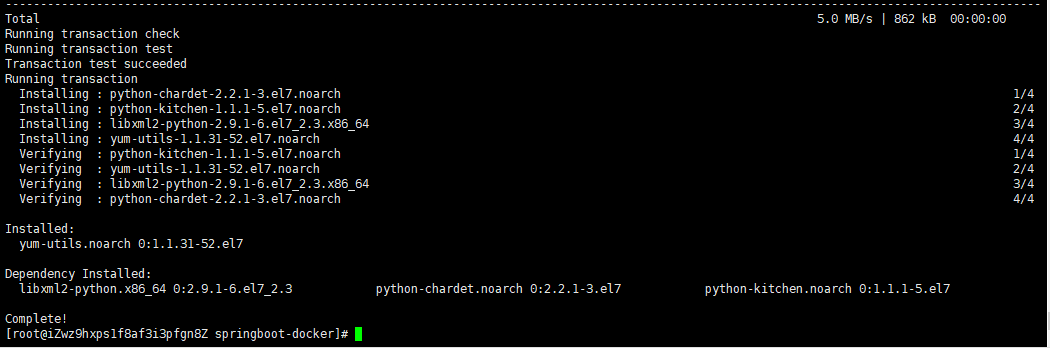
第二个命令
yum install -y yum-utils device-mapper-persistent-data lvm2
2.添加docker稳定版本的yum软件源
yum-config-manager --add-repo https://download.docker.com/linux/centos/docker-ce.repo

3.再次更新yum源,并安装docker
yum update

yum install -y docker-ce

看到这个页面,标识docker已经安装成功了。4.安装完成之后启动docker
systemctl start docker
5.重启
systemctl restart docker
6.停止
systemctl stop docker
7.开机自启动
systemctl enable docker
8.查看docker的状态
systemctl status docker
通过脚本安装
除了上面的yum安装,还可以采用shell脚本安装,安装流程如下:
curl -fsSL https://get.docker.com/ | sh
或者
wget -qO- https://get.docker.com/ | sh
拉取java环境
拉取jdk很简单,直接执行一行代码即可,我这里拉取的时java 8的版本。
docker pull java:8
拉取完成之后执行:
docker images
如果出现下面内容,表示拉取成功

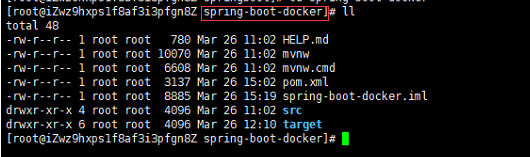
创建springboot项目
1.新建项目
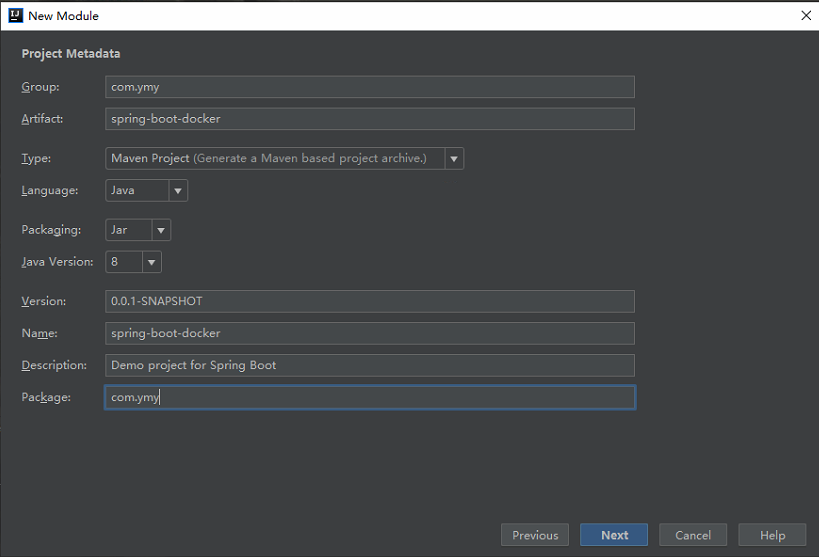
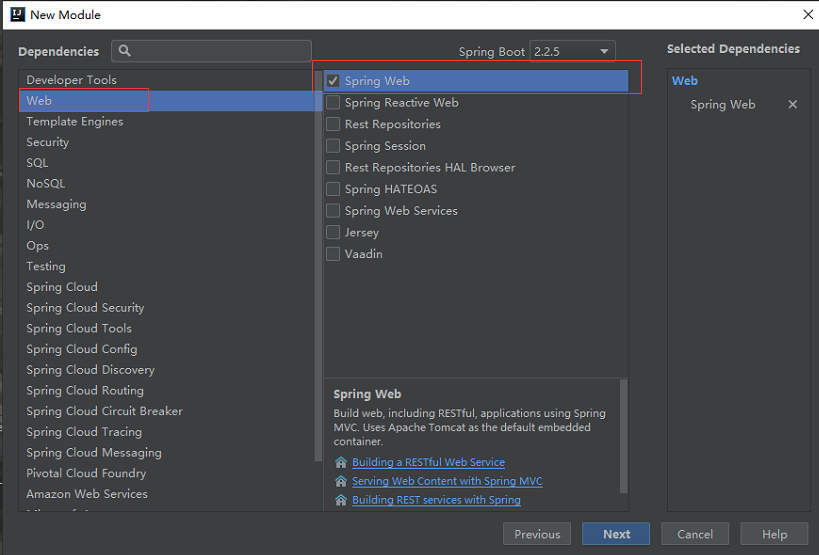
引入sprint-boot-web的依赖
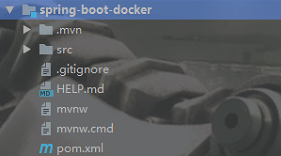
新建完成之后的项目结构
2.引入docker依赖
<properties>
       <docker.image.prefix>registry.aliyuncs.com/linhuatestdocker.image.prefix>
    properties>


            <plugin>
                <groupId>com.spotifygroupId>
                <artifactId>docker-maven-pluginartifactId>
                <version>1.0.0version>
                <configuration>
                    <imageName>${docker.image.prefix}/${project.artifactId}imageName>

                    <dockerDirectory>src/main/dockerdockerDirectory>
                    <resources>
                        <resource>
                            <targetPath>/targetPath>
                            <directory>${project.build.directory}directory>
                            <include>${project.build.finalName}.jarinclude>
                        resource>
                    resources>
                configuration>
            plugin>
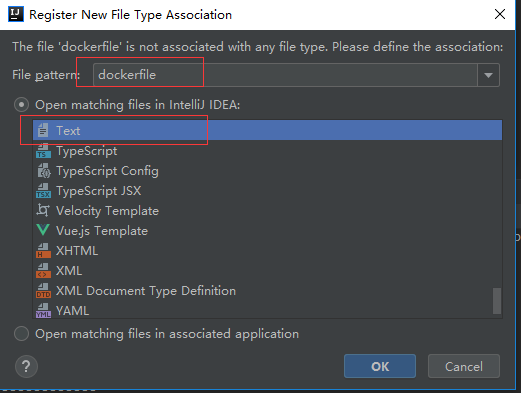
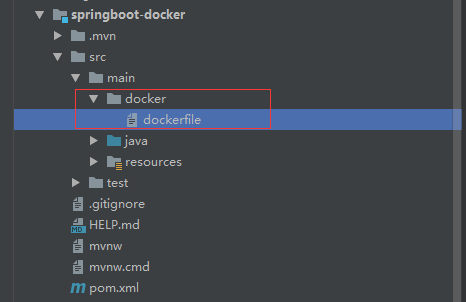
3.新建docker文件在main目录下新建docker目录,然后在docker目录下创建dockerfile文件,不需要后缀名。
创建完成之后的工程目录如下:
4.编辑dockerfile文件
FROM java:8
VOLUME /tmp/tomcat
ADD spring-boot-docker-0.0.1-SNAPSHOT.jar springboot-docker.jar
ENTRYPOINT ["java","-Djava.security.egd=file:/dev/./urandom","-jar","/springboot-docker.jar"]
FROM:指定存在的镜像,java:8是我刚刚拉取的镜像,运行的基础。VOLUME:指向的一个临时文件,用于存储tomcat工作。ADD:复制文件并且重命名文件。ENTRYPOINT:初始化配置或者自定义配置。
5.创建测试接口
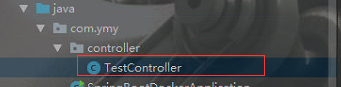
TestController内容如下:
package com.ymy.controller;
import lombok.extern.slf4j.Slf4j;
import org.springframework.web.bind.annotation.RequestMapping;
import org.springframework.web.bind.annotation.RequestMethod;
import org.springframework.web.bind.annotation.RestController;
@RestController
@Slf4j
public class TestController {
@RequestMapping(value = "/test",method = RequestMethod.GET)
public String test(){
System.out.println("这是控制台日志!");
log.info("这是输出到文件的日志");
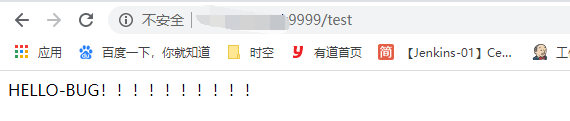
return "HELLO-BUG!!!!!!!!!!";
}
}
在resources目录下创建log4j2.xml文件主要看这两个参数:

这里我使用了log4j2的日志,如何配置log4j2的日志,请参考 springboot整合Log4j2(将日志输出到指定文件)。
6.编写application.yml配置文件
server:
  port: 9999
到这里springboot项目就创建完成了,我们现在启动一下项目。
  .   ____          _            __ _ _
 /\\ / ___'_ __ _ _(_)_ __ __ _ \ \ \ \ ( ( )\___ | '_ | '_| | '_ \/ _` | \ \ \ \
 \\/  ___)| |_)| | | | | || (_| |  ) ) ) )
  '  |____| .__|_| |_|_| |_\__, | / / / /
 =========|_|==============|___/=/_/_/_/
 :: Spring Boot ::        (v2.2.5.RELEASE)

15:29:19.386 [main] INFO  com.ymy.SpringBootDockerApplication  - Starting SpringBootDockerApplication on LAPTOP-3GLHJRE9 with PID 20652 (D:\springboot\spring-boot-docker\target\classes started by admin in D:\springboot)
15:29:19.395 [main] INFO  com.ymy.SpringBootDockerApplication  - No active profile set, falling back to default profiles: default
15:29:20.183 [main] INFO  org.springframework.boot.web.embedded.tomcat.TomcatWebServer  - Tomcat initialized with port(s): 9999 (http)
15:29:20.200 [main] INFO  org.apache.coyote.http11.Http11NioProtocol  - Initializing ProtocolHandler ["http-nio-9999"]
15:29:20.201 [main] INFO  org.apache.catalina.core.StandardService  - Starting service [Tomcat]
15:29:20.201 [main] INFO  org.apache.catalina.core.StandardEngine  - Starting Servlet engine: [Apache Tomcat/9.0.31]
15:29:20.309 [main] INFO  org.apache.catalina.core.ContainerBase.[Tomcat].[localhost].[/]  - Initializing Spring embedded WebApplicationContext
15:29:20.309 [main] INFO  org.springframework.web.context.ContextLoader  - Root WebApplicationContext: initialization completed in 881 ms
15:29:20.452 [main] INFO  org.springframework.scheduling.concurrent.ThreadPoolTaskExecutor  - Initializing ExecutorService 'applicationTaskExecutor'
15:29:20.568 [main] INFO  org.apache.coyote.http11.Http11NioProtocol  - Starting ProtocolHandler ["http-nio-9999"]
15:29:20.596 [main] INFO  org.springframework.boot.web.embedded.tomcat.TomcatWebServer  - Tomcat started on port(s): 9999 (http) with context path ''
15:29:20.599 [main] INFO  com.ymy.SpringBootDockerApplication  - Started SpringBootDockerApplication in 1.664 seconds (JVM running for 4.04)
如果看到这个页面表示springboot项目没有问题,现在我们将项目拷贝到服务器中。
打包springboot到docker

执行
mvn clean package docker:build
执行完之后将会看到
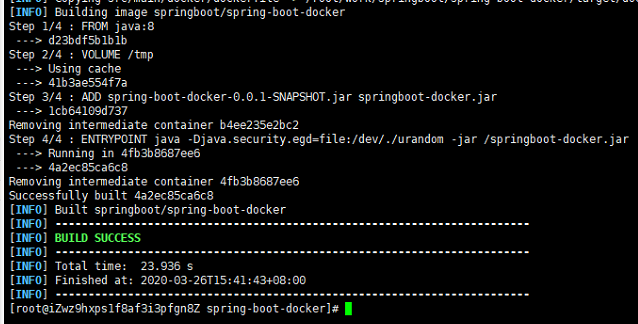
表示打包成功。
执行
docker images

我们发现docker的镜像中多了一个springboot/spring-boot-docker,没错,这个就是我们的springboot项目,既然镜像已经生成,那么如何使用这个镜像呢?
执行
docker run --name springbooot-docker -p 9999:9999 -d 4a2

run:运行的意思–name:指定镜像启动的之后的名称-p:容器和外部的端口映射 第一个端口:外部 第二个端口:内部-d:后台运行 -t:实时运行,窗口关闭,程序结束。4a2:表示镜像的id(IMAGE ID)前3位,这里的id并不需要输入全称,只需要输入前几个就行,有一个前提:当有很多镜像的时候,前面几个字符就有可能会相同,这个时候就需要多输入几位,直到不相同位置。
启动了镜像之后我怎么知道有没有成功呢?这个时候我们就需要一个命令来查看已经启动的任务
docker ps

docker查看容器的日志
这说明我们已经springboot项目已经启动成功了,到这里docker部署springboot项目差不就结束了,但是你可能还有一个疑问,如果我想看控制台的日志怎么办呢?像我们一般使用java -jar的时候都会生成一个控制台的日志文件,那docker容器中怎么查看控制台日志呢?其实很简单,只需要一行命令即可
docker ps
找到容器的id

然后执行
docker logs -f --tail=100 ca
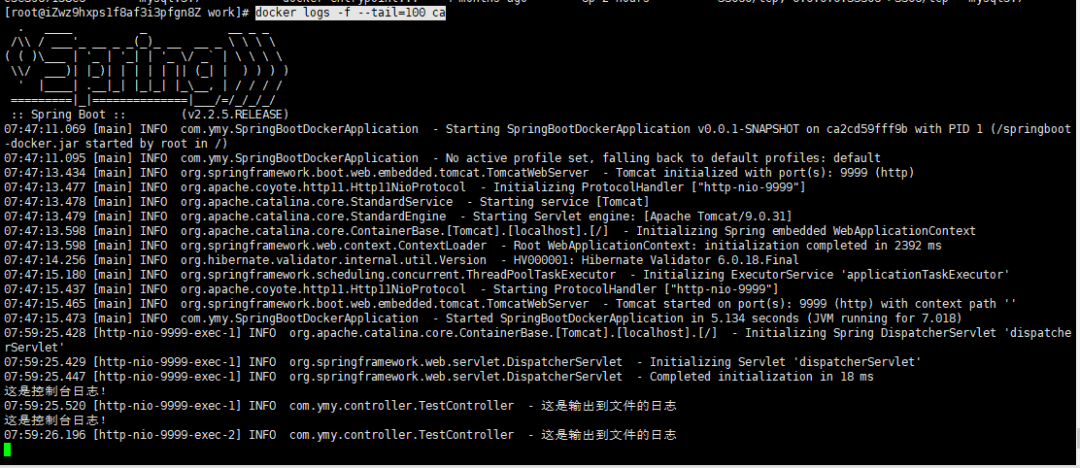
这个时候我们就能看到控制台的日志了,如何我们想看log4j2输出的文件日志呢?
查看log4j2输出问文件日志
还记得我们在log4j2中配置了日志的输出目录了吗?

没错,就是这个, 我们切换到这个目下
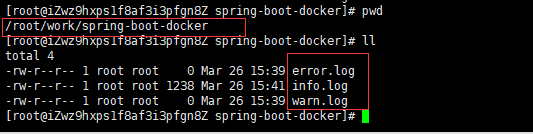
发现这里生成了三个文件,我们打开info.log
tail -100f info.log

docker exec -it ca2cd59fff9b /bin/bash
ca2cd59fff9b:容器id
然后再切换到我们日志的输出路径
cd work/spring-boot-docker

这里也找到了三个日志文件,我们打印info.log
tail -100f info.log
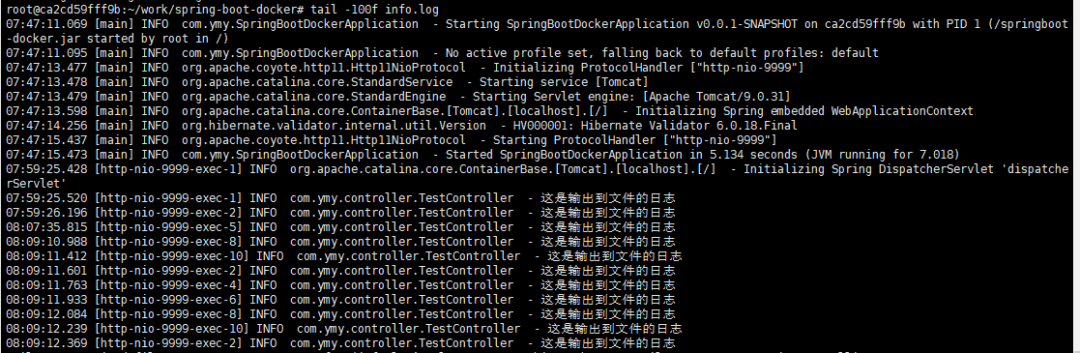
这就是我们log4j2输出到文件的日志,到这里docker整合springboot项目就差不多结束了,如果想要退出docker容器可以使用
exit
END
PS:如果觉得我的分享不错,欢迎大家随手点赞、在看。