SpringBoot中Cache怎么玩?
点击上方蓝色字体,选择“标星公众号”
优质文章,第一时间送达
一、缓存的作用
随着用户群体的扩展,系统所需要处理的数据请求将成几何式增长,数据库很容易会因为无法处理庞大的请求而产生宕机现象,这对一个软件来说是十分可怕的,而缓存就是解决这一问题的一个方案。缓存的使用将大大提高数据库的承载能力,提高系统的承载力和安全性。
1. JSR107
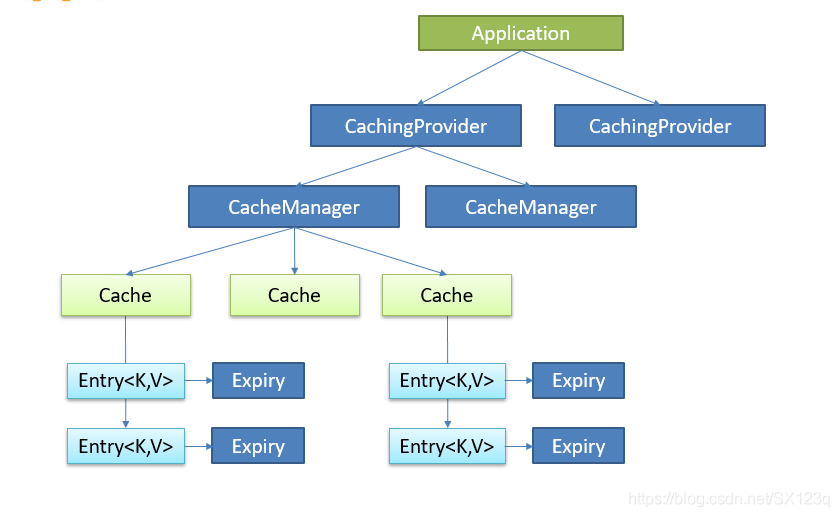
Java Caching定义了5个核心接口,分别是CachingProvider, CacheManager, Cache, Entry 和 Expiry。
CachingProvider定义了创建、配置、获取、管理和控制多个CacheManager。一个应用可以在运行期访问多个CachingProvider。
CacheManager定义了创建、配置、获取、管理和控制多个唯一命名的Cache,这些Cache存在于CacheManager的上下文中。一个CacheManager仅被一个CachingProvider所拥有。
Cache是一个类似Map的数据结构并临时存储以Key为索引的值。一个Cache仅被一个CacheManager所拥有。
Entry是一个存储在Cache中的key-value对。
Expiry 每一个存储在Cache中的条目有一个定义的有效期。一旦超过这个时间,条目为过期的状态。一旦过期,条目将不可访问、更新和删除。缓存有效期可以通过ExpiryPolicy设置。
其中,CacheManager和Cache是最常用的。他们的关系类似于MySQL数据库中数据库和表的关系,和MySQl不同的是:Cache中存储的是key-value形式的Entry。
如图
二、Spring缓存抽象
Spring从3.1开始定义了org.springframework.cache.Cache
和org.springframework.cache.CacheManager接口来统一不同的缓存技术;
并支持使用JCache(JSR-107)注解简化我们开发;
Cache接口为缓存的组件规范定义,包含缓存的各种操作集合;
Cache接口下Spring提供了各种xxxCache的实现;如RedisCache,EhCacheCache , ConcurrentMapCache等;
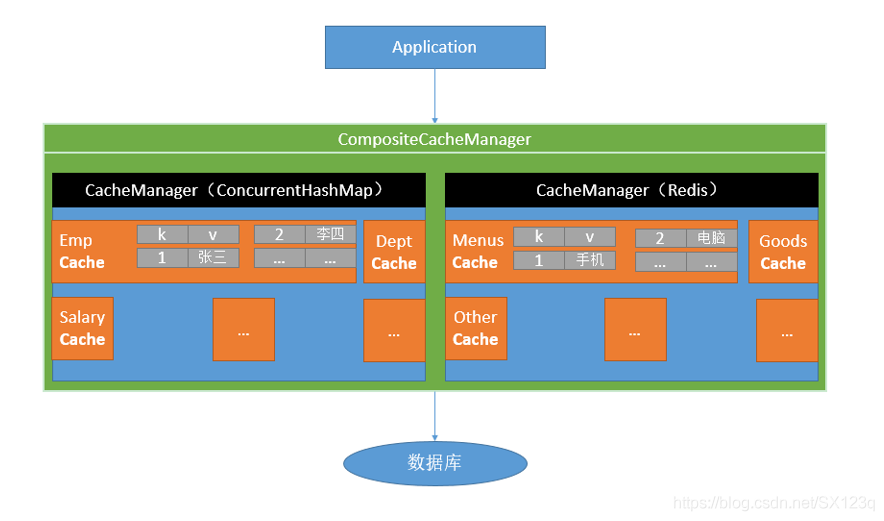
每次调用需要缓存功能的方法时,Spring会检查检查指定参数的指定的目标方法是否已经被调过;如果有就直接从缓存中获取方法调用后的结果,如果没有就调用方法并缓存结果后返回给用户。下次调用直接从缓存中获取。
使用Spring缓存抽象时我们需要关注以下两点;
确定方法需要被缓存以及他们的缓存策略
从缓存中读取之前缓存存储的数据
图解如下:
三、几个重要概念&缓存注解
1. 重要概念&缓存注解
| Cache | 缓存接口,定义缓存操作。实现有:RedisCache、EhCacheCache、ConcurrentMapCache等 |
|---|---|
| CacheManager | 缓存管理器,管理各种缓存(Cache组件) |
| @Cacheable | 主要针对方法配置,能够根据方法的请求参数对其结果进行缓存 |
| @CacheEvict | 清空缓存(和==@Cacheable==配合使用才有意义) |
| @CachePut | 保证方法被调用,又希望结果被缓存。(和==@Cacheable==配合使用才有意义) |
| @Caching | 组合注解,可同时使用上面三个注解。用于实现复杂的缓存策略 |
| @CacheConfig | 一般用在类上,抽取配置其他注解的共有属性,例如cacheNames |
| @EnableCaching | 开启基于注解的缓存 |
| keyGenerator | 缓存数据时key生成策略 |
| serialize | 缓存数据时value序列化策略 |
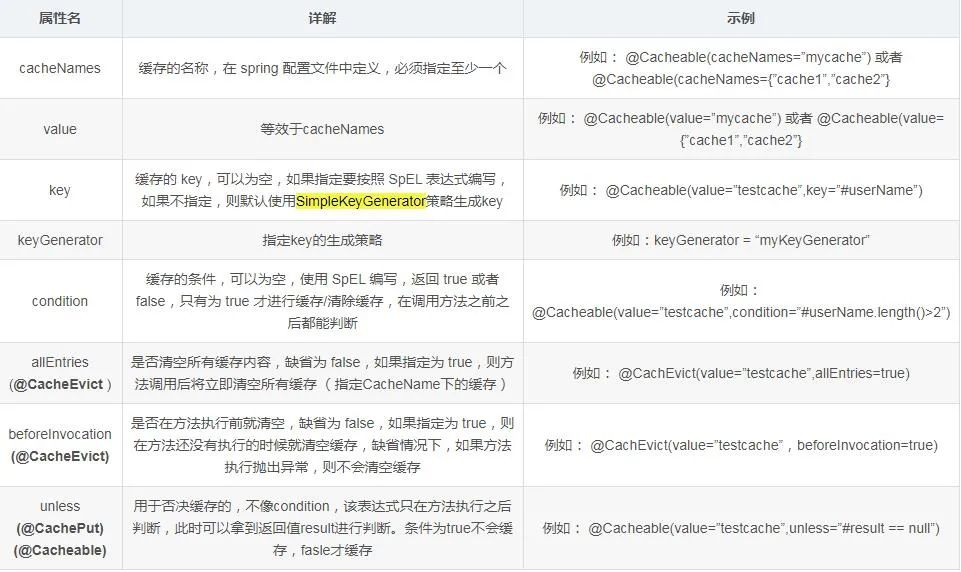
2. @Cacheable/@CachePut/@CacheEvict注解下的常用属性
需注意:
key和keyGenerator二选一使用
3. SpEL表达式详解
| 名字 | 位置 | 描述 | 示例 |
|---|---|---|---|
| methodName | root.object | 当前被调用的方法名 | #root.methodName |
| method | root.object | 当前被调用的方法 | #root.method.name |
| target | root.object | 当前被调用的目标对象 | #root.target |
| targetClass | root.object | 当前被调用的目标对象类 | #root.targetClass |
| args | root.object | 当前被调用的方法的参数列表 | #root.args[0] |
| caches | root object | 当前方法调用使用的缓存列表(如@Cacheable(value={“cache1”, “cache2”})),则有两个cache | #root.caches[0].name |
| argument name | evaluation context | 方法参数的名字. 可以直接==#参数名==,也可以使用 #p0或==#a0== 的形式,0代表参数的索引; | #iban 、 #a0 、 #p0 |
| result | evaluation context | 方法执行后的返回值(仅当方法执行之后的判断有效,如‘unless’,’cache put’的表达式 ’cache evict’的表达式beforeInvocation=false) | #result |
四、缓存使用
部分注释看不懂没有关系,第五部分将会依据测试代码进行源码解析。不要放弃!
1. 环境搭建
1. 测试环境
JDK:1.8
IDE:IntelliJ IDEA 2019.3 x64
maven:apache-maven-3.5.2
mysql:MySQl Server 5.5
swagger2:2.7.0
mybatisplus:3.4.0
整合Swagger2便于测试
整合lombok+mybatis-plus减少代码书写量(偷个懒)
2. 数据库构建
缓存注解推荐在Service层使用,因为Service层是负责业务逻辑操作数据的
/*
SQLyog Enterprise v12.09 (64 bit)
MySQL - 5.5.40 : Database - springboot_cache
*********************************************************************
*/


/*!40101 SET NAMES utf8 */;

/*!40101 SET SQL_MODE=''*/;

/*!40014 SET @OLD_UNIQUE_CHECKS=@@UNIQUE_CHECKS, UNIQUE_CHECKS=0 */;
/*!40014 SET @OLD_FOREIGN_KEY_CHECKS=@@FOREIGN_KEY_CHECKS, FOREIGN_KEY_CHECKS=0 */;
/*!40101 SET @OLD_SQL_MODE=@@SQL_MODE, SQL_MODE='NO_AUTO_VALUE_ON_ZERO' */;
/*!40111 SET @OLD_SQL_NOTES=@@SQL_NOTES, SQL_NOTES=0 */;
CREATE DATABASE /*!32312 IF NOT EXISTS*/`springboot_cache` /*!40100 DEFAULT CHARACTER SET utf8 */;

USE `springboot_cache`;

/*Table structure for table `employee` */

DROP TABLE IF EXISTS `employee`;

CREATE TABLE `employee` (
  `id` int(11) NOT NULL AUTO_INCREMENT,
  `lastName` varchar(255) DEFAULT NULL,
  `email` varchar(255) DEFAULT NULL,
  `gender` int(2) DEFAULT NULL,
  PRIMARY KEY (`id`)
) ENGINE=InnoDB AUTO_INCREMENT=3 DEFAULT CHARSET=utf8;

/*Data for the table `employee` */

insert  into `employee`(`id`,`lastName`,`email`,`gender`) values (1,'花花','232342@',2),(2,'叶子','2342432323@',3);

/*!40101 SET SQL_MODE=@OLD_SQL_MODE */;
/*!40014 SET FOREIGN_KEY_CHECKS=@OLD_FOREIGN_KEY_CHECKS */;
/*!40014 SET UNIQUE_CHECKS=@OLD_UNIQUE_CHECKS */;
/*!40111 SET SQL_NOTES=@OLD_SQL_NOTES */;
3. 依赖导入
            org.mybatis.spring.boot
            mybatis-spring-boot-starter
            2.1.3


            org.springframework.boot
            spring-boot-starter-web


            org.springframework.boot
            spring-boot-starter-cache


            mysql
            mysql-connector-java
            5.1.37
            runtime


            org.projectlombok
            lombok
            true


            com.baomidou
            mybatis-plus-boot-starter
            3.4.0


            com.baomidou
            mybatis-plus-generator
            3.4.0


            org.apache.velocity
            velocity-engine-core
            2.2


            io.springfox
            springfox-swagger2
            2.7.0


            io.springfox
            springfox-swagger-ui
            2.7.0


            org.springframework.boot
            spring-boot-starter-test
            test


                    org.junit.vintage
                    junit-vintage-engine
4. 配置文件设置
dev2的环境将在整合redis时使用
spring:
  profiles:
    active: dev1

---
spring:
  profiles: dev1
  datasource:
    driver-class-name: com.mysql.jdbc.Driver
    url: jdbc:mysql://localhost:3306/springboot_cache
    username: root
    password: root
server:
  port: 8080
#控制台打印配置信息
mybatis-plus:
  configuration:
    log-impl: org.apache.ibatis.logging.stdout.StdOutImpl
  type-aliases-package: com.yezi.redistest.pojo
  mapper-locations: classpath:com/yezi/redistest/mapper/xml/*.xml
debug: true
---

spring:
  profiles: dev2
  datasource:
    driver-class-name: com.mysql.jdbc.Driver
    url: jdbc:mysql://localhost:3306/springboot_cache
    username: root
    password: root
  redis:
    host: localhost
    port: 6379
    database: 0
    timeout: 1800000
    lettuce:
      pool:
        max-active: 20
        max-wait: -1  # 最大阻塞时间,负数表示没有限制
        max-idle: 5
        min-idle: 0
server:
  port: 8080
#控制台打印配置信息
mybatis-plus:
  configuration:
    log-impl: org.apache.ibatis.logging.stdout.StdOutImpl
  type-aliases-package: com.yezi.redistest.pojo
  mapper-locations: classpath:com/yezi/redistest/mapper/xml/*.xml
5. 代码生成器配置
import com.baomidou.mybatisplus.annotation.DbType;
import com.baomidou.mybatisplus.annotation.IdType;
import com.baomidou.mybatisplus.generator.AutoGenerator;
import com.baomidou.mybatisplus.generator.config.DataSourceConfig;
import com.baomidou.mybatisplus.generator.config.GlobalConfig;
import com.baomidou.mybatisplus.generator.config.PackageConfig;
import com.baomidou.mybatisplus.generator.config.StrategyConfig;
import com.baomidou.mybatisplus.generator.config.rules.DateType;
import com.baomidou.mybatisplus.generator.config.rules.NamingStrategy;
import org.junit.jupiter.api.Test;

/**
 *
 * @author 叶子
 * @since 2020/10/28
 */
public class CodeGenerator {

    @Test
    public void run() {

        // 1、创建代码生成器
        AutoGenerator mpg = new AutoGenerator();

        // 2、全局配置
        GlobalConfig gc = new GlobalConfig();
        String projectPath = System.getProperty("user.dir");//得到当前文件夹路径
        gc.setOutputDir(projectPath + "/src/main/java");//代码生成目录
        gc.setAuthor("叶子");
        gc.setOpen(false); //生成后是否打开资源管理器
        gc.setFileOverride(false); //重新生成时文件是否覆盖
        gc.setServiceName("%sService"); //去掉Service接口的首字母I
        gc.setIdType(IdType.ID_WORKER_STR); //主键策略
        gc.setDateType(DateType.ONLY_DATE);//定义生成的实体类中日期类型
        gc.setSwagger2(true);//开启Swagger2模式

        mpg.setGlobalConfig(gc);

        // 3、数据源配置
        DataSourceConfig dsc = new DataSourceConfig();
        dsc.setUrl("jdbc:mysql://localhost:3306/springboot_cache");
        dsc.setDriverName("com.mysql.jdbc.Driver");
        dsc.setUsername("root");
        dsc.setPassword("root");
        dsc.setDbType(DbType.MYSQL);
        mpg.setDataSource(dsc);

        // 4、包配置
        PackageConfig pc = new PackageConfig();
        pc.setParent("com.yezi.redistest");
        /*pc.setModuleName("ucenter"); //模块名*/
        pc.setController("controller");
        pc.setEntity("pojo");
        pc.setService("service");
        pc.setMapper("mapper");
        mpg.setPackageInfo(pc);

        // 5、策略配置
        StrategyConfig strategy = new StrategyConfig();
        strategy.setInclude("department","employee");//表名称
        strategy.setNaming(NamingStrategy.underline_to_camel);//数据库表映射到实体的命名策略
        strategy.setTablePrefix(pc.getModuleName() + "_"); //生成实体时去掉表前缀

        strategy.setColumnNaming(NamingStrategy.underline_to_camel);//数据库表字段映射到实体的命名策略
        strategy.setEntityLombokModel(true); // lombok 模型 @Accessors(chain = true) setter链式操作

        strategy.setRestControllerStyle(true); //restful api风格控制器
        strategy.setControllerMappingHyphenStyle(true); //url中驼峰转连字符

        mpg.setStrategy(strategy);


        // 6、执行
        mpg.execute();
    }
}
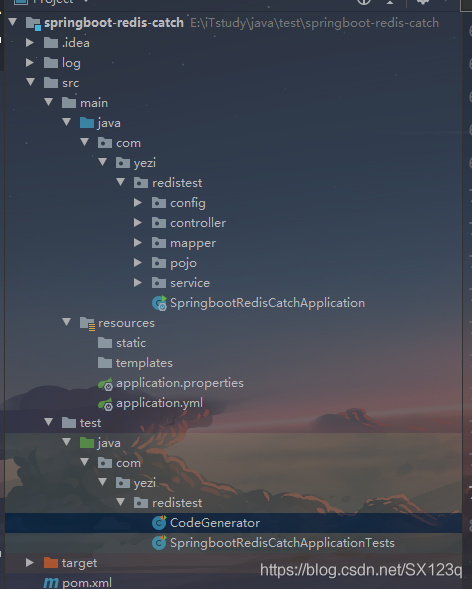
6. 项目结构如下
7. 开启缓存注解
@SpringBootApplication
@MapperScan(basePackages = "com.yezi.redistest.mapper")
@EnableCaching /* 开启缓存注解 */
public class SpringbootRedisCatchApplication {

    public static void main(String[] args) {
        SpringApplication.run(SpringbootRedisCatchApplication.class, args);
    }

}
2. @CacheConfig&@Cacheable注解的使用
1. 运行流程
@Cacheable:
1、service方法运行之前,先去查询Cache(缓存组件),按照cacheNames指定的名字获取;
(CacheManager先获取相应的缓存),第一次获取缓存如果没有Cache组件会自动创建。
2、去Cache中查找缓存的内容,使用一个key,默认就是方法的参数;
key是按照某种策略生成的;默认是使用keyGenerator生成的,默认使用SimpleKeyGenerator生 > 成key;
SimpleKeyGenerator生成key的默认策略;
如果没有参数;key=new SimpleKey();
如果有一个参数:key=参数的值
如果有多个参数:key=new SimpleKey(params);
3、没有查到缓存就调用目标方法;
4、将目标方法返回的结果,放进缓存中
2. 详细代码
package com.yezi.redistest.service.impl;

import com.baomidou.mybatisplus.core.conditions.query.QueryWrapper;
import com.baomidou.mybatisplus.core.conditions.update.UpdateWrapper;
import com.yezi.redistest.pojo.Employee;
import com.yezi.redistest.mapper.EmployeeMapper;
import com.yezi.redistest.service.EmployeeService;
import com.baomidou.mybatisplus.extension.service.impl.ServiceImpl;
import org.springframework.cache.annotation.*;
import org.springframework.stereotype.Service;

/**
 *
 *  服务实现类
 *
 *
 * @author 叶子
 * @since 2020-10-27
 */
@Service
@CacheConfig(cacheNames = "employee") /* 指定Cache组件名,本类的所有缓存都会被存储在名为employee的缓存组件中 */
public class EmployeeServiceImpl extends ServiceImpl implements EmployeeService {

    /**
     * 将方法的运行结果进行缓存;以后再要相同的数据,直接从缓存中获取,不用调用方法;
     * CacheManager管理多个Cache组件的,对缓存的真正CRUD操作在Cache组件中,每一个缓存组件有自己唯一一个名字;
     * CacheManager和Cache的关系类似于MySQL数据库中 数据库和表的关系
     *   @Cacheable标注的方法执行之前先来检查缓存中有没有这个数据,默认按照参数的值作为key去查询缓存,
     *   如果没有就运行方法并将结果放入缓存;以后再来调用就可以直接使用缓存中的数据;
     *
     *   核心:
     *      1)、使用CacheManager【ConcurrentMapCacheManager】按照名字得到Cache【ConcurrentMapCache】组件
     *      2)、key使用keyGenerator生成的,默认是SimpleKeyGenerator
     * @param id
     * @return
     */
    @Override
    @Cacheable(key = "#id")
    public Employee getEmployeeById(Integer id) {
        return baseMapper.selectById(id);
    }
}
3. @CachePut注解的使用
请注意:
此注解需和@Cacheable注解配合使用才有意义
作用:更新数据后缓存中相应的数据也被更新,再次查询该数据时依然是从缓存中获取(已更新),提高了效率
1. 运行流程
@CachePut
首先执行service方法,查询数据库得到数据
查询Cache(缓存组件),按照cacheNames指定的名字获取;(CacheManager先获取相应的缓存)
使用指定的key查询Cache中是否有对应数据,如果有就进行更新,没有就创建
2. 详细代码
本方法在EmployeeServiceImpl类中
    /**
     * unless = "#result == null"
     *  当返回值为null时就不进行缓存
     * @param employee
     * @return
     */
    @Override
    @CachePut(key = "#employee.id",unless = "#result == null")
    public Employee update(Employee employee) {
        System.out.println(employee.getId());
        UpdateWrapper wrapper = new UpdateWrapper<>();

        int i = baseMapper.updateById(employee);
        if (i > 0){
            return employee;
        }

        return null;
    }
4. @CacheEvict注解使用
请注意:
此注解需和@Cacheable注解配合使用才有意义
作用:删除数据后缓存中相应的数据也被删除
1. 运行流程
@CacheEvict
先执行service方法
如果service方法成功执行就移除指定Cache下的
指定key的数据,不成功就不进行移除操作
2. 详细代码
本方法在EmployeeServiceImpl类中
    @Override
    @CacheEvict(key = "#id")
    public void deleteById(Integer id) {
        baseMapper.deleteById(id);
    }
5. @Caching注解的使用
本方法在EmployeeServiceImpl类中
1. 详细代码
    /**
     * 这里我没有具体指定缓存策略
     * 但是我们可以看到:
     *      使用这个注解可以同时使用@Cacheable、@CachePut和@CacheEvict注解
     *      从而实现一些复杂的缓存策略
     * @param lastName
     * @return
     */
    @Override
    @Caching(cacheable = {
            @Cacheable
    },put = {
            @CachePut
    },evict = {
            @CacheEvict
    })
    public Employee getByLastName(String lastName) {
        QueryWrapper wrapper = new QueryWrapper<>();
        wrapper.eq("lastName",lastName);
        Employee employee = baseMapper.selectOne(wrapper);

        return employee;
    }
五、Cache原理解析(深入源码)
这一部分主要通过对以下两方面的分析来学习SpringBoot缓存的原理
SpringBoot启动过程中对Cache的自动导入
@Cacheable注解的执行流程
1. SpringBoot自动配置Cache原理分析
根据SpringBoot的自动配置原理,我们肯定要去找一个叫做×××AutoConfiguration的类,在此就应该是CacheAutoConfiguration自动配置类
CacheAutoConfiguration类截图
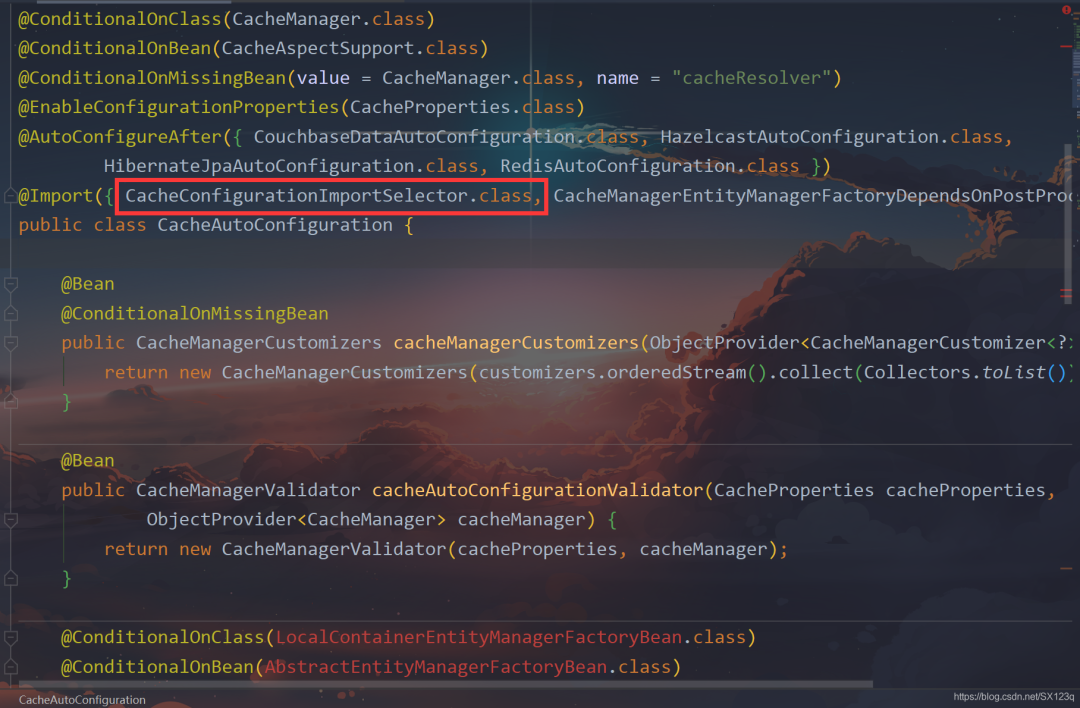
可以看到,这个类导入了一个CacheConfigurationImportSelector类(翻译过来就是:缓存配置导入选择器),那么它导入了哪些配置类呢?进入CacheConfigurationImportSelector源码进行查看
CacheConfigurationImportSelector源码
/**
  * {@link ImportSelector} to add {@link CacheType} configuration classes.
  */
static class CacheConfigurationImportSelector implements ImportSelector {

    @Override
    public String[] selectImports(AnnotationMetadata importingClassMetadata) {
        CacheType[] types = CacheType.values();
        String[] imports = new String[types.length];
        for (int i = 0; i < types.length; i++) {
            imports[i] = CacheConfigurations.getConfigurationClass(types[i]);
        }
        return imports;
    }

}
可以看到,CacheConfigurationImportSelector通过调用CacheConfigurations类的getConfigurationClass()方法拿到需要导入的配置类的名单(封装配置类全限定名的String数组)
我们通过debug模式查看导入的配置类有哪些:
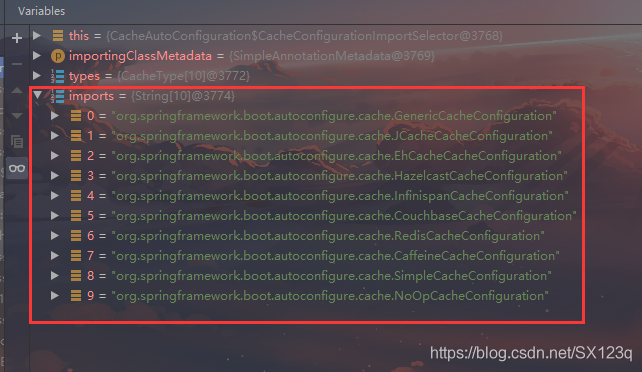
一共导入了10个缓存配置类,包括RedisCacheConfiguration、SimpleCacheConfiguration等,这其中有许多是用来自动配置一些缓存中间件的,比如RedisCacheConfiguration,当Redis的依赖被引入时,这个配置类就会生效,帮我们自动配置使用Redis实现缓存技术。
关于SpringBoot集成redis实现缓存的操作以及原理,我将在另一篇博客中进行具体介绍。
那么在我们没有使用任何缓存中间件的情况下,SpringBoot默认使用哪个缓存配置类呢?
我们关闭程序,在yml(或者properties)文件中配置以debug级别打印日志,然后启动
debug: true

通过日志信息我们知道了:SpringBoot自动帮我们注入了SimpleCacheConfiguration配置类
SimpleCacheConfiguration配置类帮我们配置了哪些内容呢?我们通过他的源码来分析:
/**
 * Simplest cache configuration, usually used as a fallback.
 *
 * @author Stephane Nicoll
 */
@Configuration(proxyBeanMethods = false)
@ConditionalOnMissingBean(CacheManager.class)
@Conditional(CacheCondition.class)
class SimpleCacheConfiguration {

 @Bean
 ConcurrentMapCacheManager cacheManager(CacheProperties cacheProperties,
   CacheManagerCustomizers cacheManagerCustomizers) {
  ConcurrentMapCacheManager cacheManager = new ConcurrentMapCacheManager();
  List cacheNames = cacheProperties.getCacheNames();
  if (!cacheNames.isEmpty()) {
   cacheManager.setCacheNames(cacheNames);
  }
  return cacheManagerCustomizers.customize(cacheManager);
 }

}
可以看到,他帮我们注册了一个cacheManager(缓存管理器) --> ConcurrentMapCacheManager
经过前面的学习,我们知道,一个cacheManager管理多个Cache,在这里SpringBoot帮我们自动注册了一个cacheManager–> ConcurrentMapCacheManager,那么我们可以大胆推测:之后的缓存操作都将使用ConcurrentMapCacheManager这个类。事实上正是如此,我们将在对@Cacheable注解的分析中来证实这一点。
2. ConcurrentMapCachemanager类分析
源码过长,在此只针对部分代码进行分析。小伙伴们可自行点开源码结合博客一起食用。
如果你看到这一部分感到吃力,请结合
@Cacheable注解原理分析一起食用
1. 获取Cache的方法
ConcurrentMapCachemanager类中有一个方法用来通过Cache的名称来获取Cache。
源码如下
    /**
     * 非源码注释
     * @param name cache名称,即由cacheNames和value属性指定的那个名称
     * @return 如果不存在指定Cache,就根据名称创建Cache。如果存在,就返回该Cache
     */
    @Override
    @Nullable
    public Cache getCache(String name) {
        Cache cache = this.cacheMap.get(name);
        if (cache == null && this.dynamic) {
            synchronized (this.cacheMap) {
                cache = this.cacheMap.get(name);
                if (cache == null) {
                    cache = createConcurrentMapCache(name);//其实就是创建了一个Map集合,后面会讲到
                    this.cacheMap.put(name, cache);
                }
            }
        }
        return cache;
    }
通过这个方法我们可以知道:cache是被存储在ConcurrentMapCachemanager类中的cacheMap属性中的,那这个cacheMap具体是什么呢?我们继续来查看源码。
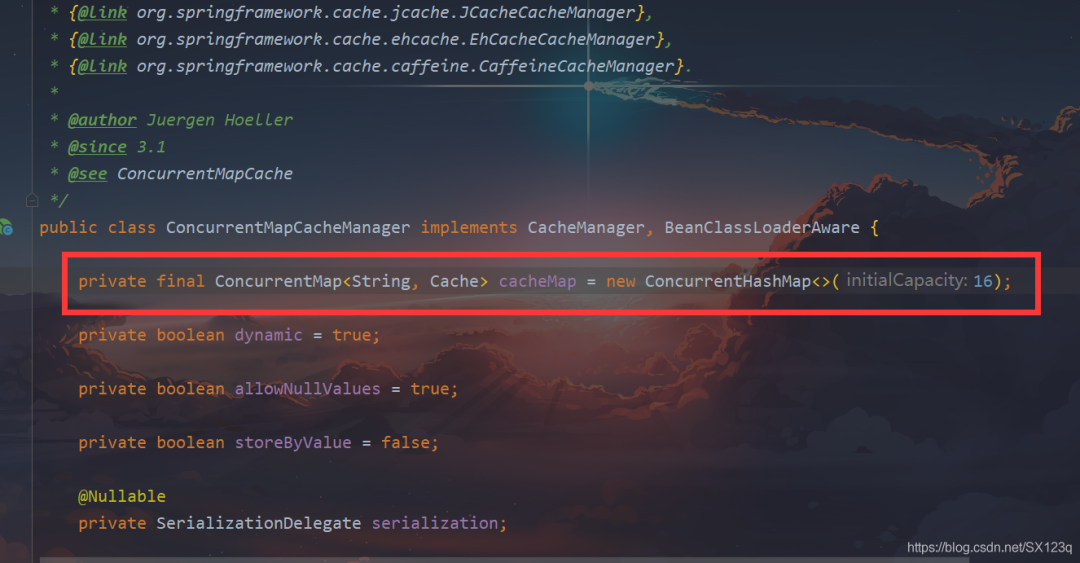
在ConcurrentMapCachemanager类中找到这个属性后,我们发现他就是一个HashMap集合!
由此我们可以得出结论:
ConcurrentMapCachemanager默认使用一个HashMap集合来实现缓存。在这个集合中:key就是Cache的名称,value就是具体的Cache
2. 创建Cache的方法
createConcurrentMapCache(String name)方法源码:
 /**
  * Create a new ConcurrentMapCache instance for the specified cache name.
  * @param name the name of the cache
  * @return the ConcurrentMapCache (or a decorator thereof)
  */
 protected Cache createConcurrentMapCache(String name) {
  SerializationDelegate actualSerialization = (isStoreByValue() ? this.serialization : null);
  return new ConcurrentMapCache(name, new ConcurrentHashMap<>(256), isAllowNullValues(), actualSerialization);
 }
我们可以看到在这里,Cache其实是用的是:ConcurrentMapCache实现类。那我们继续来分析ConcurrentMapCache源码
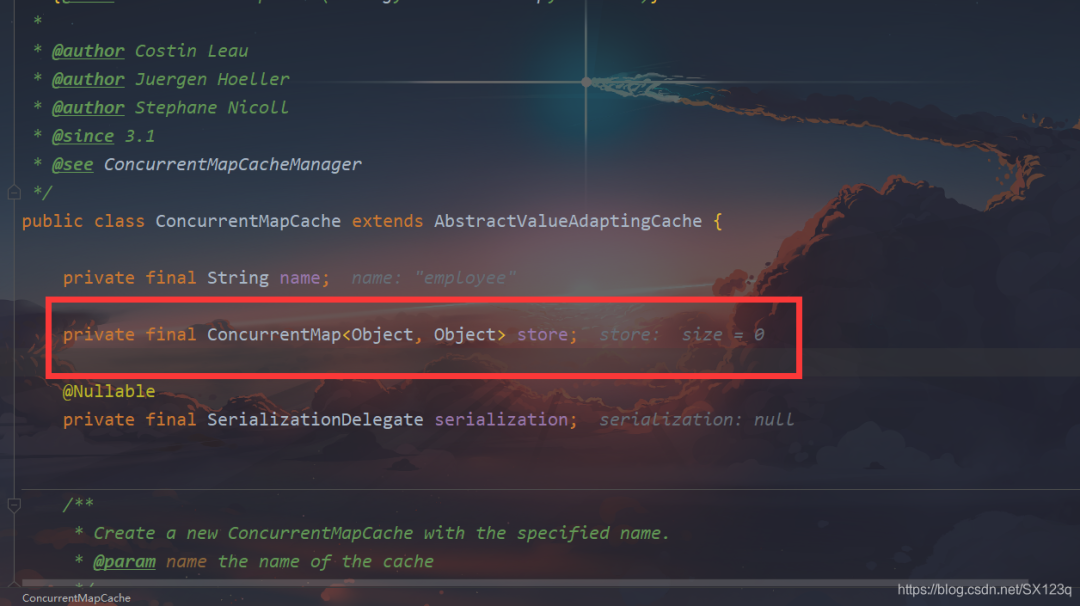
这里我们重点来关注这个store属性,其实他存储的就是我们前面所说的Entry
至此,我们就可以明白SpringBoot默认使用的Cache实现机制了,下面我用一幅图来展现以上这两个类的关系(ConcurrentMapCachemanager和ConcurrentMapCache)
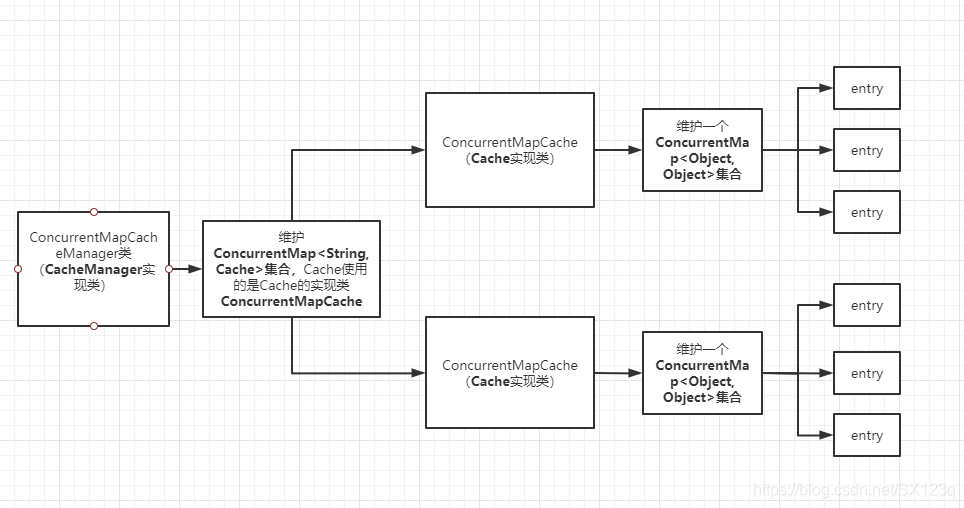
在这里,我们使用的缓存管理器就是ConcurrentMapCachemanager,而具体的缓存接口实现类就是ConcurrentMapCache。
这两个类中还有其他方法未做讲解。有一部分会在@Cacheable注解原理分析中进行讲解,而另一部分则不再赘述。
3. @Cacheable注解原理分析
1. 尝试获取cache
在之前使用此注解的时候,我们提到他会先查询Cache(缓存组件),所以这个注解肯定会首先调用ConcurrentMapCachemanager类中的getCache方法,我们为这个方法打上断点,进行调试。
补充:这里我使用Swagger接口文档对获取employee的接口进行了测试(还是上面的测试项目)
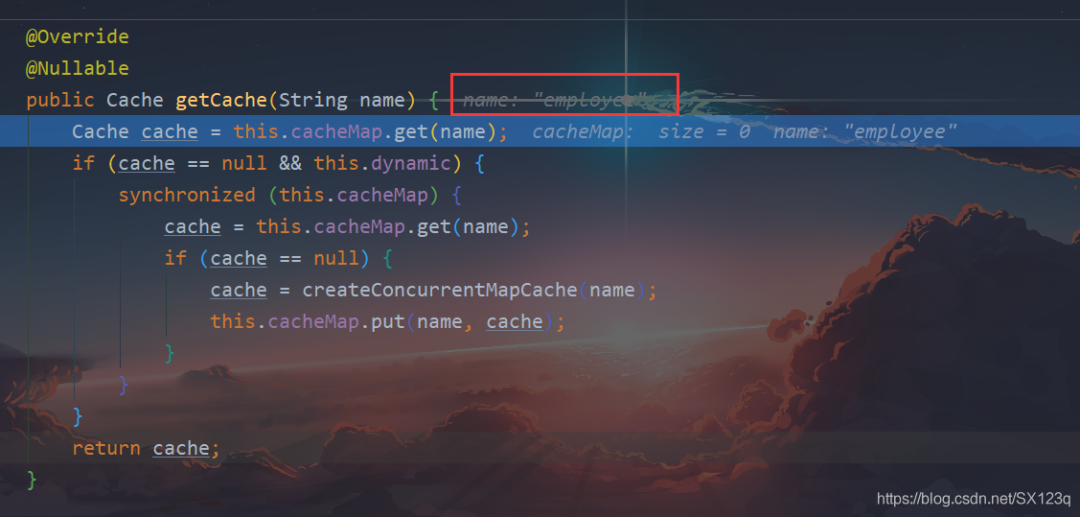
可以看到,@Cacheable注解调用了这个方法,并使用我们指定的cacheName(employee)去查询是否存在这个Cache(缓存组件)。由于是第一次调用,所以缓存中是肯定没有这个Cache的,它将为我们创建一个名为employee的缓存组件。
点击下一步,正如我们预测的,它创建了这个cache

至此,获取缓存组件的过程就结束了。接下来根据我们之前对@Cacheable执行过程的分析,他将会使用我们指定的key(在这里就是员工的id)来获取对应的value。在ConcurrentMapCache类中有一个对应的方法:lookup(Object key)。建议提前为其打上断点!
2. 使用指定key在cache中查找数据
我们对程序进行放行,得到:
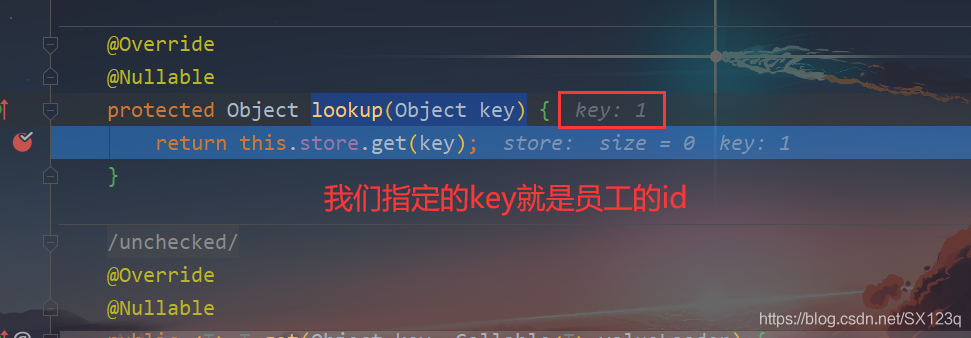
由于这是第一次调用,所以缓存中肯定是没有这个数据的。此时@Cacheable注解将会调用service方法,获取数据
我们继续放行
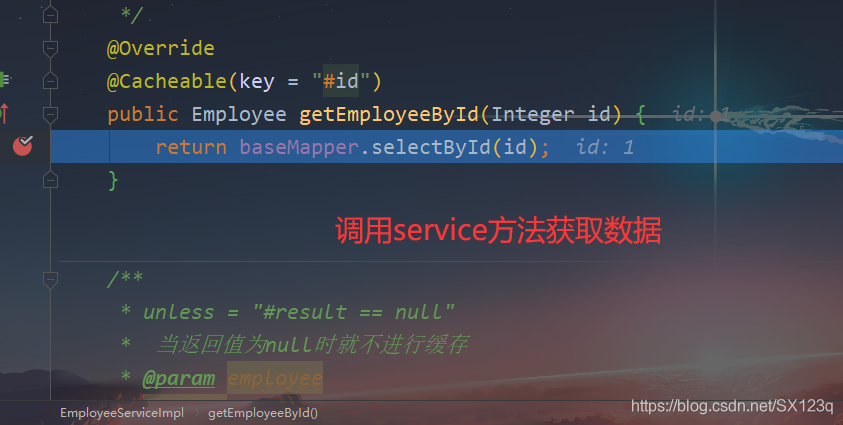
3. 将数据添加到cache中(缓存中没有对应数据时执行)
添加数据(Entry)的操作将会调用ConcurrentMapCache类中的==put(Object key, @Nullable Object value)==方法,建议提前打上断点
继续放行
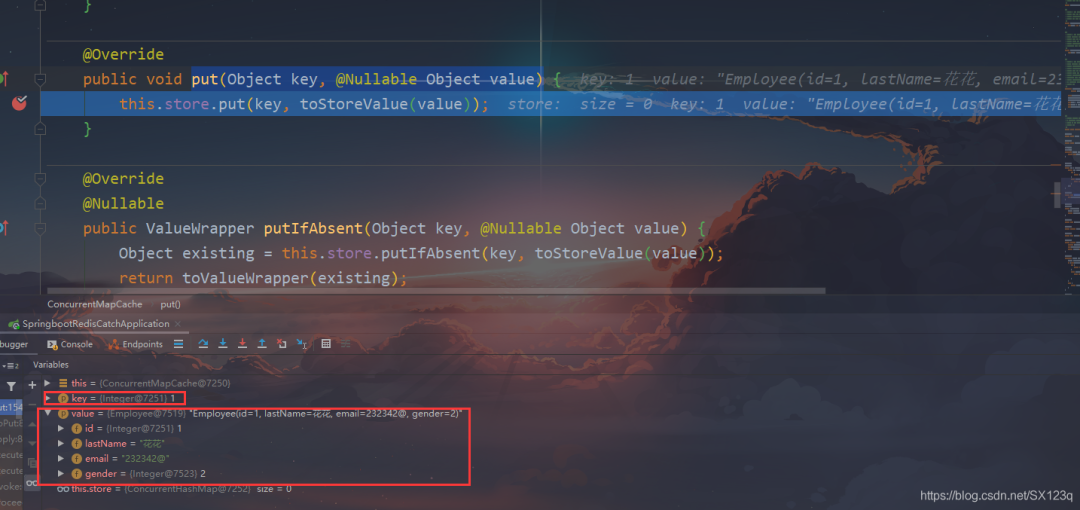
这样,查询得到的数据就被添加到缓存中了。下次调用就会直接从缓存中获取数据而不用再次调用service方法
4. @Cacheable注解执行流程图

版权声明:本文为博主原创文章,遵循 CC 4.0 BY-SA 版权协议,转载请附上原文出处链接和本声明。
本文链接:
https://blog.csdn.net/sx123q/article/details/109366061
粉丝福利:实战springboot+CAS单点登录系统视频教程免费领取
???
?长按上方微信二维码 2 秒 即可获取资料
感谢点赞支持下哈 
