
「源码解析」一文吃透react-redux源码(useMemo经典源码级案例)
前言
使用过redux的同学都知道,redux作为react公共状态管理工具,配合react-redux可以很好的管理数据,派发更新,更新视图渲染的作用,那么对于 react-redux 是如何做到根据 state 的改变,而更新组件,促使视图渲染的呢,让我们一起来探讨一下,react-redux 源码的奥妙所在。
在正式分析之前我们不妨来想几个问题:
1 为什么要在 root 根组件上使用 react-redux 的 Provider 组件包裹?
2 react-redux 是怎么和 redux 契合,做到 state 改变更新视图的呢?
3 provide 用什么方式存放当前的 redux 的 store, 又是怎么传递给每一个需要管理state的组件的?
4 connect 是怎么样连接我们的业务组件,然后传递我们组件更新函数的呢?
5 connect 是怎么通过第一个参数,来订阅与之对应的 state 的呢?
6 connect 怎么样将 props,和 redux的 state 合并的?
带着这些疑问我们不妨先看一下 Provider 究竟做了什么?
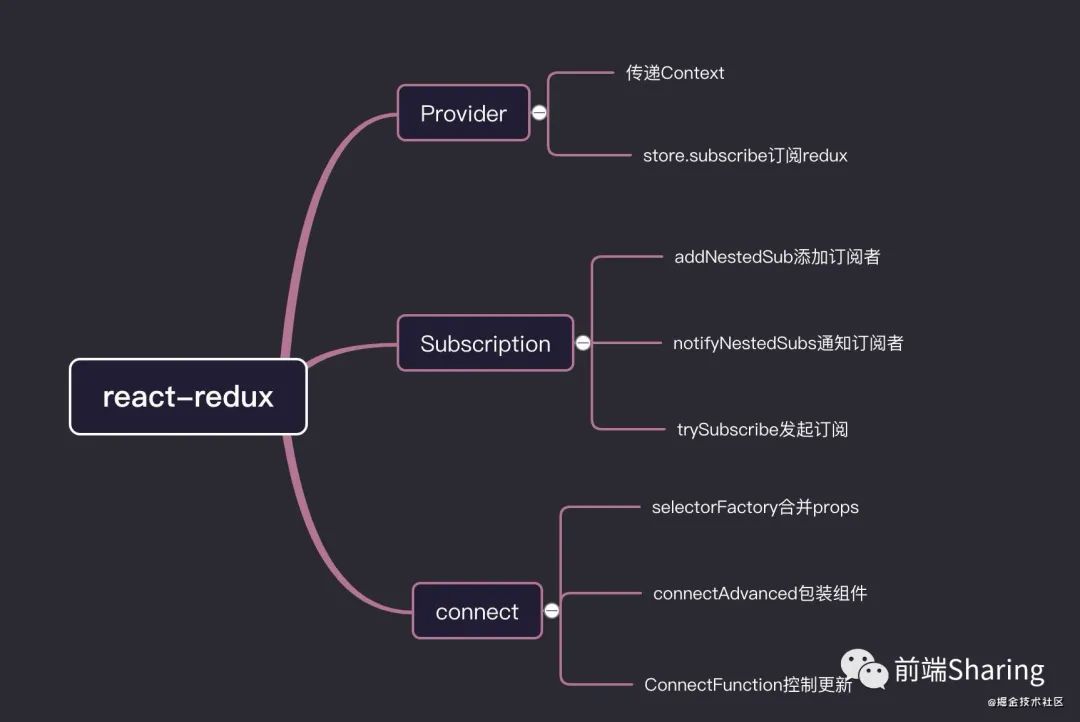
一 Provider 创建Subscription,context保存上下文
/* provider 组件代码 */function Provider({ store, context, children }) {/* 利用useMemo,跟据store变化创建出一个contextValue 包含一个根元素订阅器和当前store */const contextValue = useMemo(() => {/* 创建了一个根 Subscription 订阅器 */const subscription = new Subscription(store)/* subscription 的 notifyNestedSubs 方法 ,赋值给 onStateChange方法 */subscription.onStateChange = subscription.notifyNestedSubsreturn {store,subscription} /* store 改变创建新的contextValue */}, [store])/* 获取更新之前的state值 ,函数组件里面的上下文要优先于组件更新渲染 */const previousState = useMemo(() => store.getState(), [store])useEffect(() => {const { subscription } = contextValue/* 触发trySubscribe方法执行,创建listens */subscription.trySubscribe() // 发起订阅if (previousState !== store.getState()) {/* 组件更新渲染之后,如果此时state发生改变,那么立即触发 subscription.notifyNestedSubs 方法 */subscription.notifyNestedSubs()}/* */return () => {subscription.tryUnsubscribe() // 卸载订阅subscription.onStateChange = null}/* contextValue state 改变出发新的 effect */}, [contextValue, previousState])const Context = context || ReactReduxContext/* context 存在用跟元素传进来的context ,如果不存在 createContext创建一个context ,这里的ReactReduxContext就是由createContext创建出的context */return <Context.Provider value={contextValue}>{children}</Context.Provider>}
从源码中provider作用大致是这样的
1 首先创建一个 contextValue ,里面包含一个创建出来的父级 Subscription (我们姑且先称之为根级订阅器)和redux提供的store。
2 通过react上下文context把 contextValue 传递给子孙组件。
二 Subscription订阅消息,发布更新
在我们分析了不是很长的 provider 源码之后,随之一个 Subscription 出现,那么这个 Subscription 由什么作用呢🤔🤔🤔,我们先来看看在 Provder 里出现的Subscription 方法。
notifyNestedSubs trySubscribe tryUnsubscribe
在整个 react-redux 执行过程中 Subscription 作用非常重要,这里方便先透漏一下,他的作用是收集所有被 connect 包裹的组件的更新函数 onstatechange,然后形成一个 callback 链表,再由父级 Subscription 统一派发执行更新,我们暂且不关心它是怎么运作的,接下来就是 Subscription 源码 ,我们重点看一下如上出现的三个方法。
/* 发布订阅者模式 */export default class Subscription {constructor(store, parentSub) {this.store = storethis.parentSub = parentSubthis.unsubscribe = nullthis.listeners = nullListenersthis.handleChangeWrapper = this.handleChangeWrapper.bind(this)}/* 负责检测是否该组件订阅,然后添加订阅者也就是listener */addNestedSub(listener) {this.trySubscribe()return this.listeners.subscribe(listener)}/* 向listeners发布通知 */notifyNestedSubs() {this.listeners.notify()}/* 对于 provide onStateChange 就是 notifyNestedSubs 方法,对于 connect 包裹接受更新的组件 ,onStateChange 就是 负责更新组件的函数 。*/handleChangeWrapper() {if (this.onStateChange) {this.onStateChange()}}/* 判断有没有开启订阅 */isSubscribed() {return Boolean(this.unsubscribe)}/* 开启订阅模式 首先判断当前订阅器有没有父级订阅器 , 如果有父级订阅器(就是父级Subscription),把自己的handleChangeWrapper放入到监听者链表中 */trySubscribe() {/*parentSub 即是provide value 里面的 Subscription 这里可以理解为 父级元素的 Subscription*/if (!this.unsubscribe) {this.unsubscribe = this.parentSub? this.parentSub.addNestedSub(this.handleChangeWrapper)/* provider的Subscription是不存在parentSub,所以此时trySubscribe 就会调用 store.subscribe */: this.store.subscribe(this.handleChangeWrapper)this.listeners = createListenerCollection()}}/* 取消订阅 */tryUnsubscribe() {if (this.unsubscribe) {this.unsubscribe()this.unsubscribe = nullthis.listeners.clear()this.listeners = nullListeners}}}
看完 Provider 和 Subscription源码,我来解释一下两者到底有什么关联,首先Provider创建 Subscription 时候没有第二个参数,就说明provider 中的Subscription 不存在 parentSub 。那么再调用Provider组件中useEffect钩子中trySubscribe的时候,会触发this.store.subscribe , subscribe 就是 redux 的 subscribe ,此时真正发起了订阅。
subscription.onStateChange = subscription.notifyNestedSubs有此可知,最终state改变,触发的是notifyNestedSubs方法。我们再一次看看这个notifyNestedSubs。
/* 向listeners发布通知 */notifyNestedSubs() {this.listeners.notify()}
最终向当前Subscription 的订阅者们发布 notify更新。
Subscription总结 - 发布订阅模式的实现
综上所述我们总结一下。Subscription 的作用,首先通过 trySubscribe 发起订阅模式,如果存在这父级订阅者,就把自己更新函数handleChangeWrapper,传递给父级订阅者,然后父级由 addNestedSub 方法将此时的回调函数(更新函数)添加到当前的 listeners 中 。如果没有父级元素(Provider的情况),则将此回调函数放在store.subscribe中,handleChangeWrapper 函数中onStateChange,就是 Provider 中 Subscription 的 notifyNestedSubs 方法,而 notifyNestedSubs 方法会通知listens 的 notify 方法来触发更新。这里透漏一下,子代Subscription会把更新自身handleChangeWrapper传递给parentSub,来统一通知connect组件更新。
这里我们弄明白一个问题
react-redux 更新组件也是用了 store.subscribe 而且 store.subscribe 只用在了 Provider 的 Subscription中 (没有 parentsub )
大致模型就是
state更改 -> store.subscribe -> 触发 provider 的 Subscription 的 handleChangeWrapper 也就是 notifyNestedSubs -> 通知 listeners.notify() -> 通知每个被 connect 容器组件的更新 -> callback 执行 -> 触发子组件Subscription 的 handleChangeWrapper ->触发子 onstatechange(可以提前透漏一下,onstatechange保存了更新组件的函数)。
前边的内容提到了**createListenerCollection,listeners**,但是他具体有什么作用我们接下来一起看一下。
function createListenerCollection() {/* batch 由getBatch得到的 unstable_batchedUpdates 方法 */const batch = getBatch()let first = nulllet last = nullreturn {/* 清除当前listeners的所有listener */clear() {first = nulllast = null},/* 派发更新 */notify() {batch(() => {let listener = firstwhile (listener) {listener.callback()listener = listener.next}})},/* 获取listeners的所有listener */get() {let listeners = []let listener = firstwhile (listener) {listeners.push(listener)listener = listener.next}return listeners},/* 接收订阅,将当前的callback(handleChangeWrapper)存到当前的链表中 */subscribe(callback) {let isSubscribed = truelet listener = (last = {callback,next: null,prev: last})if (listener.prev) {listener.prev.next = listener} else {first = listener}/* 取消当前 handleChangeWrapper 的订阅*/return function unsubscribe() {if (!isSubscribed || first === null) returnisSubscribed = falseif (listener.next) {listener.next.prev = listener.prev} else {last = listener.prev}if (listener.prev) {listener.prev.next = listener.next} else {first = listener.next}}}}}
batch
import { unstable_batchedUpdates as batch } from './utils/reactBatchedUpdates'setBatch(batch)
我们可以得出结论 createListenerCollection 可以产生一个 listeners 。 listeners的作用。
1收集订阅:以链表的形式收集对应的 listeners (每一个Subscription) 的handleChangeWrapper函数。
2派发更新:, 通过 batch 方法( react-dom 中的 unstable_batchedUpdates ) 来进行批量更新。
温馨提示: React 的 unstable_batchedUpdate() API 允许将一次事件循环中的所有 React 更新都一起批量处理到一个渲染过程中。
总结
🤔到这里我们明白了:
1 react-redux 中的 provider 作用 ,通过 react 的 context 传递 subscription 和 redux 中的store ,并且建立了一个最顶部根 Subscription 。
2 Subscription 的作用:起到发布订阅作用,一方面订阅 connect 包裹组件的更新函数,一方面通过 store.subscribe 统一派发更新。
3 Subscription 如果存在这父级的情况,会把自身的更新函数,传递给父级 Subscription 来统一订阅。
三 connect 究竟做了什么?
1 回顾 connect 用法
工慾善其事,必先利其器 ,想要吃透源码之前,必须深度熟悉其用法。才能知其然知其所以然。我们先来看看高阶组件connect用法。
function connect(mapStateToProps?, mapDispatchToProps?, mergeProps?, options?mapStateToProps
const mapStateToProps = state => ({ todos: state.todos })作用很简单,组件依赖redux的 state,映射到业务组件的 props中,state改变触发,业务组件props改变,触发业务组件更新视图。当这个参数没有的时候,当前组件不会订阅 store 的改变。
mapDispatchToProps
const mapDispatchToProps = dispatch => {return {increment: () => dispatch({ type: 'INCREMENT' }),decrement: () => dispatch({ type: 'DECREMENT' }),reset: () => dispatch({ type: 'RESET' })}}
将 redux 中的dispatch 方法,映射到,业务组件的props中。
mergeProps
/** stateProps , state 映射到 props 中的内容* dispatchProps, dispatch 映射到 props 中的内容。* ownProps 组件本身的 props*/(stateProps, dispatchProps, ownProps) => Object
正常情况下,如果没有这个参数,会按照如下方式进行合并,返回的对象可以是,我们自定义的合并规则。我们还可以附加一些属性。
{ ...ownProps, ...stateProps, ...dispatchProps }
options
{context?: Object, // 自定义上下文pure?: boolean, // 默认为 true , 当为 true 的时候 ,除了 mapStateToProps 和 props ,其他输入或者state 改变,均不会更新组件。areStatesEqual?: Function, // 当pure true , 比较引进store 中state值 是否和之前相等。(next: Object, prev: Object) => booleanareOwnPropsEqual?: Function, // 当pure true , 比较 props 值, 是否和之前相等。(next: Object, prev: Object) => booleanareStatePropsEqual?: Function, // 当pure true , 比较 mapStateToProps 后的值 是否和之前相等。(next: Object, prev: Object) => booleanareMergedPropsEqual?: Function, // 当 pure 为 true 时, 比较 经过 mergeProps 合并后的值 , 是否与之前等 (next: Object, prev: Object) => booleanforwardRef?: boolean, //当为true 时候,可以通过ref 获取被connect包裹的组件实例。}
options可以是如上属性,上面已经标注了每一个属性的作用,这里就不多说了。
2 connect 初探
对于connect 组件 ,我们先看源码一探究竟
/src/connect/connect.js
export function createConnect({connectHOC = connectAdvanced,mapStateToPropsFactories = defaultMapStateToPropsFactories,mapDispatchToPropsFactories = defaultMapDispatchToPropsFactories,mergePropsFactories = defaultMergePropsFactories,selectorFactory = defaultSelectorFactory} = {}) {return function connect(mapStateToProps,mapDispatchToProps,mergeProps,{pure = true,areStatesEqual = strictEqual,areOwnPropsEqual = shallowEqual,areStatePropsEqual = shallowEqual,areMergedPropsEqual = shallowEqual,...extraOptions} = {}) {/* 经过代理包装后的 mapStateToProps */const initMapStateToProps = match( mapStateToProps, mapStateToPropsFactories,'mapStateToProps' )/* 经过代理包装后的 mapDispatchToProps */const initMapDispatchToProps = match( mapDispatchToProps, mapDispatchToPropsFactories,'mapDispatchToProps')/* 经过代理包装后的 mergeProps */const initMergeProps = match(mergeProps, mergePropsFactories, 'mergeProps')return connectHOC(selectorFactory, {methodName: 'connect',getDisplayName: name => `Connect(${name})`,shouldHandleStateChanges: Boolean(mapStateToProps),initMapStateToProps,initMapDispatchToProps,initMergeProps,pure,areStatesEqual,areOwnPropsEqual,areStatePropsEqual,areMergedPropsEqual,...extraOptions})}}export default /*#__PURE__*/ createConnect()
我们先来分析一下整个函数做的事。
1 首先定一个 createConnect方法。传入了几个默认参数,有两个参数非常重要,connectHOC 作为整个 connect 的高阶组件。selectorFactory 做为整合connect更新过程中的形成新props的主要函数。默认的模式是pure模式。
2 然后执行createConnect方法,返回真正的connect函数本身。connect接收几个参数,然后和默认的函数进行整合,包装,代理,最后形成三个真正的初始化函数,这里的过程我们就先不讲了。我们接下来分别介绍这三个函数的用途。
initMapStateToProps ,用于形成真正的 MapStateToProps函数,将 store 中 state ,映射到 props
initMapDispatchToProps,用于形成真正的 MapDispatchToProps,将 dispatch 和 自定义的 dispatch 注入到props。
initMergeProps,用于形成真正的 mergeProps函数,合并业务组件的 props , state 映射的 props , dispatch 映射的 props。
这里有一个函数非常重要,这个函数就是mergeProps, 请大家记住这个函数,因为这个函数是判断整个connect是否更新组件关键所在。上边说过 connect基本用法的时候说过,当我们不向connect传递第三个参数mergeProps 的时候,默认的defaultMergeProps如下
/src/connect/mergeProps.js
export function defaultMergeProps(stateProps, dispatchProps, ownProps) {return { ...ownProps, ...stateProps, ...dispatchProps }}
这个函数返回了一个新的对象,也就是新的props。而且将 业务组件 props , store 中的 state ,和 dispatch 结合到一起,形成一个新对象,作为新的 props 传递给了业务组件。
3 selectorFactory 形成新的props
前面说到selectorFactory 很重要,用于形成新的props,我们记下来看selectorFactory 源码。
/src/connect/selectorFactory.js
export default function finalPropsSelectorFactory(dispatch,{ initMapStateToProps, initMapDispatchToProps, initMergeProps, ...options }) {// mapStateToProps mapDispatchToProps mergeProps 为真正connect 经过一层代理的 proxy 函数const mapStateToProps = initMapStateToProps(dispatch, options)const mapDispatchToProps = initMapDispatchToProps(dispatch, options)const mergeProps = initMergeProps(dispatch, options)const selectorFactory = options.pure ? pureFinalPropsSelectorFactory : impureFinalPropsSelectorFactory// 返回一个 函数用于生成新的 propsreturn selectorFactory(mapStateToProps,mapDispatchToProps,mergeProps,dispatch,options)}
finalPropsSelectorFactory 的代码很简单, 首先得到真正connect 经过一层代理函数 mapStateToProps ,mapDispatchToProps ,mergeProps。然后调用selectorFactory (在pure模式下,selectorFactory 就是 pureFinalPropsSelectorFactory ) 。
可以这里反复用了闭包,可以刚开始有点蒙,不过静下心来看发现其实不是很难。由于默认是pure,所以我们接下来主要看 pureFinalPropsSelectorFactory 函数做了些什么。
/** pure组件处理 , 对比 props 是否发生变化 然后 合并props */export function pureFinalPropsSelectorFactory(mapStateToProps,mapDispatchToProps,mergeProps,dispatch,{ areStatesEqual, areOwnPropsEqual, areStatePropsEqual } //判断 state prop 是否相等) {let hasRunAtLeastOnce = falselet statelet ownPropslet statePropslet dispatchPropslet mergedProps/* 第一次 直接形成 ownProps stateProps dispatchProps 合并 形成新的 props */function handleFirstCall(firstState, firstOwnProps) {state = firstStateownProps = firstOwnPropsstateProps = mapStateToProps(state, ownProps)dispatchProps = mapDispatchToProps(dispatch, ownProps)mergedProps = mergeProps(stateProps, dispatchProps, ownProps)hasRunAtLeastOnce = truereturn mergedProps}function handleNewPropsAndNewState() {// props 和 state 都改变 mergeProps}function handleNewProps() {// props 改变 mergeProps}function handleNewState() {// state 改变 mergeProps}/* 不是第一次的情况 props 或者 store.state 发生改变的情况。*/function handleSubsequentCalls(nextState, nextOwnProps) {/* 判断两次 props 是否相等 */const propsChanged = !areOwnPropsEqual(nextOwnProps, ownProps)/* 判断两次 store.state 是否相等 */const stateChanged = !areStatesEqual(nextState, state)state = nextStateownProps = nextOwnPropsif (propsChanged && stateChanged) return handleNewPropsAndNewState()if (propsChanged) return handleNewProps()if (stateChanged) return handleNewState()return mergedProps}return function pureFinalPropsSelector(nextState, nextOwnProps) {return hasRunAtLeastOnce? handleSubsequentCalls(nextState, nextOwnProps): handleFirstCall(nextState, nextOwnProps)}}
这个函数处理逻辑很清晰。大致上做了这些事。通过闭包的形式返回一个函数pureFinalPropsSelector。pureFinalPropsSelector通过判断是否是第一次初始化组件。
如果是第一次,那么直接调用mergeProps合并ownProps,stateProps,dispatchProps 形成最终的props。如果不是第一次,那么判断到底是props还是 store.state 发生改变,然后针对那里变化,重新生成对应的props,最终合并到真正的props。
整个 selectorFactory 逻辑就是形成新的props传递给我们的业务组件。
4 connectAdvanced 形成真正包裹业务组件的 Hoc
接下来我们看一下 connect 返回的 connectAdvanced()到底做了什么,为了方便大家理解connect,我们这里先看看 connect 用法。
正常模式下:
const mapStateToProp = (store) => ({ userInfo: store.root.userInfo })function Index(){/* ..... */return <div> { /* .... */ } </div>}export default connect(mapStateToProp)(Index)
装饰器模式下:
const mapStateToProp = (store) => ({ userInfo: store.root.userInfo })@connect(mapStateToProp)class Index extends React.Component{/* .... */render(){return <div> { /* .... */ } </div>}}
我们上面讲到,connect执行 接受 mapStateToProp 等参数,最后返回 connectAdvanced() ,那么上述例子中connect执行第一步connect(mapStateToProp)===connectAdvanced(),也就是connectAdvanced()执行返回真正的hoc,用于包裹我们的业务组件。
接下来我们看 connectAdvanced 代码
/src/components/connectAdvanced.js
export default function connectAdvanced(selectorFactory, // 每次 props,state改变执行 ,用于生成新的 props。{getDisplayName = name => `ConnectAdvanced(${name})`,//可能被包装函数(如connect())重写methodName = 'connectAdvanced',//如果定义了,则传递给包装元素的属性的名称,指示要呈现的调用。用于监视react devtools中不必要的重新渲染。renderCountProp = undefined,shouldHandleStateChanges = true, //确定此HOC是否订阅存储更改storeKey = 'store',withRef = false,forwardRef = false, // 是否 用 forwarRef 模式context = ReactReduxContext,// Provider 保存的上下文...connectOptions} = {}) {/* ReactReduxContext 就是store存在的context */const Context = context/* WrappedComponent 为connect 包裹的组件本身 */return function wrapWithConnect(WrappedComponent){// WrappedComponent 被 connect 的业务组件本身}}
connectAdvanced接受配置参数 , 然后返回真正的 HOC wrapWithConnect。
// 我们可以讲下面的表达式分解connect(mapStateToProp)(Index)// 执行 connectconnect(mapStateToProp)//返回connectAdvanced()//返回HOCwrapWithConnect
接下来我们分析一下wrapWithConnect到底做了些什么?
5 wrapWithConnect 高阶组件
接下来我们来一起研究一下 wrapWithConnect,我们重点看一下 wrapWithConnect作为高阶组件,会返回一个组件,这个组件会对原有的业务组件,进行一系列增强等工作。
function wrapWithConnect(WrappedComponent) {const wrappedComponentName =WrappedComponent.displayName || WrappedComponent.name || 'Component'const displayName = getDisplayName(wrappedComponentName)const selectorFactoryOptions = {...connectOptions,getDisplayName,methodName,renderCountProp,shouldHandleStateChanges,storeKey,displayName,wrappedComponentName,WrappedComponent}const { pure } = connectOptionsfunction createChildSelector(store) {// 合并函数 mergeprops 得到最新的propsreturn selectorFactory(store.dispatch, selectorFactoryOptions)}//判断是否是pure纯组件模式 如果是 将用 useMemo 提升性能const usePureOnlyMemo = pure ? useMemo : callback => callback()// 负责更新的容器子组件function ConnectFunction (props){// props 为 业务组件 真正的 props}const Connect = pure ? React.memo(ConnectFunction) : ConnectFunctionConnect.WrappedComponent = WrappedComponentConnect.displayName = displayName/* forwardRef */if (forwardRef) {const forwarded = React.forwardRef(function forwardConnectRef(props,ref) {return <Connect {...props} reactReduxForwardedRef={ref} />})forwarded.displayName = displayNameforwarded.WrappedComponent = WrappedComponentreturn hoistStatics(forwarded, WrappedComponent)}return hoistStatics(Connect, WrappedComponent)}}
wrapWithConnect 的做的事大致分为一下几点:
第一步
1 声明负责更新的 ConnectFunction 无状态组件。和负责合并 props 的createChildSelector方法
第二步
2 判断是否是 pure 纯组件模式,如果是用react.memo包裹,这样做的好处是,会向 pureComponent 一样对 props 进行浅比较。
第三步
3 如果 connect 有forwardRef配置项,用React.forwardRef处理,这样做好处如下。
正常情况下因为我们的WrappedComponent 被 connect 包装,所以不能通过ref访问到业务组件WrappedComponent的实例。
子组件
const mapStateToProp = (store) => ({ userInfo: store.root.userInfo })class Child extends React.Component{render(){/* ... */}}export default connect(mapStateToProp)(Child)
父组件
class Father extends React.Compoent{child = nullrender(){return <Child ref={(cur)=> this.child = cur } { /* 获取到的不是`Child`本身 */ } />}}
我们无法通过 ref 访问到 Child 组件。
所以我们可以通过 options 的 forwardRef 属性设置为 true,这样就可以根本解决问题。
connect(mapStateToProp,mapDispatchToProps,mergeProps,{ forwardRef:true })(Child)
第四步
hoistStatics(Connect, WrappedComponent)
最后做的事情就是通过hoistStatics库 把子组件WrappedComponent的静态方法/属性,继承到父组件Connect上。因为在 高阶组件 包装 业务组件的过程中,如果不对静态属性或是方法加以额外处理,是不会被包装后的组件访问到的,所以需要类似hoistStatics这样的库,来做处理。
接下来讲的就是整个 connect的核心了。我们来看一下负责更新的容器ConnectFunction 到底做了些什么?
6 ConnectFunction 控制更新
ConnectFunction 的代码很复杂,需要我们一步步去吃透,一步步去消化。
function ConnectFunction(props) {/* TODO: 第一步 把 context ForwardedRef props 取出来 */const [reactReduxForwardedRef,wrapperProps // props 传递的props] = useMemo(() => {const { reactReduxForwardedRef, ...wrapperProps } = propsreturn [reactReduxForwardedRef, wrapperProps]}, [props])// 获取 context内容 里面含有 redux 中store 和 subscriptionconst contextValue = useContext(Context)//TODO: 判断 store 是否来此 props didStoreComeFromProps ,正常情况下 ,prop 中是不存在 store 所以 didStoreComeFromProps = falseconst didStoreComeFromProps =Boolean(props.store) &&Boolean(props.store.getState) &&Boolean(props.store.dispatch)const didStoreComeFromContext =Boolean(contextValue) && Boolean(contextValue.store)// 获取 redux 中 storeconst store = didStoreComeFromProps ? props.store : contextValue.store// 返回merge函数 用于生成真正传给子组件 propsconst childPropsSelector = useMemo(() => {return createChildSelector(store)}, [store])// TODO: 第二步 subscription 监听者实例const [subscription, notifyNestedSubs] = useMemo(() => {// 如果没有订阅更新,那么直接返回。if (!shouldHandleStateChanges) return NO_SUBSCRIPTION_ARRAYconst subscription = new Subscription(store,didStoreComeFromProps ? null : contextValue.subscription // 和 上级 `subscription` 建立起关系。this.parentSub = contextValue.subscription)// notifyNestedSubs 触发 noticy 所有子代 listener 监听者 -> 触发batch方法,触发 batchupdate方法 ,批量更新const notifyNestedSubs = subscription.notifyNestedSubs.bind(subscription)return [subscription, notifyNestedSubs]}, [store, didStoreComeFromProps, contextValue])/* 创建出一个新的contextValue ,把父级的 subscription 换成自己的 subscription */const overriddenContextValue = useMemo(() => {if (didStoreComeFromProps) {return contextValue}return {...contextValue,subscription}}, [didStoreComeFromProps, contextValue, subscription])const [[previousStateUpdateResult],forceComponentUpdateDispatch /* */] = useReducer(storeStateUpdatesReducer, EMPTY_ARRAY, initStateUpdates)// TODO: 第三步const lastChildProps = useRef() //保存上一次 合并过的 props信息(经过 ownprops ,stateProps , dispatchProps 合并过的 )const lastWrapperProps = useRef(wrapperProps) // 保存本次上下文执行 业务组件的 propsconst childPropsFromStoreUpdate = useRef()const renderIsScheduled = useRef(false) // 当前组件是否处于渲染阶段// actualChildProps 为当前真正处理过后,经过合并的 propsconst actualChildProps = usePureOnlyMemo(() => {// 调用 mergeProps 进行合并,返回合并后的最新 porpsreturn childPropsSelector(store.getState(), wrapperProps)}, [store, previousStateUpdateResult, wrapperProps])/* 负责更新缓存变量,方便下一次更新的时候比较 */useEffect(()=>{captureWrapperProps(...[lastWrapperProps,lastChildProps,renderIsScheduled,wrapperProps,actualChildProps,childPropsFromStoreUpdate,notifyNestedSubs])})useEffect(()=>{subscribeUpdates(...[shouldHandleStateChanges,store,subscription,childPropsSelector,lastWrapperProps,lastChildProps,renderIsScheduled,childPropsFromStoreUpdate,notifyNestedSubs,forceComponentUpdateDispatch])},[store, subscription, childPropsSelector])// TODO: 第四步:reactReduxForwardedRef 是处理父级元素是否含有 forwardRef 的情况 这里可以忽略。const renderedWrappedComponent = useMemo(() => (<WrappedComponent{...actualChildProps}ref={reactReduxForwardedRef}/>),[reactReduxForwardedRef, WrappedComponent, actualChildProps])const renderedChild = useMemo(() => {//shouldHandleStateChanges 来源 connect是否有第一个参数if (shouldHandleStateChanges) {return (// ContextToUse 传递 context<ContextToUse.Provider value={overriddenContextValue}>{renderedWrappedComponent}</ContextToUse.Provider>)}return renderedWrappedComponent}, [ContextToUse, renderedWrappedComponent, overriddenContextValue])return renderedChild}
为了方便大家更直观的理解,我这里保留了影响流程的核心代码,我会一步步分析 整个核心部分。想要弄明白这里,需要对 react-hooks 和 provider 有一些了解。
第一步
通过 props 分离出 reactReduxForwardedRef , wrapperProps 。reactReduxForwardedRef 是当开启 ForwardedRef 模式下,父级传过来的 React.forwaedRef。
然后判断通过常量didStoreComeFromProps储存当前,redux.store 是否来自 props, 正常情况下,我们的 store 都来自 provider ,不会来自props,所以我们可以把didStoreComeFromProps = true 。接下来我们获取到 store,通过 store 来判断是否更新真正的合并props函数childPropsSelector。
第二步 创建 子代 subscription, 层层传递新的 context(很重要)
这一步非常重要,判断通过shouldHandleStateChanges判断此 HOC 是否订阅存储更改,如果已经订阅了更新(此时connect 具有第一个参数),那么创建一个 subscription ,并且和上一层provider的subscription建立起关联。this.parentSub = contextValue.subscription。然后分离出 subscription 和 notifyNestedSubs(notifyNestedSubs的作用是通知当前subscription的 listeners 进行更新的方法。) 。
然后通过 useMemo 创建出一个新的 contextValue ,把父级的 subscription 换成自己的 subscription。用于通过 Provider 传递新的 context。这里简单介绍一下,运用了 Provider 可以和多个消费组件有对应关系。多个 Provider 也可以嵌套使用,里层的会覆盖外层的数据。react-redux用context更倾向于Provider良好的传递上下文的能力。
接下来通过useReducer制造出真正触发更新的forceComponentUpdateDispatch 函数。也就是整个 state 或者是 props改变,触发组件更新的函数。为什么这么做呢?
笔者认为react-redxx这样设计原因是希望connect自己控制自己的更新,并且多个上下级 connect不收到影响。所以一方面通过useMemo来限制业务组件不必要的更新,另一方面来通过forceComponentUpdateDispatch来更新 HOC 函数,产生actualChildProps,actualChildProps 改变 ,useMemo执行,触发组件渲染。
第三步:保存信息,执行副作用钩子(最重要的部分到了)
这一步十分重要,为什么这么说呢,首先先通过useRef缓存几个变量:
lastChildProps -> 保存上一次 合并过的 props 信息(经过 ownprops ,stateProps , dispatchProps 合并过的 )。 lastWrapperProps -> 保存本次上下文执行 业务组件的 props 。 renderIsScheduled -> 当前组件是否处于渲染阶段。 actualChildProps -> actualChildProps 为当前真正处理过后,经过合并的 props, 组件通过 dep -> actualChildProps,来判断是否进行更新。
接下来执行两次 useEffect , 源码中不是这个样子的,我这里经过简化,第一个 useEffect 执行了 captureWrapperProps ,captureWrapperProps 是干什么的呢?
//获取包装的propsfunction captureWrapperProps(lastWrapperProps,lastChildProps,renderIsScheduled,wrapperProps,actualChildProps,childPropsFromStoreUpdate,notifyNestedSubs) {lastWrapperProps.current = wrapperProps //子propslastChildProps.current = actualChildProps //经过 megeprops 之后形成的 proprenderIsScheduled.current = false // 当前组件渲染完成}
captureWrapperProps 的作用很简单,在一次组件渲染更新后,将上一次 合并前 和 合并后 的props,保存起来。这么做目的是,能过在两次hoc执行渲染中,对比props stateProps是否发生变化。从而确定是否更新 hoc,进一步更新组件。
执行第二个 useEffect 是很关键。执行subscribeUpdates 函数,subscribeUpdates 是订阅更新的主要函数,我们一起来看看:
function subscribeUpdates(shouldHandleStateChanges,store,subscription,childPropsSelector,lastWrapperProps, //子propslastChildProps, //经过 megeprops 之后形成的 proprenderIsScheduled,childPropsFromStoreUpdate,notifyNestedSubs,forceComponentUpdateDispatch) {if (!shouldHandleStateChanges) return// 捕获值以检查此组件是否卸载以及何时卸载let didUnsubscribe = falselet lastThrownError = null//store更新订阅传播到此组件时,运行此回调const checkForUpdates = ()=>{//....}subscription.onStateChange = checkForUpdates//开启订阅者 ,当前是被connect 包转的情况 会把 当前的 checkForceUpdate 放在存入 父元素的addNestedSub中。subscription.trySubscribe()//在第一次呈现之后从存储中提取数据,以防存储从我们开始就改变了。checkForUpdates()/* 卸载订阅起 */const unsubscribeWrapper = () => {didUnsubscribe = truesubscription.tryUnsubscribe()subscription.onStateChange = null}return unsubscribeWrapper}
这绝对是整个订阅更新的核心,首先声明 store 更新订阅传播到此组件时的回调函数checkForUpdates把它赋值给onStateChange,如果store中的state发生改变,那么在组件订阅了state内容之后,相关联的state改变就会触发当前组件的onStateChange,来合并得到新的props,从而触发组件更新。
然后subscription.trySubscribe()把订阅函数onStateChange绑定给父级subscription,进行了层层订阅。
最后,为了防止渲染后,store内容已经改变,所以首先执行了一次checkForUpdates。那么checkForUpdates的作用很明确了,就是检查是否派发当前组件的更新。
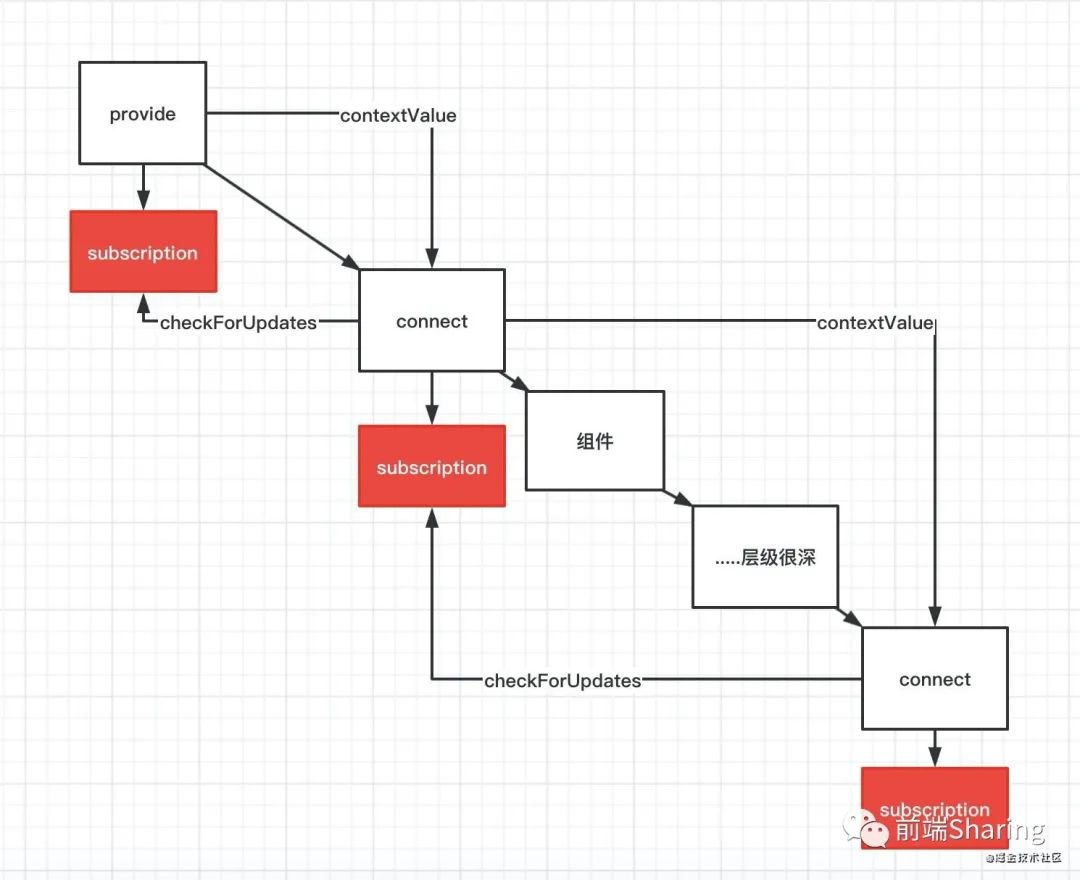
到这里我们明白了,react-redux 通过 subscription 进行层层订阅。对于一层层的组件结构,整体模型图如下:。
接下来我们看一下checkForUpdates
//store更新订阅传播到此组件时,运行此回调const checkForUpdates = () => {if (didUnsubscribe) {//如果写在了return}// 获取 store 里stateconst latestStoreState = store.getState()qlet newChildProps, errortry {/* 得到最新的 props */newChildProps = childPropsSelector(latestStoreState,lastWrapperProps.current)}//如果新的合并的 props没有更改,则此处不做任何操作-层叠订阅更新if (newChildProps === lastChildProps.current) {if (!renderIsScheduled.current) {notifyNestedSubs() /* 通知子代 subscription 触发 checkForUpdates 来检查是否需要更新。*/}} else {lastChildProps.current = newChildPropschildPropsFromStoreUpdate.current = newChildPropsrenderIsScheduled.current = true// 此情况 可能考虑到 代码运行到这里 又发生了 props 更新 所以触发一个 reducer 来促使组件更新。forceComponentUpdateDispatch({type: 'STORE_UPDATED',payload: {error}})}}
checkForUpdates 通过调用 childPropsSelector来形成新的props,然后判断之前的 prop 和当前新的 prop 是否相等。如果相等,证明没有发生变化,无须更新当前组件,那么通过调用notifyNestedSubs来通知子代容器组件,检查是否需要更新。如果不相等证明订阅的store.state发生变化,那么立即执行forceComponentUpdateDispatch来触发组件的更新。
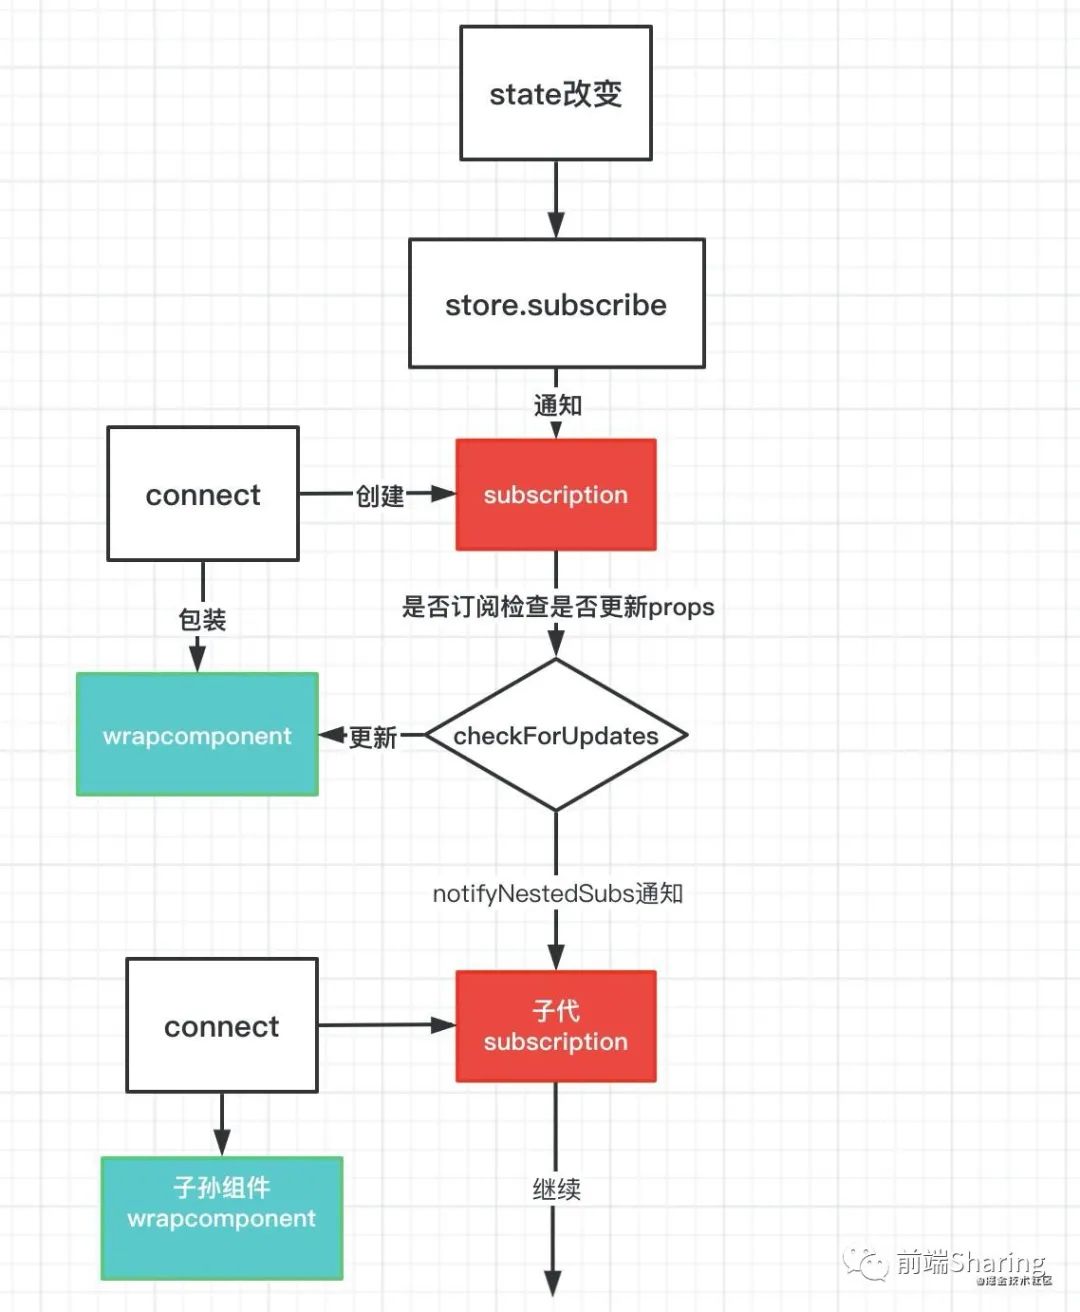
对于层层订阅的结构,整个更新模型图如下:
总结
接下来我们总结一下整个connect的流程。我们还是从订阅和更新两个方向入手。
订阅流程
整个订阅的流程是,如果被connect包裹,并且具有第一个参数。首先通过context获取最近的 subscription,然后创建一个新的subscription,并且和父级的subscription建立起关联。当第一次hoc容器组件挂在完成后,在useEffect里,进行订阅,将自己的订阅函数checkForUpdates,作为回调函数,通过trySubscribe 和this.parentSub.addNestedSub ,加入到父级subscription的listeners中。由此完成整个订阅流程。
更新流程
整个更新流程是,那state改变,会触发根订阅器的store.subscribe,然后会触发listeners.notify ,也就是checkForUpdates函数,然后checkForUpdates函数首先根据mapStoretoprops,mergeprops等操作,验证该组件是否发起订阅,props 是否改变,并更新,如果发生改变,那么触发useReducer的forceComponentUpdateDispatch函数,来更新业务组件,如果没有发生更新,那么通过调用notifyNestedSubs,来通知当前subscription的listeners检查是否更新,然后尽心层层checkForUpdates,逐级向下,借此完成整个更新流程。
四 关于 useMemo 用法思考?
整个react-redux源码中,对于useMemo用法还是蛮多的,我总结了几条,奉上🌹🌹:
1 缓存属性 / 方法
react-redux源码中,多处应用了useMemo 依赖/缓存 属性的情况。这样做的好处是只有依赖项发生改变的时候,才更新新的缓存属性/方法,比如 childPropsSelector , subscription , actualChildProps 等主要方法属性。
2 控制组件渲染,渲染节流。
react-redux源码中,通过 useMemo来控制业务组件是否渲染。通过 actualChildProps变化,来证明是否来自 **自身 props ** 或 订阅的 state 的修改,来确定是否渲染组件。
例子🌰:
const renderedWrappedComponent = useMemo(() => (<WrappedComponent{...actualChildProps}ref={reactReduxForwardedRef}/>),[reactReduxForwardedRef, WrappedComponent, actualChildProps])
五 总结
希望这篇文章能让屏幕前的你,对react-redux的订阅和更新流程有一个新的认识。送人玫瑰,手留余香,阅读的朋友可以给笔者点赞,关注一波 ,陆续更新前端超硬核文章。