一个 SpringBoot 项目该包含哪些?
作者:不一样的科技宅
juejin.im/post/6844904083942277127
前言
建立一个全新的项目,或者把旧的庞大的项目,进行拆分成多个项目。在建立新的项目中,经常需要做一些重复的工作,比如说拷贝一下常用的工具类,通用代码等等。
所以就可以做一个基础的项目方便使用,在经历新项目的时候,直接在基础项目上进行简单配置就可以开发业务代码了。
基础项目该包含哪些东西。
Swagger 在线接口文档。
CodeGenerator 代码生成器。
统一返回。
通用的分页对象。
常用工具类。
全局异常拦截。
错误枚举。
自定义异常。
多环境配置文件。
Maven 多环境配置。
日志配置。
JenkinsFile。
❝
可以在评论区进行补充
❞
Swagger
写接口文档通常是一件比较头疼的事情,然而 swagger 就用是用来帮我们解决这个问题的。可以在线生成接口文档,并且可以在页面上进行测试。
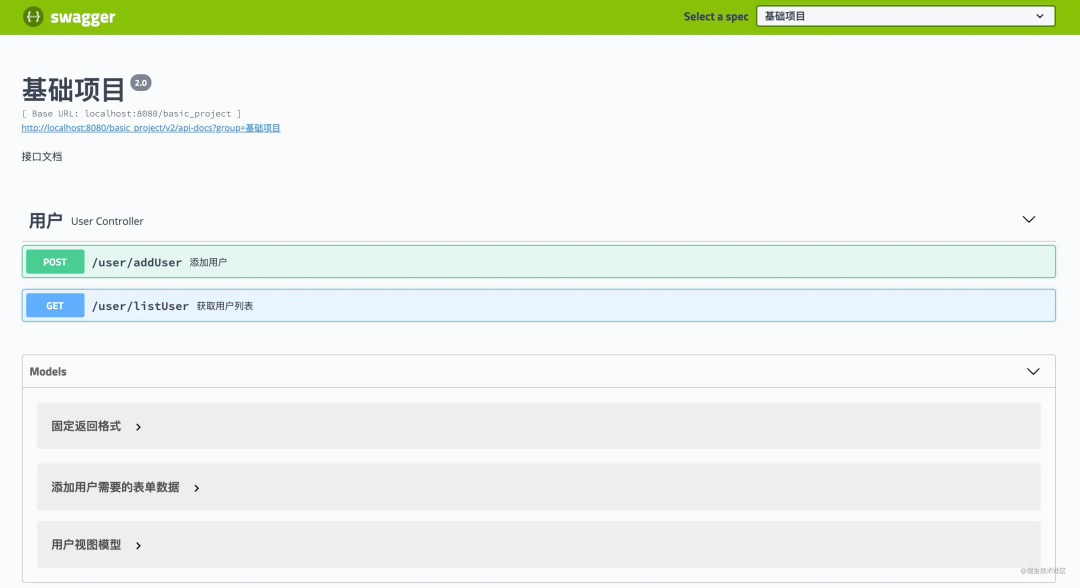
可以非常清楚的显示,请求数据已经响应数据。当然这一切都需要在代码中进行配置。
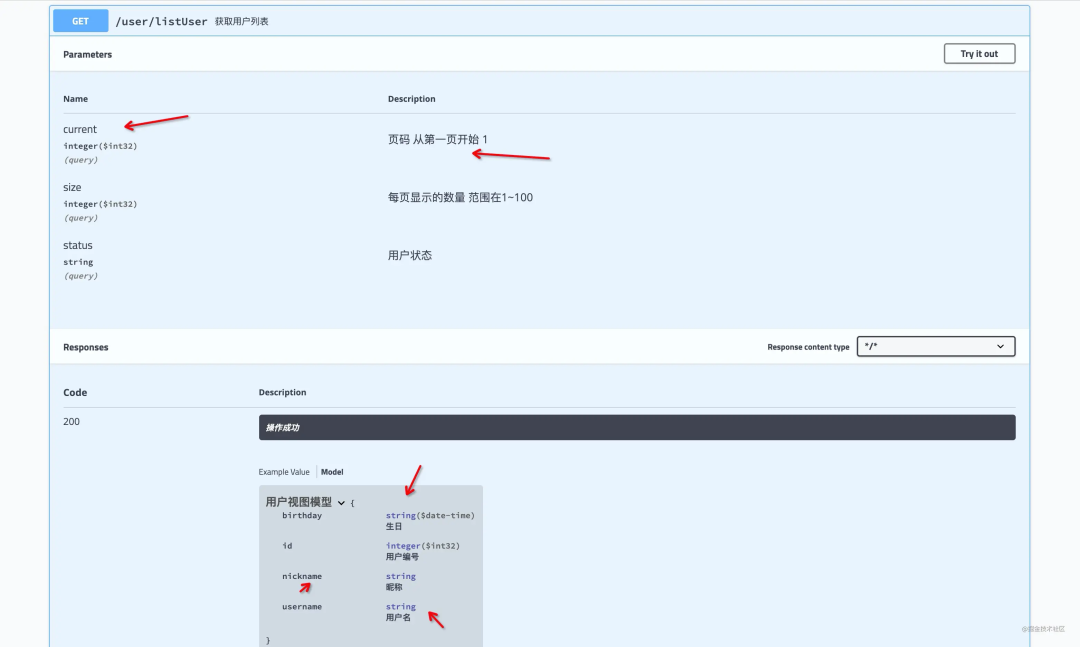
「注意的点:接口文档只能在测试 / 开发环境开启,其他环境请关闭。」
常用的 Swagger 注解
@Api用于Controller@ApiOperation用于Controller内的方法。@ApiResponses用于标识接口返回数据的类型。@ApiModel用于标识类的名称@ApiModelProperty用于标识属性的名称
案例
@RestController
@Api(tags = "用户")
@AllArgsConstructor
@RequestMapping("/user")
public class UserController {

    private IUserService userService;

    /**
     * 获取用户列表
     * @param listUserForm 表单数据
     * @return 用户列表
     */
    @ApiOperation("获取用户列表")
    @GetMapping("/listUser")
    @ApiResponses(
            @ApiResponse(code = 200, message = "操作成功", response = UserVo.class)
    )
    public ResultVo listUser(@Validated ListUserForm listUserForm){
        return ResultVoUtil.success(userService.listUser(listUserForm));
    }
}
@Data
@ApiModel("获取用户列表需要的表单数据")
@EqualsAndHashCode(callSuper = false)
public class ListUserForm extends PageForm<ListUserForm> {

    /**
     * 用户状态
     */
    @ApiModelProperty("用户状态")
    @NotEmpty(message = "用户状态不能为空")
    @Range(min =  -1 , max = 1 , message = "用户状态有误")
    private String status;

}
对应的 swagger 的配置可以查看基础项目内的SwaggerConfiguration.java.
CodeGenerator 代码生成器。
mybatis_plus 代码生成器可以帮我们生成entity,service,serviceImpl,mapper,mapper.xml。省去了建立一大堆实体类的麻烦。
由于配置太长这里就不贴出来了,对应的 CodeGenerator 的配置可以查看基础项目内的CodeGenerator.java.
常用的封装
统一返回 ResultVo
将所有的接口的响应数据的格式进行统一。
@Data
@ApiModel("固定返回格式")
public class ResultVo {

    /**
     * 错误码
     */
    @ApiModelProperty("错误码")
    private Integer code;

    /**
     * 提示信息
     */
    @ApiModelProperty("提示信息")
    private String message;

    /**
     * 具体的内容
     */
    @ApiModelProperty("响应数据")
    private Object data;

}
抽象表单 BaseForm
public abstract class BaseForm<T> {

    /**
     * 获取实例
     * @return 返回实体类
     */
    public abstract T buildEntity();

}
有小伙伴可能有疑问了,这个类有啥用呢。先看一下,下面的代码。
/**
 * 添加用户
 * @param userForm 表单数据
 * @return true 或者 false
 */
@Override
public boolean addUser(AddUserForm userForm) {
    User user = new User();
    user.setNickname(userForm.getNickname());
    user.setBirthday(userForm.getBirthday());
    user.setUsername(userForm.getUsername());
    user.setPassword(userForm.getPassword());
    return save(user);
}
重构一下,感觉清爽了一些。
/**
 * 添加用户
 * @param userForm 表单数据
 * @return true 或者 false
 */
@Override
public boolean addUser(AddUserForm userForm) {
    User user = new User();
    BeanUtils.copyProperties(this,user);
    return save(user);
}
使用 BaseForm 进行重构 AddUserForm 继承 BaseForm 并重写 buildEntity
@Data
@EqualsAndHashCode(callSuper = false)
public class AddUserForm extends BaseForm<User> {

    /**
     * 昵称
     */
    private String nickname;

    /**
     * 生日
     */
    private Date birthday;

    /**
     * 用户名
     */
    private String username;

    /**
     * 密码
     */
    private String password;

    /**
     * 构造实体
     * @return 实体对象
     */
    @Override
    public User buildEntity() {
        User user = new User();
        BeanUtils.copyProperties(this,user);
        return user;
    }
}
/**
 * 添加用户
 * @param userForm 表单数据
 * @return true 或者 false
 */
@Override
public boolean addUser(AddUserForm userForm) {
    return save(userForm.buildEntity());
}
上面的代码有没有种似曾相识的感觉,很多情况都是将接受到的参数,转变成对应的实体类然后**「保存」或者「更新」**。
所以对于这类的form可以继承baseform并实现buildEntity()这样可以更加符合面向对象,service不需要关心form如何转变成entity, 只需要在使用的时候调用buildEntity()即可,尤其是在form -> entity相对复杂的时候,这样做可以减少service内的代码。让代码逻辑看起来更加清晰。
通用的分页对象
涉及到查询的时候,绝大多数都需要用到分页,所以说封装分页对象就很有必要。可以注意下 PageForm.calcCurrent()、PageVo.setCurrentAndSize()、PageVo.setTotal()这个几个方法。
PageForm
@Data
@ApiModel(value = "分页数据", description = "分页需要的表单数据")
public class PageForm<T extends PageForm<?>>{

    /**
     * 页码
     */
    @ApiModelProperty(value = "页码 从第一页开始 1")
    @Min(value = 1, message = "页码输入有误")
    private Integer current;

    /**
     * 每页显示的数量
     */
    @ApiModelProperty(value = "每页显示的数量 范围在1~100")
    @Range(min = 1, max = 100, message = "每页显示的数量输入有误")
    private Integer size;

    /**
     * 计算当前页 ,方便mysql 进行分页查询
     * @return 返回 pageForm
     */
    @ApiModelProperty(hidden = true)
    public T calcCurrent(){
        current = (current - 1 ) * size;
        return (T) this;
    }
}
PageVo
@Data
public class PageVo<T> {
    /**
     * 分页数据
     */
    @ApiModelProperty(value = "分页数据")
    private List<T> records;
    /**
     * 总条数
     */
    @ApiModelProperty(value = "总条数")
    private Integer total;

    /**
     * 总页数
     */
    @ApiModelProperty(value = "总页数")
    private Integer pages;

    /**
     * 当前页
     */
    @ApiModelProperty(value = "当前页")
    private Integer current;

    /**
     * 查询数量
     */
    @ApiModelProperty(value = "查询数量")
    private Integer size;

    /**
     * 设置当前页和每页显示的数量
     * @param pageForm 分页表单
     * @return 返回分页信息
     */
    @ApiModelProperty(hidden = true)
    public PageVo<T> setCurrentAndSize(PageForm<?> pageForm){
        BeanUtils.copyProperties(pageForm,this);
        return this;
    }

    /**
     * 设置总记录数
     * @param total 总记录数
     */
    @ApiModelProperty(hidden = true)
    public void setTotal(Integer total) {
        this.total = total;
        this.setPages(this.total % this.size > 0 ? this.total / this.size + 1 : this.total / this.size);
    }
}
案例
ListUserForm
@Data
@ApiModel("获取用户列表需要的表单数据")
@EqualsAndHashCode(callSuper = false)
public class ListUserForm extends PageForm<ListUserForm> {

    /**
     * 用户状态
     */
    @ApiModelProperty("用户状态")
    @NotEmpty(message = "用户状态不能为空")
    @Range(min =  -1 , max = 1 , message = "用户状态有误")
    private String status;

}
UserServiceImpl
/**
 * 获取用户列表
 * @param listUserForm 表单数据
 * @return 用户列表
 */
@Override
public PageVo<UserVo> listUser(ListUserForm listUserForm) {
    PageVo<UserVo> pageVo = new PageVo<UserVo>().setCurrentAndSize(listUserForm);
    pageVo.setTotal(countUser(listUserForm.getStatus()));
    pageVo.setRecords(userMapper.listUser(listUserForm.calcCurrent()));
    return pageVo;
}

/**
 * 获取用户数量
 * @param status 状态
 * @return 用户数量
 */
private Integer countUser(String status){
    return count(new QueryWrapper<User>().eq("status",status));
}
UserController
/**
 * 获取用户列表
 * @param listUserForm 表单数据
 * @return 用户列表
 */
@ApiOperation("获取用户列表")
@GetMapping("/listUser")
@ApiResponses(
        @ApiResponse(code = 200, message = "操作成功", response = UserVo.class)
)
public ResultVo listUser(@Validated ListUserForm listUserForm){
    return ResultVoUtil.success(userService.listUser(listUserForm));
}
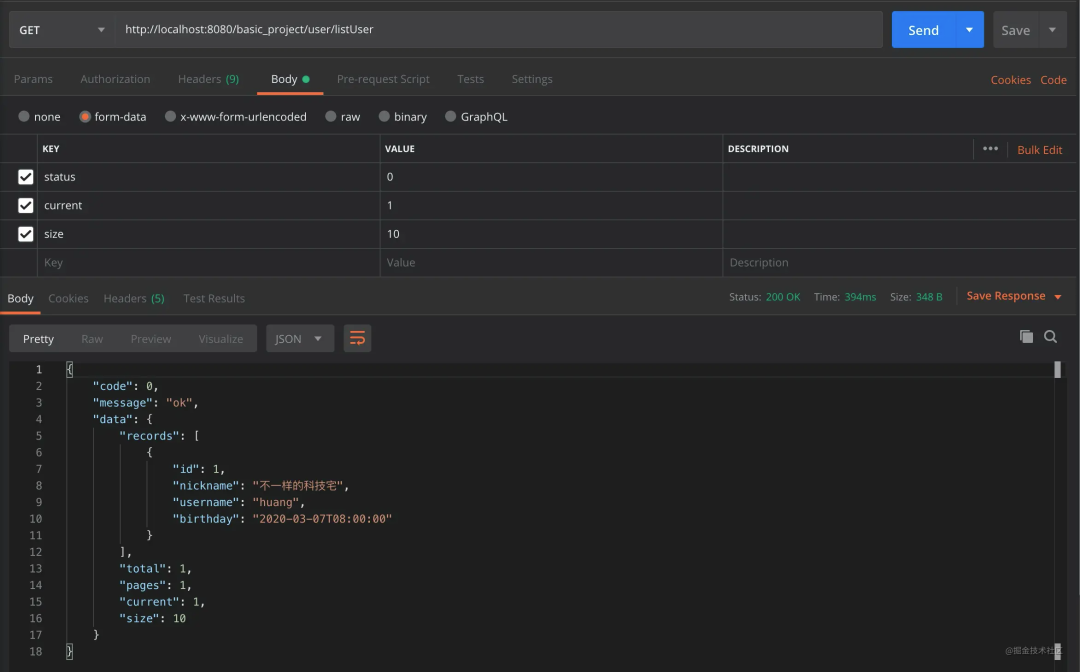
注意的点
PageVo 在实例化的时候需要设置**「当前页」和「每页显示的数量」** 可以调用
setCurrentAndSize()完成。进行分页查询的时候,需要计算偏移量。
listUserForm.calcCurrent()
为什么要计算偏移量呢?
假如查询第 1 页每页显示 10 条记录,前端传递过来的参数是
current=1&&size=10,这个时候limit 1,10没有问题。假如查询第 2 页每页显示 10 条记录,前端传递过来的参数是
current=2&&size=10,这个时候limit 2,10就有问题,实际应该是limit 10,10。calcCurrent()的作用就是如此。
为什么不用 MybatisPlus 自带的分页插件呢?
❝
自带的分页查询在大量数据下,会出现性能问题。
❞
常用工具类
常用工具类可以根据自己的开发习惯引入。
异常处理
异常处理的大致流程主要如下。
异常信息抛出 ->
ControllerAdvice进行捕获格式化输出内容手动抛出
CustomException并传入ReulstEnum——> 进行捕获错误信息输出错误信息。
自定义异常
@Data
@EqualsAndHashCode(callSuper = false)
public class CustomException extends RuntimeException {

    /**
     * 状态码
     */
    private final Integer code;

    /**
     * 方法名称
     */
    private final String method;


    /**
     * 自定义异常
     *
     * @param resultEnum 返回枚举对象
     * @param method     方法
     */
    public CustomException(ResultEnum resultEnum, String method) {
        super(resultEnum.getMsg());
        this.code = resultEnum.getCode();
        this.method = method;
    }

    /**
     * @param code    状态码
     * @param message 错误信息
     * @param method  方法
     */
    public CustomException(Integer code, String message, String method) {
        super(message);
        this.code = code;
        this.method = method;
    }

}
错误信息枚举
根据业务进行添加。
@Getter
public enum ResultEnum {

    /**
     * 未知异常
     */
    UNKNOWN_EXCEPTION(100, "未知异常"),

    /**
     * 添加失败
     */
    ADD_ERROR(103, "添加失败"),

    /**
     * 更新失败
     */
    UPDATE_ERROR(104, "更新失败"),

    /**
     * 删除失败
     */
    DELETE_ERROR(105, "删除失败"),

    /**
     * 查找失败
     */
    GET_ERROR(106, "查找失败"),

    ;

    private Integer code;

    private String msg;

    ResultEnum(Integer code, String msg) {
        this.code = code;
        this.msg = msg;
    }

    /**
     * 通过状态码获取枚举对象
     * @param code 状态码
     * @return 枚举对象
     */
    public static ResultEnum getByCode(int code){
        for (ResultEnum resultEnum : ResultEnum.values()) {
            if(code == resultEnum.getCode()){
                return resultEnum;
            }
        }
        return null;
    }

}
全局异常拦截
全局异常拦截是使用@ControllerAdvice进行实现,常用的异常拦截配置可以查看 GlobalExceptionHandling。
@Slf4j
@RestControllerAdvice
public class GlobalExceptionHandling {

    /**
     * 自定义异常
     */
    @ExceptionHandler(value = CustomException.class)
    public ResultVo processException(CustomException e) {
        log.error("位置:{} -> 错误信息:{}", e.getMethod() ,e.getLocalizedMessage());
        return ResultVoUtil.error(Objects.requireNonNull(ResultEnum.getByCode(e.getCode())));
    }

    /**
     * 通用异常
     */
    @ResponseStatus(HttpStatus.OK)
    @ExceptionHandler(Exception.class)
    public ResultVo exception(Exception e) {
        e.printStackTrace();
        return ResultVoUtil.error(ResultEnum.UNKNOWN_EXCEPTION);
    }
}
案例
Controller
/**
 * 删除用户
 * @param id 用户编号
 * @return 成功或者失败
 */
@ApiOperation("删除用户")
@DeleteMapping("/deleteUser/{id}")
public ResultVo deleteUser(@PathVariable("id") String id){
    userService.deleteUser(id);
    return ResultVoUtil.success();
}
Service
/**
 * 删除用户
 * @param id id
 */
@Override
public void deleteUser(String id) {
    // 如果删除失败抛出异常。 -- 演示而已不推荐这样干
    if(!removeById(id)){
        throw new CustomException(ResultEnum.DELETE_ERROR, MethodUtil.getLineInfo());
    }
}
结果
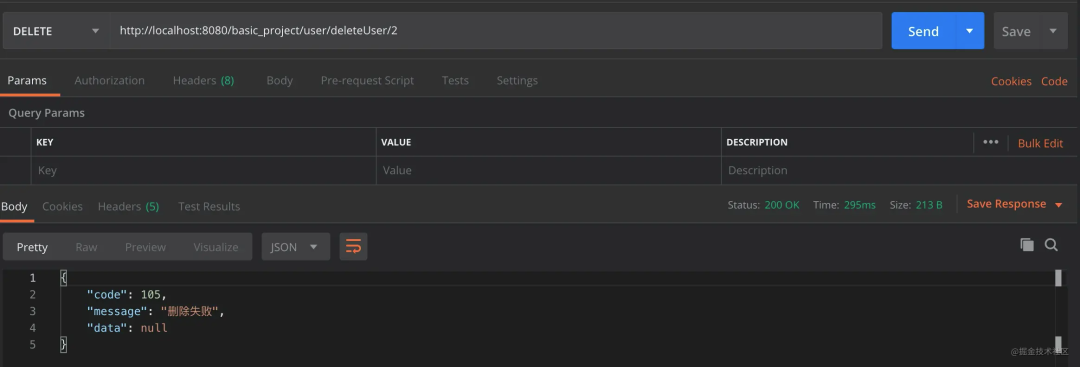

「将报错代码所在的文件第多少行都打印出来。方便排查。」
注意的点
所有手动抛出的错误信息,都应在错误信息枚举ResultEnum进行统一维护。不同的业务使用不同的错误码。方便在报错时进行分辨。快速定位问题。
多环境配置
SpringBoot 多环境配置
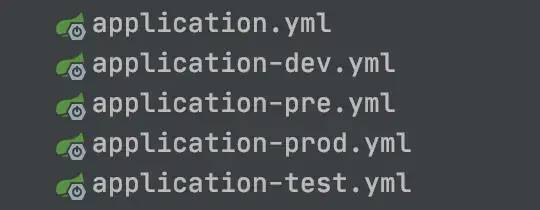
对于一个项目来讲基本都 4 有个环境dev,test,pre,prod,对于 SpringBoot 项目多建立几个配置文件就可以了。
然后启动的时候可以通过配置spring.profiles.active 来选择启动的环境。
java -jar BasicProject.jar --spring.profiles.active=prod
Maven 多环境配置
假如想在打包的时候动态指定环境,这个时候就需要借助 Maven 的 xml 来实现。
配置 XML
<!--  配置环境  -->
<profiles>
    <profile>
        <!-- 开发 -->
        <id>dev</id>
        <activation>
            <activeByDefault>true</activeByDefault>
        </activation>
        <properties>
            <activatedProperties>dev</activatedProperties>
        </properties>
    </profile>
    <profile>
        <!-- 测试 -->
        <id>test</id>
        <properties>
            <activatedProperties>test</activatedProperties>
        </properties>
    </profile>
    <profile>
        <!-- 准生产 -->
        <id>pre</id>
        <properties>
            <activatedProperties>pre</activatedProperties>
        </properties>
    </profile>
    <profile>
        <!-- 生产 -->
        <id>prod</id>
        <properties>
            <activatedProperties>prod</activatedProperties>
        </properties>
    </profile>
</profiles>
更改 application.yml
spring:
  profiles:
    # 选择环境
    active: @activatedProperties@
使用案例
mvn clean package -P prod
mvn clean package -P pre
mvn clean package -P test
打包完可以解压开查看application.yml 会发现spring.profiles.active=@activatedProperties@ 发生了改变。
日志配置
采用 logback 日志配置,参考
https://gitee.com/huangxunhui/basic_project/blob/master/src/main/resources/logback-spring.xml
JenkinsFile
JenkinsFile 肯定顾名思义是给 jenkins 用的。主要是配置项目根据如何进行构建并发布到不同的环境。需要去了解 pipeline 语法,以及如何配置 jenkins。
结尾
如果觉得对你有帮助,可以随手点个在看哦,谢谢。

