高斯分类器-水果识别
点击下方卡片,关注“新机器视觉”公众号
重磅干货,第一时间送达
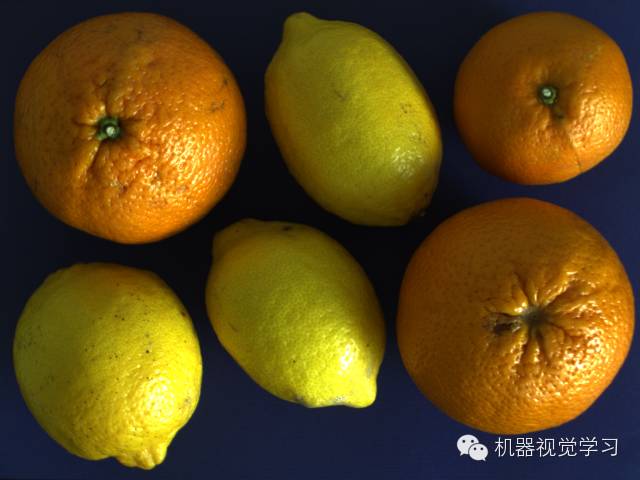
原图:
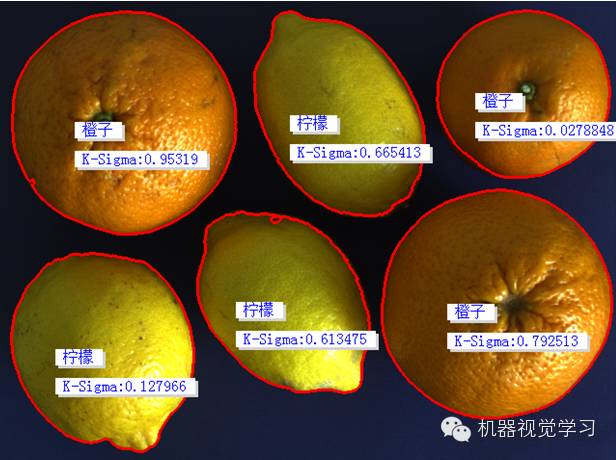
结果:
代码如下(Halcon实现):
*读取图片ImageFiles := []ImageFiles[0] := 'F:/HALCON/fruits/citrus_fruits_01.png'ImageFiles[1] := 'F:/HALCON/fruits/citrus_fruits_02.png'ImageFiles[2] := 'F:/HALCON/fruits/citrus_fruits_03.png'ImageFiles[3] := 'F:/HALCON/fruits/citrus_fruits_04.png'ImageFiles[4] := 'F:/HALCON/fruits/citrus_fruits_05.png'ImageFiles[5] := 'F:/HALCON/fruits/citrus_fruits_06.png'ImageFiles[6] := 'F:/HALCON/fruits/citrus_fruits_07.png'ImageFiles[7] := 'F:/HALCON/fruits/citrus_fruits_08.png'ImageFiles[8] := 'F:/HALCON/fruits/citrus_fruits_09.png'ImageFiles[9] := 'F:/HALCON/fruits/citrus_fruits_10.png'ImageFiles[10] := 'F:/HALCON/fruits/citrus_fruits_11.png'ImageFiles[11] := 'F:/HALCON/fruits/citrus_fruits_12.png'ImageFiles[12] := 'F:/HALCON/fruits/citrus_fruits_13.png'ImageFiles[13] := 'F:/HALCON/fruits/citrus_fruits_14.png'ImageFiles[14] := 'F:/HALCON/fruits/citrus_fruits_15.png'*关闭窗口dev_close_window ( )*读图片read_image (Image, ImageFiles[0])*获取图片大小get_image_size (Image, Width, Height)*新建窗口dev_open_window (0, 0, Width, Height, 'black', WindowHandle)*设置填充模式-边缘填充dev_set_draw ('margin')*设置线宽dev_set_line_width (3)*名称变量FeaturName :=['橙子','柠檬']**创建分类器create_class_gmm (2, 2, 1, 'spherical', 'normalization', 10, 42, GMMHandle)*for循环for i := 0 to 3 by 1*读图片read_image (Image, ImageFiles[i])*转换3通道图像为3个单通道图像decompose3 (Image, Image1, Image2, Image3)*阈值处理threshold (Image1, Region, 50, 255)*填充区域fill_up (Region, RegionFillUp)*连通区域connection (RegionFillUp, ConnectedRegions)*区域选择-面积select_shape (ConnectedRegions, SelectedRegions, 'area', 'and', 150, 99999)*对象计数count_obj (SelectedRegions, Number)*for循环for j := 1 to Number by 1{*选择对象select_obj (SelectedRegions, ObjectSelected, j)*计算对象圆度circularity (ObjectSelected, Circularity)*计算对象面积和中心坐标area_center (ObjectSelected, Area, Row, Column)*特征转换实数FeaturesVector :=real([Circularity, Area])*特征向量分别增加到不同的类训练样本if (i<2){*橘子的面积和圆度特征增加到橘子的类别中add_sample_class_gmm (GMMHandle, FeaturesVector, 0, 0)}else{*柠檬的面积和圆度特征增加到柠檬的类别中add_sample_class_gmm (GMMHandle, FeaturesVector, 1, 0)}endif}endforendfor*训练分类器train_class_gmm (GMMHandle, 100, 0.001, 'training', 0.0001, Centers, Iter)*提取图片的特征,使用前面已经训练好的分类器进行分类*for循环for Index := 0 to |ImageFiles| - 1 by 1*读图片read_image (Image, ImageFiles[Index])*转换3通道图像为3个单通道图像decompose3 (Image, Image1, Image2, Image3)*阈值处理threshold (Image1, Region, 50, 255)*填充区域fill_up (Region, RegionFillUp)*连通区域connection (RegionFillUp, ConnectedRegions)*区域选择-面积select_shape (ConnectedRegions, SelectedRegions, 'area', 'and', 150, 99999)*对象计数count_obj (SelectedRegions, Number)*显示图像-Imagedev_display (Image)*for循环for j := 1 to Number by 1{*选择区域select_obj (SelectedRegions, ObjectSelected, j)*计算区域圆度circularity (ObjectSelected, Circularity)*计算区域的面积和中心坐标area_center (ObjectSelected, Area, Row, Column)*特征转换实数-圆度、面积FeaturesVector :=real([Circularity, Area])*使用分类器进行分类classify_class_gmm (GMMHandle, FeaturesVector, 1, ClassID, ClassProb, Density, KSigmaProb)*显示识别到的名称disp_message (WindowHandle, FeaturName[ClassID], 'window', Row, Column-50, 'blue', 'true')*显示K-Sigma值disp_message (WindowHandle, 'K-Sigma:'+KSigmaProb, 'window', Row+30, Column-50, 'blue', 'true')endforstop ( )endfor*清除分类器,释放内存clear_class_gmm (GMMHandle)注:
1>.分类器的创建.
2>.增加特征到分类器中.
3>.训练分类器.
4>.使用分类器进行分类 -识别.
5>.本例中分类特征是圆度和面积(也可以增加颜色特征).
来源:小白学视觉
本文仅做学术分享,如有侵权,请联系删文。
评论


