SpringIOC容器初始化流程12大步源码解析
点击上方蓝色字体,选择“标星公众号”
优质文章,第一时间送达
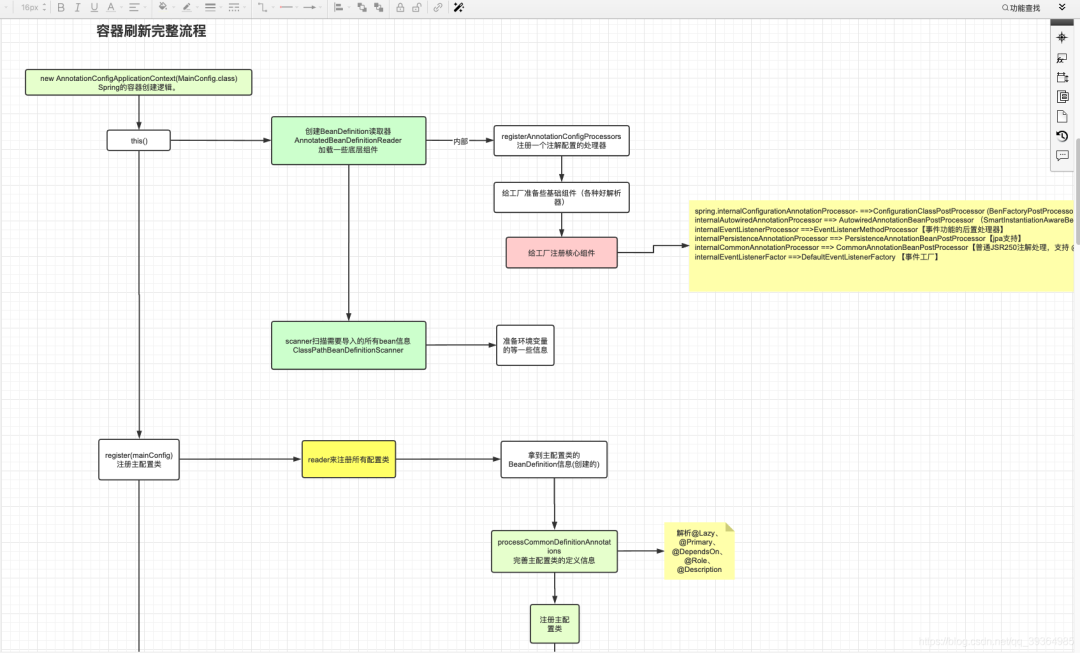
1.概要及IOC容器初始化流程图
下面是IOC初始化的完整流程图


就以我们new了一个AnnotationConfigApplicationContext 为例,参数穿传的是我们的是我们的主配置类, 配置类就简单加俩注解@Configuration、@ComponentScan("com.xixi") ,new 一个AnnotationConfigApplicationContext 就是创建了一个IOC容器,里面就进行了12个步骤来初始化容器
//伪代码 简单写下
ApplicationContext applicationContext = new AnnotationConfigApplicationContext(MainConfig.class);

@ComponentScan("com")
@Configuration
public class MainConfig {

}
以下是Spring刷新容器的代码,Spring中起了个名叫刷新,其实就是创建IOC容器,一共就12步 debug逐个击破就完了 非常的easy
 @Override  //容器刷新的十二大步。模板模式
 public void refresh() throws BeansException, IllegalStateException {
  synchronized (this.startupShutdownMonitor) {
   StartupStep contextRefresh = this.applicationStartup.start("spring.context.refresh");

   //1.准备上下文环境 Prepare this context for refreshing.
   prepareRefresh();

   // Tell the subclass to refresh the internal bean factory.
   // 2.工厂创建:BeanFactory第一次开始创建的时候,有xml解析逻辑。
   ConfigurableListableBeanFactory beanFactory = obtainFreshBeanFactory();

   //3.给容器中注册了环境信息作为单实例Bean方便后续自动装配;放了一些后置处理器处理(监听、xxAware功能) Prepare the bean factory for use in this context.
   prepareBeanFactory(beanFactory);

   try {
    //4.留给子类的模板方法,允许子类继续对工厂执行一些处理; Allows post-processing of the bean factory in context subclasses.
    postProcessBeanFactory(beanFactory);

    StartupStep beanPostProcess = this.applicationStartup.start("spring.context.beans.post-process");
    //5.【大核心】工厂增强:执行所有的BeanFactory后置增强器;利用BeanFactory后置增强器对工厂进行修改或者增强,配置类会在这里进行解析。 Invoke factory processors registered as beans in the context.
    invokeBeanFactoryPostProcessors(beanFactory);

    //6.【核心】注册所有的Bean的后置处理器 Register bean processors that intercept bean creation.
    registerBeanPostProcessors(beanFactory);
    beanPostProcess.end();

    //7.初始化国际化功能 Initialize message source for this context.
    initMessageSource();

    //8.初始化事件多播功能(事件派发) Initialize event multicaster for this context.
    initApplicationEventMulticaster();

    //9. Initialize other special beans in specific context subclasses.
    onRefresh();

    //10.注册监听器,从容器中获取所有的ApplicationListener; Check for listener beans and register them.
    registerListeners();

    // Instantiate all remaining (non-lazy-init) singletons.
    //11.【大核心】bean创建;完成 BeanFactory 初始化。(工厂里面所有的组件都好了)
    finishBeanFactoryInitialization(beanFactory);

    //12.发布事件 Last step: publish corresponding event.
    finishRefresh();
   }

   catch (BeansException ex) {
    if (logger.isWarnEnabled()) {
     logger.warn("Exception encountered during context initialization - " +
       "cancelling refresh attempt: " + ex);
    }

    // Destroy already created singletons to avoid dangling resources.
    destroyBeans();

    // Reset 'active' flag.
    cancelRefresh(ex);

    // Propagate exception to caller.
    throw ex;
   }

   finally {
    // Reset common introspection caches in Spring's core, since we
    // might not ever need metadata for singleton beans anymore...
    resetCommonCaches();
    contextRefresh.end();
   }
  }
 }
2.AnnotationConfigApplicationContext构造器
分析12大步之前先看下this()里边干了啥
public AnnotationConfigApplicationContext(Class<?>... componentClasses) {
  this();
  register(componentClasses);
  refresh(); //容器完整刷新(创建出所有组件,组织好所有功能)
 }
下面是this中的代码,可以看到主要就创建了俩基础组件 AnnotatedBeanDefinitionReader Bean定义的读取器,ClassPathBeanDefinitionScanner bean定义的扫描器,用来扫描指定路径下所有的bean信息
public AnnotationConfigApplicationContext() {
  StartupStep createAnnotatedBeanDefReader = this.getApplicationStartup().start("spring.context.annotated-bean-reader.create");
  this.reader = new AnnotatedBeanDefinitionReader(this);
  createAnnotatedBeanDefReader.end();
  this.scanner = new ClassPathBeanDefinitionScanner(this);
 }
重点看下创建读取器过程,里面调用了registerAnnotationConfigProcessors方法给工厂创建了很多基础组件,各种解析器
 public AnnotatedBeanDefinitionReader(BeanDefinitionRegistry registry, Environment environment) {
  Assert.notNull(registry, "BeanDefinitionRegistry must not be null");
  Assert.notNull(environment, "Environment must not be null");
  this.registry = registry;
  this.conditionEvaluator = new ConditionEvaluator(registry, environment, null);
  AnnotationConfigUtils.registerAnnotationConfigProcessors(this.registry);
 }
可以看到里面注册了ConfigurationClassPostProcessor 配置类的后置处理器,我们加了@Configuration注解的类就是用这个处理器来解析的,还有AutowiredAnnotationBeanPostProcessor自动化装配相关的后置处理器等等
 public static Set<BeanDefinitionHolder> registerAnnotationConfigProcessors(
   BeanDefinitionRegistry registry, @Nullable Object source) {

  DefaultListableBeanFactory beanFactory = unwrapDefaultListableBeanFactory(registry);
  if (beanFactory != null) {
   if (!(beanFactory.getDependencyComparator() instanceof AnnotationAwareOrderComparator)) {
    beanFactory.setDependencyComparator(AnnotationAwareOrderComparator.INSTANCE);
   }
   if (!(beanFactory.getAutowireCandidateResolver() instanceof ContextAnnotationAutowireCandidateResolver)) {
    beanFactory.setAutowireCandidateResolver(new ContextAnnotationAutowireCandidateResolver());
   }
  }

  Set<BeanDefinitionHolder> beanDefs = new LinkedHashSet<>(8);
  //注册底层的  配置文件处理器
  if (!registry.containsBeanDefinition(CONFIGURATION_ANNOTATION_PROCESSOR_BEAN_NAME)) {
   RootBeanDefinition def = new RootBeanDefinition(ConfigurationClassPostProcessor.class);
   def.setSource(source);
   beanDefs.add(registerPostProcessor(registry, def, CONFIGURATION_ANNOTATION_PROCESSOR_BEAN_NAME));
  }
        //注册底层的自动装配处理器
  if (!registry.containsBeanDefinition(AUTOWIRED_ANNOTATION_PROCESSOR_BEAN_NAME)) {
   RootBeanDefinition def = new RootBeanDefinition(AutowiredAnnotationBeanPostProcessor.class);
   def.setSource(source);
   beanDefs.add(registerPostProcessor(registry, def, AUTOWIRED_ANNOTATION_PROCESSOR_BEAN_NAME));
  }
        //注册支持JSR-250的处理
  // Check for JSR-250 support, and if present add the CommonAnnotationBeanPostProcessor.
  if (jsr250Present && !registry.containsBeanDefinition(COMMON_ANNOTATION_PROCESSOR_BEAN_NAME)) {
   RootBeanDefinition def = new RootBeanDefinition(CommonAnnotationBeanPostProcessor.class);
   def.setSource(source);
   beanDefs.add(registerPostProcessor(registry, def, COMMON_ANNOTATION_PROCESSOR_BEAN_NAME));
  }

  // Check for JPA support, and if present add the PersistenceAnnotationBeanPostProcessor.
  if (jpaPresent && !registry.containsBeanDefinition(PERSISTENCE_ANNOTATION_PROCESSOR_BEAN_NAME)) {
   RootBeanDefinition def = new RootBeanDefinition();
   try {
    def.setBeanClass(ClassUtils.forName(PERSISTENCE_ANNOTATION_PROCESSOR_CLASS_NAME,
      AnnotationConfigUtils.class.getClassLoader()));
   }
   catch (ClassNotFoundException ex) {
    throw new IllegalStateException(
      "Cannot load optional framework class: " + PERSISTENCE_ANNOTATION_PROCESSOR_CLASS_NAME, ex);
   }
   def.setSource(source);
   beanDefs.add(registerPostProcessor(registry, def, PERSISTENCE_ANNOTATION_PROCESSOR_BEAN_NAME));
  }

  if (!registry.containsBeanDefinition(EVENT_LISTENER_PROCESSOR_BEAN_NAME)) {
   RootBeanDefinition def = new RootBeanDefinition(EventListenerMethodProcessor.class);
   def.setSource(source);
   beanDefs.add(registerPostProcessor(registry, def, EVENT_LISTENER_PROCESSOR_BEAN_NAME));
  }

  if (!registry.containsBeanDefinition(EVENT_LISTENER_FACTORY_BEAN_NAME)) {
   RootBeanDefinition def = new RootBeanDefinition(DefaultEventListenerFactory.class);
   def.setSource(source);
   beanDefs.add(registerPostProcessor(registry, def, EVENT_LISTENER_FACTORY_BEAN_NAME));
  }

  return beanDefs;
 }
this()里边就是定义一些Spring容器底层用到的一些基础组件。
然后看下一步register(componentClasses);方法,componentClasses是我们的主配置类,是个可变参数我们可以传多个,然后i就全部注册到工厂里存着 也是解析成BeanDefinition存到Map里
 @Override
 public void register(Class<?>... componentClasses) {
  Assert.notEmpty(componentClasses, "At least one component class must be specified");
  StartupStep registerComponentClass = this.getApplicationStartup().start("spring.context.component-classes.register")
    .tag("classes", () -> Arrays.toString(componentClasses));
  this.reader.register(componentClasses);
  registerComponentClass.end();
 }
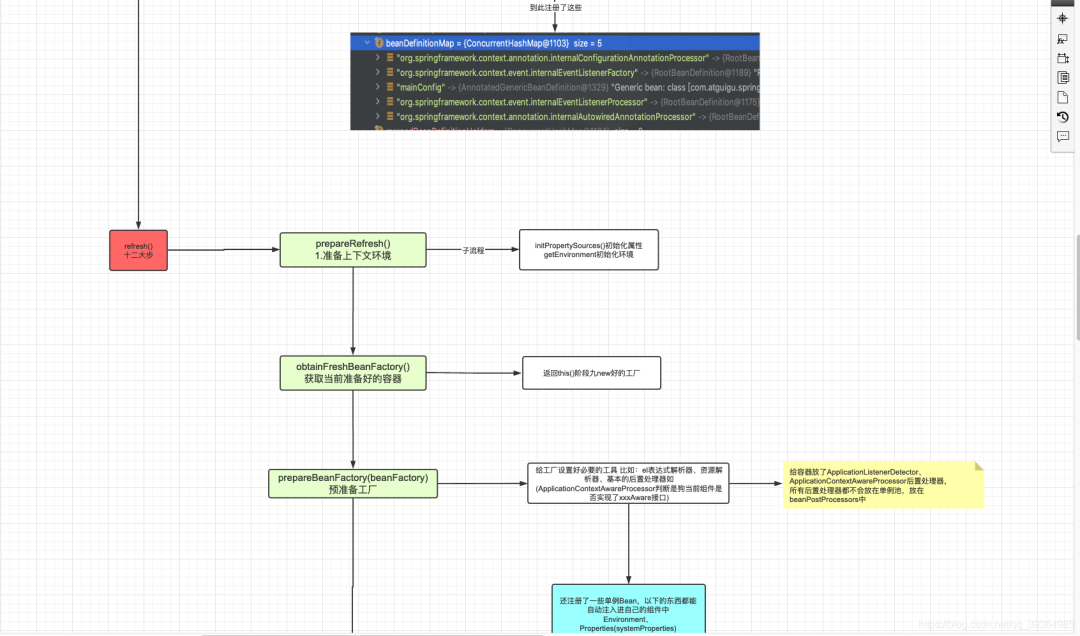
3.第一步--prepareRefresh()准备上下文环境
容器刷新的12大步是在 AbstractApplicationContext 抽象类中进行,说明AbstractApplicationContext是个模板类,定义了容器初始化的基本步骤,不一定每个方法都是他来实现。
 protected void prepareRefresh() {
  // Switch to active.
  this.startupDate = System.currentTimeMillis();
  this.closed.set(false);
  this.active.set(true);

  if (logger.isDebugEnabled()) {
   if (logger.isTraceEnabled()) {
    logger.trace("Refreshing " + this);
   }
   else {
    logger.debug("Refreshing " + getDisplayName());
   }
  }

  //其他子容器自行实现(比如:WebApplicationContext) Initialize any placeholder property sources in the context environment.
  initPropertySources();

  //准备环境变量信息 Validate that all properties marked as required are resolvable:
  // see ConfigurablePropertyResolver#setRequiredProperties
  getEnvironment().validateRequiredProperties();

  // 存储子容器早期运行的一些监听器; Store pre-refresh ApplicationListeners...
  if (this.earlyApplicationListeners == null) {
   this.earlyApplicationListeners = new LinkedHashSet<>(this.applicationListeners);
  }
  else {
   // Reset local application listeners to pre-refresh state.
   this.applicationListeners.clear();
   this.applicationListeners.addAll(this.earlyApplicationListeners);
  }

  //早期的一些时间存储到这里 Allow for the collection of early ApplicationEvents,
  // to be published once the multicaster is available...
  this.earlyApplicationEvents = new LinkedHashSet<>();
 }
1.前边三行代码记录下容器启动时间,关闭状态设置成false,活跃状态设置为true,很好理解。
2.然后 initPropertySources 这个方法在AbstractApplicationContext中就没有实现,而是交给子类实现,这个方法可以定义一些自己的初始化操作。比如Web环境下的IOC容器就在这加载一些应用上下文信息
3.getEnvironment().validateRequiredProperties(); 方法创建了 StandardEnvironment环境对象,debug下可以看到首先拿到了一些我们系统的环境变量,比如JAVA_HOME ,系统时间等等

4.存储一些早期的监听器,如果是单纯的IOC环境,暂时没有任何监听器存在,到此IOC容器刷新第一步准备环境上下文就结束了
4.第二步创建工厂实例
obtainFreshBeanFactory方法返回了在this()阶段就创建好的工厂实例, 说明ApplicationContext其实并没有实现任何的创建bean的功能,而是组合持有了工厂来配合实现整个流程
   // 2.工厂创建:BeanFactory第一次开始创建的时候,有xml解析逻辑。
   ConfigurableListableBeanFactory beanFactory = obtainFreshBeanFactory();
5. 第三步预准备工厂
这个阶段继续创建了一些Spring底层用到的基础组件,例如StandardBeanExpressionResolver EL表达式的解析器 解析 ${}这些玩意的,还有ResourceEditorRegistrar资源解析器,基础的后置处理器ApplicationContextAwareProcessor(判断那些实现Aware接口)等
最后还把一些默认组件放到了单例池子
protected void prepareBeanFactory(ConfigurableListableBeanFactory beanFactory) {
  // Tell the internal bean factory to use the context's class loader etc.
  beanFactory.setBeanClassLoader(getClassLoader());
  if (!shouldIgnoreSpel) { //解释器模式  ${ }
   beanFactory.setBeanExpressionResolver(new StandardBeanExpressionResolver(beanFactory.getBeanClassLoader()));
  }
  beanFactory.addPropertyEditorRegistrar(new ResourceEditorRegistrar(this, getEnvironment()));

  // Configure the bean factory with context callbacks.
  beanFactory.addBeanPostProcessor(new ApplicationContextAwareProcessor(this)); //准备一个处理Aware接口功能的后置处理器
  beanFactory.ignoreDependencyInterface(EnvironmentAware.class); //告诉Spring先别管这些接口
  beanFactory.ignoreDependencyInterface(EmbeddedValueResolverAware.class);
  beanFactory.ignoreDependencyInterface(ResourceLoaderAware.class);
  beanFactory.ignoreDependencyInterface(ApplicationEventPublisherAware.class);
  beanFactory.ignoreDependencyInterface(MessageSourceAware.class);
  beanFactory.ignoreDependencyInterface(ApplicationContextAware.class);
  beanFactory.ignoreDependencyInterface(ApplicationStartupAware.class);

  //注册可以解析到的依赖 BeanFactory interface not registered as resolvable type in a plain factory.
  // MessageSource registered (and found for autowiring) as a bean.
  beanFactory.registerResolvableDependency(BeanFactory.class, beanFactory);
  beanFactory.registerResolvableDependency(ResourceLoader.class, this);
  beanFactory.registerResolvableDependency(ApplicationEventPublisher.class, this);
  beanFactory.registerResolvableDependency(ApplicationContext.class, this);

  // Register early post-processor for detecting inner beans as ApplicationListeners.
  beanFactory.addBeanPostProcessor(new ApplicationListenerDetector(this));

  // Detect a LoadTimeWeaver and prepare for weaving, if found.
  if (!NativeDetector.inNativeImage() && beanFactory.containsBean(LOAD_TIME_WEAVER_BEAN_NAME)) {
   beanFactory.addBeanPostProcessor(new LoadTimeWeaverAwareProcessor(beanFactory));
   // Set a temporary ClassLoader for type matching.
   beanFactory.setTempClassLoader(new ContextTypeMatchClassLoader(beanFactory.getBeanClassLoader()));
  }

  //注册默认组件: Register default environment beans.
  if (!beanFactory.containsLocalBean(ENVIRONMENT_BEAN_NAME)) {
   beanFactory.registerSingleton(ENVIRONMENT_BEAN_NAME, getEnvironment());
  }
  if (!beanFactory.containsLocalBean(SYSTEM_PROPERTIES_BEAN_NAME)) {
   beanFactory.registerSingleton(SYSTEM_PROPERTIES_BEAN_NAME, getEnvironment().getSystemProperties());
  }
  if (!beanFactory.containsLocalBean(SYSTEM_ENVIRONMENT_BEAN_NAME)) {
   beanFactory.registerSingleton(SYSTEM_ENVIRONMENT_BEAN_NAME, getEnvironment().getSystemEnvironment());
  }
  if (!beanFactory.containsLocalBean(APPLICATION_STARTUP_BEAN_NAME)) {
   beanFactory.registerSingleton(APPLICATION_STARTUP_BEAN_NAME, getApplicationStartup());
  }
 }
6.第四步postProcessBeanFactory
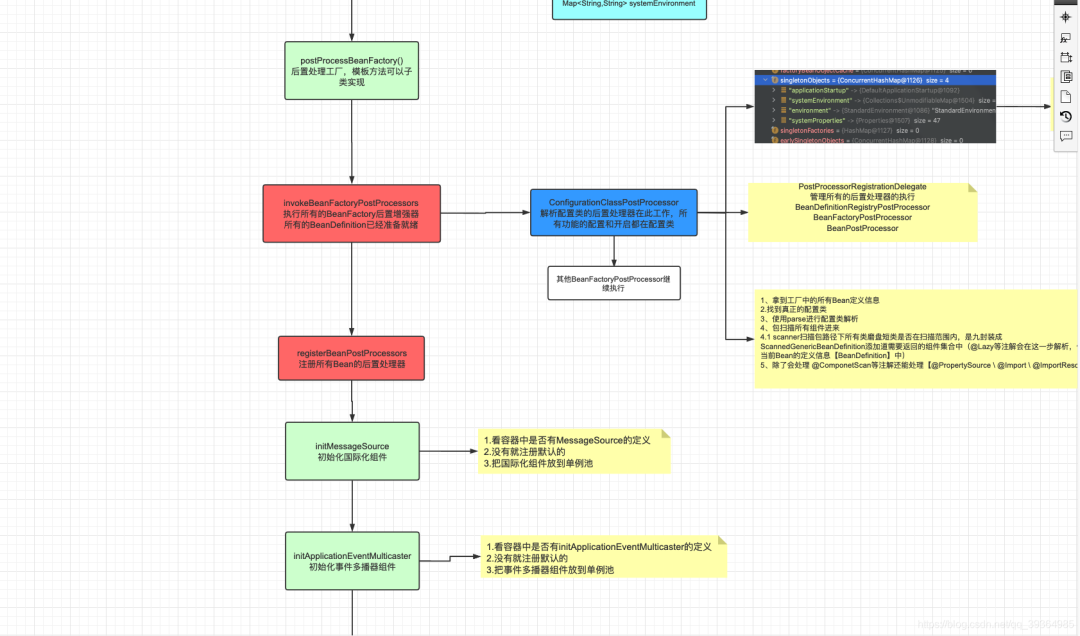
postProcessBeanFactory这个方法工厂没有实现 是留给子类的模板方法,允许子类继承对工厂执行一些处理
7. 第五步执行所有的BeanFactory后置增强器
这里边调用了
PostProcessorRegistrationDelegate.invokeBeanFactoryPostProcessors(beanFactory, getBeanFactoryPostProcessors());来执行所有的工厂增强器
PostProcessorRegistrationDelegate类可以说是一个门面模式或者一个装饰者,他用来处理Spring的所有后置处理器
 protected void invokeBeanFactoryPostProcessors(ConfigurableListableBeanFactory beanFactory) {
  PostProcessorRegistrationDelegate.invokeBeanFactoryPostProcessors(beanFactory, getBeanFactoryPostProcessors()); //执行所有的工厂增强器
  //上面的类叫:后置处理器的注册代理(门面模式-装饰模式)
  // Detect a LoadTimeWeaver and prepare for weaving, if found in the meantime
  // (e.g. through an @Bean method registered by ConfigurationClassPostProcessor)
  if (!NativeDetector.inNativeImage() && beanFactory.getTempClassLoader() == null && beanFactory.containsBean(LOAD_TIME_WEAVER_BEAN_NAME)) {
   beanFactory.addBeanPostProcessor(new LoadTimeWeaverAwareProcessor(beanFactory));
   beanFactory.setTempClassLoader(new ContextTypeMatchClassLoader(beanFactory.getBeanClassLoader()));
  }
 }
此方法执行了所有的BeanFactory的后置处理器,BeanFactory的后置处理器一共两种 BeanDefinitionRegistryPostProcessor 和 BeanFactoryPostProcessor。
先执行默认的处理器,-> 然后再取出实现了PriorityOrdered排序接口的处理器进行排序,执行处理器 ->接下来取出实现了Ordered排序接口的的处理器,排序然后执行。 两类处理器都是这个执行流程
 //执行工厂的后置处理器
 public static void invokeBeanFactoryPostProcessors(
   ConfigurableListableBeanFactory beanFactory, List<BeanFactoryPostProcessor> beanFactoryPostProcessors) {

  // WARNING: Although it may appear that the body of this method can be easily
  // refactored to avoid the use of multiple loops and multiple lists, the use
  // of multiple lists and multiple passes over the names of processors is
  // intentional. We must ensure that we honor the contracts for PriorityOrdered
  // and Ordered processors. Specifically, we must NOT cause processors to be
  // instantiated (via getBean() invocations) or registered in the ApplicationContext
  // in the wrong order.
  //
  // Before submitting a pull request (PR) to change this method, please review the
  // list of all declined PRs involving changes to PostProcessorRegistrationDelegate
  // to ensure that your proposal does not result in a breaking change:
  // https://github.com/spring-projects/spring-framework/issues?q=PostProcessorRegistrationDelegate+is%3Aclosed+label%3A%22status%3A+declined%22

  // Invoke BeanDefinitionRegistryPostProcessors first, if any.
  Set<String> processedBeans = new HashSet<>();

  if (beanFactory instanceof BeanDefinitionRegistry) {
   BeanDefinitionRegistry registry = (BeanDefinitionRegistry) beanFactory;
   List<BeanFactoryPostProcessor> regularPostProcessors = new ArrayList<>();
   List<BeanDefinitionRegistryPostProcessor> registryProcessors = new ArrayList<>();
   //先拿到底层默认有的BeanFactoryPostProcessor
   for (BeanFactoryPostProcessor postProcessor : beanFactoryPostProcessors) {
    if (postProcessor instanceof BeanDefinitionRegistryPostProcessor) {
     BeanDefinitionRegistryPostProcessor registryProcessor =
       (BeanDefinitionRegistryPostProcessor) postProcessor;
     registryProcessor.postProcessBeanDefinitionRegistry(registry);
     registryProcessors.add(registryProcessor);
    }
    else {
     regularPostProcessors.add(postProcessor);
    }
   }

   // Do not initialize FactoryBeans here: We need to leave all regular beans
   // uninitialized to let the bean factory post-processors apply to them!
   // Separate between BeanDefinitionRegistryPostProcessors that implement
   // PriorityOrdered, Ordered, and the rest.
   List<BeanDefinitionRegistryPostProcessor> currentRegistryProcessors = new ArrayList<>();

   // 首先:从工厂中获取所有的实现了 PriorityOrdered 接口的 BeanDefinitionRegistryPostProcessor; First, invoke the BeanDefinitionRegistryPostProcessors that implement PriorityOrdered.
   String[] postProcessorNames =
     beanFactory.getBeanNamesForType(BeanDefinitionRegistryPostProcessor.class, true, false); //拿到系统中每一个组件的BD信息,进行类型对比,是否匹配指定的类型
   for (String ppName : postProcessorNames) {
    if (beanFactory.isTypeMatch(ppName, PriorityOrdered.class)) {
     currentRegistryProcessors.add(beanFactory.getBean(ppName, BeanDefinitionRegistryPostProcessor.class));//从工厂中获取这个组件【getBean整个组件创建的流程】并放到这个集合
     processedBeans.add(ppName);
    }
   } //下面利用优先级排序
   sortPostProcessors(currentRegistryProcessors, beanFactory);
   registryProcessors.addAll(currentRegistryProcessors);
   invokeBeanDefinitionRegistryPostProcessors(currentRegistryProcessors, registry, beanFactory.getApplicationStartup()); //执行这些BeanDefinitionRegistryPostProcessor的
   currentRegistryProcessors.clear();

   // 接下来,获取所有实现了Ordered接口的 BeanDefinitionRegistryPostProcessor Next, invoke the BeanDefinitionRegistryPostProcessors that implement Ordered.
   postProcessorNames = beanFactory.getBeanNamesForType(BeanDefinitionRegistryPostProcessor.class, true, false);
   for (String ppName : postProcessorNames) {
    if (!processedBeans.contains(ppName) && beanFactory.isTypeMatch(ppName, Ordered.class)) {
     currentRegistryProcessors.add(beanFactory.getBean(ppName, BeanDefinitionRegistryPostProcessor.class));
     processedBeans.add(ppName); //即使实现了 PriorityOrdered 和Ordered,也是以 PriorityOrdered
    }
   }//排序
   sortPostProcessors(currentRegistryProcessors, beanFactory);
   registryProcessors.addAll(currentRegistryProcessors);
   invokeBeanDefinitionRegistryPostProcessors(currentRegistryProcessors, registry, beanFactory.getApplicationStartup()); //执行
   currentRegistryProcessors.clear();

   // 最后,我们自定义的一般没有任何优先级和排序接口   Finally, invoke all other BeanDefinitionRegistryPostProcessors until no further ones appear.
   boolean reiterate = true;
   while (reiterate) {
    reiterate = false;
    postProcessorNames = beanFactory.getBeanNamesForType(BeanDefinitionRegistryPostProcessor.class, true, false);//拿到所有的BeanDefinitionRegistryPostProcessor
    for (String ppName : postProcessorNames) {
     if (!processedBeans.contains(ppName)) {
      currentRegistryProcessors.add(beanFactory.getBean(ppName, BeanDefinitionRegistryPostProcessor.class));
      processedBeans.add(ppName);
      reiterate = true;
     }
    }//排序,根据类名大小写进行排序
    sortPostProcessors(currentRegistryProcessors, beanFactory);
    registryProcessors.addAll(currentRegistryProcessors);
    invokeBeanDefinitionRegistryPostProcessors(currentRegistryProcessors, registry, beanFactory.getApplicationStartup());
    currentRegistryProcessors.clear(); //防止重复执行
   }

   // 接下来,再来执行postProcessBeanFactory的回调, Now, invoke the postProcessBeanFactory callback of all processors handled so far.
   invokeBeanFactoryPostProcessors(registryProcessors, beanFactory);
   invokeBeanFactoryPostProcessors(regularPostProcessors, beanFactory);
  }

  else {
   // Invoke factory processors registered with the context instance.
   invokeBeanFactoryPostProcessors(beanFactoryPostProcessors, beanFactory);
  }
  //以前在执行 BeanDefinitionRegistryPostProcessor ,以后来执行 BeanFactoryPostProcessor
  // Do not initialize FactoryBeans here: We need to leave all regular beans
  // uninitialized to let the bean factory post-processors apply to them!
  String[] postProcessorNames =
    beanFactory.getBeanNamesForType(BeanFactoryPostProcessor.class, true, false);

  // Separate between BeanFactoryPostProcessors that implement PriorityOrdered,
  // Ordered, and the rest.
  List<BeanFactoryPostProcessor> priorityOrderedPostProcessors = new ArrayList<>();
  List<String> orderedPostProcessorNames = new ArrayList<>();
  List<String> nonOrderedPostProcessorNames = new ArrayList<>();
  for (String ppName : postProcessorNames) {
   if (processedBeans.contains(ppName)) {
    // skip - already processed in first phase above
   }
   else if (beanFactory.isTypeMatch(ppName, PriorityOrdered.class)) {
    priorityOrderedPostProcessors.add(beanFactory.getBean(ppName, BeanFactoryPostProcessor.class));
   }
   else if (beanFactory.isTypeMatch(ppName, Ordered.class)) {
    orderedPostProcessorNames.add(ppName);
   }
   else {
    nonOrderedPostProcessorNames.add(ppName);
   }
  }

  // 首先执行所有实现了 PriorityOrdered 的 BeanFactoryPostProcessor;First, invoke the BeanFactoryPostProcessors that implement PriorityOrdered.
  sortPostProcessors(priorityOrderedPostProcessors, beanFactory);
  invokeBeanFactoryPostProcessors(priorityOrderedPostProcessors, beanFactory);

  // 接下来执行,实现了 Ordered 接口的 BeanFactoryPostProcessor  Next, invoke the BeanFactoryPostProcessors that implement Ordered.
  List<BeanFactoryPostProcessor> orderedPostProcessors = new ArrayList<>(orderedPostProcessorNames.size());
  for (String postProcessorName : orderedPostProcessorNames) {
   orderedPostProcessors.add(beanFactory.getBean(postProcessorName, BeanFactoryPostProcessor.class));
  }
  sortPostProcessors(orderedPostProcessors, beanFactory);
  invokeBeanFactoryPostProcessors(orderedPostProcessors, beanFactory);

  // 最后执行没有任何优先级和排序接口的 BeanFactoryPostProcessor Finally, invoke all other BeanFactoryPostProcessors.
  List<BeanFactoryPostProcessor> nonOrderedPostProcessors = new ArrayList<>(nonOrderedPostProcessorNames.size());
  for (String postProcessorName : nonOrderedPostProcessorNames) {
   nonOrderedPostProcessors.add(beanFactory.getBean(postProcessorName, BeanFactoryPostProcessor.class));
  }
  invokeBeanFactoryPostProcessors(nonOrderedPostProcessors, beanFactory); //执行所有的 BeanFactoryPostProcessor

  // Clear cached merged bean definitions since the post-processors might have
  // modified the original metadata, e.g. replacing placeholders in values...
  beanFactory.clearMetadataCache();
 }
8. 第六步注册所有的bean的后置处理器 BeanPostProcessors
取出所有的BeanPostProcessor后置处理器,该排序的排序,然后全都放到容器的集合中
容器有一个集合属性来保存所有的BeanPostProcessor
/** BeanPostProcessors to apply. 保存了所有的Bean后置增强器 */
private final List<BeanPostProcessor> beanPostProcessors = new BeanPostProcessorCacheAwareList();
 public static void registerBeanPostProcessors(
   ConfigurableListableBeanFactory beanFactory, AbstractApplicationContext applicationContext) {

  // WARNING: Although it may appear that the body of this method can be easily
  // refactored to avoid the use of multiple loops and multiple lists, the use
  // of multiple lists and multiple passes over the names of processors is
  // intentional. We must ensure that we honor the contracts for PriorityOrdered
  // and Ordered processors. Specifically, we must NOT cause processors to be
  // instantiated (via getBean() invocations) or registered in the ApplicationContext
  // in the wrong order.
  //
  // Before submitting a pull request (PR) to change this method, please review the
  // list of all declined PRs involving changes to PostProcessorRegistrationDelegate
  // to ensure that your proposal does not result in a breaking change:
  // https://github.com/spring-projects/spring-framework/issues?q=PostProcessorRegistrationDelegate+is%3Aclosed+label%3A%22status%3A+declined%22
  //获取到容器中所有的 BeanPostProcessor; Bean的后置处理器
  String[] postProcessorNames = beanFactory.getBeanNamesForType(BeanPostProcessor.class, true, false);

  // Register BeanPostProcessorChecker that logs an info message when
  // a bean is created during BeanPostProcessor instantiation, i.e. when
  // a bean is not eligible for getting processed by all BeanPostProcessors.
  int beanProcessorTargetCount = beanFactory.getBeanPostProcessorCount() + 1 + postProcessorNames.length;
  beanFactory.addBeanPostProcessor(new BeanPostProcessorChecker(beanFactory, beanProcessorTargetCount));

  // Separate between BeanPostProcessors that implement PriorityOrdered,
  // Ordered, and the rest.
  List<BeanPostProcessor> priorityOrderedPostProcessors = new ArrayList<>();
  List<BeanPostProcessor> internalPostProcessors = new ArrayList<>();
  List<String> orderedPostProcessorNames = new ArrayList<>();
  List<String> nonOrderedPostProcessorNames = new ArrayList<>();
  for (String ppName : postProcessorNames) {
   if (beanFactory.isTypeMatch(ppName, PriorityOrdered.class)) {  //获取所有实现了 PriorityOrdered 的 BeanPostProcessor
    BeanPostProcessor pp = beanFactory.getBean(ppName, BeanPostProcessor.class);
    priorityOrderedPostProcessors.add(pp);
    if (pp instanceof MergedBeanDefinitionPostProcessor) {
     internalPostProcessors.add(pp);
    }
   }
   else if (beanFactory.isTypeMatch(ppName, Ordered.class)) {
    orderedPostProcessorNames.add(ppName);
   }
   else {
    nonOrderedPostProcessorNames.add(ppName);
   }
  }

  //首先,注册所有的实现了 PriorityOrdered 的 BeanPostProcessor ;  First, register the BeanPostProcessors that implement PriorityOrdered.
  sortPostProcessors(priorityOrderedPostProcessors, beanFactory);
  registerBeanPostProcessors(beanFactory, priorityOrderedPostProcessors);

  //接下来,注册所有的实现了 Ordered 的 BeanPostProcessor  Next, register the BeanPostProcessors that implement Ordered.
  List<BeanPostProcessor> orderedPostProcessors = new ArrayList<>(orderedPostProcessorNames.size());
  for (String ppName : orderedPostProcessorNames) {
   BeanPostProcessor pp = beanFactory.getBean(ppName, BeanPostProcessor.class); //获取后置处理器对象
   orderedPostProcessors.add(pp);
   if (pp instanceof MergedBeanDefinitionPostProcessor) {
    internalPostProcessors.add(pp);
   }
  }
  sortPostProcessors(orderedPostProcessors, beanFactory);
  registerBeanPostProcessors(beanFactory, orderedPostProcessors);

  // 最后,注册所有普通的 BeanPostProcessor ;Now, register all regular BeanPostProcessors.
  List<BeanPostProcessor> nonOrderedPostProcessors = new ArrayList<>(nonOrderedPostProcessorNames.size());
  for (String ppName : nonOrderedPostProcessorNames) {
   BeanPostProcessor pp = beanFactory.getBean(ppName, BeanPostProcessor.class); //从容器中获取这个组件
   nonOrderedPostProcessors.add(pp);
   if (pp instanceof MergedBeanDefinitionPostProcessor) {
    internalPostProcessors.add(pp);
   }
  }
  registerBeanPostProcessors(beanFactory, nonOrderedPostProcessors);

  //最后,重新注册所有internal的BeanPostProcessors  Finally, re-register all internal BeanPostProcessors.
  sortPostProcessors(internalPostProcessors, beanFactory);
  registerBeanPostProcessors(beanFactory, internalPostProcessors);

  // 重新注册一下这个后置处理器 Re-register post-processor for detecting inner beans as ApplicationListeners,
  // 把他放到后置处理器的最后一位; moving it to the end of the processor chain (for picking up proxies etc).
  beanFactory.addBeanPostProcessor(new ApplicationListenerDetector(applicationContext));
 }
9. 第七步初始化国际化组件
MESSAGE_SOURCE_BEAN_NAME 对应的值是 "messageSource", 先从容器中拿一个名为 “messageSource” 类型为MessageSource的组件,拿到就赋值给工厂,拿不到就创建个DelegatingMessageSource类型的组件
 protected void initMessageSource() {
  ConfigurableListableBeanFactory beanFactory = getBeanFactory();
  if (beanFactory.containsLocalBean(MESSAGE_SOURCE_BEAN_NAME)) {
   this.messageSource = beanFactory.getBean(MESSAGE_SOURCE_BEAN_NAME, MessageSource.class);
   // Make MessageSource aware of parent MessageSource.
   if (this.parent != null && this.messageSource instanceof HierarchicalMessageSource) {
    HierarchicalMessageSource hms = (HierarchicalMessageSource) this.messageSource;
    if (hms.getParentMessageSource() == null) {
     // Only set parent context as parent MessageSource if no parent MessageSource
     // registered already.
     hms.setParentMessageSource(getInternalParentMessageSource());
    }
   }
   if (logger.isTraceEnabled()) {
    logger.trace("Using MessageSource [" + this.messageSource + "]");
   }
  }
  else {
   // Use empty MessageSource to be able to accept getMessage calls.
   DelegatingMessageSource dms = new DelegatingMessageSource();
   dms.setParentMessageSource(getInternalParentMessageSource());
   this.messageSource = dms;
   beanFactory.registerSingleton(MESSAGE_SOURCE_BEAN_NAME, this.messageSource);
   if (logger.isTraceEnabled()) {
    logger.trace("No '" + MESSAGE_SOURCE_BEAN_NAME + "' bean, using [" + this.messageSource + "]");
   }
  }
 }
10. 第八步初始化事件多播器组件
先从容器中拿一个名为applicationEventMulticaster的组件,拿到设置给容器。拿不到就创建一个简单的事件多播器
Spring监听器是观察者模式的应用。
 protected void initApplicationEventMulticaster() {
  ConfigurableListableBeanFactory beanFactory = getBeanFactory();
  if (beanFactory.containsLocalBean(APPLICATION_EVENT_MULTICASTER_BEAN_NAME)) {
   this.applicationEventMulticaster =
     beanFactory.getBean(APPLICATION_EVENT_MULTICASTER_BEAN_NAME, ApplicationEventMulticaster.class);
   if (logger.isTraceEnabled()) {
    logger.trace("Using ApplicationEventMulticaster [" + this.applicationEventMulticaster + "]");
   }
  }
  else {
   this.applicationEventMulticaster = new SimpleApplicationEventMulticaster(beanFactory);
   beanFactory.registerSingleton(APPLICATION_EVENT_MULTICASTER_BEAN_NAME, this.applicationEventMulticaster); //注册一个事件派发器
   if (logger.isTraceEnabled()) {
    logger.trace("No '" + APPLICATION_EVENT_MULTICASTER_BEAN_NAME + "' bean, using " +
      "[" + this.applicationEventMulticaster.getClass().getSimpleName() + "]");
   }
  }
 }
11. 第九步onRefresh
这一步啥也没实现,也是留给子类实现的
12. 第十步注册早期的监听器
 /** 多播器和监听器是观察者模式(里面包含了所有的监听器)
  * Add beans that implement ApplicationListener as listeners.
  * Doesn't affect other listeners, which can be added without being beans.
  */
 protected void registerListeners() {
  //把所有监听器保存到多播器的集合中 Register statically specified listeners first.
  for (ApplicationListener<?> listener : getApplicationListeners()) {
   getApplicationEventMulticaster().addApplicationListener(listener);
  }

  // Do not initialize FactoryBeans here: We need to leave all regular beans
  // uninitialized to let post-processors apply to them! 获取ApplicationListener在ioc容器中注册的bean的名字
  String[] listenerBeanNames = getBeanNamesForType(ApplicationListener.class, true, false);
  for (String listenerBeanName : listenerBeanNames) {
   getApplicationEventMulticaster().addApplicationListenerBean(listenerBeanName); //获取所有的容器中的监听器,并保存他们的名字
  }

  //派发之前攒的一些早期事件 Publish early application events now that we finally have a multicaster...
  Set<ApplicationEvent> earlyEventsToProcess = this.earlyApplicationEvents;
  this.earlyApplicationEvents = null;
  if (!CollectionUtils.isEmpty(earlyEventsToProcess)) {
   for (ApplicationEvent earlyEvent : earlyEventsToProcess) {
    getApplicationEventMulticaster().multicastEvent(earlyEvent);
   }
  }
 }
13. 第十一步大大核心 完成BeanFactory初始化, 创建所有组件
这个方法最重要一步是preInstantiateSingletons()方法,这里面初始化所有非懒加载的单例bean
 protected void finishBeanFactoryInitialization(ConfigurableListableBeanFactory beanFactory) {
  // 给工厂设置好 ConversionService【负责类型转换的组件服务】, Initialize conversion service for this context.
  if (beanFactory.containsBean(CONVERSION_SERVICE_BEAN_NAME) &&
    beanFactory.isTypeMatch(CONVERSION_SERVICE_BEAN_NAME, ConversionService.class)) {
   beanFactory.setConversionService(
     beanFactory.getBean(CONVERSION_SERVICE_BEAN_NAME, ConversionService.class));
  }

  // 注册一个默认的值解析器("${}")  ;Register a default embedded value resolver if no BeanFactoryPostProcessor
  // (such as a PropertySourcesPlaceholderConfigurer bean) registered any before:
  // at this point, primarily for resolution in annotation attribute values.
  if (!beanFactory.hasEmbeddedValueResolver()) {
   beanFactory.addEmbeddedValueResolver(strVal -> getEnvironment().resolvePlaceholders(strVal));
  }

  // LoadTimeWeaverAware;aspectj:加载时织入功能【aop】。 Initialize LoadTimeWeaverAware beans early to allow for registering their transformers early.
  String[] weaverAwareNames = beanFactory.getBeanNamesForType(LoadTimeWeaverAware.class, false, false);
  for (String weaverAwareName : weaverAwareNames) {
   getBean(weaverAwareName); //从容器中获取组件,有则直接获取,没则进行创建
  }

  // Stop using the temporary ClassLoader for type matching.
  beanFactory.setTempClassLoader(null);

  // Allow for caching all bean definition metadata, not expecting further changes.
  beanFactory.freezeConfiguration();

  // Instantiate all remaining (non-lazy-init) singletons.
  //初始化所有的非懒加载的单实例Bean
  beanFactory.preInstantiateSingletons();
 }
这个方法维护了Bean的整个生命周期, 其中包含 实例化Bean ->属性注入 -> 到初始化Bean,以及在实例化前后,属性注入的自动装配,初始化前后执行了所有的BeanPostProcessor后置处理器,例如AOP,事务等就是利用后置处理器在Bean的生命周期的某个时期进行干预的。
里面代码量很大不在此文中详细展开讲了。大致逻辑就是 遍历所有BeanName 然后通过BeanName获取Bean的定义BeanDefinition,接着一些华丽唿哨判断,例如是否单例,是否抽象,是否是FactoryBean类型的,不是的话走普通创建逻辑, 还有处理循环依赖等等很多很多
Spring中所有组件都是通过getBean方法获取的,getBean里边逻辑就是先从单例池获取,获取不到再创建。
Spring容器刷新最重要的部分就在这了
 @Override
 public void preInstantiateSingletons() throws BeansException {
  if (logger.isTraceEnabled()) {
   logger.trace("Pre-instantiating singletons in " + this);
  }

  // Iterate over a copy to allow for init methods which in turn register new bean definitions.
  // While this may not be part of the regular factory bootstrap, it does otherwise work fine.
  List<String> beanNames = new ArrayList<>(this.beanDefinitionNames);

  // 创建出所有的单实例Bean;Trigger initialization of all non-lazy singleton beans...
  for (String beanName : beanNames) {
   RootBeanDefinition bd = getMergedLocalBeanDefinition(beanName); //开始解析文件的时候每一个bean标签被解析封装成一个BeanDefinition
   if (!bd.isAbstract() && bd.isSingleton() && !bd.isLazyInit()) {
    if (isFactoryBean(beanName)) { //如果是FactoryBean则执行下面逻辑
     Object bean = getBean(FACTORY_BEAN_PREFIX + beanName); //得到HelloFactory
     if (bean instanceof FactoryBean) {
      FactoryBean<?> factory = (FactoryBean<?>) bean;
      boolean isEagerInit;
      if (System.getSecurityManager() != null && factory instanceof SmartFactoryBean) {
       isEagerInit = AccessController.doPrivileged(
         (PrivilegedAction<Boolean>) ((SmartFactoryBean<?>) factory)::isEagerInit,
         getAccessControlContext());
      }
      else {
       isEagerInit = (factory instanceof SmartFactoryBean &&
         ((SmartFactoryBean<?>) factory).isEagerInit());
      }
      if (isEagerInit) {
       getBean(beanName);
      }
     }
    }
    else { //不是FactoryBean则执行这个,普通的单实例非懒加载bean的创建
     getBean(beanName); //
    }
   }
  }

  // 触发 post-initialization 逻辑;  Trigger post-initialization callback for all applicable beans...
  for (String beanName : beanNames) {
   Object singletonInstance = getSingleton(beanName);
   if (singletonInstance instanceof SmartInitializingSingleton) {
    StartupStep smartInitialize = this.getApplicationStartup().start("spring.beans.smart-initialize")
      .tag("beanName", beanName);
    SmartInitializingSingleton smartSingleton = (SmartInitializingSingleton) singletonInstance;
    if (System.getSecurityManager() != null) {
     AccessController.doPrivileged((PrivilegedAction<Object>) () -> {
      smartSingleton.afterSingletonsInstantiated();
      return null;
     }, getAccessControlContext());
    }
    else {
     smartSingleton.afterSingletonsInstantiated();
    }
    smartInitialize.end();
   }
  }
 }
14. 第十二步 收尾工作finishRefresh
最后收尾工作很简单了 清理下不用的缓存 ,初始化个LifecycleProcessor类型处理器,干嘛用的我也不知道,发布下容器刷新完成的事件。完事 至此SpringIOC容器的创建过程就完全结束了。
 protected void finishRefresh() {
  // Clear context-level resource caches (such as ASM metadata from scanning).
  clearResourceCaches();

  // Initialize lifecycle processor for this context.
  initLifecycleProcessor();

  //告诉LifecycleProcessor容器onRefresh Propagate refresh to lifecycle processor first.
  getLifecycleProcessor().onRefresh();

  //发布事件 Publish the final event.
  publishEvent(new ContextRefreshedEvent(this));

  //jconsole(暴露MBean端点信息) Participate in LiveBeansView MBean, if active.
  if (!NativeDetector.inNativeImage()) {
   LiveBeansView.registerApplicationContext(this);
  }
 }
————————————————
版权声明:本文为CSDN博主「飞翔的小羊」的原创文章,遵循CC 4.0 BY-SA版权协议,转载请附上原文出处链接及本声明。
原文链接:
https://blog.csdn.net/qq_39364985/article/details/115308960
锋哥最新SpringCloud分布式电商秒杀课程发布
👇👇👇
👆长按上方微信二维码 2 秒
感谢点赞支持下哈 
