
Linux 或 Windows 上实现端口映射
点击上方“开源Linux”,选择“设为星标”
回复“学习”获取独家整理的学习资料!
通常服务器会有许多块网卡,因此也可能会连接到不同的网络,在隔离的网络中,某些服务可能会需要进行通信,此时服务器经过配置就可以承担起了转发数据包的功能。
一、Windows下实现端口映射
1. 查询端口映射情况
netsh interface portproxy show v4tov42. 查询某一个IP的所有端口映射情况
netsh interface portproxy show v4tov4 | find "[IP]"例:netsh interface portproxy show v4tov4 | find "192.168.1.1"
3. 增加一个端口映射
netsh interface portproxy add v4tov4 listenaddress=[外网IP] listenport=[外网端口] connectaddress=[内网IP] connectport=[内网端口]例:netsh interface portproxy add v4tov4 listenaddress=2.2.2.2 listenport=8080 connectaddress=192.168.1.50 connectport=80
4. 删除一个端口映射
netsh interface portproxy delete v4tov4 listenaddress=[外网IP] listenport=[外网端口]例:netsh interface portproxy delete v4tov4 listenaddress=2.2.2.2 listenport=8080
二、Linux下端口映射
1. 允许数据包转发
echo 1 >/proc/sys/net/ipv4/ip_forwardiptables -t nat -A POSTROUTING -j MASQUERADEiptables -A FORWARD -i [内网网卡名称] -j ACCEPTiptables -t nat -A POSTROUTING -s [内网网段] -o [外网网卡名称] -j MASQUERADE例:echo 1 >/proc/sys/net/ipv4/ip_forwardiptables -t nat -A POSTROUTING -j MASQUERADEiptables -A FORWARD -i ens33 -j ACCEPTiptables -t nat -A POSTROUTING -s 192.168.50.0/24 -o ens37 -j MASQUERADE
2. 设置端口映射
iptables -t nat -A PREROUTING -p tcp -m tcp --dport [外网端口] -j DNAT --to-destination [内网地址]:[内网端口]例:iptables -t nat -A PREROUTING -p tcp -m tcp --dport 6080 -j DNAT --to-destination 10.0.0.100:6090
实验:将部署在内网的服务映射到外网
实验环境
VMWare Workstation Pro
5台最小化安装的centos 7虚拟机
实验拓扑
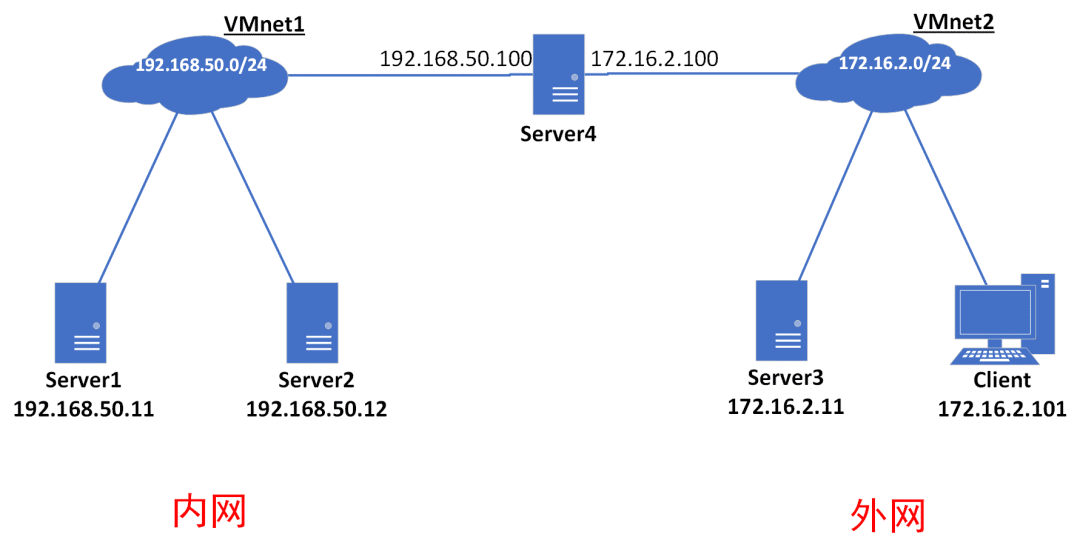
内网和外网是相对Server4来说的。Server1和Server2为内网环境的两台服务器;Server3为外网环境下的一台服务器;Server4为一台双网卡主机,分别连接192.168.50.0/24和172.16.2.0/24两个网络。
配置实验环境
1. Server1,2,3上搭建HTTP服务
用Python在Server1上搭建一个简单的HTTP服务
cd ~echo "server1" > index.htmlpython -m SimpleHTTPServer 8080
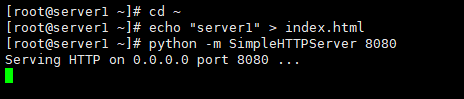
Server2、Server3同理
对照实验
在client上访问Server1的资源
curl http://192.168.50.11:8080/index.html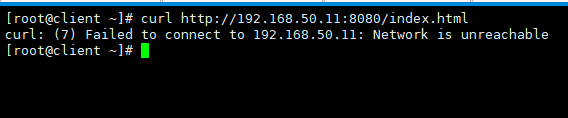
在client上访问Server2的资源
curl http://192.168.50.12:8080/index.htm
在client上访问Server3的资源
curl http://172.16.2.11:8080/index.html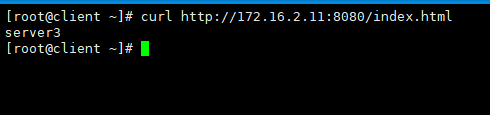
可以看到,外网的client是无法访问内网Server1,Server2的资源的。
在Server4上配置端口映射
临时配置
#允许数据包转发echo 1 >/proc/sys/net/ipv4/ip_forwardiptables -t nat -A POSTROUTING -j MASQUERADEiptables -A FORWARD -i ens33 -j ACCEPTiptables -t nat -A POSTROUTING -s 192.168.50.0/24 -o ens37 -j MASQUERADE#设置端口映射iptables -t nat -A PREROUTING -p tcp -m tcp --dport 8081 -j DNAT --to-destination 192.168.50.11:8080iptables -t nat -A PREROUTING -p tcp -m tcp --dport 8082 -j DNAT --to-destination 192.168.50.12:8080
永久配置
如果需要永久配置,则将以上命令追加到/etc/rc.local文件。
检查效果
在client上访问Server1的资源
curl http://172.16.2.100:8081/index.html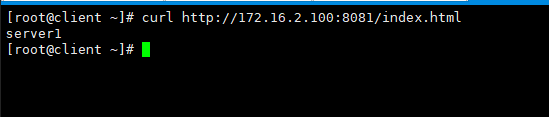
在client上访问Server2的资源
curl http://172.16.2.100:8082/index.html
在client上访问Server3的资源
curl http://172.16.2.11:8080/index.html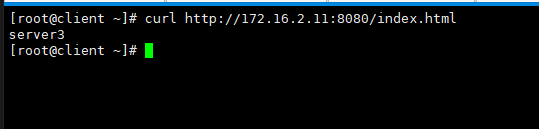
如果Server4为Windows,替换一下相应的命令即可
Windows的IP信息如下
| 网卡 | IP地址 | 子网掩码 | 默认网关 | 备注 |
|---|---|---|---|---|
| Ethernet0 | 192.168.50.105 | 255.255.255.0 | - | 内网网卡 |
| Ethernet1 | 172.16.2.105 | 255.255.255.0 | - | 外网网卡 |

配置并查看端口映射情况
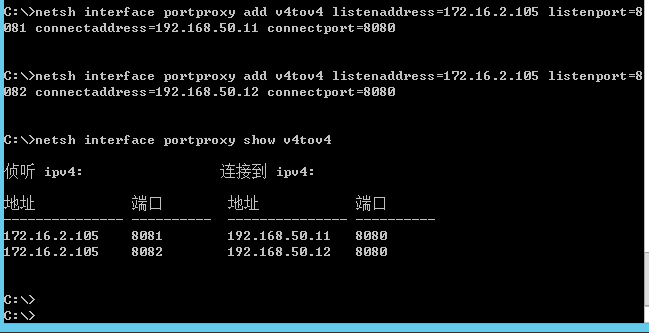
netsh interface portproxy add v4tov4 listenaddress=172.16.2.105 listenport=8081 connectaddress=192.168.50.11 connectport=8080netsh interface portproxy add v4tov4 listenaddress=172.16.2.105 listenport=8082 connectaddress=192.168.50.12 connectport=8080netsh interface portproxy show v4tov4
检查效果
在client节点上
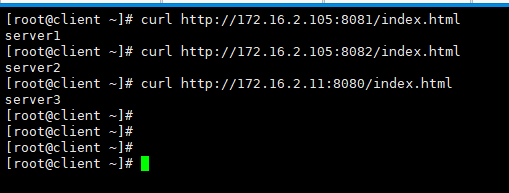
curl http://172.16.2.105:8081/index.htmlcurl http://172.16.2.105:8082/index.htmlcurl http://172.16.2.11:8080/index.html
转自:varlemon
https://www.cnblogs.com/connect/p/server-port-proxy.html
关注「开源Linux」加星标,提升IT技能
评论