接到“网站动态换主题”的需求,我是如何踩坑的
需求背景
随着业务的发展,客户的需求也会变得更加多样化,产品后期就需要有自定义界面的能力,于是出现了“动态换主题”的需求。
设计部门的同事让我们可以参考Ant Design色板生成算法演进之路
后面我们动态计算色板也是采用了目前 Ant Design 的算法, @ant-design/colors
但是切换主题的方式,经验证并不能很完美的适用于我们微前端项目。
设计标准
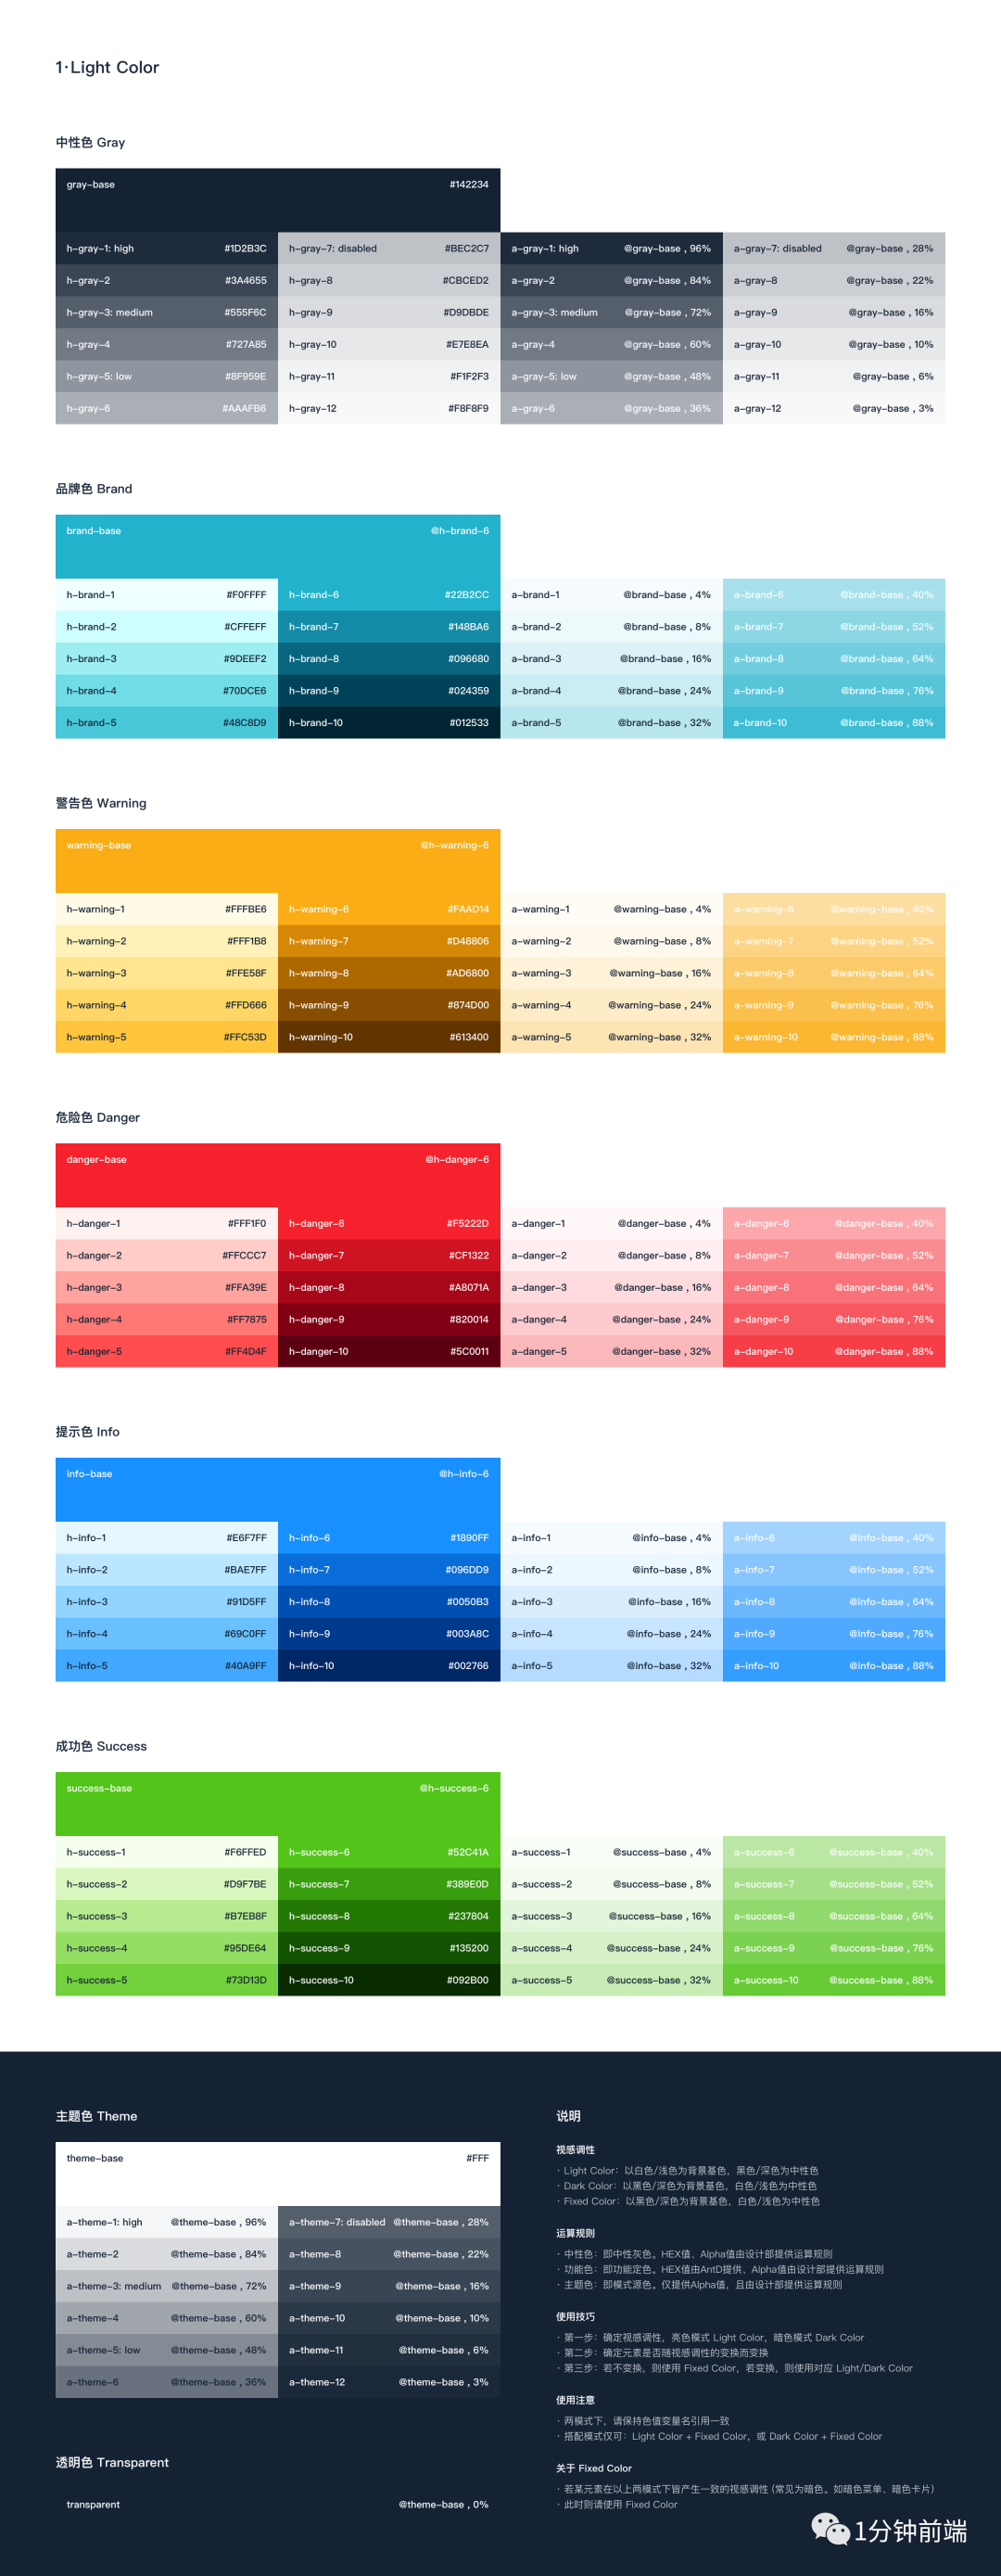
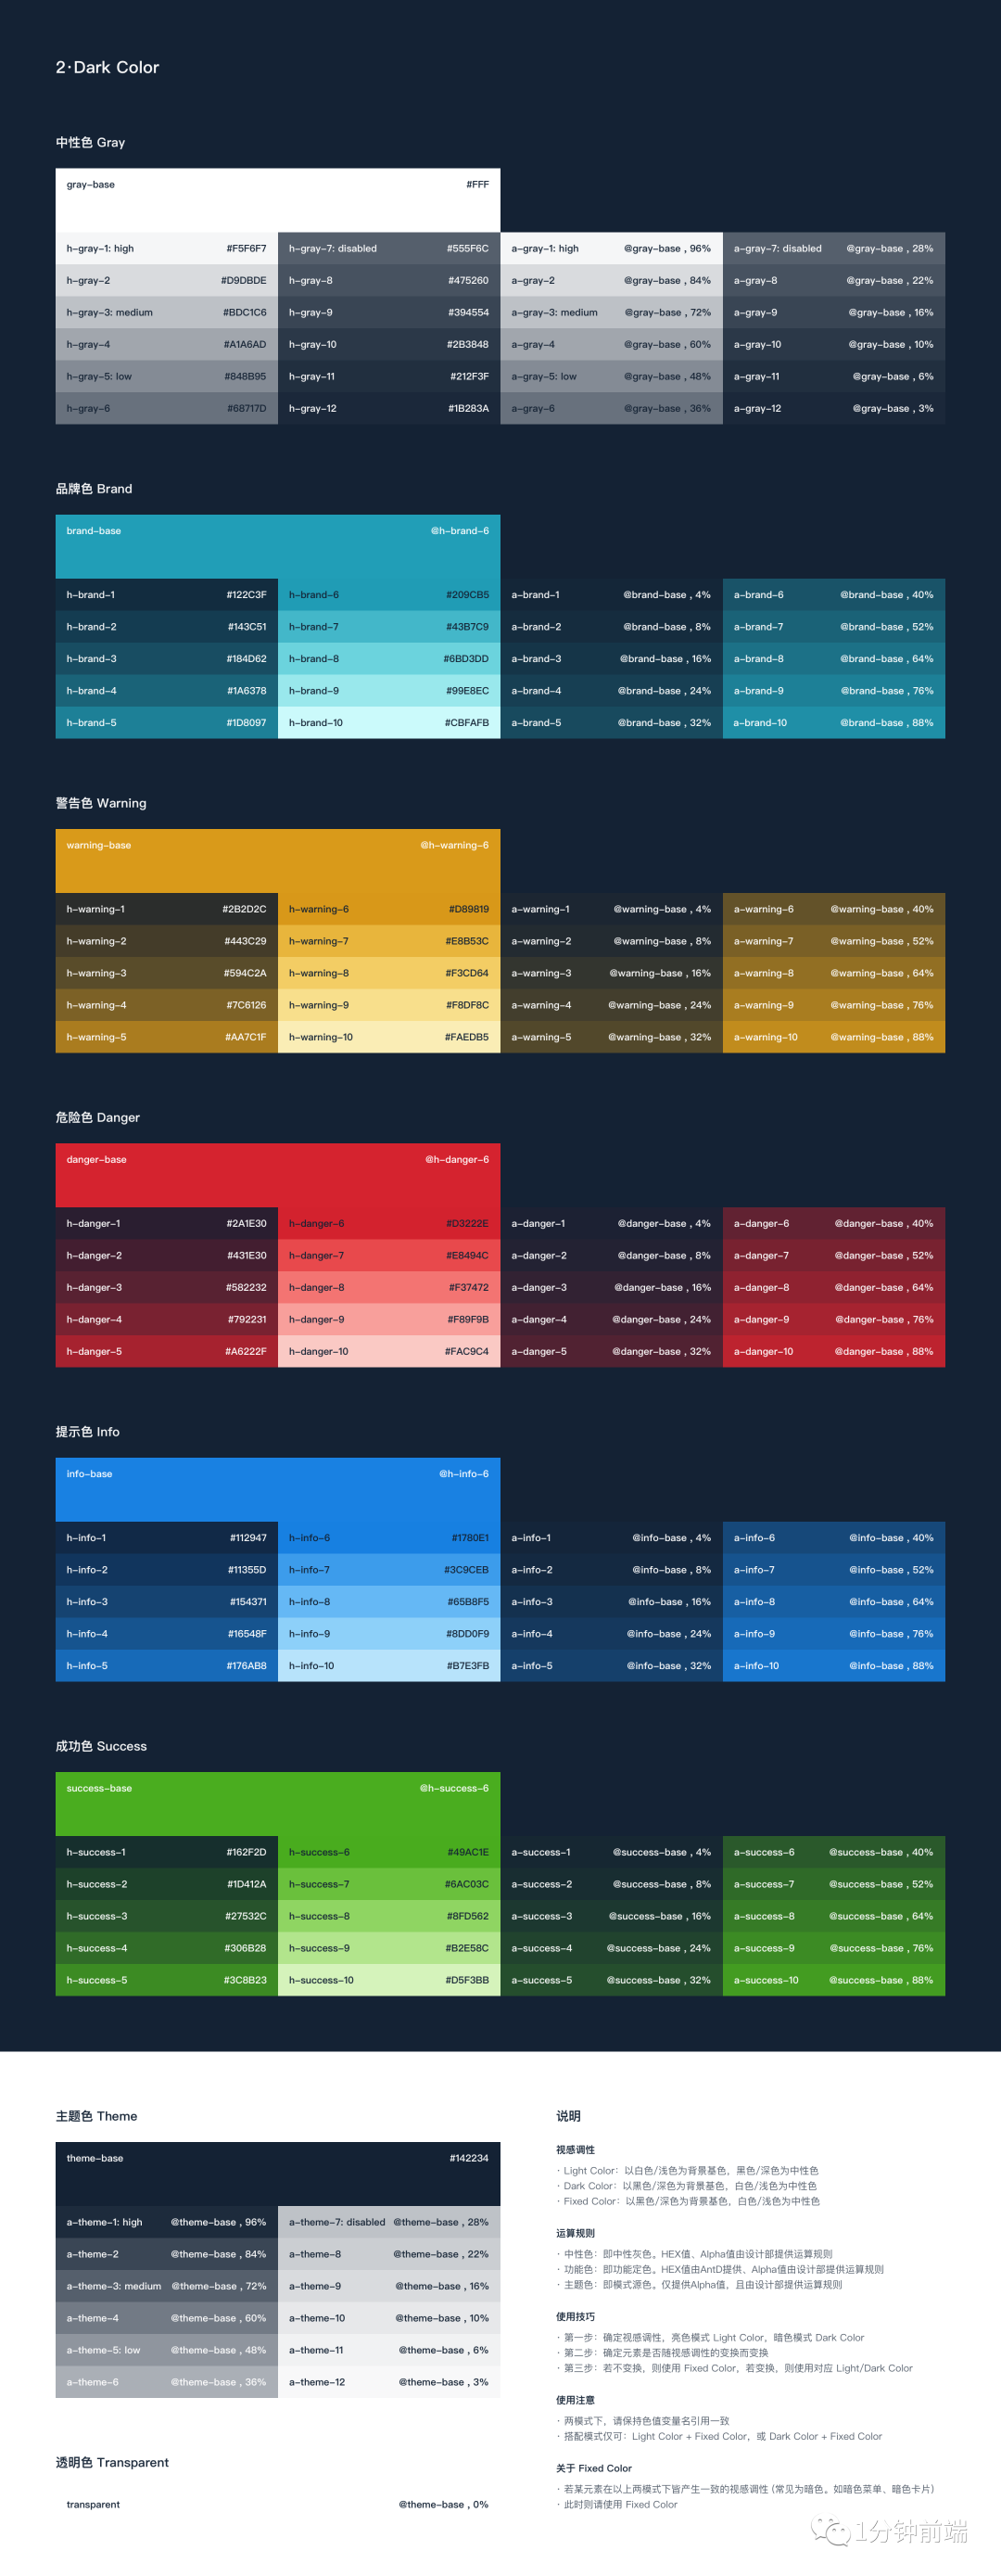
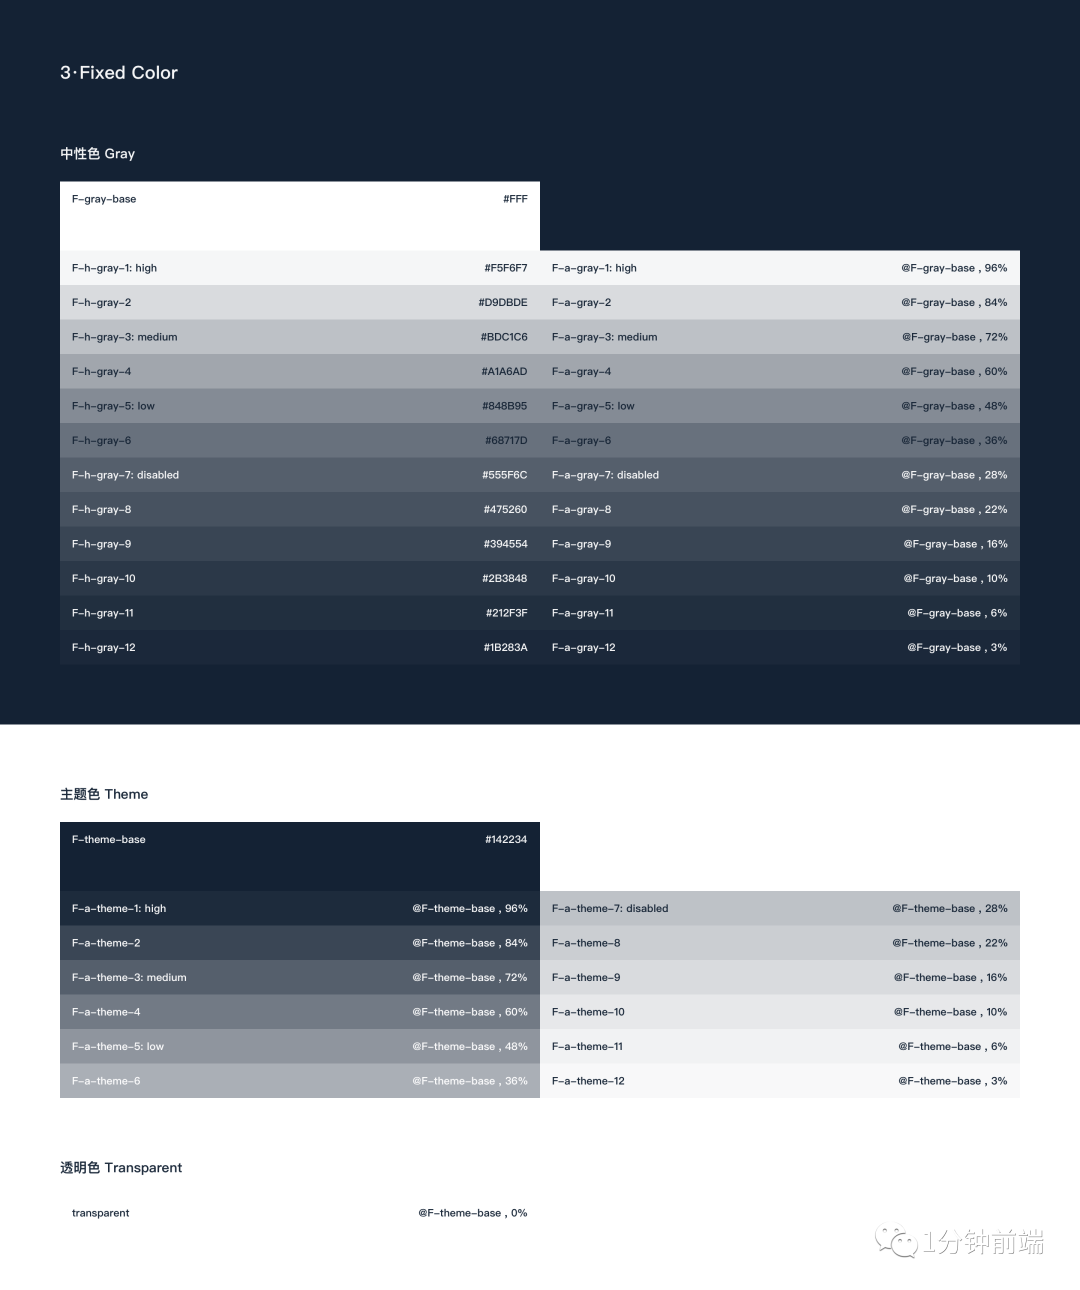
以上色系变量表是我们本次最终需要的全部变量
其中每种色系分为两种,h开头的和a开头的,a开头的通过调整透明度来生成,h 开头的一组由 base 色通过ant-design 的动态计算生成
本色系设计由合思设计团队 出品,中性色为直接定义死的,不做计算;
可配置的基础色分为
品牌色(brand-base):#22B2CC
警告色(warning-base):#FAAD14
危险色(danger-base):#F5222D
提示色(info-base):#1890FF
成功色(success-base):#52C41A
前端方案
我在接到需求后,经过和公司架构师及其他同事的探讨后,渐渐产出了以下几种方案,一步步踩坑过来。
方案一:
两种主题模式(light/dark),需要分别两个 less 文件来定义这两套颜色变量
Light-colors.less
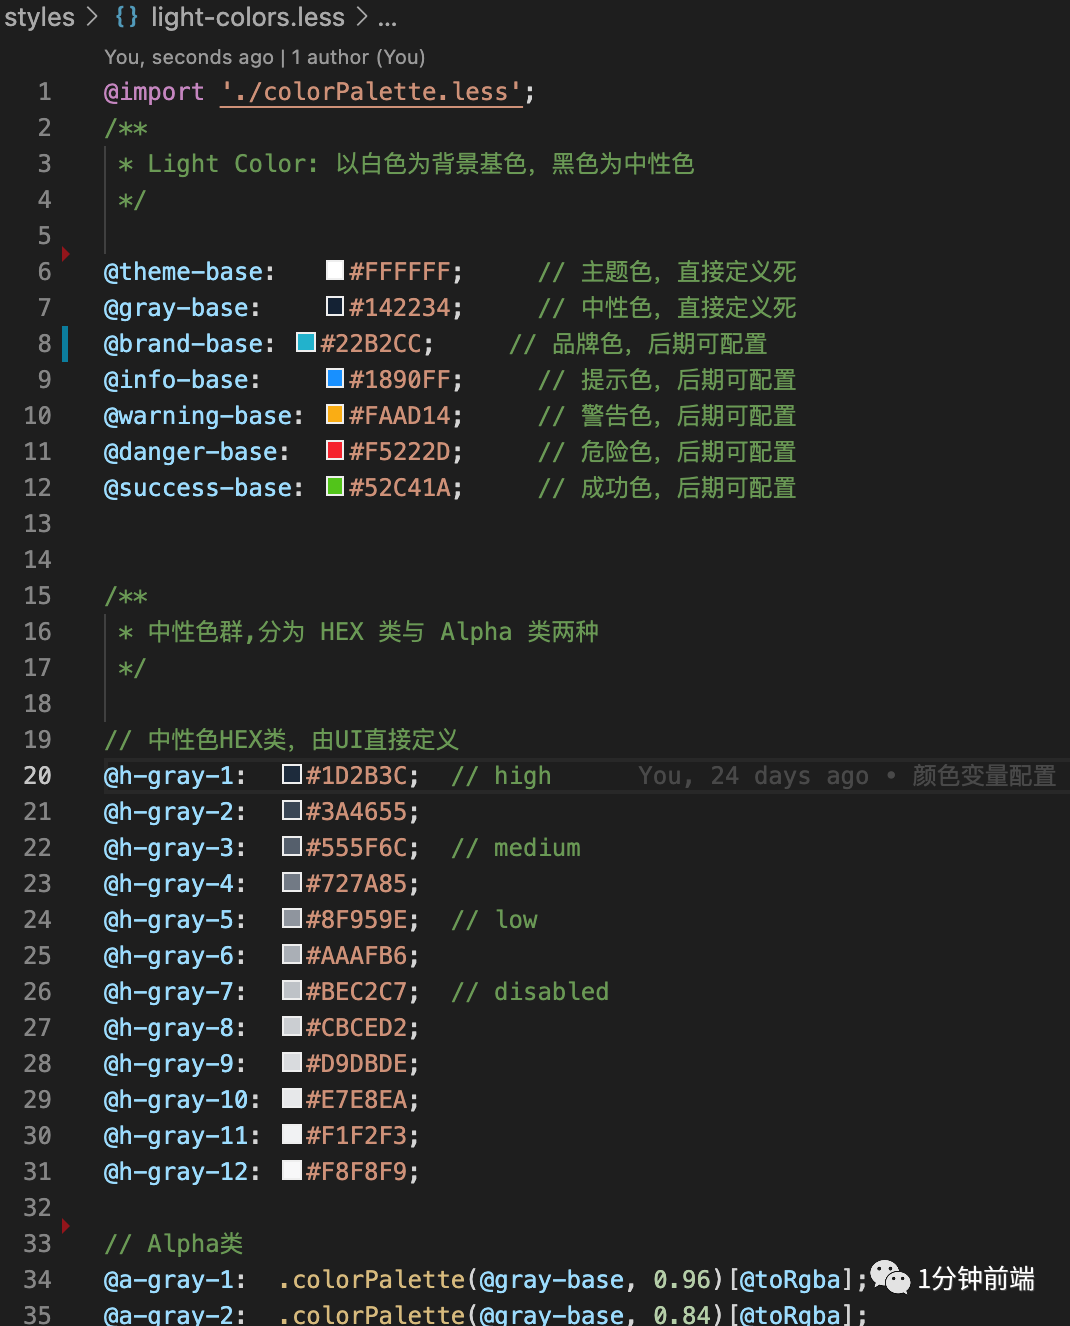
dark-colors.less
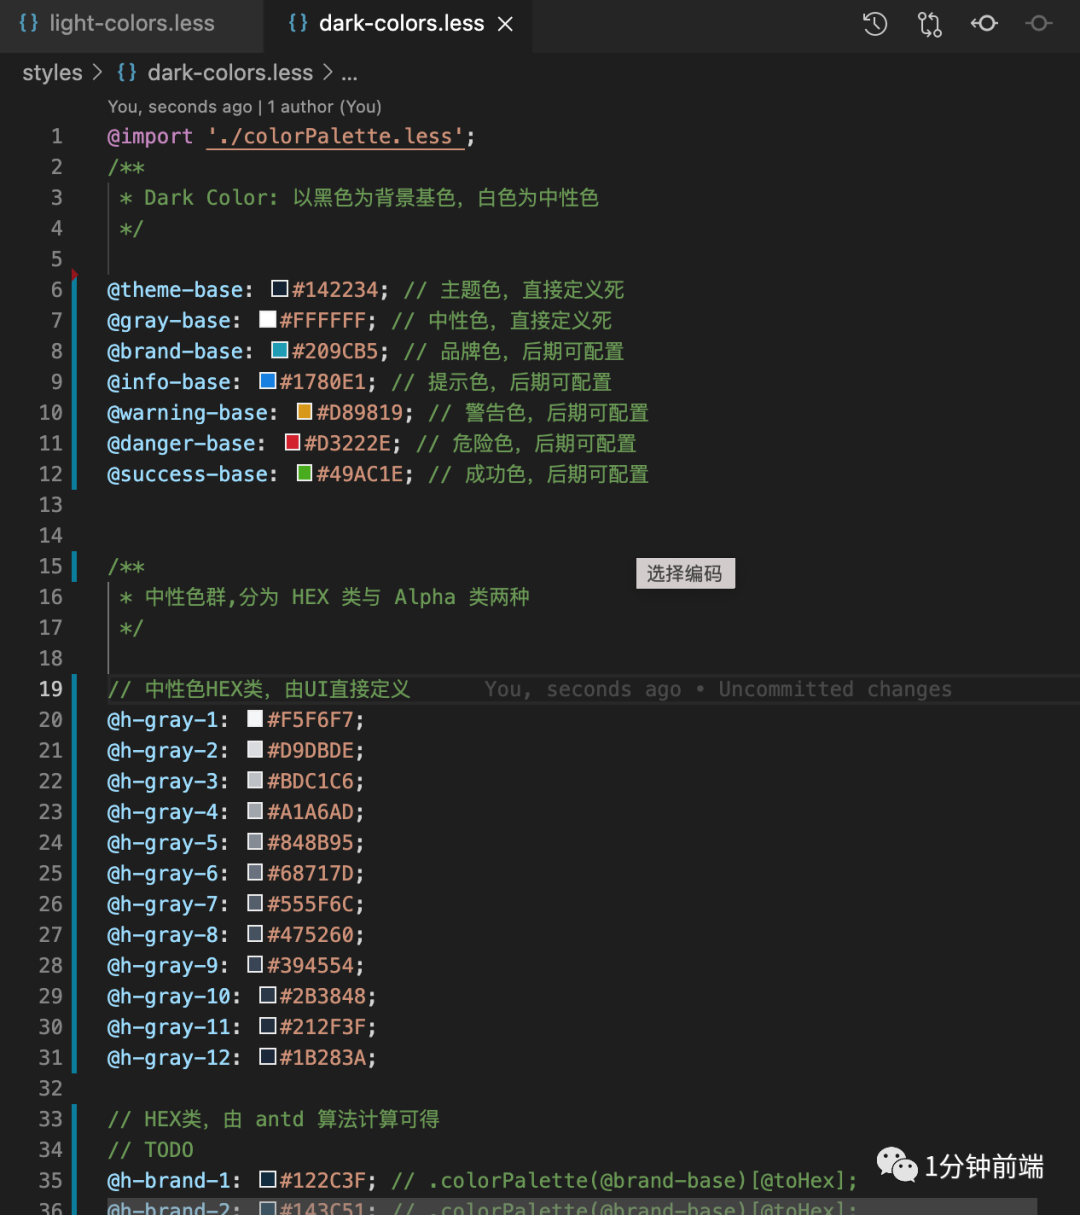
两种模式下,值固定不变的颜色变量单独定义一个文件 common-colors.less ,然后我选择将三个文件引入到同一个index 中输出使用,需要使用的地方只需要引入index.less 即可。

但是问题来了
1、如何在index.less 中来判断使用light-colors 还是 dark-colors 呢?
@import 只能定义在文件顶部,也没有任何可以做条件引入的方法
2、如何根据品牌色动态计算色系变量值呢?
计算为色系变量值是通过js产出一个数组,想要导入到一个less文件中,再引入使用,想要动态切换的话,需要用到 less的modifyVars方法, 也是Ant Design 官方提供的方式,接着我们尝试
方案二:
less 的modifyVars方法是是基于 less 在浏览器中的编译来实现。所以在引入less文件的时候需要通过link方式引入,然后基于less.js中的方法来进行修改变量
less.modifyVars({
  '@themeColor': '#22B2CC'
});
<link rel="stylesheet/less" type="text/css" href="./src/less/theme-colors.less" />// color 传入颜色值
changeTheme (color) {
less.modifyVars({ // 调用 `less.modifyVars` 方法来改变变量值'
@themeColor':color
})
.then(() => {
console.log('修改成功');
});
};需要引入
less编译器,太大了,严重影响性能;需要
webpack配置,无法多个进程间共享变量,不适用于微前端项目。这种方法仅限于用
less的项目才能使用,如果你项目使用的是sass,是没有类似less.modifyVars这种解决方案的。
方案三:
1、在webpack构建时,通过 webpack-theme-color-replacer这个插件从所有输出的css文件中提取主题颜色样式,并创建一个仅包含颜色样式的'theme-colors.css'文件。在网页的运行时,客户端部分下载此css文件,然后将颜色动态替换为新的自定义颜色,能够满足更灵活丰富的功能场景,性能出色。
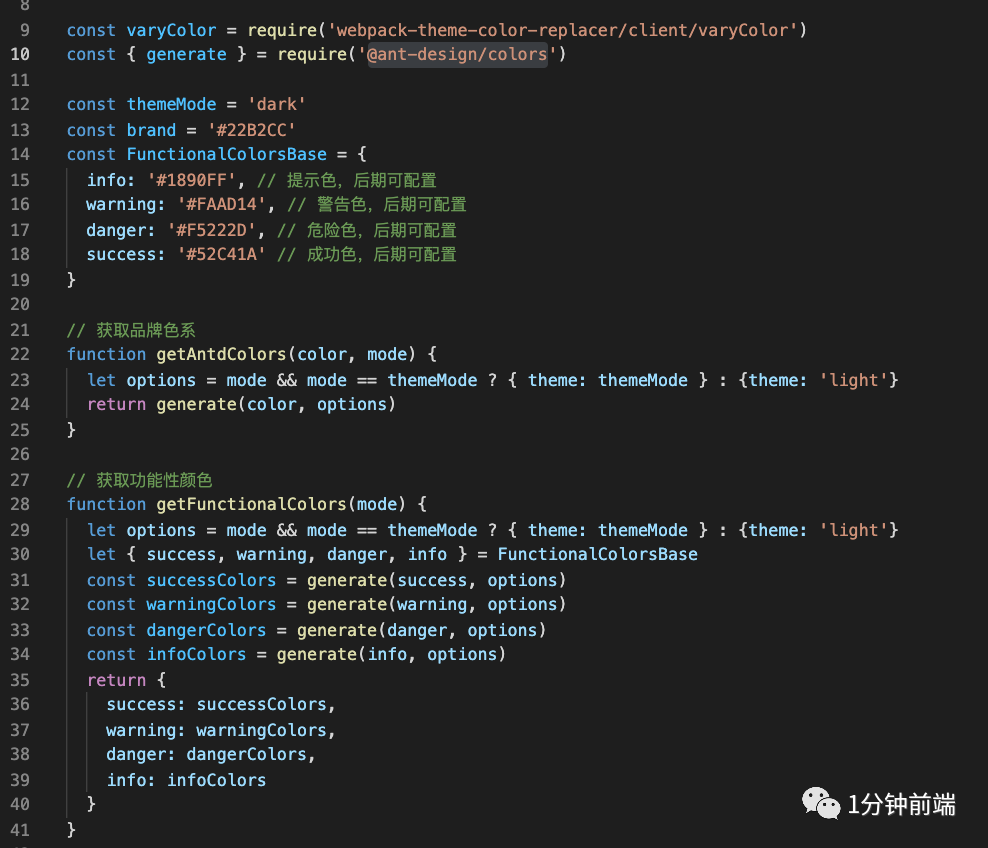
2、@ant-design/colors 来动态计算出品牌色系和功能色系。
3、可以动态的切换品牌色来获取整个主题的切换。
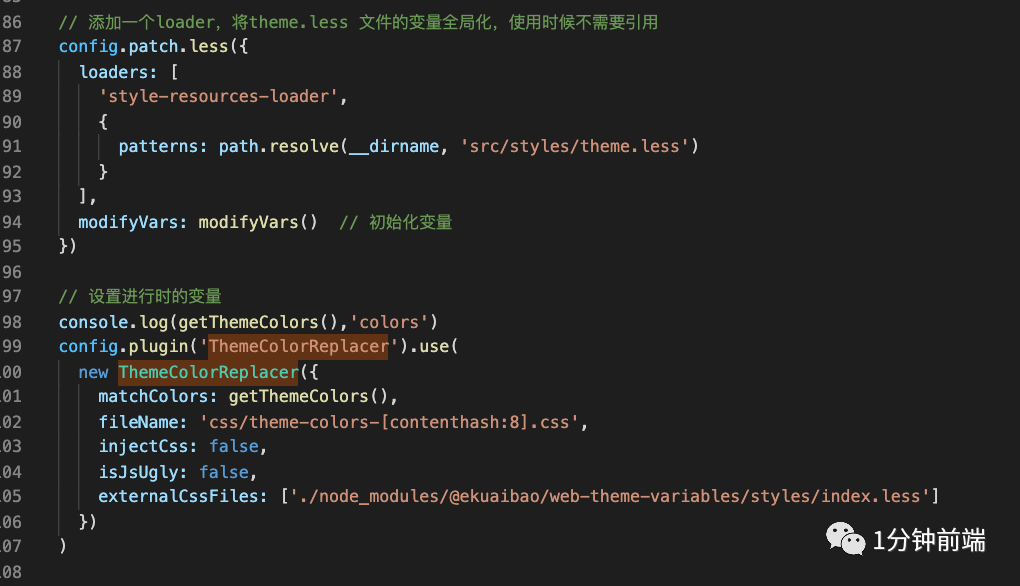
色系通过 提供的基准色, 自动计算及输出的颜色集合:
通过计算就可以输出整个色系数组如下:
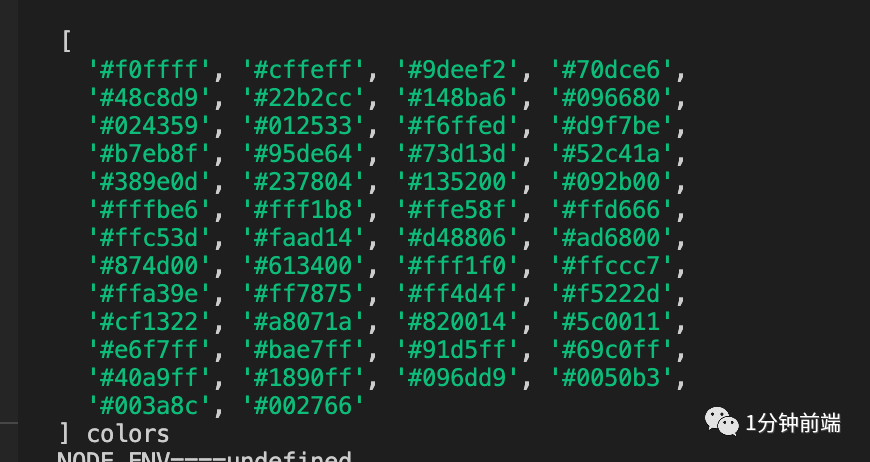
需要设置颜色的地方就可以直接使用定义的这些变量,需要切换主题或者颜色的时候,传入主题模式、品牌色重新计算,就可以实现动态切换主题了。
看似没啥问题,但是在我们的系统里,问题来了。
因为我们是微前端项目,拆包出大概二三十个项目,创建一个仅包含颜色样式的theme-colors.css文件这一步是运行在编译时的,那么每个子项目如果没有配置这个webpack,就无法共享该变量,在开发编译阶段就会报错!即使每个项目都配置了这样的webpack构建,也会创建各自的 theme-colors.css 文件,更改主题时候也无法同步切换,一样的坑爹!!!
由此可见,即使一个方案很好很成熟,也不是满足所有项目的。落实一个方案的时候,要根据自己的项目情况做分析,做出一个符合自身项目的解决方案才是硬道理,而不是一味的生搬硬套。
于是该方案毙掉,继续思考下一个方案。
方案四:
时代好了,浏览器普遍支持Css3变量了,基于Css3 Variable 共享全局主题变量看起来就是一个很通用的方案了。
首先定义一个全局变量,改变这个变量的值,页面中所有引用这个变量的元素都会进行改变,既没有 less 的编译过程,也不存在什么性能问题,这不就是我们最期望的动态换肤方案吗?
Css3 Variable的用法就是给变量加--前缀,涉及到主题色的都改成var(--themeColor)这种方式
我们先查一下兼容性
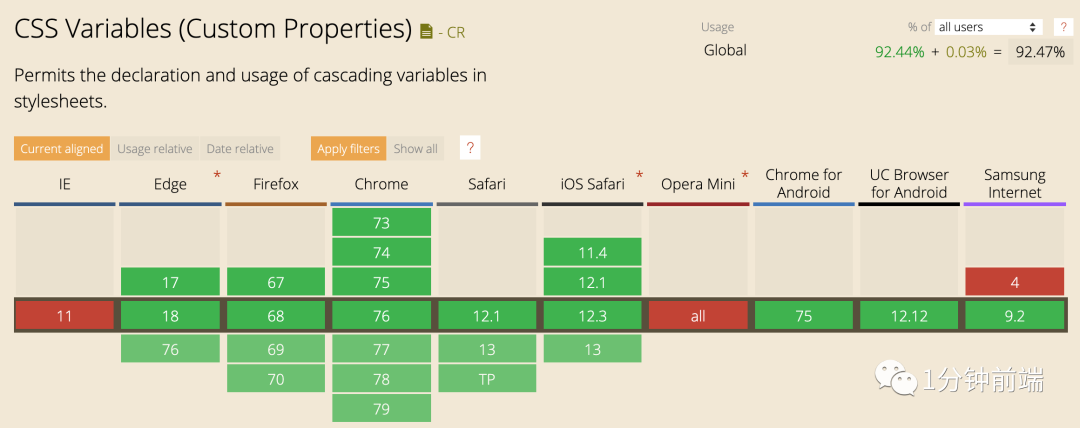
主流浏览器基本全部兼容,对于大多数互联网企业产品完全够用了,但是对于某些还在使用IE 浏览器的产品就需要ponyfill 方案兼容了。
也确实有这样一个 polyfill 能兼容IE: css-vars-ponyfill
这个polyfill 只会在不支持Css3 Variable 的环境会生效
我们开始写代码了:
1、建一个存放公共css变量的js文件(variable.js),将需要定义的css变量存放到该js文件,品牌色及功能色等通过antd算法计算获得;
import { getAlphaColor } from "./themeUtils";
const { generate } = require("@ant-design/colors");
import baseTheme from "./baseTheme";
import lightTheme from "./lightTheme";
import darkTheme from "./darkTheme";
import { functionalColorsBase, grayBase } from "./colors";

const themeModes = {
  light: undefined,
  dark: {
    theme: "dark",
    backgroundColor: grayBase,
  },
};

// 获取品牌色系
export const getBrandColors = (color, mode) => {
  let options = themeModes[mode];
  return generate(color, options);
};

// 获取功能色系
export const getFunctionalColors = (mode) => {
  let options = themeModes[mode];
  let { success, warning, danger, info } = functionalColorsBase;
  const successColors = generate(success, options);
  const warningColors = generate(warning, options);
  const dangerColors = generate(danger, options);
  const infoColors = generate(info, options);
  return {
    success: successColors,
    warning: warningColors,
    danger: dangerColors,
    info: infoColors,
  };
};

// 输出色板
export const modifyVars = (color, mode) => {
  const brandColors = getBrandColors(color, mode);
  const { success, warning, danger, info } = getFunctionalColors(mode);
  const colors = {
    ...baseTheme,
    "--brand-base": brandColors[5],
    "--success-base": success[5],
    "--warning-base": warning[5],
    "--danger-base": danger[5],
    "--info-base": info[5],
    "--h-brand-1": brandColors[0],
    "--h-brand-2": brandColors[1],
    "--h-brand-3": brandColors[2],
    "--h-brand-4": brandColors[3],
    "--h-brand-5": brandColors[4],
    "--h-brand-6": brandColors[5],
    "--h-brand-7": brandColors[6],
    "--h-brand-8": brandColors[7],
    "--h-brand-9": brandColors[8],
    "--h-brand-10": brandColors[9],
    "--h-success-1": success[0],
    "--h-success-2": success[1],
    "--h-success-3": success[2],
    "--h-success-4": success[3],
    "--h-success-5": success[4],
    "--h-success-6": success[5],
    "--h-success-7": success[6],
    "--h-success-8": success[7],
    "--h-success-9": success[8],
    "--h-success-10": success[9],
    "--h-warning-1": warning[0],
    "--h-warning-2": warning[1],
    "--h-warning-3": warning[2],
    "--h-warning-4": warning[3],
    "--h-warning-5": warning[4],
    "--h-warning-6": warning[5],
    "--h-warning-7": warning[6],
    "--h-warning-8": warning[7],
    "--h-warning-9": warning[8],
    "--h-warning-10": warning[9],
    "--h-danger-1": danger[0],
    "--h-danger-2": danger[1],
    "--h-danger-3": danger[2],
    "--h-danger-4": danger[3],
    "--h-danger-5": danger[4],
    "--h-danger-6": danger[5],
    "--h-danger-7": danger[6],
    "--h-danger-8": danger[7],
    "--h-danger-9": danger[8],
    "--h-danger-10": danger[9],
    "--h-info-1": info[0],
    "--h-info-2": info[1],
    "--h-info-3": info[2],
    "--h-info-4": info[3],
    "--h-info-5": info[4],
    "--h-info-6": info[5],
    "--h-info-7": info[6],
    "--h-info-8": info[7],
    "--h-info-9": info[8],
    "--h-info-10": info[9],
  };
  const darkConfigableTheme = {
    "--a-brand-1": getAlphaColor(brandColors[5], 0.04),
    "--a-brand-2": getAlphaColor(brandColors[5], 0.08),
    "--a-brand-3": getAlphaColor(brandColors[5], 0.16),
    "--a-brand-4": getAlphaColor(brandColors[5], 0.24),
    "--a-brand-5": getAlphaColor(brandColors[5], 0.32),
    "--a-brand-6": getAlphaColor(brandColors[5], 0.4),
    "--a-brand-7": getAlphaColor(brandColors[5], 0.52),
    "--a-brand-8": getAlphaColor(brandColors[5], 0.64),
    "--a-brand-9": getAlphaColor(brandColors[5], 0.76),
    "--a-brand-10": getAlphaColor(brandColors[5], 0.88),

    "--a-success-1": getAlphaColor(success[5], 0.04),
    "--a-success-2": getAlphaColor(success[5], 0.08),
    "--a-success-3": getAlphaColor(success[5], 0.16),
    "--a-success-4": getAlphaColor(success[5], 0.24),
    "--a-success-5": getAlphaColor(success[5], 0.32),
    "--a-success-6": getAlphaColor(success[5], 0.4),
    "--a-success-7": getAlphaColor(success[5], 0.52),
    "--a-success-8": getAlphaColor(success[5], 0.64),
    "--a-success-9": getAlphaColor(success[5], 0.76),
    "--a-success-10": getAlphaColor(success[5], 0.88),

    "--a-warning-1": getAlphaColor(warning[5], 0.04),
    "--a-warning-2": getAlphaColor(warning[5], 0.08),
    "--a-warning-3": getAlphaColor(warning[5], 0.16),
    "--a-warning-4": getAlphaColor(warning[5], 0.24),
    "--a-warning-5": getAlphaColor(warning[5], 0.32),
    "--a-warning-6": getAlphaColor(warning[5], 0.4),
    "--a-warning-7": getAlphaColor(warning[5], 0.52),
    "--a-warning-8": getAlphaColor(warning[5], 0.64),
    "--a-warning-9": getAlphaColor(warning[5], 0.76),
    "--a-warning-10": getAlphaColor(warning[5], 0.88),

    "--a-danger-1": getAlphaColor(danger[5], 0.04),
    "--a-danger-2": getAlphaColor(danger[5], 0.08),
    "--a-danger-3": getAlphaColor(danger[5], 0.16),
    "--a-danger-4": getAlphaColor(danger[5], 0.24),
    "--a-danger-5": getAlphaColor(danger[5], 0.32),
    "--a-danger-6": getAlphaColor(danger[5], 0.4),
    "--a-danger-7": getAlphaColor(danger[5], 0.52),
    "--a-danger-8": getAlphaColor(danger[5], 0.64),
    "--a-danger-9": getAlphaColor(danger[5], 0.76),
    "--a-danger-10": getAlphaColor(danger[5], 0.88),

    "--a-info-1": getAlphaColor(info[5], 0.04),
    "--a-info-2": getAlphaColor(info[5], 0.08),
    "--a-info-3": getAlphaColor(info[5], 0.16),
    "--a-info-4": getAlphaColor(info[5], 0.24),
    "--a-info-5": getAlphaColor(info[5], 0.32),
    "--a-info-6": getAlphaColor(info[5], 0.4),
    "--a-info-7": getAlphaColor(info[5], 0.52),
    "--a-info-8": getAlphaColor(info[5], 0.64),
    "--a-info-9": getAlphaColor(info[5], 0.76),
    "--a-info-10": getAlphaColor(info[5], 0.88),
  };
  const lightModeColors = { ...lightTheme, ...colors };
  const darkModeColors = { ...darkTheme, ...darkConfigableTheme, ...colors };
  console.log(lightModeColors, "=====", darkModeColors);
  return mode == "light" ? lightModeColors : darkModeColors;
};
2、页面使用css变量,无论是web主项目,还是各个plugin子项目都可以共享变量,不需要引入任何依赖,设计图标注与代码对应关系:
| UI | CODE |
| h-brand-1 | var(--h-brand-1) |
3、封装切换主题的js,在项目入口做初始化调用,支持更改light和dark模式,及变更品牌色基准色
import { brandBase, modifyVars } from "./variable";
import cssVars from "css-vars-ponyfill";

const key = "data-theme";

// 获取当前主题
export const getTheme = (mode, color) => {
  const localTheme = localStorage.getItem(key);
  const dataTheme = localTheme
    ? JSON.parse(localTheme)
    : {
        color: color || brandBase,
        mode: mode || "light",
      };
  return dataTheme;
};

// 初始化主题
export const initTheme = (mode, color) => {
  const dataTheme = getTheme(mode, color);
  document.documentElement.setAttribute("data-theme", dataTheme.mode);
  cssVars({
    watch: true,
    // 当添加,删除或修改其<link>或<style>元素的禁用或href属性时,ponyfill将自行调用
    variables: modifyVars(dataTheme.color, dataTheme.mode), // variables 自定义属性名/值对的集合
    onlyLegacy: false, // false  默认将css变量编译为浏览器识别的css样式  true 当浏览器不支持css变量的时候将css变量编译为识别的css
  });
};

// 变更主题
export const changeTheme = (mode, color) => {
  const dataTheme = {
    color: color || brandBase,
    mode: mode || "light",
  };
  localStorage.setItem(key, JSON.stringify(dataTheme));
  document.documentElement.setAttribute("data-theme", dataTheme.mode);
  cssVars({
    watch: true,
    variables: modifyVars(dataTheme.color, dataTheme.mode),
    onlyLegacy: false,
  });
};
4、在切换主题的按钮组件中调用 changeTheme切换主题
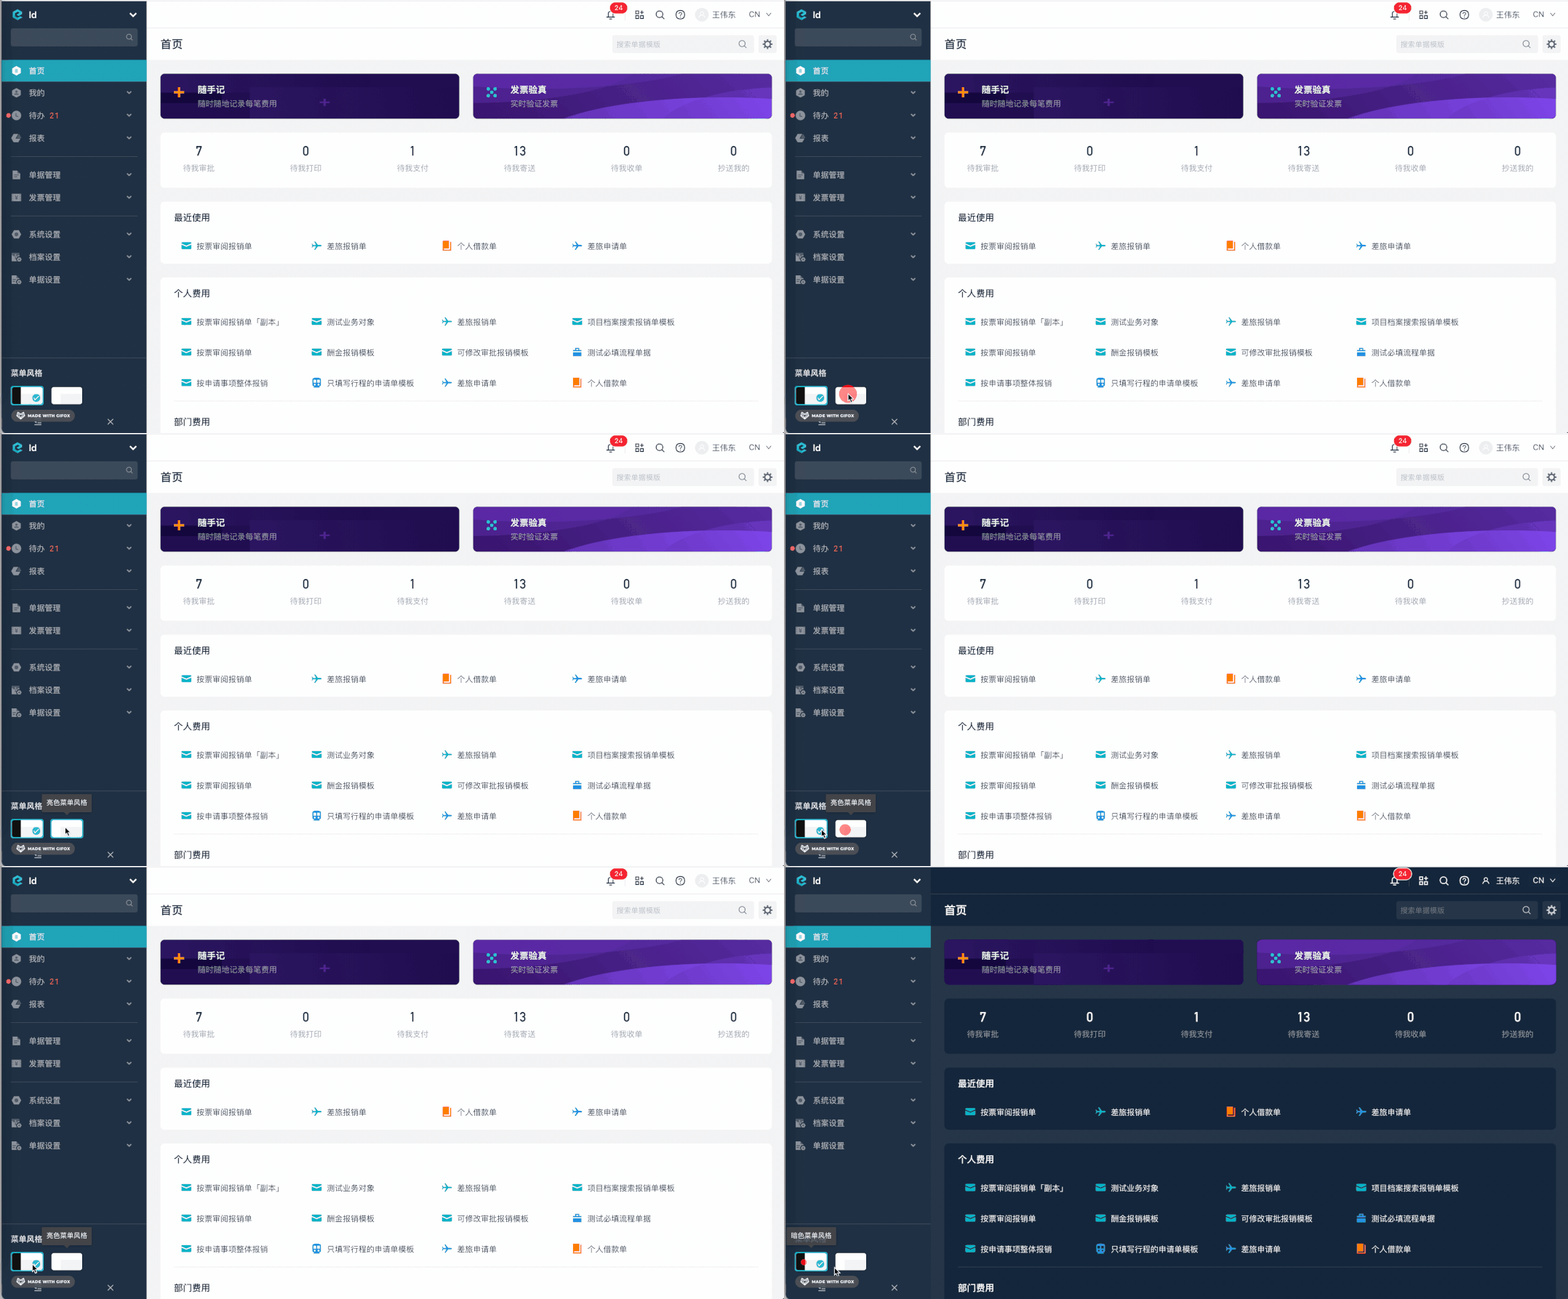
最终效果,目前只有部分扫雷了部分页面,控制开关为临时征用侧边栏:
总结
至此,一个微前端项目的动态换肤方案已经实现,大家如果有更好的方案,欢迎补充哦~
注:该方案出自合思大前端团队 ,北京和南昌均有技术团队,如果你有考虑新的工作机会,欢迎投简历!
1.看到这里了就点个在看支持下吧,你的「点赞,在看」是我创作的动力。
2.关注公众号
程序员成长指北,回复「1」加入高级前端交流群!「在这里有好多 前端 开发者,会讨论 前端 Node 知识,互相学习」!3.也可添加微信【ikoala520】,一起成长。
“在看转发”是最大的支持
