数据自动抓取到底有多简单?
说到数据自动抓取,很多人可能会联想到网络爬虫,不自觉地就会认为这超出了自己的能力圈边界。但是,当我们对互联网上发现的某些数据感兴趣的时候,我们知道如何自动保存这些网页数据以供日后数据分析,节省下来手工复制下载的时间,喝杯咖啡、刷会儿抖音,是不是很香?web 开发有两个基本概念:前端和后端。简单来说,浏览器端、客户端就是前端,提供真实服务的服务器端就是后端。网页开发模式主要分为两类:前后端分离模式和非前后端分离模式。前后端分离模式,是指前端通过 AJAX 向后端 API 服务发送数据请求,后端响应请求并返回数据给前端,前端使用后端返回的数据(通常是 JSON 数据)渲染呈现网页。非前后端分离模式是由服务器端渲染生成 HTML 网页,直接发送给浏览器端渲染。前后端分离模式是当前网页开发的主流模式,互联网大厂几乎都使用这种模式,但是一些政府事业单位的网站以外包为主,更新迭代缓慢,非前后端分离模式较多。关于这两种开发模式,只需当作科普理解即可。CSV vs JSONJSON 数据是 web 开发中经常用到的数据格式,很多人经常使用 CSV 格式,但是对 JSON 数据格式不太熟悉。现在有很多在线工具可以轻松实现 CSV 格式与 JSON 格式之间的相互转换。便于理解 JSON 数据,这里简单对比一下 CSV 和 JSON。
CSV 格式:
JSON格式:ID,Name,Season,Points1,LeBron James,2019-20,25.21,LeBron James,2018-19,27.41,LeBron James,2017-18,27.
[{ "id": 1, "name": "LeBron James", "season": "2019-20", "points": 25.2 },{ "id": 1, "name": "LeBron James", "season": "2018-19", "points": 27.4 },{ "id": 1, "name": "LeBron James", "season": "2017-18", "points": 27.5 }]
可以看出,相比CSV,JSON有更多的符号以及重复的表头字段名。虽然这个例子是一种比较常见的 JSON 格式,但有时候 JSON 也会写成 和 CSV 相似的样式,比如 stats.nba.com 这个网站里使用的样式:
直接使用 API 爬取数据现在流行的前后端分离开发模式下,web 网页应用一般通过 AJAX 向后端 API 服务接口发送数据请求,前端使用 API 返回的数据(通常是 JSON 格式)渲染呈现网页。因此,我们只要找到返回请求数据的 API 接口,并模拟发送请求给这个 API,我们就能拿到想要的数据了。这里我们用 stats.nba.com 这个网站为例,使用 Node.js 来演示如何使用 API 自动抓取 NBA 篮球运动员的年度职业数据。1. 检查数据是否动态加载首先,我们使用 Chrome 浏览器去 stats.nba.com 网站上找到詹姆斯的数据主页https://www.nba.com/stats/player/2544/{"headers": ["id", "name", "season", "points"],"rows": [[1, "LeBron James", "2019-20", 25.2],[1, "LeBron James", "2018-19", 27.4],[1, "LeBron James", "2017-18", 27.5]]}
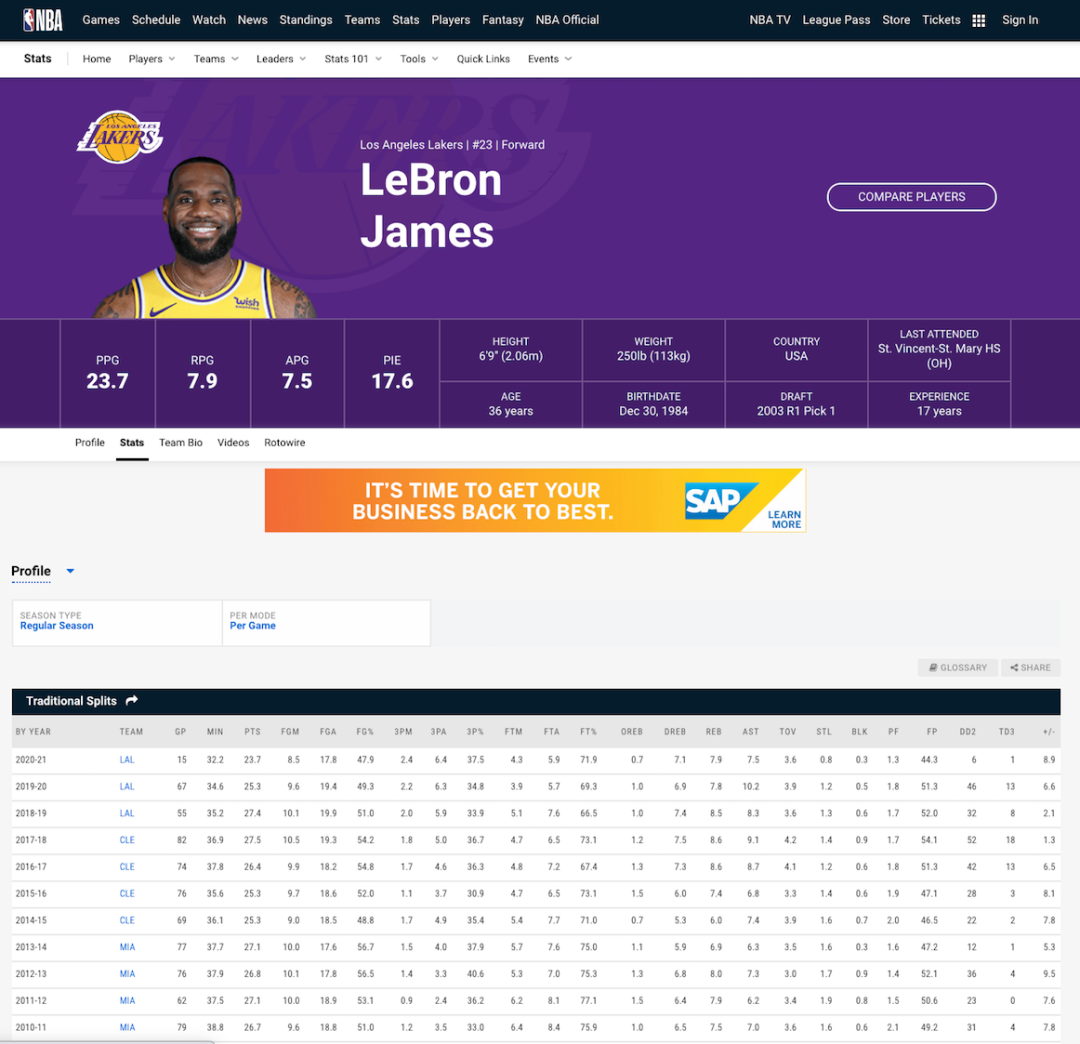
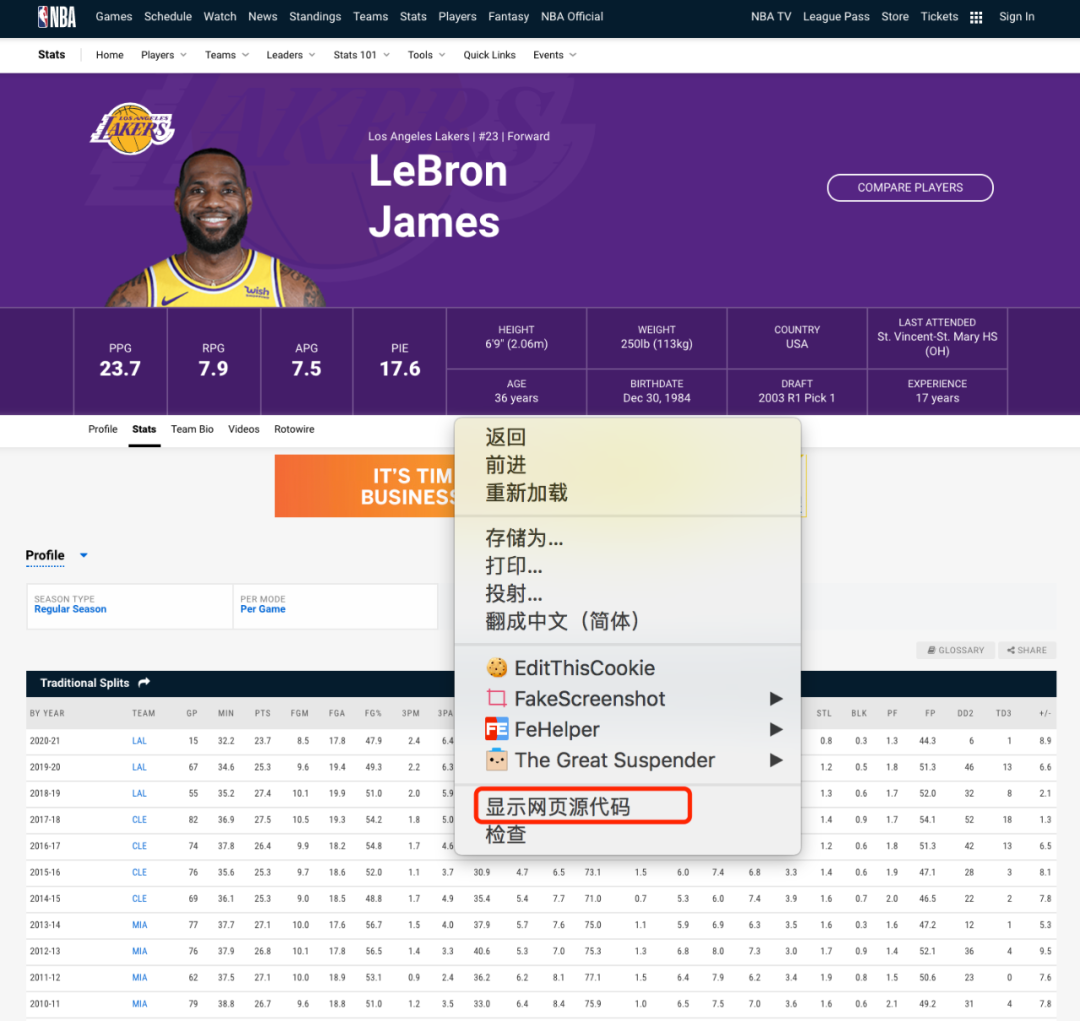
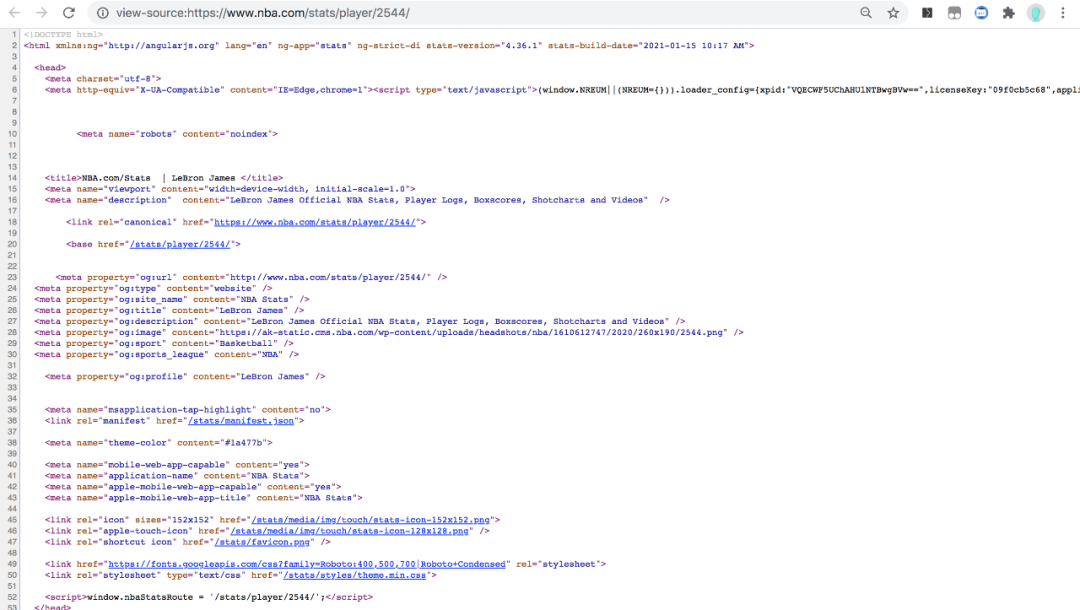
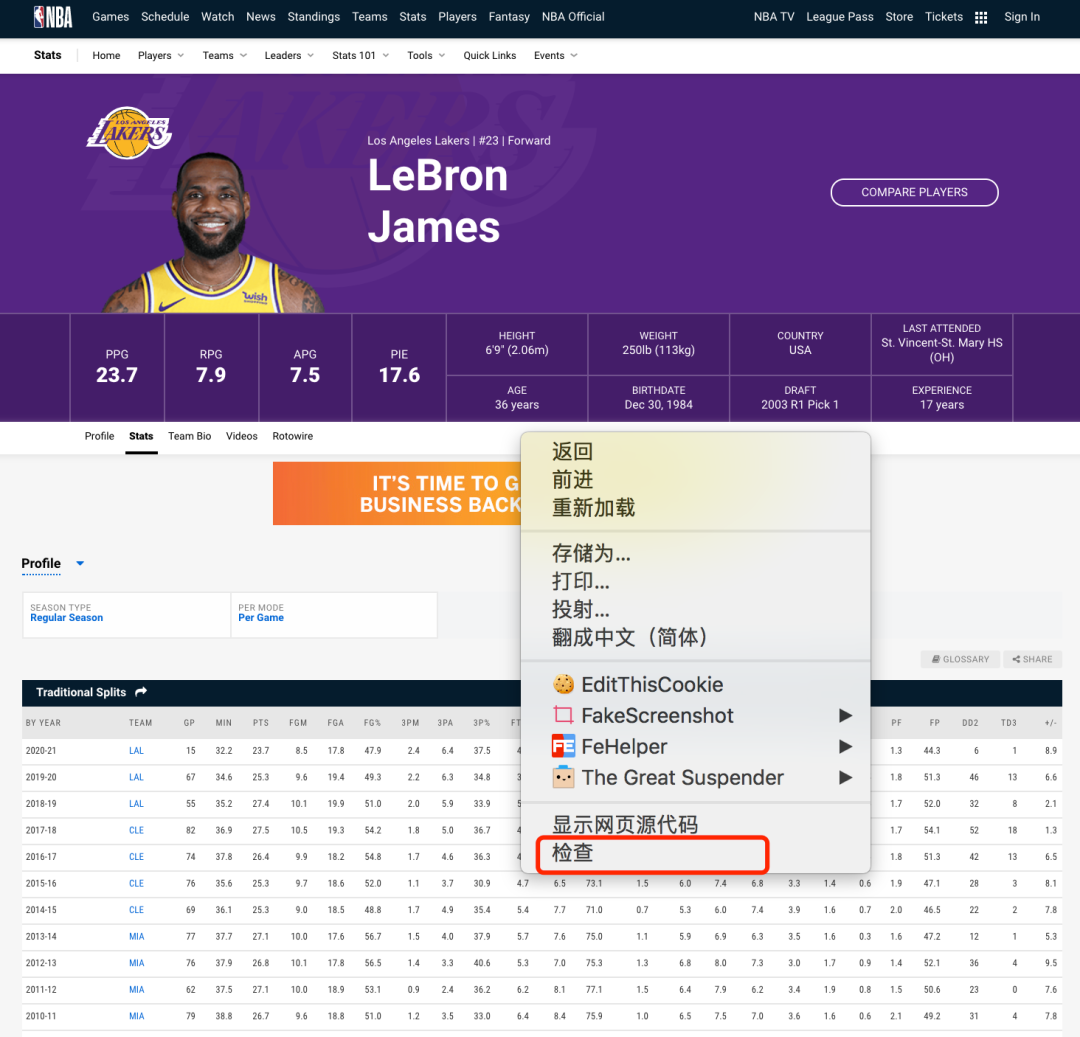
2. 寻找返回数据的 API 接口数据不在 HTML页面里,到底在哪里呢?我们可以使用浏览器的开发人员工具寻找线索。在网页上鼠标单击右键,选择 检查 菜单调出开发人员工具。
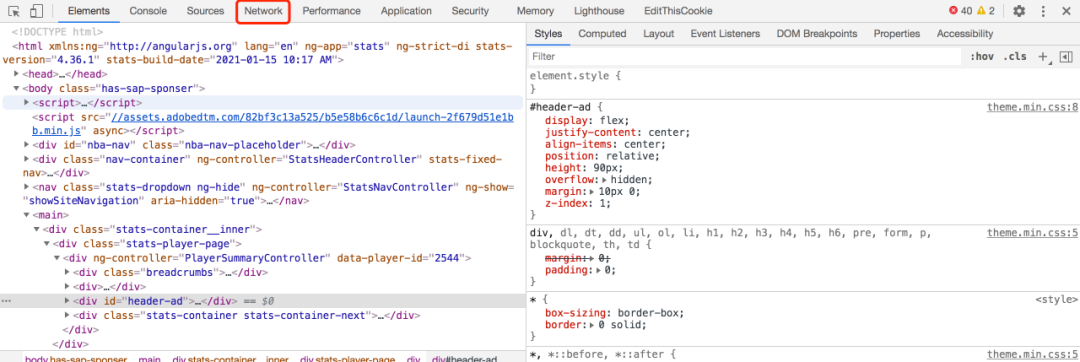
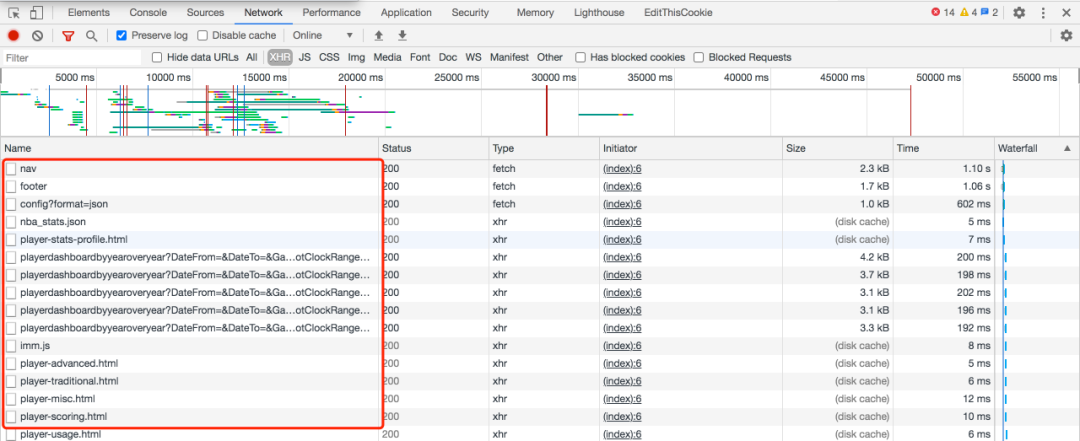
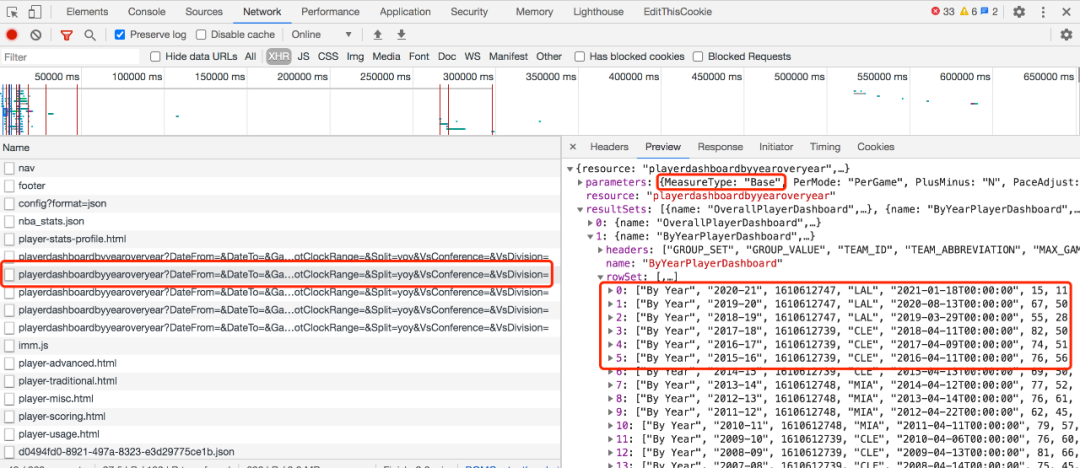
3. 写一个 Node.js 脚本自动爬取多页面数据自动爬取数据你可以使用任何语言,这里只是以 node.js 为例,给大家演示。安装 request 库
复制下面代码到 index.js 文件npm init -ynpm install --save request request-promise-native
命令窗口运行脚本const rp = require("request-promise-native");const fs = require("fs");async function main() {console.log("Making API Request...");// request the data from the JSON APIconst results = await rp({uri: "https://stats.nba.com/stats/playerdashboardbyyearoveryear?DateFrom=&DateTo=&GameSegment=&LastNGames=0&LeagueID=00&Location=&MeasureType=Base&Month=0&OpponentTeamID=0&Outcome=&PORound=0&PaceAdjust=N&PerMode=PerGame&Period=0&PlayerID=2544&PlusMinus=N&Rank=N&Season=2020-21&SeasonSegment=&SeasonType=Regular+Season&ShotClockRange=&Split=yoy&VsConference=&VsDivision=" ,headers: {"Connection": "keep-alive","User-Agent": "Mozilla/5.0 (Macintosh; Intel Mac OS X 10_14_6) AppleWebKit/537.36 (KHTML, like Gecko) Chrome/78.0.3904.108 Safari/537.36","x-nba-stats-origin": "stats","Referer": "https://stats.nba.com/player/2544/"},json: true});console.log("Got results =", results);// save the JSON to diskawait fs.promises.writeFile("output.json", JSON.stringify(results, null, 2));console.log("Done!")}// start the main scriptmain();
node index.jshttps://stats.nba.com/stats/playerdashboardbyyearoveryear?对比其他球员职业数据的 API 接口路径,发现只要修改这个 playerID 就可以变成对应球员的 API 接口。根据球员主页的路径,能够获取球员对应的 playerID。
DateFrom=&DateTo=&GameSegment=&LastNGames=0&LeagueID=00&
Location=&MeasureType=Base&Month=0&OpponentTeamID=0&Outcome=&
PORound=0&PaceAdjust=N&PerMode=PerGame&Period=0&
PlayerID=2544&
PlusMinus=N&Rank=N&Season=2019-20&SeasonSegment=&
SeasonType=Regular+Season&ShotClockRange=&Split=yoy&
VsConference=&VsDivision=
| Player ID | Player | URL |
| 2544 | LeBron James | https://stats.nba.com/player/2544/ |
| 1629029 | Luka Doncic | https://stats.nba.com/player/1629029/ |
| 201935 | James Harden | https://stats.nba.com/player/201935/ |
| 202695 | Kawhi Leonard | https://stats.nba.com/player/202695/ |
我们提取了一个请求数据的公共函数 fetchPlayerYearOverYear,遍历 ID 数组,并调用这个函数就能一次获取需要的全部数据。另外,出于对服务器的保护以及道德操守,我们一般要设置延迟来避免造成服务器堵塞,影响其他用户的访问。通过上述步骤,我们就成功的使用 API 实现了数据自动抓取。那如果是非前后端分离模式的 web 网页应用,没有 API 接口,我们怎么实现自动抓取呢?自动抓取服务端渲染的 HTML 网页数据非前后端分离模式的 web 应用是将数据直接呈现在 HTML 页面内,这种情况我们只要下载、解析 HTML 就能提取到我们的目标数据。下面还是用案例来演示,目标是从 espn.com 网站上爬取 NBA 比赛数据。1. 验证数据是否在 HTML 页面内和上一个案例相似,我们目标是爬取篮球比赛得分数据,地址: https://www.espn.com/nba/boxscore?gameId=401160888。const rp = require("request-promise-native");const fs = require("fs");// helper to delay execution by 300ms to 1100msasync function delay() {const durationMs = Math.random() * 800 + 300;return new Promise(resolve => {setTimeout(() => resolve(), durationMs);});}async function fetchPlayerYearOverYear(playerId) {console.log(`Making API Request for ${playerId}...`);// add the playerId to the URI and the Referer header// NOTE: we could also have used the `qs` option for the// query parameters.const results = await rp({uri: "https://stats.nba.com/stats/playerdashboardbyyearoveryear?DateFrom=&DateTo=&GameSegment=&LastNGames=0&LeagueID=00&Location=&MeasureType=Base&Month=0&OpponentTeamID=0&Outcome=&PORound=0&PaceAdjust=N&PerMode=PerGame&Period=0&" +`PlayerID=${playerId}` +"&PlusMinus=N&Rank=N&Season=2019-20&SeasonSegment=&SeasonType=Regular+Season&ShotClockRange=&Split=yoy&VsConference=&VsDivision=",headers: {"Connection": "keep-alive","User-Agent": "Mozilla/5.0 (Macintosh; Intel Mac OS X 10_14_6) AppleWebKit/537.36 (KHTML, like Gecko) Chrome/78.0.3904.108 Safari/537.36","x-nba-stats-origin": "stats","Referer": `https://stats.nba.com/player/${playerId}/`},json: true});// save to disk with playerID as the file nameawait fs.promises.writeFile(`${playerId}.json`,JSON.stringify(results, null, 2));}async function main() {// PlayerIDs for LeBron, Harden, Kawhi, Lukaconst playerIds = [2544, 201935, 202695, 1629029];console.log("Starting script for players", playerIds);// make an API request for each playerfor (const playerId of playerIds) {await fetchPlayerYearOverYear(playerId);// be polite to our friendly data hosts and// don't crash their serversawait delay();}console.log("Done!");}main();
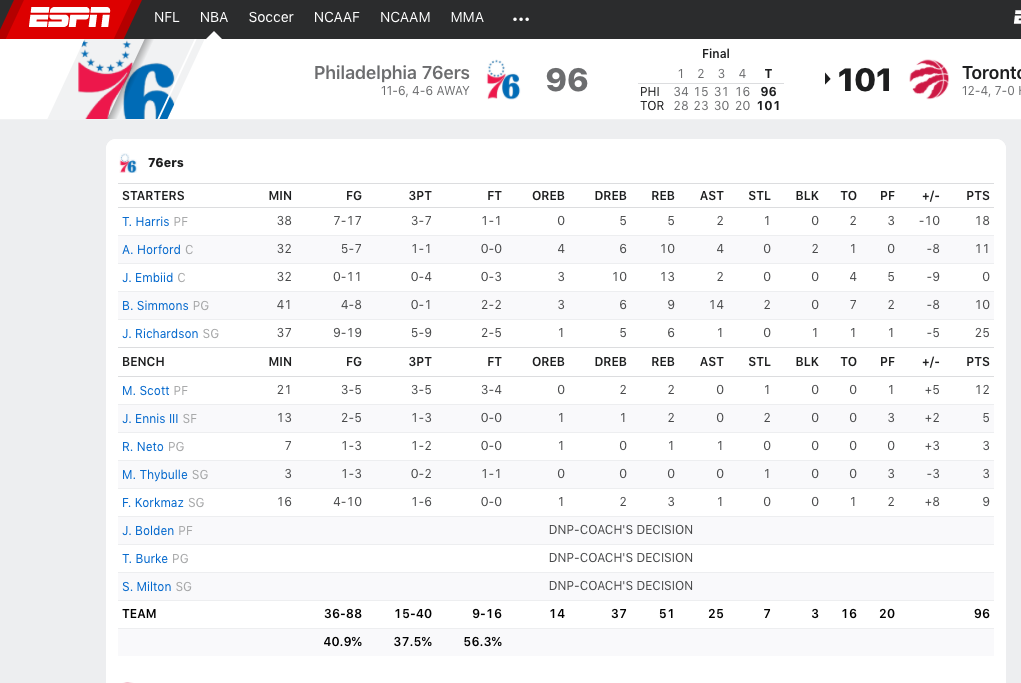
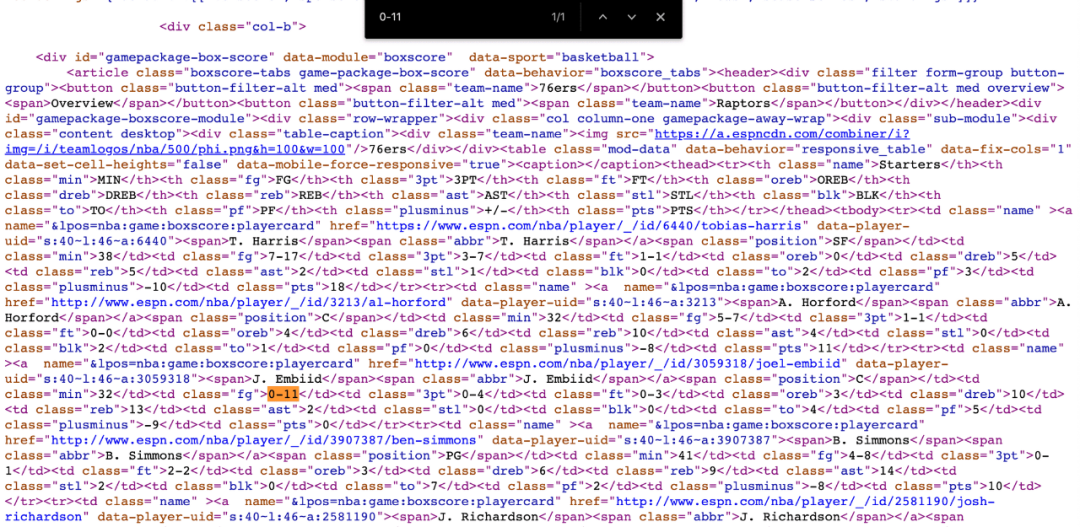
2. 找到可以定位目标数据的 CSS 元素选择器我们需要用某些标识来识别出HTML里目标数据,而 CSS 选择器是一个非常好的标识。鼠标右键单击页面-检查,调出开发人员工具。
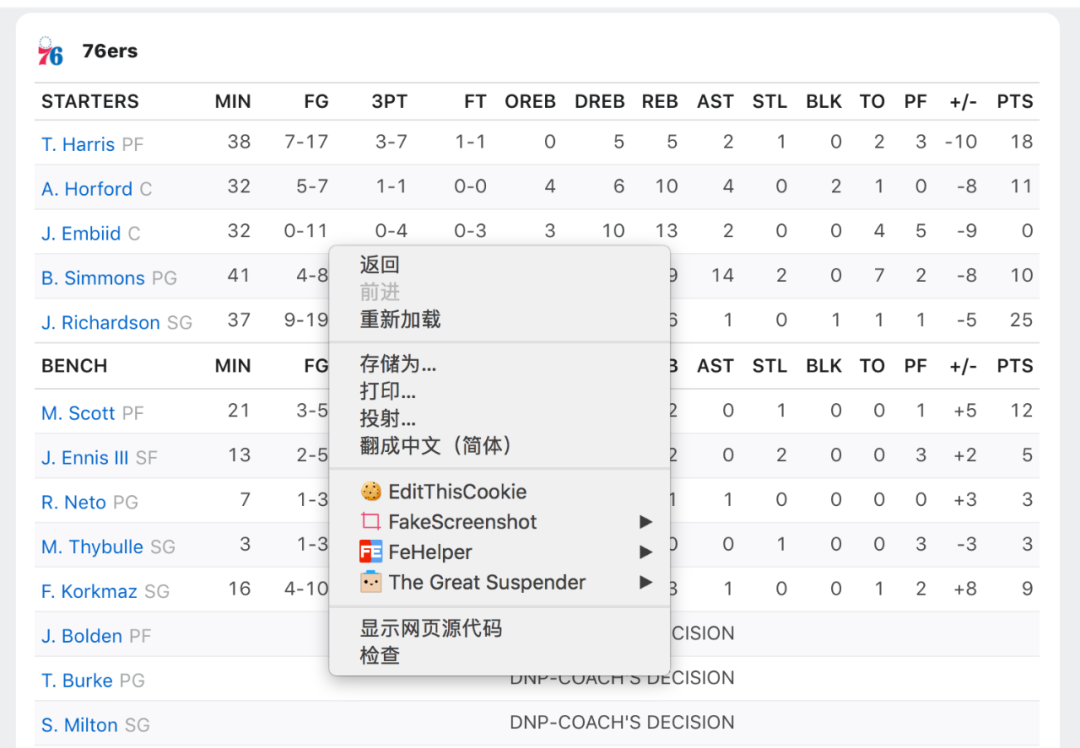
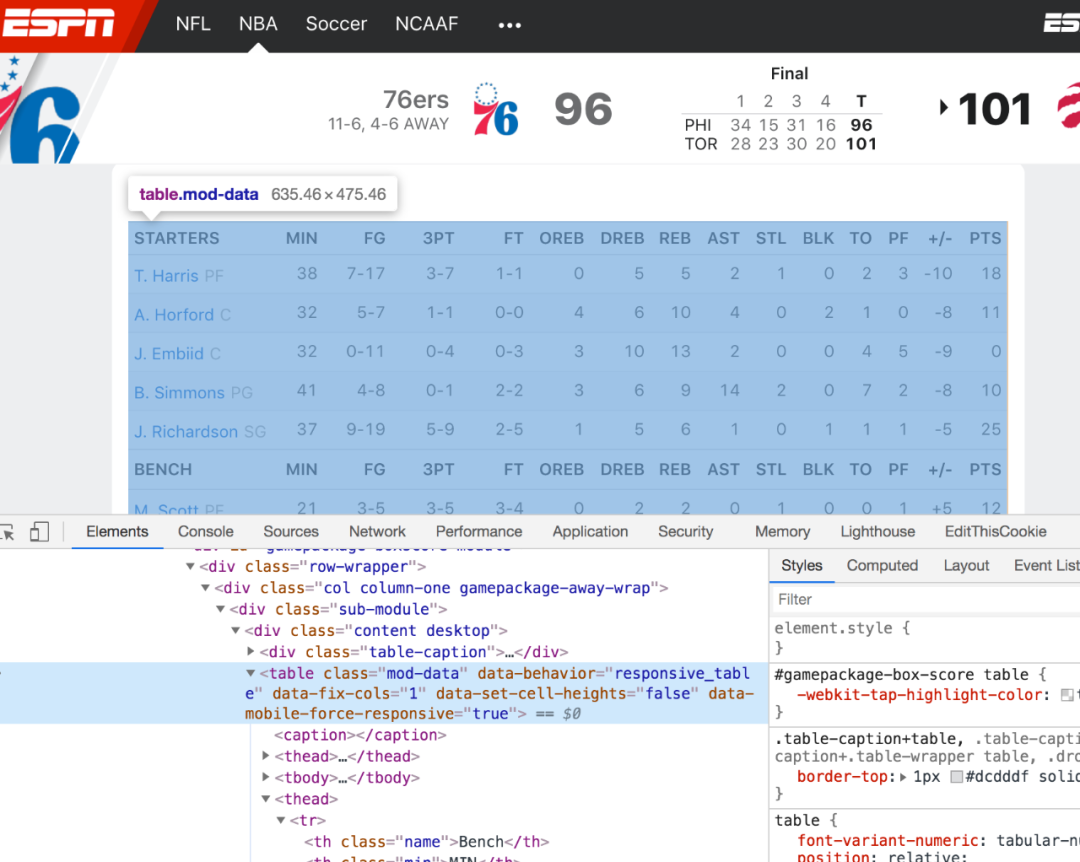
document.querySelectorAll('tr')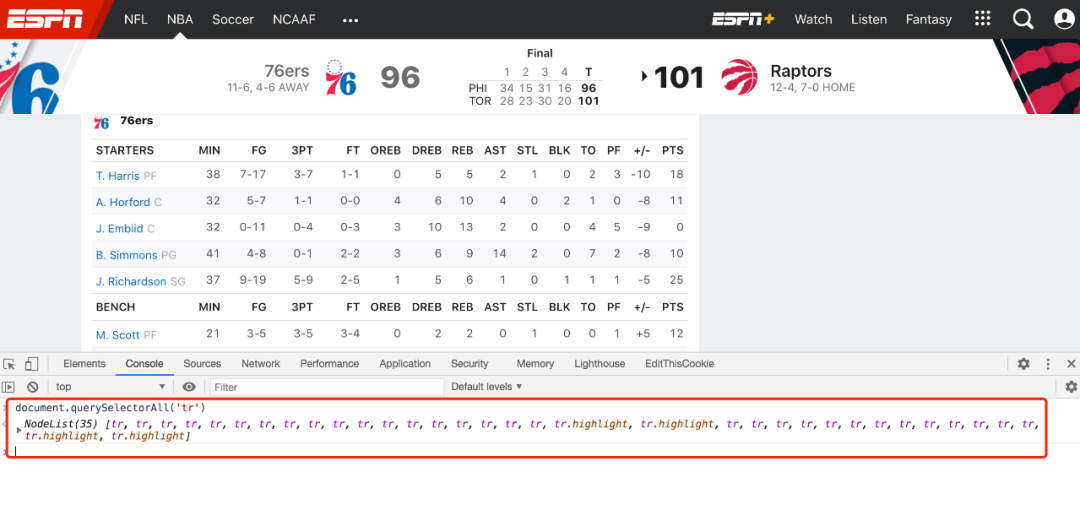

document.querySelectorAll('.gamepackage-away-wrap tbody tr')
ok,大功告成了!接下来,我们要做的是使用Node.js 的 request 库下载 HTML页面,使用cheerio 库解析HTML页面并提取目标数据。document.querySelectorAll('.gamepackage-away-wrap tbody tr:not(.highlight)')> NodeList(13) [tr, tr, tr, tr, tr, tr, tr, tr, tr, tr, tr, tr, tr]
3. 下载 HMTL 页面和上个案例一样,我们先按照 request 库,命令行窗口输入:
然后新建一个 index.js 文件,输入以下代码npm init -ynpm install --save request request-promise-native
运行这个程序const rp = require('request-promise-native');const fs = require('fs');async function downloadBoxScoreHtml() {// where to download the HTML fromconst uri = 'https://www.espn.com/nba/boxscore?gameId=401160888';// the output filenameconst filename = 'boxscore.html';// check if we already have the fileconst fileExists = fs.existsSync(filename);if (fileExists) {console.log(`Skipping download for ${uri} since ${filename} already exists.`);return;}// download the HTML from the web serverconsole.log(`Downloading HTML from ${uri}...`);const results = await rp({ uri: uri });// save the HTML to diskawait fs.promises.writeFile(filename, results);}async function main() {console.log('Starting...');await downloadBoxScoreHtml();console.log('Done!');}main();
node index.js4. 使用 Cheerio 解析 HTMLCheerio 是从 HTML 页面里提取数据的最佳工具库,跟 jQuery 非常类似。安装 Cheerio
npm install --save cheerio第一步,使用 Cheerio.load 函数读取 html文件内容
第二步,使用 css 选择器提取数据,跟 jQuery 语法一样// the input filenameconst htmlFilename = 'boxscore.html';// read the HTML from diskconst html = await fs.promises.readFile(htmlFilename);// parse the HTML with Cheerioconst $ = cheerio.load(html);
const $trs = $('.gamepackage-away-wrap tbody tr:not(.highlight)')进一步使用选择器遍历我们提取到的 html 片段,就能得到目标数据。<tr><td class="name"><a name="&lpos=nba:game:boxscore:playercard" href="https://www.espn.com/nba/player/_/id/6440/tobias-harris" data-player-uid="s:40~l:46~a:6440"><span>T. Harris</span><span class="abbr">T. Harris</span></a><span class="position">SF</span></td><td class="min">38</td><td class="fg">7-17</td><td class="3pt">3-7</td><td class="ft">1-1</td><td class="oreb">0</td><td class="dreb">5</td><td class="reb">5</td><td class="ast">2</td><td class="stl">1</td><td class="blk">0</td><td class="to">2</td><td class="pf">3</td><td class="plusminus">-10</td><td class="pts">18</td></tr>...
数据结果:const values = $trs.toArray().map(tr => {// find all children <td>const tds = $(tr).find('td').toArray();// create a player object based on the <td> valuesconst player = {};for (td of tds) {// parse the <td>const $td = $(td);// map the td class attr to its valueconst key = $td.attr('class');const value = $td.text();player[key] = value;}return player;});
现在你学会了使用 cheerio 库。接下来我们新建 index.js 文件,输入以下代码并运行,即可获取到我们的目标数据。[{"name": "T. HarrisT. HarrisSF","min": "38","fg": "7-17","3pt": "3-7","ft": "1-1","oreb": "0","dreb": "5","reb": "5","ast": "2","stl": "1","blk": "0","to": "2","pf": "3","plusminus": "-10","pts": "18"}...]
小结总结一下,自动抓取数据根据 web 应用开发模式的不同,分为两种方法。前后端分离模式下,我们可以直接使用 API 自动抓取数据;而非前后端分离模式下,我们需要先下载 HTML 网页,再解析 HTML 并提取数据。你学会了吗?参考网站:https://beshaimakes.com/js-scrape-data最后,如果觉得不错,不要忘记你的三连,留下你的三连是对我的最大支持!const rp = require('request-promise-native');const fs = require('fs');const cheerio = require('cheerio');async function downloadBoxScoreHtml() {// where to download the HTML fromconst uri = 'https://www.espn.com/nba/boxscore?gameId=401160888';// the output filenameconst filename = 'boxscore.html';// check if we already have the fileconst fileExists = fs.existsSync(filename);if (fileExists) {console.log(`Skipping download for ${uri} since ${filename} already exists.`);return;}// download the HTML from the web serverconsole.log(`Downloading HTML from ${uri}...`);const results = await rp({ uri: uri });// save the HTML to diskawait fs.promises.writeFile(filename, results);}async function parseBoxScore() {console.log('Parsing box score HTML...');// the input filenameconst htmlFilename = 'boxscore.html';// read the HTML from diskconst html = await fs.promises.readFile(htmlFilename);// parse the HTML with Cheerioconst $ = cheerio.load(html);// Get our rowsconst $trs = $('.gamepackage-away-wrap tbody tr:not(.highlight)');const values = $trs.toArray().map(tr => {// find all children <td>const tds = $(tr).find('td').toArray();// create a player object based on the <td> valuesconst player = {};for (td of tds) {const $td = $(td);// map the td class attr to its valueconst key = $td.attr('class');let value;if (key === 'name') {value = $td.find('a span:first-child').text();} else {value = $td.text();}player[key] = isNaN(+value) ? value : +value;}return player;});return values;}async function main() {console.log('Starting...');await downloadBoxScoreHtml();const boxScore = await parseBoxScore();// save the scraped results to diskawait fs.promises.writeFile('boxscore.json',JSON.stringify(boxScore, null, 2));console.log('Done!');}main();

如果你喜欢,请点点关注啦~
以上
评论
