一篇教程学会Spring Boot线程池的使用

帮助万千Java学习者持续成长

作者|Muscleheng
blog.csdn.net/Muscleheng/article/details/81409672
前言
最近在做订单模块,用户购买服务类产品之后,需要进行预约,预约成功之后分别给商家和用户发送提醒短信。考虑发短信耗时的情况所以我想用异步的方法去执行,于是就在网上看见了Spring的@Async了。
但是遇到了许多问题,使得@Async无效,也一直没有找到很好的文章去详细的说明@Async的正确及错误的使用方法及需要注意的地方,这里简单整理了一下遇见的问题,Sring是以配置文件的形式来开启@Async,而SpringBoot则是以注解的方式开启。
我们可以使用springBoot默认的线程池,不过一般我们会自定义线程池(因为比较灵活),配置方式有:
使用 xml 文件配置的方式
使用Java代码结合@Configuration进行配置(推荐使用)
下面分别实现两种配置方式
第一步、配置@Async
一、springBoot启动类的配置:
在Spring Boot的主程序中配置@EnableAsync,如下所示:
@ServletComponentScan
@SpringBootApplication
@EnableAsync
public class ClubApiApplication {
    public static void main(String[] args) {
        SpringApplication.run(ClubApiApplication.class, args);
    }
}
二、Spring XML的配置方式:
1.applicationContext.xml同目录下创建文件threadPool.xml文件:
<?xml version="1.0" encoding="UTF-8"?>
<beans xmlns="http://www.springframework.org/schema/beans"
    xmlns:xsi="http://www.w3.org/2001/XMLSchema-instance"
    xmlns:task="http://www.springframework.org/schema/task"
    xsi:schemaLocation="http://www.springframework.org/schema/beans http://www.springframework.org/schema/beans/spring-beans.xsd
                        http://www.springframework.org/schema/task http://www.springframework.org/schema/task/spring-task.xsd">

    <!-- 开启异步,并引入线程池 -->
    <task:annotation-driven executor="threadPool" />

    <!-- 定义线程池 -->
    <bean id="threadPool"
        class="org.springframework.scheduling.concurrent.ThreadPoolTaskExecutor">
        <!-- 核心线程数,默认为1 -->
        <property name="corePoolSize" value="10" />

        <!-- 最大线程数,默认为Integer.MAX_VALUE -->
        <property name="maxPoolSize" value="50" />

        <!-- 队列最大长度,一般需要设置值>=notifyScheduledMainExecutor.maxNum;默认为Integer.MAX_VALUE -->
        <property name="queueCapacity" value="100" />

        <!-- 线程池维护线程所允许的空闲时间,默认为60s -->
        <property name="keepAliveSeconds" value="30" />

        <!-- 完成任务自动关闭 , 默认为false-->
        <property name="waitForTasksToCompleteOnShutdown" value="true" />

        <!-- 核心线程超时退出,默认为false -->
        <property name="allowCoreThreadTimeOut" value="true" />

        <!-- 线程池对拒绝任务(无线程可用)的处理策略,目前只支持AbortPolicy、CallerRunsPolicy;默认为后者 -->
        <property name="rejectedExecutionHandler">
            <!-- AbortPolicy:直接抛出java.util.concurrent.RejectedExecutionException异常 -->
            <!-- CallerRunsPolicy:主线程直接执行该任务,执行完之后尝试添加下一个任务到线程池中,可以有效降低向线程池内添加任务的速度 -->
            <!-- DiscardOldestPolicy:抛弃旧的任务、暂不支持;会导致被丢弃的任务无法再次被执行 -->
            <!-- DiscardPolicy:抛弃当前任务、暂不支持;会导致被丢弃的任务无法再次被执行 -->
            <bean class="java.util.concurrent.ThreadPoolExecutor$CallerRunsPolicy" />
        </property>
    </bean>
</beans>
2.然后在applicationContext.xml中引入threadPool.xml:<import resource="threadPool.xml" />
<!--如果不使用自定义线程池,可以直接使用下面这段标签-->
<!--
<task:executor id="WhifExecutor" pool-size="10"/>
-->
<import resource="threadPool.xml" />
<task:annotation-driven executor="WhifExecutor" />
第二步:创建两个异步方法的类,如下所示:
第一个类(这里模拟取消订单后发短信,有两个发送短信的方法):
@Service
public class TranTest2Service {


    // 发送提醒短信 1
    @Async
    public void sendMessage1() throws InterruptedException {

        System.out.println("发送短信方法---- 1   执行开始");
        Thread.sleep(5000); // 模拟耗时
        System.out.println("发送短信方法---- 1   执行结束");
    }

    // 发送提醒短信 2
    @Async
    public void sendMessage2() throws InterruptedException {

        System.out.println("发送短信方法---- 2   执行开始");
        Thread.sleep(2000); // 模拟耗时
        System.out.println("发送短信方法---- 2   执行结束");
    }
}
第二个类。调用发短信的方法 (异步方法不能与被调用的异步方法在同一个类中,否则无效):
@Service
public class OrderTaskServic {
    @Autowired
    private TranTest2Service tranTest2Service;

    // 订单处理任务
    public void orderTask() throws InterruptedException {

        this.cancelOrder(); // 取消订单
        tranTest2Service.sendMessage1(); // 发短信的方法   1
        tranTest2Service.sendMessage2(); // 发短信的方法  2

    }

    // 取消订单
    public void cancelOrder() throws InterruptedException {
        System.out.println("取消订单的方法执行------开始");
        System.out.println("取消订单的方法执行------结束 ");
    }

}
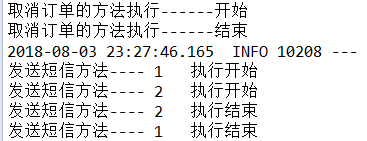
经过测试得到如下结果:
1.没有使用@Async

2.使用了@Async

可以看出,没有使用@Async方式实现的发送短信是同步执行的,意思就是说第一条发送之后再发送第二条,第二条发送成功之后再给用户提示,这样显然会影响用户体验,再看使用了@Async实现的,在执行第一个发送短信方法之后马上开启另一个线程执行第二个方法,显然这样我们的处理速度回快很多。
使用Java代码结合@Configuration注解的配置方式(推荐使用)
1. 新建一个配置类
package com.boot.common.conf;

import java.util.concurrent.ThreadPoolExecutor;

import org.springframework.context.annotation.Bean;
import org.springframework.context.annotation.Configuration;
import org.springframework.scheduling.annotation.EnableAsync;
import org.springframework.scheduling.concurrent.ThreadPoolTaskExecutor;

/**
 * 线程池配置
 * @author zhh
 *
 */
@Configuration
@EnableAsync
public class ThreadPoolTaskConfig {

/**
 *   默认情况下,在创建了线程池后,线程池中的线程数为0,当有任务来之后,就会创建一个线程去执行任务,
 *    当线程池中的线程数目达到corePoolSize后,就会把到达的任务放到缓存队列当中;
 *  当队列满了,就继续创建线程,当线程数量大于等于maxPoolSize后,开始使用拒绝策略拒绝
 */

    /** 核心线程数(默认线程数) */
    private static final int corePoolSize = 20;
    /** 最大线程数 */
    private static final int maxPoolSize = 100;
    /** 允许线程空闲时间(单位:默认为秒) */
    private static final int keepAliveTime = 10;
    /** 缓冲队列大小 */
    private static final int queueCapacity = 200;
    /** 线程池名前缀 */
    private static final String threadNamePrefix = "Async-Service-";

    @Bean("taskExecutor") // bean的名称,默认为首字母小写的方法名
    public ThreadPoolTaskExecutor taskExecutor(){
        ThreadPoolTaskExecutor executor = new ThreadPoolTaskExecutor();
        executor.setCorePoolSize(corePoolSize);
        executor.setMaxPoolSize(maxPoolSize);
        executor.setQueueCapacity(queueCapacity);
        executor.setKeepAliveSeconds(keepAliveTime);
        executor.setThreadNamePrefix(threadNamePrefix);

        // 线程池对拒绝任务的处理策略
        // CallerRunsPolicy:由调用线程(提交任务的线程)处理该任务
        executor.setRejectedExecutionHandler(new ThreadPoolExecutor.CallerRunsPolicy());
        // 初始化
        executor.initialize();
        return executor;
    }
}
2.创建两个异步方法的类(和之前的类类似仅仅是方法上注解不一样),如下所示:
第一个类(这里模拟取消订单后发短信,有两个发送短信的方法):
package com.boot.test1.service;

import org.slf4j.Logger;
import org.slf4j.LoggerFactory;
import org.springframework.scheduling.annotation.Async;
import org.springframework.stereotype.Service;

@Service
public class TranTest2Service {
    Logger log = LoggerFactory.getLogger(TranTest2Service.class);

    // 发送提醒短信 1
        @PostConstruct // 加上该注解项目启动时就执行一次该方法
    @Async("taskExecutor")
    public void sendMessage1() throws InterruptedException {
        log.info("发送短信方法---- 1   执行开始");
        Thread.sleep(5000); // 模拟耗时
        log.info("发送短信方法---- 1   执行结束");
    }

    // 发送提醒短信 2
        @PostConstruct // 加上该注解项目启动时就执行一次该方法
    @Async("taskExecutor")
    public void sendMessage2() throws InterruptedException {

        log.info("发送短信方法---- 2   执行开始");
        Thread.sleep(2000); // 模拟耗时
        log.info("发送短信方法---- 2   执行结束");
    }
}
代码中的 @Async("taskExecutor") 对应我们自定义线程池中的 @Bean("taskExecutor") ,表示使用我们自定义的线程池。
第二个类。调用发短信的方法 (异步方法不能与被调用的异步方法在同一个类中,否则无效):
@Service
public class OrderTaskServic {
    @Autowired
    private TranTest2Service tranTest2Service;

    // 订单处理任务
    public void orderTask() throws InterruptedException {

        this.cancelOrder(); // 取消订单
        tranTest2Service.sendMessage1(); // 发短信的方法   1
        tranTest2Service.sendMessage2(); // 发短信的方法  2

    }

    // 取消订单
    public void cancelOrder() throws InterruptedException {
        System.out.println("取消订单的方法执行------开始");
        System.out.println("取消订单的方法执行------结束 ");
    }

}
运行截图:

注意看,截图中的 [nio-8090-exec-1] 是Tomcat的线程名称
[Async-Service-1]、[Async-Service-2]表示线程1和线程2 ,是我们自定义的线程池里面的线程名称,我们在配置类里面定义的线程池前缀:
private static final String threadNamePrefix = "Async-Service-"; // 线程池名前缀,说明我们自定义的线程池被使用了。
注意事项
如下方式会使@Async失效
异步方法使用static修饰
异步类没有使用@Component注解(或其他注解)导致spring无法扫描到异步类
异步方法不能与被调用的异步方法在同一个类中
类中需要使用@Autowired或@Resource等注解自动注入,不能自己手动new对象
如果使用SpringBoot框架必须在启动类中增加@EnableAsync注解
