用 Python 将微信热文转换成Word文档 | 神级操作
不得不说微信公众号已经成为了一个开放平台,每天数以万计的微信公众号文章在这产生,我们关注一个微信公众号每天便可以看到新的文章,我们同时也不知不觉的将好的文章分享到给朋友。
那么如何保存一个好的文章呢?普遍选择收藏,然而在这里,我提供一个更巧妙的方法,直接转换成word文档保存在电脑里面。即便是以后文章404了,我们还可以看得到嘛。

一篇微信文章,url开头一定是https://mp.weixin.qq.com/s/,后面跟着一长串字符串,比如qLjifoyinoVN5i5vjW0f7w。
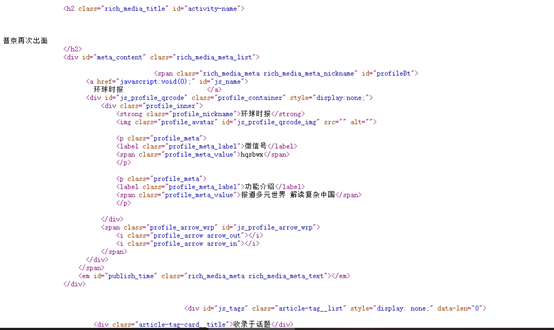
查看网页源代码,我们发现


微信热文的网页源代码很长,即便是上面的一个很简短的文章,但我们要从中提取到我们想要的东西,比如
<h2id="activity-name">普京再次出面h2>妥妥的文章题目,我们要把它保存为word文档,题目肯定少不了。
<div id="js_profile_qrcode"class="profile_container" style="display:none;">
 <div>
   <strong>环球时报strong>
   <imgid="js_profile_qrcode_img" src="" alt="">
   <p>
     <label>微信号label>
     <spanclass="profile_meta_value">hqsbwxspan>p>
   <p>
     <label>功能介绍label>
     <span>报道多元世界 解读复杂中国span>p>
 div>
这里一下子就提示了这篇文章是那个微信号发布的,而且还有微信号的介绍,这也是我们需要的信息
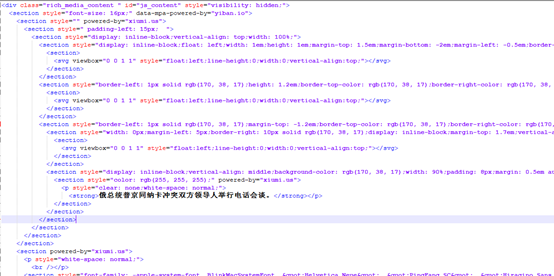
<div id="js_content" style="visibility: hidden;">这个就是正文的标签了,这个标签里面蕴含着正文,下面是正文的第一个标签,我们将它格式化一下,如下

我们发现section套了很多层,但是实际上,这第一个标签就这一句话是重点:“俄总统普京同纳卡冲突双方领导人举行电话会谈。”

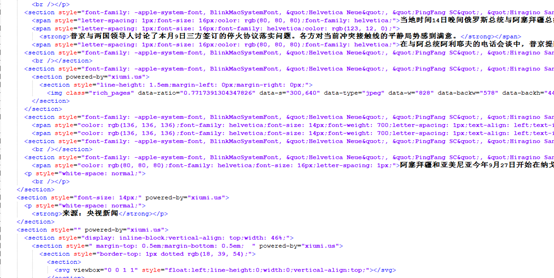
下一个标签也是section,但是涵盖了好几句话。我们发现了span标签和strong标签。而且出现了很多次rgb(),我们知道rgb是代表标签内字体的颜色的。当然,strong是标签内加粗咯。
<img data-ratio="0.7717391304347826" data-s="300,640"data-type="jpeg" data-w="828" data-backw="578"data-backh="446" src="https://mmbiz.qpic.cn/mmbiz_jpg/qkQTRn2Z9NwC8nNHScsBAFeOFtHHb95ftWKOZve0QJMqJPFtoicdYO8uTWom8fBdG07icCKDo0FoyNjHUyoBibI2g/640?wx_fmt=jpeg"style="text-align: center;width: 660.994px;box-sizing: border-box!important;visibility: visible !important;" />另一个图片标签
<img data-ratio="1.345"src=""color: rgb(249, 38, 114);">mmbiz.qpic.cn/mmbiz_gif/wlCrBZoK8HF5AE2ibhItnFJgoIQBcJhTzO438azQniaRJRYNFk0CzlORnm0g1hG7HX3bhXAIC1J4E2XGb1WKA4qA/640?wx_fmt=gif"data-type="gif" data-w="200" style="vertical-align:middle;box-sizing: border-box;" />这个是图片的标签,里面蕴含着很多重要的东西,比如,data-type="gif",表明这是一个gif文件,src指向了图片的地址,data-w="200",代表图片的宽度,这很重要。
格式化后的内容如下所示


标签套标签,让人眼花缭乱。
不过,还是一步一步来吧。
2、设计代码,步步分析
这一步我们需要开始编写代码了,python-docx是一个生成和处理docx的第三方库,使用pip install python-docx 一键下载
需要用到的第三方库有,python-docx,bs4(用于html解析处理)
from docx import Document
from docx.oxml.ns import qn
import re
from docx.shared import RGBColor,Inches,Pt
from urllib.request import urlopen,Request
from bs4 import BeautifulSoup
from docx.enum.text import WD_PARAGRAPH_ALIGNMENT
import io
from os.path import join


qingqiu={'User-Agent':"Mozilla/5.0 (Windows NT 6.1; WOW64) AppleWebKit/535.11 (KHTML, like Gecko) Chrome/17.0.963.56 Safari/535.11",
      'Accept':'text/plain, text/html'
      }
编写一个简单的过滤函数,因为我们得到文章标题后,需要将文章标题中一些字符删去,比如换行符,空格,以及{}?
/|\等字符,因为含有这些字符的字符串不能做文件名
def guolv(text):
    t = re.sub('\s', '', text)
    t = re.sub('[?<>()[\]{}|]', ':', t)
    return t
假设微信url已经确定,在这里我们编写一个类,这个类专门用来处理的。
class WX_doc():
    def __init__(self, url, path):
        self.img_num = 0
        self.doc = Document()
        self.doc.styles['Normal'].font.name = '微软雅黑'
        self.doc.styles['Normal']._element.rPr.rFonts.set(qn('w:eastAsia'), '微软雅黑')
        self.url = url
        self.path = path
self.img_num是针对img处理的,每处理一个img,self.img_num+=1,请注意,最好设置好文章的字体,因为python-docx默认字体显示中文会比较难看……不信你可以去试试。当然也可以将字体设为宋体
url是指微信热文的链接,path是Word文档处理完后的保存路径。
接下来是一个插入一个标题的方法。
注:
我们设单独的def开头的为函数,包含在class内的def开头的为方法
def head(self, title, lv=3, size=13):
    p = self.doc.add_heading('', lv)
    p.paragraph_format.alignment = WD_PARAGRAPH_ALIGNMENT.CENTER
    r = p.add_run(title)
    r.font.name = '微软雅黑'
    r.font.color.rgb = RGBColor(0, 0, 0)
    r.font.size = Pt(size)
    r._element.rPr.rFonts.set(qn('w:eastAsia'), u'微软雅黑')
将标题插入后,设置为居中,颜色黑色,大小默认13,字体微软雅黑。
2、巧妙处理标签
对于正文来讲,标签套标签让人眼花缭乱,然而我们如何处理正文中的文字,图像甚至表格呢?
,对于标签套标签,我设计的思路是:
用对应的标签方法处理标签
hd = Request(self.url, headers=qingqiu)
a = urlopen(hd)
b = a.read()
bb = b.decode('UTF-8')
bs = BeautifulSoup(bb, 'lxml')
h2 = bs.find('h2', {'class': "rich_media_title"})
title = guolv(h2.text)
self.head(title, 2, 18)

pingtai = bs.find('strong', {'class': "profile_nickname"})
PMV=bs.findAll('span',{'class':'profile_meta_value'})
p = self.doc.add_paragraph()
r = p.add_run('%s' % pingtai.text)
r.font.bold = True
r.font.color.rgb = RGBColor(0, 191, 255)
r.font.size = Pt(12)
r=p.add_run('(%s: %s)'%(PMV[0].text,PMV[1].text))
r.font.size = Pt(9)

wb = bs.find('div', {'class': "rich_media_content"})
这样一处理,bs就是整篇微信文章的BeautifulSoup结构的html,这样处理就方便的多。
对于标题和发布者的,我们放到后面处理,现在要考虑正文的处理,wb就是正文的bs结构。
如何编写标签函数?我假定只关注字体的颜色和加粗,其余字体大小不考虑(这样的话保存的文章样式是一致的),使用RGB代表颜色,比如RGB=(0,0,0)就是纯黑了,bold代表加粗,bold=True就是加粗。
标签
p代表段落,p标签内的文字会形成一个段。对应doc中的add_paragraph方法,接下来我们编写WX_doc的第一个标签处理方法。默认字体颜色黑色,不加粗。
def para(self, label):
    p = self.doc.add_paragraph('')
    for i in label:
        self.transit(i,p, (0, 0, 0), False)
这样就完了,主要操作就是,将p中每一个标签拿出来,交给transit函数处理,transit会针对相应的标签交给相应的标签方法。
但是如果出现这样的情况,p内含p,就像section一样一层套一层,那么需要另一个p处理方法
def para2(self,label,p,RGB,bold):
    "解决p内含p的情况"
    for i in label:
        self.transit(i,p, RGB, bold)
对于后面的标签处理方法,我们规定,需4个参数,第一个BeautifulSoup结构的标签label,第二个,所属的段落p,为doc.add_paragraph方法返回的段落p,第三个和第四个为RGB和bold。
标签
Span标签出险率极高,基本上每段文字都会出现,我们假定span中的style设定文字的颜色。
比如这一段span
<spanstyle="letter-spacing: 1px;font-size: 16px;font-family: helvetica;color: rgb(123,12, 0);"><strong>普京与两国领导人讨论了本月9日三方签订的停火协议落实问题。各方对当前冲突接触线的平静局势感到满意。strong>span>多次观察后,编写的处理方法如下
def span(self, label, p, RGB, bold):
    attr = label.attrs.get('style')
    if attr:
        ys = re.findall('(?<=rgb\()[\s\S]+?(?=\))', attr)
    else:
        ys=[]
    if ys:
        rgb = re.findall('\d+', ys[0])
        r = int(rgb[0])
        g = int(rgb[1])
        b = int(rgb[2])
        RGB = (r, g, b)
    for i in label:
        if i.name == None:
            self.text(i,p, RGB, bold)
        elif i.name == "strong":
            self.strong(i,p, RGB, bold)
        else:
            self.transit(i,p, RGB, bold)
当BeautifulSoup结构下的标签结构为None时,它就是一段纯文字
Text 纯文字处理
处理纯文字用的方法,需要注意的是,要将文字中的换行符删去。
def text(self, i, p, RGB, bold):
    i=str(i)
    i=i.replace('\n','')
    r = p.add_run(i)
    r.font.bold = bold
    r.font.color.rgb = RGBColor(RGB[0], RGB[1], RGB[2])
标签
Strong就是加粗
def strong(self, label, p, RGB, bold):
    for i in label:
        if i.name == None:
            self.text(i,p, RGB, True)
        elif i.name == 'span':
            self.span(i,p, RGB, True)
Section常常会出现套叠的情况,即便是里面有字体颜色大小的指示,我还是以span指示的颜色为准。那么如何正确处理section便是一个难题。
<sectionstyle="font-family: -apple-system-font, BlinkMacSystemFont, "HelveticaNeue", "PingFang SC", "Hiragino SansGB", "Microsoft YaHei UI", "MicrosoftYaHei", Arial, sans-serif;letter-spacing: 0.544px;white-space:normal;background-color: rgb(255, 255, 255);line-height: 1.5em;margin-left:0px;margin-right: 0px;">
<span style="color: rgb(136,136, 136);font-family: helvetica;font-size: 14px;font-weight:700;letter-spacing: 1px;text-align: left;text-indent: 28px;widows: 1;">▲span>
<span style="color: rgb(136,136, 136);font-family: helvetica;font-size: 14px;font-weight:700;letter-spacing: 1px;text-align: left;text-indent: 28px;widows: 1;">俄总统网站声明截图span>section>上面的section中出现了span,所以思路来了,遍历section中的标签,如果出现span和stong,直接按段落处理
def section(self,label):
    for i in label:
        if i.name=='p':
            self.para(i)
        elif i.name in ['span','strong']:
            self.para(label)
            return 0
        elif i.name=='section':
            self.section(i)
        elif i.name in ['ul','ol']:
            self.ul2(i)
        elif i.name=='img':
            self.img(i)
        elif i.name in ['br','svg','center']:
            pass
        elif i.name=='blockquote':
            self.blockquote(i)
        elif i.name=='pre':
            self.pre(label)
        else:
            print('section中:%s:%s'%(i.name,str(i)))
最后else表示没有这个标签的处理函数,就提示这个标签的位置,以及名称,所含内容
mmbiz.qpic.cn/mmbiz_jpg/qkQTRn2Z9NwC8nNHScsBAFeOFtHHb95ftWKOZve0QJMqJPFtoicdYO8uTWom8fBdG07icCKDo0FoyNjHUyoBibI2g/640?wx_fmt=jpeg"style="text-align: center;width: 660.994px;box-sizing: border-box!important;visibility: visible !important;" /> 我们发现data-w是设定图片的宽度,当图片过大的时候,需要将图片宽度设定好。Img处理函数如下 transit方法 最后我们编写transit方法 transit函数要处理一个标签,如果已经编写好了这个标签方法,那么将这个标签交给对应的标签方法处理,如果没有,就提示这个标签的位置,以及名称,所含内容 main 核心处理 最后我们当然是处理并且转换成文档啦,加入文章标题,发布者,和内容,直接发完整代码吧,如下: 3、实战测试 运行后输入微信url,结果如下: 保存下来的Word文档如下: 4、其他标签的处理说明 刚刚我们仅仅是编写了section,span,p,strong等标签,就可以对付一个简单的文章,但是实际上还有其他的标签,仅仅是这篇文章没出现而已。所以为了让这程序越来越好,我们需要添加一些标签处理的方法。 Blockquote代表着引用,比如文章引用的哪句话,抄了哪些文献的句子,都用这个标签。为了和正文区别,我将字体大小设置为9默认颜色(100,100,100)
<imgdata-ratio="1.345"src=""color: rgb(249, 38, 114);">mmbiz.qpic.cn/mmbiz_gif/wlCrBZoK8HF5AE2ibhItnFJgoIQBcJhTzO438azQniaRJRYNFk0CzlORnm0g1hG7HX3bhXAIC1J4E2XGb1WKA4qA/640?wx_fmt=gif"data-type="gif" data-w="200" style="vertical-align:middle;box-sizing: border-box;" />def img(self, label):
src = label.attrs['src']
da_s = label.attrs.get('data-s')
data_type = label.attrs.get('data-type')
data_w = label.attrs.get('data-w')
self.img_num += 1
a = urlopen(src)
b = a.read()
path = io.BytesIO(b)
if da_s:
num = re.findall('\d+', da_s)
h = int(num[0]) // 75
w = int(num[1]) // 75
if w > 6:
self.doc.add_picture(path, width=Inches(6))
else:
self.doc.add_picture(path, width=Inches(w), height=Inches(h))
elif data_w:
data_w = int(data_w)
if data_w < 75:
# 标签太小,直接忽略
print('忽略太小图片%d.%s' % (self.img_num, data_type))
elif data_w > 450:
self.doc.add_picture(path, width=Inches(6))
else:
self.doc.add_picture(path, width=Inches(data_w / 75))
else:
self.doc.add_picture(path, width=Inches(6))
print("图片%d打入成功!" % (self.img_num - 1))def transit(self, label, p, RGB, bold):
"本函数提供label的中转方案 其中br由中转方案解决"
if label.name == 'span':
self.span(label, p,RGB,bold)
elif label.name == None:
self.text(label, p,RGB,bold)
elif label.name in ['strong','em']:
self.strong(label, p,RGB,bold)
elif label.name=='section':
self.section(label)
elif label.name =='p':
self.para2(label,p,RGB,bold)
elif label.name == 'img':
self.img(label)
elif label.name in ['br','svg','mpcpc','center']:
pass
elif label.name == 'a':
self.link(label, p,RGB,bold)
elif label.name == 'iframe':
self.iframe(label, p)
elif label.name == 'blockquote':
self.blockquote(label)
elif label.name == 'ul':
self.ul(label, p)
elif label.name=='pre':
self.pre(label)
else:
print('p中:%s %s'%(str(label.name),str(label.text)))
t = label.text
if len(t) < 2:
return 0
r = p.add_run(t)
r.font.bold = bold
r.font.color.rgb = RGBColor(RGB[0], RGB[1], RGB[2])def main(self) -> None:
hd = Request(self.url, headers=qingqiu)
a = urlopen(hd)
b = a.read()
bb = b.decode('UTF-8')
bs = BeautifulSoup(bb, 'lxml')
h2 = bs.find('h2', {'class': "rich_media_title"})
title = guolv(h2.text)
self.head(title, 2, 18)
pingtai = bs.find('strong', {'class': "profile_nickname"})
PMV=bs.findAll('span',{'class':'profile_meta_value'})
p = self.doc.add_paragraph()
r = p.add_run('%s' % pingtai.text)
r.font.bold = True
r.font.color.rgb = RGBColor(0, 191, 255)
r.font.size = Pt(12)
r=p.add_run('(%s: %s)'%(PMV[0].text,PMV[1].text))
r.font.size = Pt(9)
wb = bs.find('div', {'class': "rich_media_content"})
for i in wb:
if i.name =='p':
self.para(i)
elif i.name=='section':
self.section(i)
elif i.name == 'blockquote':
self.blockquote(i)
elif i.name == 'table':
self.table(i)
elif i.name in[None,'center','hr']:
pass
elif i.name in ['h1', 'h2', 'h3','h4']:
self.head(i.text, int(i.name[1]) + 1)
elif i.name in ['ul','ol']:
self.ul2(i)
elif i.name == 'pre':
self.pre(i)
else:
print("%s"%str(i))
self.save_docx(title)
wz_pa=join(self.path,title+'.docx')
print('文档保存成功!保存路径:%s'%wz_pa)
self.ok=False
print(wz_pa)

标签
def blockquote(self, label):
    "定义一个摘自另一个源的块引用"
    p = self.doc.add_paragraph('')
    p.style.font.size = Pt(9)
    for i in label:
        self.transit(i,p,(100,100,100),False)
