来看看这是什么,Flutter学习(下)
五、 选项卡Tab布局
1. Tab选项卡布局
DefaultTabController 标签控制器组件
TabBar 标签栏组件
TabBarView 标签内容组件
2. 添加标签控制器
DefaultTabController
length 定义标签个数
定义一个 Scaffold标准布局
定义一个 appBar 头部栏
定义一个 bottom
DefaultTabController(length: 2,child: Scaffold(appBar: AppBar(title: Text('Tabs'),elevation: 0.0,bottom: TabBar(tabs: <Widget>[],),),body: TabBarView(children: <Widget>[],)),),
3. 添加标签栏
添加一组标签栏组件
每个组件都是Tab类型
TabBar(tabs: <Widget>[Tab(text: '我的收藏',),Tab(text: '我的历史',),],),
4. 添加标签栏内容
添加一组标签栏内容组件
TabBarView(children: <Widget>[Text('收藏'),Text('历史'),],)
5. 自定义标签栏的样式
标签边距
下划线长度
下划线粗细
下划线颜色
标签颜色
未选择状态的颜色
TabBar(labelPadding: EdgeInsets.only(left: 20.0, right: 20.0),indicatorSize: TabBarIndicatorSize.label,indicatorWeight: 3.0,indicatorColor: Colors.blueAccent,unselectedLabelColor: Colors.black54,labelColor: Colors.blue,labelStyle: TextStyle(fontSize: 14.0,),tabs: ...,),
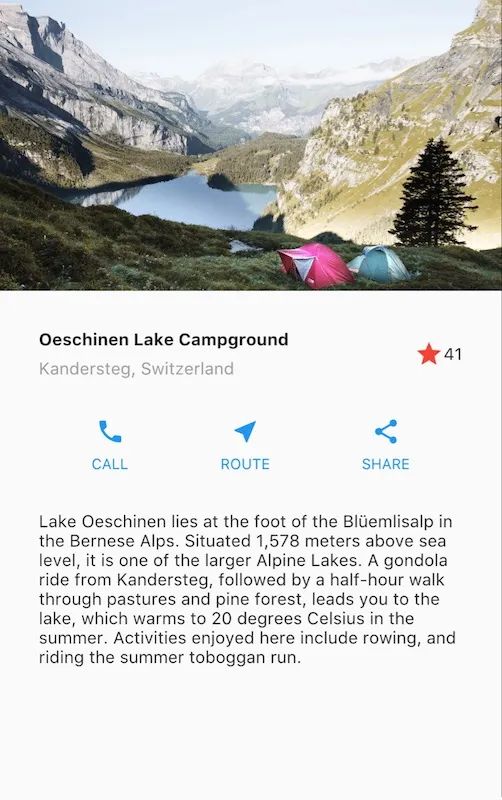
六、 布局小案例

布局:垂直布局
图片
Row 水平布局
标题Text
副标题Text
Column 垂直布局
图标 星星
数字
图标栏 Row 水平布局
图标
文字
图标
文字
图标
文字
Column 垂直布局
Column 垂直布局
Column 垂直布局
段落文本 Text
1. ListView 可以滚动的垂直布局
ListView(children: [Image.asset('images/pic.jpg',),标题组件,按钮组件,文本组件,],),
2.载入资源图片
在工程根目录创建一个 images 文件夹.
添加 pic.jpg.
更新 pubspec.yaml 文件以包含 assets 标签.
Image.asset('images/pic.jpg',height: 240.0,fit: BoxFit.cover,),
3. 标题行
定义一个充满剩余空间的部件 Expanded
定义垂直布局的标题文字和副标题文字
定义图标组件
数字
Row(children: [Expanded(child: Column(crossAxisAlignment: CrossAxisAlignment.start,children: [Container(padding: const EdgeInsets.only(bottom: 8.0),child: Text(Lake Campground',style: TextStyle(fontWeight: FontWeight.bold,),),),Text(Switzerland',style: TextStyle(color: Colors.grey[500],),),],),),Icon(Icons.star,color: Colors.red[500],),Text('41'),],),
4. 按钮行
按钮三个横排排列 Row的对齐方式
Row(mainAxisAlignment: MainAxisAlignment.spaceEvenly,children: [按钮,按钮,按钮,],),Column(mainAxisAlignment: MainAxisAlignment.center,children: [Icon(图标),Container(margin: const EdgeInsets.only(top: 8.0),child: Text(文字,style: TextStyle(fontSize: 12.0,fontWeight: FontWeight.w400,color: 颜色,),),),],);
5.优化小图标
创建一个可传参的自定义图标小组件
class IconWiget extends StatelessWidget {final IconData icon;final String text;IconWiget(this.icon,this.text);@overrideWidget build(BuildContext context) {return Column(mainAxisAlignment: MainAxisAlignment.center,children: [icon,Container(margin: const EdgeInsets.only(top: 8.0),child: Text(text,style: TextStyle(fontSize: 12.0,fontWeight: FontWeight.w400,color: 颜色,),),),],}}
使用小图标
Row(mainAxisAlignment: MainAxisAlignment.spaceEvenly,children: [IconWiget(图标1,'CALL'),IconWiget(图标2,'ROUTE'),IconWiget(图标3,'SHARE'),],),
6. 文本
Container(padding: const EdgeInsets.all(32.0),child: Text(文本,),);
八、 更多组件
1. 固定宽高比组件
AspectRatio 组件
AspectRatio(aspectRatio: 16.0 / 9.0,child: Container(color: Color.fromRGBO(3, 54, 255, 1.0),),);
aspectRatio 定义盒子比例
根据父级盒子
2. 层叠堆放组件
Stack 组件
定义第一个最底层的组件
通过Positioned组件来定义对位组件
定义方位属性
alignment对齐属性
定义多个子组件
```Stack(alignment: Alignment.topLeft,children: <Widget>[// 第一个子组件在最下面decoration: BoxDecoration(color: Color.fromRGBO(3, 54, 255, 1.0),borderRadius: BorderRadius.circular(8.0),),),//做层叠定位的组件right: 20.0,top: 20.0,child: Icon(Icons.ac_unit, color: Colors.white, size: 16.0),),Positioned(right: 40.0,top: 60.0,child: Icon(Icons.ac_unit, color: Colors.white, size: 18.0),),],);```
3. 固定尺寸组件
SizedBox 组件
SizedBox(height: 32.0,width: 100.0),
固定宽度
固定高度
4. 水平分割线组件
Divider 组件
Divider(height: 1.0,)
颜色设置
固定高度
5. 列表行组件
ListTile 组件
ListTile(title: Text('我的账户'),subtitle: Text('data'),leading: Icon(Icons.account_box),trailing: Icon(Icons.account_box),onTap: (){print('按下了我的账户');},),
-
行前图标 -
行尾图标 -
标题 -
副标题 -
点按动作
6.Tag标签组件
Chip 组件
Chip(label: Text('Tag'),backgroundColor: Colors.orange,: CircleAvatar(backgroundColor: Colors.grey,child: Text('e'),),onDeleted: () {},deleteIcon: Icon(Icons.delete),),
文字 label
背景颜色 backgroundColor
行前图标 avatar
删除按钮 onDeleted
九、 表单输入
1. 文本输入
使用文本框组件
TextField()
2. 文本输入样式
decoration 装饰属性
TextField(decoration: InputDecoration(icon: Icon(Icons.subject),labelText: '姓名',hintText: '请输入',border: InputBorder.none,border: OutlineInputBorder(),filled: true,),);
Icon 图标
labelText 提示
hintText 预置提示
border 边框
filled 背景颜色
3. 输入监听
onChanged 改变
onSubmitted 确认按钮
onChanged: (value) {debugPrint('input: $value');},onSubmitted: (value) {debugPrint('submit: $value');},
密码框
obscureText
4.状态组件
StatefulWidget 添加一个有状态的组件
class Form extends StatefulWidget {_FormState createState() => _FormState(); //为组件建立状态管理}class _FormState extends State<Form> { //创建有状态的组件Widget build(BuildContext context) {return Container();}}
可以有数据改变的组件
十、 按钮
1. 浮动按钮
FloatingActionButton
FloatingActionButton(child: Icon(Icons.arrow_back),onPressed: () {},elevation: 0.0,backgroundColor: Colors.black26,),
点按动作
阴影
背景颜色
在Scaffold底部工具栏中使用浮动按钮
floatingActionButton: floatingActionButton(),floatingActionButtonLocation: FloatingActionButtonLocation.centerDocked,
在Scaffold布局中定义个一个浮动按钮
在Scaffold布局中创建底部工具栏
使底部工具栏贴合浮动按钮
2. 文字按钮
文字按钮
文字
点按动作
文字颜色
FlatButton(child: Text('按钮'),onPressed: () {},textColor: Colors.blue,),
带小图标的文字按钮
FlatButton.icon(icon: Icon(Icons.add),label: Text('按钮'),onPressed: () {},textColor: Colors.blue,),
4. 带效果的按钮
RaisedButton 带水墨效果的按钮
RaisedButton(child: Text('按钮'),onPressed: () {},splashColor: Colors.grey,elevation: 0.0,),
带小图标的 RaisedButton
splashColor 修改水墨效果的颜色
RaisedButton.icon(icon: Icon(Icons.add),label: Text('按钮'),onPressed: () {},splashColor: Colors.grey,elevation: 12.0,),
5. 边框按钮
OutlineButton(child: Text('按钮'),onPressed: () {},splashColor: Colors.grey[100],borderSide: BorderSide(color: Colors.black,),textColor: Colors.black,),
八、 路由
1. 跳转与返回
Navigator.push 方法是向路由堆中添加一个新的路由
Navigator.push(context, MaterialPageRoute(builder: (context) => Show()));
MaterialPageRoute的build方法返回一个新的组件并跳转
Navigator.pop 方法是从路由堆里面拿出最前面的路由
Navigator.pop(context);路由使用context参数传入
2. 初始路由
可以在MaterialApp中初始化一些路由
routes: {'/': (context) => Home(),'/about': (context) => Page(),'/user': (context) => UserPage(),},
4. 带名字的路由
使用 Navigator.pushNamed 跳转到一个带名字的路由
Navigator.pushNamed(context, '/about');
