
自学鸿蒙应用开发(44)- 秒表应用开发(2)
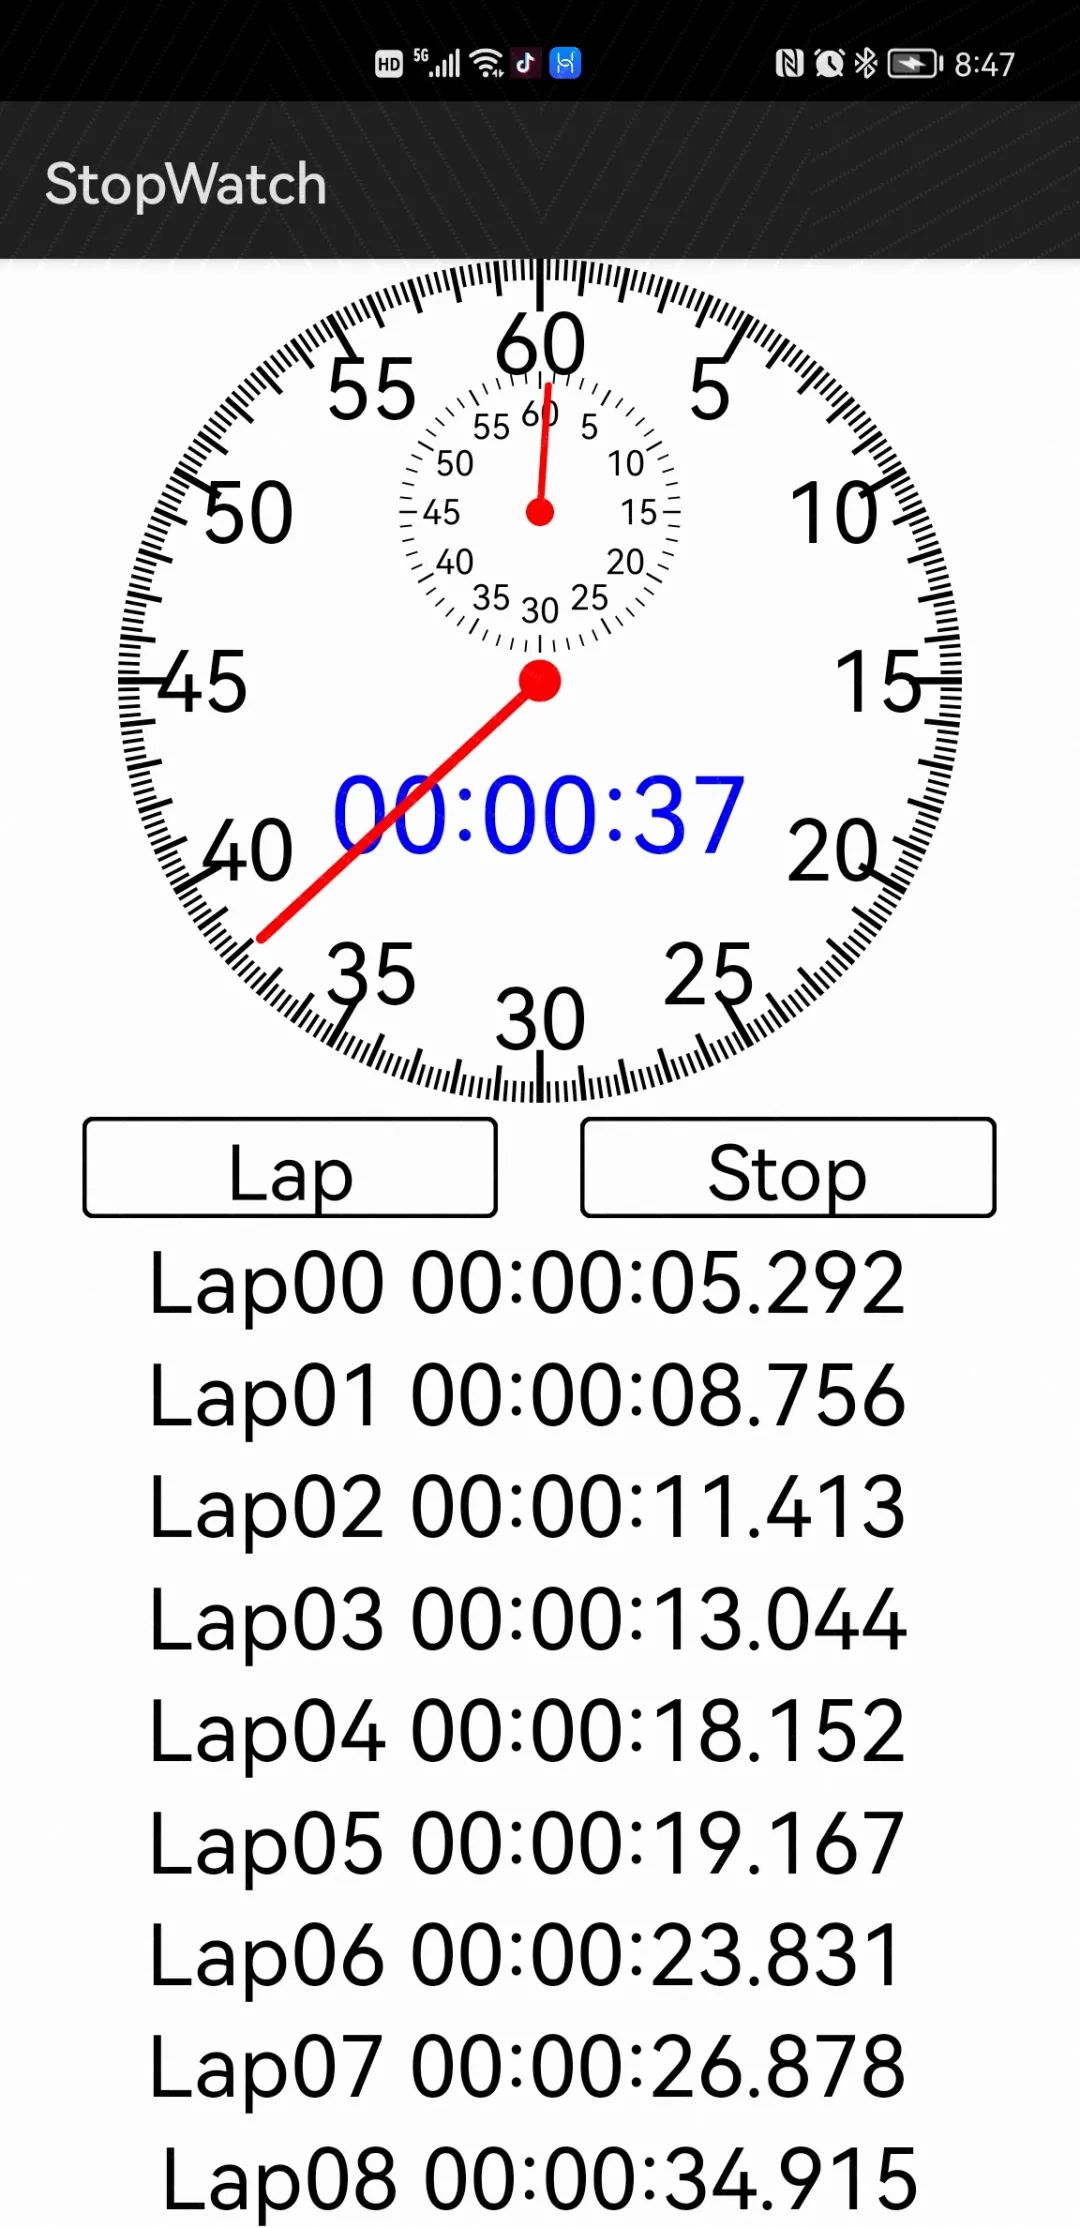
经过几天的开发,秒表应用终于初具规模了,先看执行效果:
指针式秒表组件
下面是自定义指针式模拟秒表组件的实现代码。具体内容参见注释。
//指针式秒表组件类public class AnalogStopWatch extends Component implements Component.DrawTask {private long start_time = 0; //计时开始时刻,毫秒单位private long millisecond = 0; //计时时间,毫秒单位private boolean running = false;//执行状态//构造函数public AnalogStopWatch(Context context) {super(context);Initialize(null);}//构造函数public AnalogStopWatch(Context context, AttrSet attrSet) {super(context, attrSet);Initialize(attrSet);}//构造函数public AnalogStopWatch(Context context, AttrSet attrSet, String styleName) {super(context, attrSet, styleName);Initialize(attrSet);}//构造函数public AnalogStopWatch(Context context, AttrSet attrSet, int resId) {super(context, attrSet, resId);Initialize(attrSet);}//获取运行状态public boolean isRunning(){return running;}//获取当前计时时长public long getMiliseconds(){return millisecond;}//根据目前的运行状态,开始或停止计时public void start_stop(){if(!running) {start_time = Calendar.getInstance().getTimeInMillis();millisecond = 0;running = true;onRunTimer();}else{running = false;}}//计时Timervoid onRunTimer(){final long delayTime = 100L; //延时时间,毫秒单位millisecond = Calendar.getInstance().getTimeInMillis() - start_time;invalidate(); //更新画面表示if(running) {//如果处于运行状态,触发下一次延时执行TaskDispatcher uiTaskDispatcher = mContext.getUITaskDispatcher();Revocable revocable = uiTaskDispatcher.delayDispatch(new Runnable() {public void run() {onRunTimer();}}, delayTime);}}//归零public void reset(){if(!running && millisecond > 0) {onResetTimer(); //启动归零处理}}//归零处理void onResetTimer(){final long delayTime = 10L;long second_value = millisecond / 1000 % 60;long minute_value = millisecond / 1000 / 60;if(second_value > 0){millisecond -= 1000; //秒针反转}if(minute_value > 0){millisecond -= 1000 * 60; //分针反转}if(second_value > 0 || minute_value >0) {//如果反转未到位,触发下次延时处理TaskDispatcher uiTaskDispatcher = mContext.getUITaskDispatcher();Revocable revocable = uiTaskDispatcher.delayDispatch(new Runnable() {public void run() {onResetTimer();}}, delayTime);}else{millisecond = 0;}invalidate();}public void onDraw(Component component, Canvas canvas){Paint paint = new Paint();RectFloat bound = getBoundRect();Point main_center = bound.getCenter();drawScale(canvas, paint, main_center, getRadius(), 1);drawScaleValue(canvas, paint, main_center, getRadius() * 0.8f,12, 5, (int)(getRadius() * 0.2f));Point center = new Point(main_center.getPointX(),bound.top + getRadius() * 0.6f);float radius = getRadius() / 3;drawScale(canvas, paint, center, radius, 5);drawScaleValue(canvas, paint, center, radius * 0.7f,12, 5, (int)(radius * 0.25f));drawDigitalTime(canvas, paint, main_center.getPointX(),main_center.getPointY() + getRadius() * 0.4f);drawMinute(canvas, center, radius);drawSecond(canvas, bound);}//描画刻度线private void drawScale(Canvas canvas, Paint paint, Point center, float radius, int scale_interval){paint.setColor(Color.WHITE);float len5sec = radius / 8;float len1sec = radius / 12;float len02sec = radius / 20;paint.setColor(Color.BLACK);for(int i = 0; i < 300; i+= scale_interval){float insideRaduis = radius;if ((i % 25)==0){insideRaduis -= len5sec;paint.setStrokeWidth(radius / 60);}else if((i % 5)==0){insideRaduis -= len1sec;paint.setStrokeWidth(radius / 80);}else{insideRaduis -= len02sec;paint.setStrokeWidth(radius / 120);}drawRadius(canvas, paint, center, insideRaduis, radius, i * Math.PI / 150);}}//描画全部刻度值private void drawScaleValue(Canvas canvas, Paint paint, Point center, float radius, int count, int offset, int font_size){for(int i = 1; i <= count; i++){drawScaleText(canvas, paint, center, radius, Math.PI * 2 / count * i, offset * i, font_size);}}//描画秒针private void drawMinute(Canvas canvas, Point center, float radius){Paint paint = new Paint();paint.setColor(Color.RED);paint.setStrokeWidth(radius / 20);paint.setStrokeCap(Paint.StrokeCap.ROUND_CAP);drawRadius(canvas, paint, center, 0, radius * 0.9f, millisecond / 60 * Math.PI * 2 / 60000);float oval_radius = radius / 10;canvas.drawOval(new RectFloat(center.getPointX() - oval_radius, center.getPointY() - oval_radius,center.getPointX() + oval_radius, center.getPointY() + oval_radius),paint);}//描画分针private void drawSecond(Canvas canvas, RectFloat bound){float radius = getRadius();Paint paint = new Paint();paint.setColor(Color.RED);paint.setStrokeWidth(radius / 40);paint.setStrokeCap(Paint.StrokeCap.ROUND_CAP);drawRadius(canvas, paint, bound.getCenter(), 0, radius * 0.9f, millisecond * Math.PI * 2 / 60000);float oval_radius = radius / 20;Point center = bound.getCenter();canvas.drawOval(new RectFloat(center.getPointX() - oval_radius, center.getPointY() - oval_radius,center.getPointX() + oval_radius, center.getPointY() + oval_radius),paint);}//描画径向直线private void drawRadius(Canvas canvas, Paint paint, Point center, float from, float to, double angle){double sin = Math.sin(angle);double cos = Math.cos(angle);canvas.drawLine(new Point(center.getPointX() + (float)(from * sin),center.getPointY() - (float)(from * cos)),new Point(center.getPointX() + (float)(to * sin),center.getPointY() - (float)(to * cos)),paint);}//描画单一刻度值private void drawScaleText(Canvas canvas, Paint paint, Point center, float radius, double angle, int value, int font_size){double sin = Math.sin(angle);double cos = Math.cos(angle);Font.Builder builder = new Font.Builder("Arial");builder.setWeight(Font.REGULAR);paint.setFont(builder.build());paint.setTextSize(font_size);String text = String.format("%d", value);float width = paint.measureText(text); //计算字符串显示宽度canvas.drawText(paint, text,center.getPointX() + (float)(radius * sin) - width / 2,center.getPointY() - (float)(radius * cos) + font_size / 3);}//描画数字时间private void drawDigitalTime(Canvas canvas, Paint paint, float x, float y){Font.Builder builder = new Font.Builder("Arial");builder.setWeight(Font.REGULAR);paint.setFont(builder.build());int font_size = (int)(getRadius() / 4);paint.setColor(Color.BLUE);paint.setTextSize(font_size);String now = String.format("%02d:%02d:%02d",millisecond/1000/3600, //hourmillisecond/1000/60%60, //minutemillisecond/1000%60); //secondfloat width = paint.measureText(now); //计算字符串显示宽度canvas.drawText(paint, now, x - width / 2 , y);}//获取秒表显示区域private RectFloat getBoundRect(){float width = getWidth();float height = getHeight();float size = Math.min(width, height);float x_padding = (width - size) / 2;float y_padding = (height - size) / 2;return new RectFloat(x_padding, y_padding, width - x_padding, height - y_padding);}//获取显示半径private float getRadius(){return getBoundRect().getWidth() / 2;}//获取圆心位置private Point getCenter(){return getBoundRect().getCenter();}//初始化private void Initialize(AttrSet attrSet){addDrawTask(this);}}
在布局中布置指针式秒表组件
在本应用的布局中,我们使用了指针式秒表组件、两个操作按钮和一个表示计时结果的Text组件:
<DirectionalLayoutxmlns:ohos="http://schemas.huawei.com/res/ohos"ohos:height="match_parent"ohos:width="match_parent"ohos:orientation="vertical"ohos:alignment="top"><xwg.harmony.stopwatch.AnalogStopWatchohos:id="$+id:analog_stop_watch"ohos:height="300vp"ohos:width="match_parent"/><DirectionalLayoutohos:height="match_content"ohos:width="match_parent"ohos:orientation="horizontal"ohos:alignment="center"ohos:top_margin="5vp"><Componentohos:height="match_parent"ohos:width="0"ohos:weight="1"/><Buttonohos:id="$+id:reset_lap"ohos:height="match_content"ohos:width="0"ohos:weight="5"ohos:text_size="27fp"ohos:text="$string:Reset"ohos:background_element="$graphic:background_button"/><Componentohos:height="match_parent"ohos:width="0"ohos:weight="1"/><Buttonohos:id="$+id:start_stop"ohos:height="match_content"ohos:width="0"ohos:weight="5"ohos:text_size="27fp"ohos:text="$string:Start"ohos:background_element="$graphic:background_button"/><Componentohos:height="match_parent"ohos:width="0"ohos:weight="1"/></DirectionalLayout><Textohos:id="$+id:lap_times"ohos:width="match_parent"ohos:height="match_parent"ohos:text_alignment="horizontal_center"ohos:text_size="30fp"ohos:multiple_lines="true"ohos:scrollable="true"ohos:top_margin="5vp"ohos:left_margin="5vp"ohos:right_margin="5vp"/></DirectionalLayout>
使用指针式秒表组件
以下是在AbilitySlice中使用指针式秒表组件的示例代码:
public class MainAbilitySlice extends AbilitySlice {AnalogStopWatch stopwatch = null;Text lap_time = null;int record_count = 0;public void onStart(Intent intent) {super.onStart(intent);super.setUIContent(ResourceTable.Layout_ability_main);//秒表组件stopwatch = (AnalogStopWatch)findComponentById(ResourceTable.Id_analog_stop_watch);//计时结果Text组件lap_time = (Text)findComponentById(ResourceTable.Id_lap_times);//开始或停止按钮Button start_stop = (Button)findComponentById(ResourceTable.Id_start_stop);//清零或保存结果按钮Button reset_lap = (Button)findComponentById(ResourceTable.Id_reset_lap);start_stop.setClickedListener(new Component.ClickedListener() {public void onClick(Component component) {stopwatch.start_stop();if(stopwatch.isRunning()){start_stop.setText(ResourceTable.String_Stop);reset_lap.setText(ResourceTable.String_Lap);clearTime();}else{start_stop.setText(ResourceTable.String_Start);reset_lap.setText(ResourceTable.String_Reset);recordTime();}}});reset_lap.setClickedListener(new Component.ClickedListener() {public void onClick(Component component) {if (stopwatch.isRunning()){recordTime();}else{stopwatch.reset();clearTime();}}});}//清除计时结果private void clearTime(){lap_time.setText("");record_count = 0;}//记录当前时间private void recordTime(){String lap_string = lap_time.getText();long milliseconds = stopwatch.getMiliseconds();String current_time = String.format("Lap%02d %02d:%02d:%02d.%03d",record_count,milliseconds / 1000 / 60 / 60 % 60, //hourmilliseconds / 1000 / 60 % 60, //minutemilliseconds / 1000 % 60, //secondmilliseconds % 1000); //milisecondlap_time.setText(lap_string + "\n" + current_time);record_count++;}}
我们没有在指针式秒钟组件中处理按钮动作,其目的是为了给使用者提供更大的灵活性。
执行结果如下:
参考代码
完整代码可以从以下链接下载:
https://github.com/xueweiguo/Harmony/tree/master/StopWatch作者著作介绍
《实战Python设计模式》是作者去年3月份出版的技术书籍,该书利用Python 的标准GUI 工具包tkinter,通过可执行的示例对23 个设计模式逐个进行说明。这样一方面可以使读者了解真实的软件开发工作中每个设计模式的运用场景和想要解决的问题;另一方面通过对这些问题的解决过程进行说明,让读者明白在编写代码时如何判断使用设计模式的利弊,并合理运用设计模式。
对设计模式感兴趣而且希望随学随用的读者通过本书可以快速跨越从理解到运用的门槛;希望学习Python GUI 编程的读者可以将本书中的示例作为设计和开发的参考;使用Python 语言进行图像分析、数据处理工作的读者可以直接以本书中的示例为基础,迅速构建自己的系统架构。
觉得本文有帮助?请分享给更多人。
关注微信公众号【面向对象思考】轻松学习每一天!
面向对象开发,面向对象思考!
评论