搞定Protocol Buffers (下)- 原来你是这样的pb
凡事知其然 更要知其所以然。本文仅抛砖引玉,阅读完本文,也许你也可以试着实现一个自己的protoc-gen-xxx。
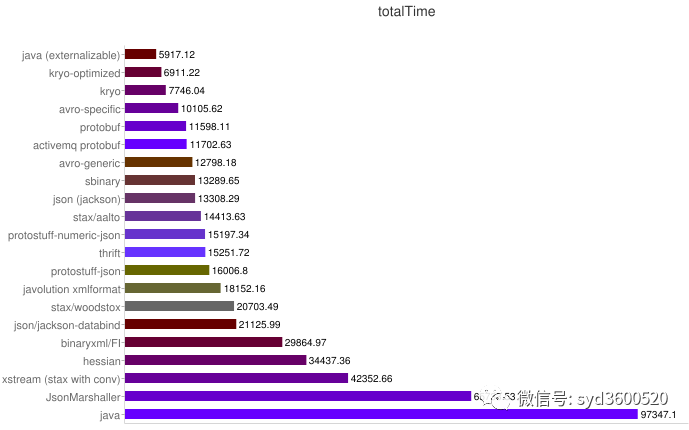
totalTime表示一个对象操作的整个时间,包括创建一个对象、序列化以及反序列化总共的耗时。
上图是从官网找的一个protocol buffers的序列化压测对比图,从图上来看protocol buffers表现相对还是比较优异的。
OK,书接上回。上一篇我们熟悉了protocol buffers安装使用以及proto3的语法,本篇继续来聊聊其实现原理。
protocol buffers 主要分编译器编译部分和运行时部分。编译器编译主要是利用protoc命令来将你书写的proto代码编译为指定语言的数据访问类,从而对Protobuf数据进行序列化和反序列化。运行时部分主要是将要传输的数据进行序列化和反序列化的过程。如下图:
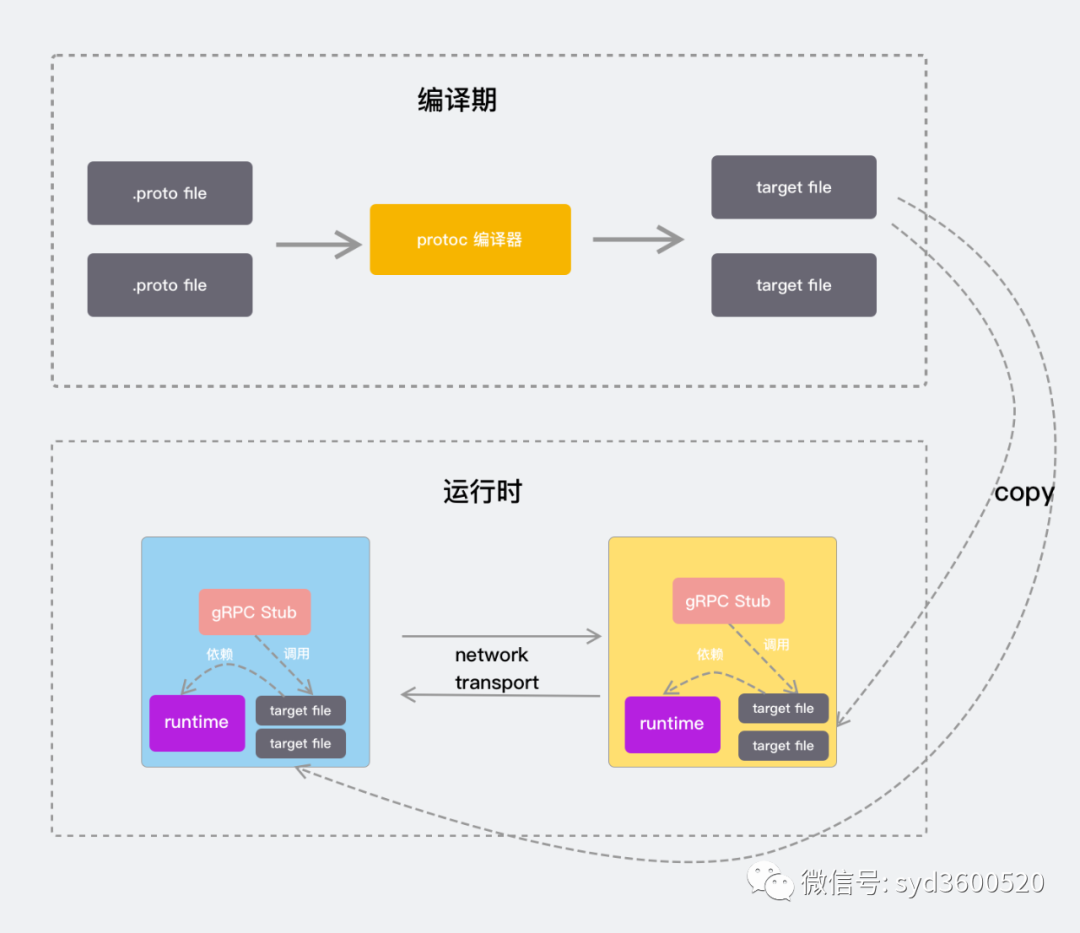
protocol buffers原理
了解一个组件的原理,没有比看源码更好的方式了。传送门:(https://github.com/protocolbuffers/protobuf),因为使用protocol buffers我们编写完.proto文件就接触的是protoc命令了,那先来看看编译器是怎么工作的吧。
编译期
编译器一瞥
通常使用protocol buffers都是先写好.proto文件,在用protocol buffers编译器生成目标语言所需要的源代码文件。然后将生成的代码和应用程序一起编译。所以要了解protocol buffers的源码,可能需要简单了解下编译器的知识。编译器一般分为前端和后端,实际的流程比较复杂,主要的步骤包括:词法分析、语法分析、语义分析、中间代码生成、优化、目标代码生成等步骤。
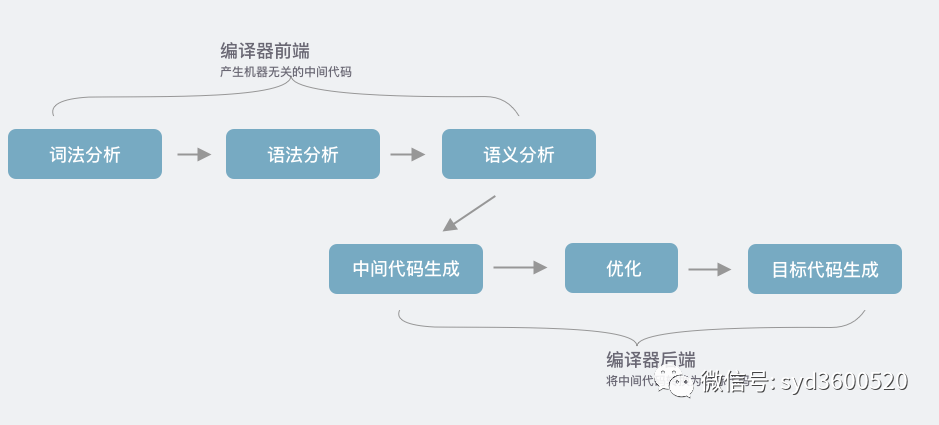
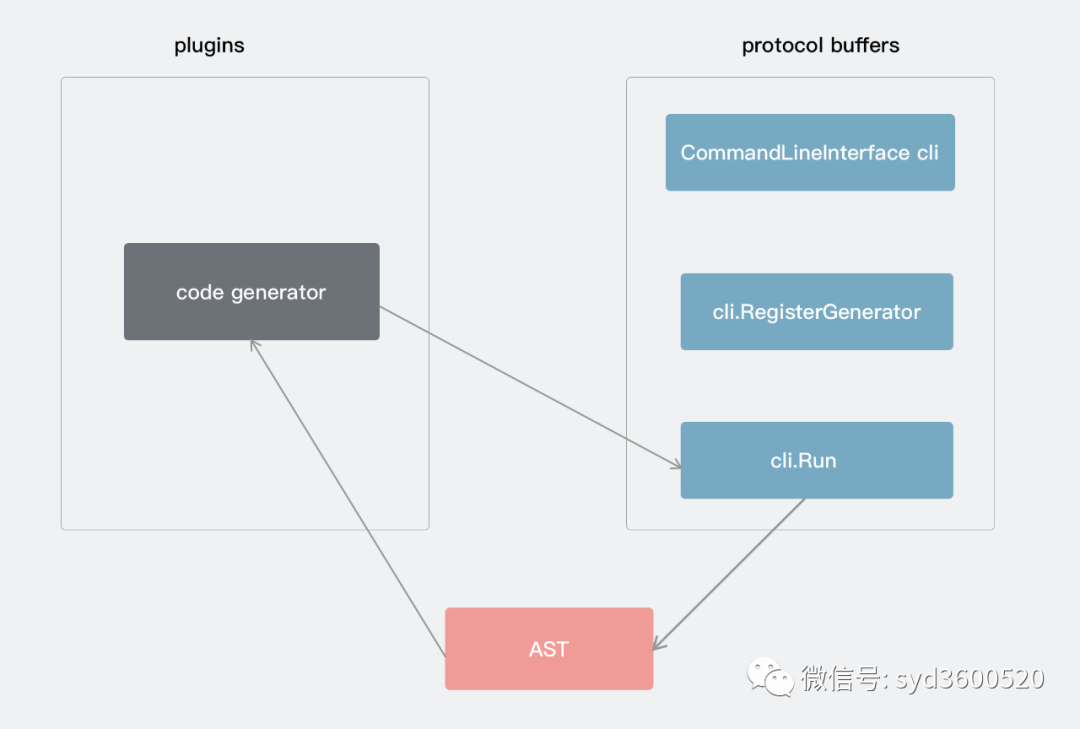
编译器前端主要是根据输入的.proto文件进行词法、语法、语义分析得到抽象语法树。
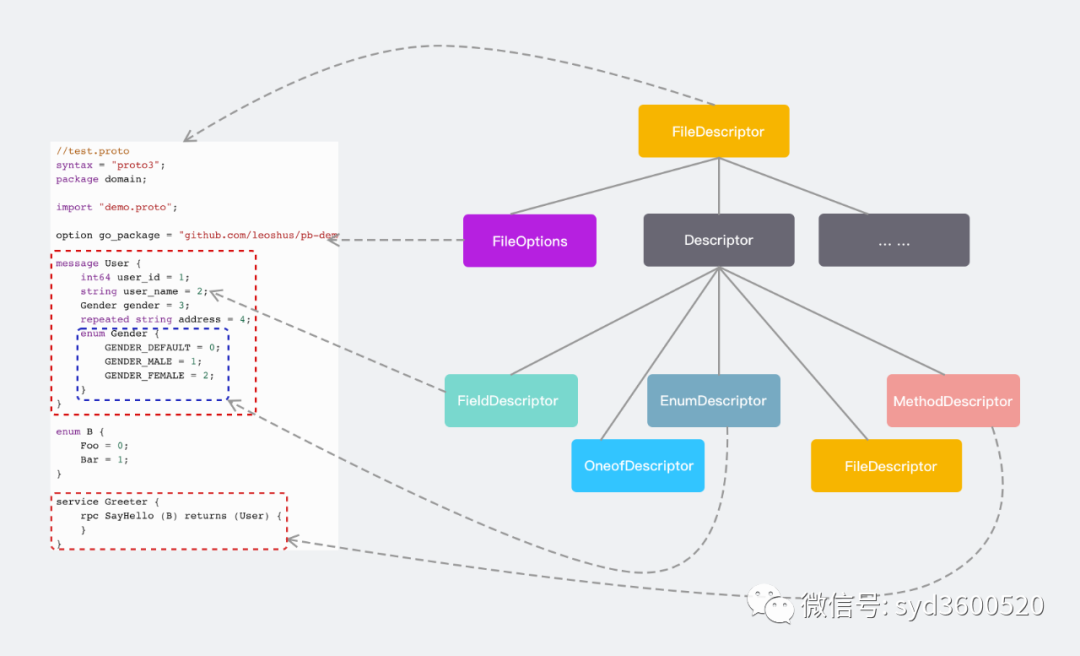
拿到AST,编译器后端就可以生成中间代码,这里是直接生成目标代码,生成目标代码的过程可以选择自带的生成器,又或者是第三方插件形式提供的Code Generator能力。实际源代码如何工作,接着看protoc指令执行流程
protoc执行流程
既然是命令执行那必然有执行入口。打开src/google/protobuf/compiler/main.cc很容易就能找打命令执行的入口。精简下执行流程如下:
int main(int argc, char* argv[]) {

  CommandLineInterface cli;
  cli.AllowPlugins("protoc-");
  ... ...
  // Proto2 Java 官方提供的Java编译器后端实现
  java::JavaGenerator java_generator;
  cli.RegisterGenerator("--java_out", "--java_opt", &java_generator,
                        "Generate Java source file.");
  ... ...
  return cli.Run(argc, argv);
}
mian函数里主要完成了内置的一些不同语言代码生成器的注册,具体protoc命令的参数解析,proto文件解析交给了CommandLineInterface::Run:
int CommandLineInterface::Run(int argc, const char* const argv[]) {
  // 1.参数解析
  // 2.proto文件解析为FileDescriptor
  ... ...
  // 3.调用Generator生成代码
  if (mode_ == MODE_COMPILE) {
    for (int i = 0; i < output_directives_.size(); i++) {
      std::string output_location = output_directives_[i].output_location;
      if (!HasSuffixString(output_location, ".zip") &&
          !HasSuffixString(output_location, ".jar") &&
          !HasSuffixString(output_location, ".srcjar")) {
        AddTrailingSlash(&output_location);
      }

      auto& generator = output_directories[output_location];

      if (!generator) {
        // First time we've seen this output location.
        generator.reset(new GeneratorContextImpl(parsed_files));
      }

      if (!GenerateOutput(parsed_files, output_directives_[i],
                          generator.get())) {
        return 1;
      }
    }
  }

//4.将所有输出写入磁盘
... ...

return 0
}
CommandLineInterface::Run()主要干了几件事:
protoc参数解析校验 proto文件解析为由 FileDescriptor、Descriptor等等组成的抽象语法树调用具体的Generator,并根据传入的 FileDescriptor生成代码将所有输出写入磁盘
我们这里主要关注下利用Generator生成代码的流程:
bool CommandLineInterface::GenerateOutput(
    const std::vector<const FileDescriptor*>& parsed_files,
    const OutputDirective& output_directive,
    GeneratorContext* generator_context) {
  // Call the generator.
  std::string error;
  if (output_directive.generator == NULL) {//插件模式
    // This is a plugin.
    GOOGLE_CHECK(HasPrefixString(output_directive.name, "--") &&
          HasSuffixString(output_directive.name, "_out"))
        << "Bad name for plugin generator: " << output_directive.name;

    std::string plugin_name = PluginName(plugin_prefix_, output_directive.name);
    std::string parameters = output_directive.parameter;
    if (!plugin_parameters_[plugin_name].empty()) {
      if (!parameters.empty()) {
        parameters.append(",");
      }
      parameters.append(plugin_parameters_[plugin_name]);
    }
    if (!GeneratePluginOutput(parsed_files, plugin_name, parameters,
                              generator_context, &error)) {
      std::cerr << output_directive.name << ": " << error << std::endl;
      return false;
    }
  } else {
    // Regular generator. 内置的生成器
   ... ...

    if (!output_directive.generator->GenerateAll(parsed_files, parameters,
                                                 generator_context, &error)) {
      // Generator returned an error.
      std::cerr << output_directive.name << ": " << error << std::endl;
      return false;
    }
  }

  return true;
}
在使用protoc命令时一般这么执行protoc --proto_path=. --objc_out=.*.proto,protoc会根据--xxx_out来识别xxx对应的代码生成器(当前protoc默认支持cpp、csharp、java、js、objectivec、php、python、ruby)。如果protoc识别不了xxx,则会在PATH路径下寻找protoc-gen-xxx的可执行文件,对应的protoc-gen-xxx是你需要实现的插件。那么protocol buffers是如何跟protoc-gen-xxx交互的呢?
bool CommandLineInterface::GeneratePluginOutput(
    const std::vector<const FileDescriptor*>& parsed_files,
    const std::string& plugin_name, const std::string& parameter,
    GeneratorContext* generator_context, std::string* error) {
  CodeGeneratorRequest request;
  CodeGeneratorResponse response;
  std::string processed_parameter = parameter;


  // Build the request.
  if (!processed_parameter.empty()) {
    request.set_parameter(processed_parameter);
  }


  std::set<const FileDescriptor*> already_seen;
  for (int i = 0; i < parsed_files.size(); i++) {
    request.add_file_to_generate(parsed_files[i]->name());
    GetTransitiveDependencies(parsed_files[i],
                              true,  // Include json_name for plugins.
                              true,  // Include source code info.
                              &already_seen, request.mutable_proto_file());
  }

  ... ...

  // 调用插件
  Subprocess subprocess;

  if (plugins_.count(plugin_name) > 0) {
    subprocess.Start(plugins_[plugin_name], Subprocess::EXACT_NAME);
  } else {
    subprocess.Start(plugin_name, Subprocess::SEARCH_PATH);
  }

  std::string communicate_error;
  //与插件进行交互
  if (!subprocess.Communicate(request, &response, &communicate_error)) {
    *error = strings::Substitute("$0: $1", plugin_name, communicate_error);
    return false;
  }

  // Write the files.  We do this even if there was a generator error in order
  // to match the behavior of a compiled-in generator.
  std::unique_ptr<io::ZeroCopyOutputStream> current_output;
  for (int i = 0; i < response.file_size(); i++) {
    const CodeGeneratorResponse::File& output_file = response.file(i);

    if (!output_file.insertion_point().empty()) {
      std::string filename = output_file.name();
      // Open a file for insert.
      // We reset current_output to NULL first so that the old file is closed
      // before the new one is opened.
      current_output.reset();
      current_output.reset(
          generator_context->OpenForInsertWithGeneratedCodeInfo(
              filename, output_file.insertion_point(),
              output_file.generated_code_info()));
    } else if (!output_file.name().empty()) {
      // Starting a new file.  Open it.
      // We reset current_output to NULL first so that the old file is closed
      // before the new one is opened.
      current_output.reset();
      current_output.reset(generator_context->Open(output_file.name()));
    } else if (current_output == NULL) {
      *error = strings::Substitute(
          "$0: First file chunk returned by plugin did not specify a file "
          "name.",
          plugin_name);
      return false;
    }

    // Use CodedOutputStream for convenience; otherwise we'd need to provide
    // our own buffer-copying loop.
    io::CodedOutputStream writer(current_output.get());
    writer.WriteString(output_file.content());
  }

  // 检查reponse.error()错误
  ... ...

  return true;
}
对于采用插件支持生成protobuf代码的方式,显然需要将protobuf编译器前端生成的抽象语法树等信息交给插件,那这是怎么做的呢?配合src/google/protobuf/compiler/plugin.proto定义就一目了然了
syntax = "proto2";
package google.protobuf.compiler;
option java_package = "com.google.protobuf.compiler";
option java_outer_classname = "PluginProtos";
message Version {
  optional int32 major = 1;
  optional int32 minor = 2;
  optional int32 patch = 3;
  optional string suffix = 4;
}
message CodeGeneratorRequest {
  repeated string file_to_generate = 1;
  optional string parameter = 2;
  repeated FileDescriptorProto proto_file = 15;
  optional Version compiler_version = 3;
}
message CodeGeneratorResponse {
  optional string error = 1;
  optional uint64 supported_features = 2;
  enum Feature {
    FEATURE_NONE = 0;
    FEATURE_PROTO3_OPTIONAL = 1;
  }
  message File {
    optional string name = 1;
    optional string insertion_point = 2;
    optional string content = 15;
    optional GeneratedCodeInfo generated_code_info = 16;
  }
  repeated File file = 15;
}
CodeGeneratorRequest request; CodeGeneratorResponse response;实际也是利用声明的proto文件生成的,用于protocol buffers跟插件之间交换信息,关于具体插件如何利用传递的信息生成代码,感兴趣的同学可以翻翻源码,不是很复杂。总结起来:
运行时
关于运行时,我们主要来聊聊protocol buffers编码的知识,具体各个语言的具体源码实现,感兴趣的童鞋可以自行翻阅。
编码
一个简单的消息类型
假设你定义了如下消息结构:
message Test1 {
  optional int32 a = 1;
}
然后你在应用程序里,创建了一个Test1消息对象,并设置a=150,序列化消息到输出流。如果你可以检查编码后消息,则会看到如下三个字节:
08 96 01
这些数字咋一看可能一脸懵逼,它们到底意味着什么呢?
了解protocol buffers的编码,你首先需要理解varints。Varints是一种使用一个或多个字节序列化整数的方法。较小的数字占用较少的字节数。
除了最后一个字节外,varint中的每个字节都设置了最高有效位(msb) 用来表示还有其他字节。每个字节的低7位用于以7位为一组存储数字的二进制补码表示,最低有效组在前,即采用了大端字节序。
比如数字1,占用一个字节,所以msb没有设置:
0000 0001
如果是数字300,就有点儿复杂了:
1010 1100 0000 0010
如何确定上面这串数字表示的就是300?首先,从每个字节中删除msb,因为这个是用来告诉我们是否已到达数字的末尾。(如果被设置,表示vaint里有多个字节)
 1010 1100 0000 0010
→ 010 1100  000 0010
反转两组7bits,因为varint存储的数字是低位在前。然后,将它们连接起来从而获得最终值:
000 0010  010 1100
→  000 0010 ++ 010 1100
→  100101100
→  256 + 32 + 8 + 4 = 300
消息结构
正如你所知道的,protocol buffers的消息是一系列key-value对组成。消息的二进制版本仅使用字段的编号作为关键字,每个字段的名称和声明的类型只能在解码端通过引用消息类型定义(即.proto文件)来确定。
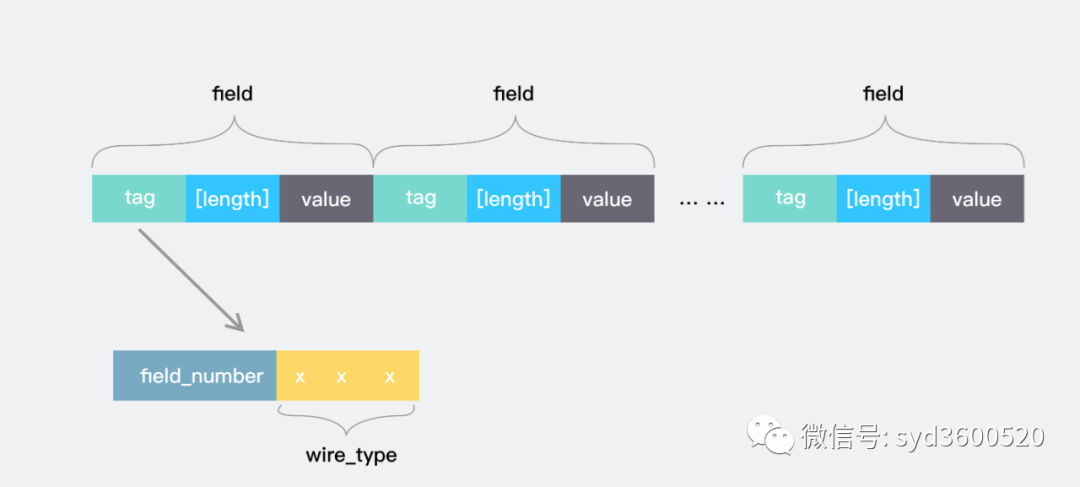
对消息进行编码时,键和值被串联到一个字节流中。在对消息进行解码时,解析器需要能够跳过无法识别的字段。这样,可以将新字段添加到消息中,而不会破坏不知道它们的旧程序。故而,wire格式的消息中没对key-value中的key实际上是两个值:
.proto文件中的字段编号提供足够信息确定value值长度的 wire type
在大多数语言实现中,这个key称为tag。
可用的wire type如下
| Type | Meaning | Used For |
|---|---|---|
| 0 | Varint | int32, int64, uint32, uint64, sint32, sint64, bool, enum |
| 1 | 64-bit | fixed64, sfixed64, double |
| 2 | Length-delimited | string, bytes, embedded messages, packed repeated fields |
| 3 | Start group | groups (deprecated) |
| 4 | End group | groups (deprecated) |
| 5 | 32-bit | fixed32, sfixed32, float |
流式消息的每个key的值格式均为(field_number << 3) | wire_type,也就是说,数字的后三位存储了wire type。
现在,让我们再来看一个简单的例子。现在,你知道流中的第一个数字始终是varint键,这里是08,或者(删除了msb):
000 1000
根据key的规则,使用最后三位来获得wire type为(0),然后右移三位来获得字段编号(1)。因此,你现在知道字段号为1,并且key对应的值为varint。使用上面varint解码知识,你可以看到接下来的两个字节存储值150。
96 01 = 1001 0110  0000 0001
       → 000 0001  ++  001 0110 (删除msb并且反转7bits组)
       → 10010110
       → 128 + 16 + 4 + 2 = 150
更多的值类型
有符号整数
如之前所说,与wire type0关联的所有protocol buffers类型都被编码为varint。但是,当对负数进行编码时,带符号的int类型(sint32和sint64)与"标准"int类型(int32和int64)之间存在重要区别。若将int32或int64用作负数的类型,则varint编码的结果需要占用10个字节的长度。实际上,它被视为一个非常大的无符号整数。若使用带符号类型,则生成的varint使用ZigZag编码,效率更高。
ZigZag编码将有符号整数映射为无符号整数,这样较小绝对值(比如,-1)的负数,也具有较小的varint编码值。这样做的方式是通过正整数和负整数来回"曲折",以便将-1编码为1,将1编码为2,将-2编码为3,依次类推,如下表:
| Signed Original | Encoded As |
|---|---|
| 0 | 0 |
| -1 | 1 |
| 1 | 2 |
| -2 | 3 |
| 2147483647 | 4294967294 |
| -2147483648 | 4294967295 |
也就是,sint32编码使用:
(n << 1) ^ (n >> 31)
sint64编码使用:
(n << 1) ^ (n >> 63)
非varint数值
非varint数值类型比较简单,double和fixed64的wire type为1,它告诉解析器期望固定的64位数据块;同样,float和fixed32的wire type为5,表明其需要使用32位的数据块。在这两种情况下,这些值都以小端字节序存储。
字符串
字符串类型的数据wire type的值为2(length-delimited)。表示该值varint编码的长度,后跟指定数量的字节数据。举个例子
message Test2 {
  optional string b = 2;
}
将b设置为testing,序列化数据为:
12 07 [74 65 73 74 69 6e 67]
中括号中的内容为testing的UTF8编码,key的值为0x12,解析下:
0x12
→ 0001 0010  (binary representation)
→ 00010 010  (regroup bits)
→ field_number = 2, wire_type = 2
0x12后的07表示varint值长度为7。即07后跟着7字节的字符串。
内嵌消息
假设你有下面这样一个内嵌消息结构:
message Test3 {
  optional Test1 c = 3;
}
将c.a设置为150,得到编码后的数据:
    1a 03 08 96 01
    0001 1010 0000 0011 0000 1000 1001 0110 0000 0001
 -> 00011 010 0000 0011 0000 1000 1001 0110 0000 0001
最后三个字节跟上面例子中单独设置Test1.a=150的序列化数据一致。根据varint解析,field_number=3 wire_type=2,故而内嵌消息编码处理跟字符串完全一致。
optional和repeated元素
如果proto2消息定义了重复的元素(没有定义[packed=ture]选项),则编码消息具有零个或多个具有相同字段编号的键值对。这些重复的值不必连续出现,它们也可能跟其他字段交错出现,元素之间的顺序会保留下来,尽管其他字段的顺序会丢失。在proto3中,重复字段使用了压缩编码。
对于proto3中任何非重复字段,或proto2中的optional字段,编码后的消息可能有也可能没有该字段编号的键值对。
通常一个编码的消息永远不会有一个以上非重复字段的实例。但解析器会根据实际情况进行处理。对于数字类型和字符串类型,如果同一字段出现多次,解析器将接受它看到的最后一个值。对于内嵌消息字段,解析器合并同一字段的多个实例,就像使用Message::MergeFrom方法一样:也就是说,后面的实例中所有单值标量字段将替换前面的实例中的单值标量字段,并合并单值内嵌消息,连接重复字段。这些规则的作用是,解析两个已编码消息的串联联产生的结果与你分别解析两个消息并合并的结果完全相同。也即:
MyMessage message;
message.ParseFromString(str1 + str2);
等价于:
MyMessage message, message2;
message.ParseFromString(str1);
message2.ParseFromString(str2);
message.MergeFrom(message2);
该属性有时很有用,因为即使你不知道它们的类型,它也允许你合并两个消息。
压缩可重复字段
2.1.0版本引入了打包可重复字段的功能,在proto2中声明为重复字段,但具有特殊的[packed=true]选项。在proto3中,重复的标量数字类型默认会被打包。这些功能类似于重复字段,但编码方式不同。包含零元素的压缩重复字段不会出现在编码的消息中。否则,该字段的所有元素都将打包为wire type为2(length-delimited)的单个键值对。每个元素的编码方式与通常相同,不同之处在于之前没有key。
例如:
message Test4 {
  repeated int32 d = 4 [packed=true];
}
现在,假设你构造一个Test4,为重复的字段d提供值3、270和86942。然后,编码形式为:
22        // key (field number 4, wire type 2)
06        // 数据长度 (6 bytes)
03        // 第一个元素 (varint 3)
8E 02     // 第二个元素 (varint 270)
9E A7 05  // 第三个元素 (varint 86942)
只有原始数字类型(使用varint,32位或64位wire的类型)的重复字段可以声明为“打包”。
请注意,尽管通常没有理由为一个打包的重复字段编码多个键值对,但编码器必须准备好接受多个键值对。在这种情况下,应将有效负载串联在一起。每对必须包含整数个元素。
protocol buffers解析器必须能够解析被编译为packed的重复字段,就好像它们没有packed一样,反之亦然。这允许以向前和向后兼容的方式将[packed = true]添加到现有字段。
字段顺序
字段编号可以在.proto文件中以任何顺序使用。顺序的选择对消息的序列化方式没有影响。
序列化消息时,对于已知字段或未知字段的写入没有保证顺序。序列化顺序是一个实现细节,将来任何特定实现的细节都可能更改。因此,protocol buffers解析器必须能够以任何顺序解析字段。
含义
不要假定序列化消息的字节输出是稳定的。对于消息中具有传递表示其他序列化的 protocol buffers消息的字节字段的场景尤其如此。默认情况下,在同一 protocol buffers消息实例上重复调用序列化方法时,可能不会返回相同的字节输出。即默认序列化不是确定性的。确定性序列化仅可确保特定二进制文件的字节输出相同。字节输出可能会在二进制的不同版本之间发生变化。 对于 protocol buffers消息实例foo,以下检查可能会失败。foo.SerializeAsString()== foo.SerializeAsString() Hash(foo.SerializeAsString())==Hash(foo.SerializeAsString()) CRC(foo.SerializeAsString())== CRC(foo.SerializeAsString()) FingerPrint(foo.SerializeAsString())== FingerPrint(foo.SerializeAsString()) 这是一些示例场景,其中逻辑等效的 protocol buffers消息foo和bar可能序列化为不同的字节输出。bar由一台旧服务器序列化,该服务器将某些字段视为未知字段。bar由以不同编程语言实现的服务器序列化,并以不同顺序序列化字段。bar有一个以不确定性方式序列化的字段。bar有一个字段,用于存储protocol buffers消息的序列化字节输出,该消息以不同的顺序进行序列化。bar由新服务器序列化,该服务器因为实现更改而以不同顺序序列化字段。foo和bar都是单个消息的串联,但是顺序不同。
总结
老生常谈总结下,Protocol Buffers优缺点:
优点:
跨平台、语言无关
使用简单protoc编译器自动帮助进行数据的序列化和反序列化
维护成本较低,只需要维护
.proto文件即可向后兼容性较好,不必破坏已部署、依赖旧有结构的程序即可完成对数据结构的更新升级
安全性较好,都是以字节数组进行传输
数据序列化后体积较小且速度也相比xml和json快20-100倍
缺点
功能简单,无法用来表示复杂的概念 不像XML成为行业标准,Protobuf只是Google内部使用的工具,通用性较差 自解释性较差,只能通过 .proto了解数据结构
关于编码,了解protocol buffers编码原理对于合理使用protocol buffers很有必要,比如我们知道int32 int64较小数时确实序列化结果更加紧凑,但是int32 int64存储负数的话却需要10个字节的长度。所以了解原理选择适合的数据类型,从而发挥protocol buffers的最大威力。对于有性能洁癖的你来说,值得拥有。
如果阅读过程中发现本文存疑或错误的地方,可以关注公众号留言。如果觉得还可以 帮忙点个在看😁
