使用Keras进行迁移学习
点击上方“小白学视觉”,选择加"星标"或“置顶”
重磅干货,第一时间送达
使用Keras进行迁移学习,从实际代码出发,清楚明白。

迁移学习是机器学习中的一个研究问题,它侧重于存储在解决一个问题时获得的知识,并将其应用于另一个不同但相关的问题。
在实践中,很少有人从零开始训练卷积网络(随机初始化),因为很少有足够的数据集。因此,使用预先训练的网络权值作为初始化或固定的特征提取器有助于解决现有的大多数问题。
非常深的网络训练是昂贵的。最复杂的模型需要使用数百台配备了昂贵gpu的机器,数周的时间来进行训练。
因为深度学习确定结构/调整/训练方法/超参数是一门没有太多理论指导的黑盒子。
我的经验:
"DON'T TRY TO BE AN HERO" ~Andrej Karapathy
我遇到的大多数计算机视觉问题都没有非常大的数据集(5000张图像- 40000张图像)。即使使用极端的数据增强策略,也很难达到较高的精度。用数百万个参数训练这些网络通常会使模型过拟合。所以迁移学习对我们有帮助。
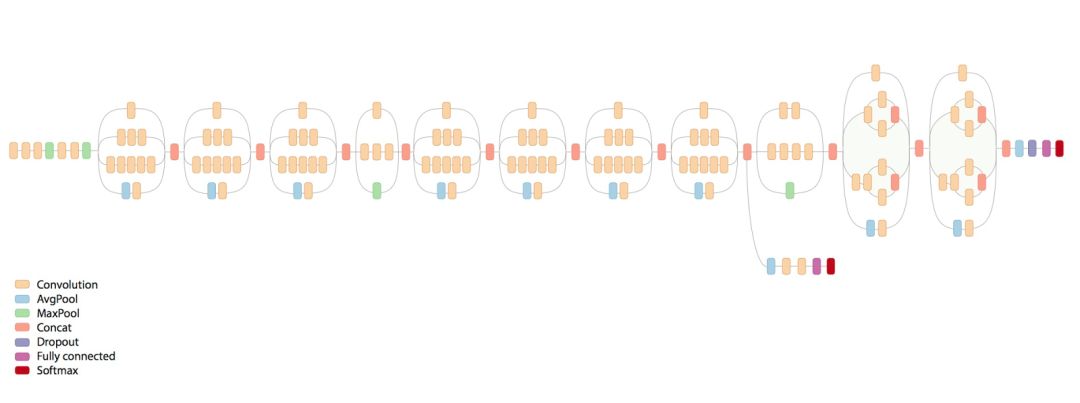
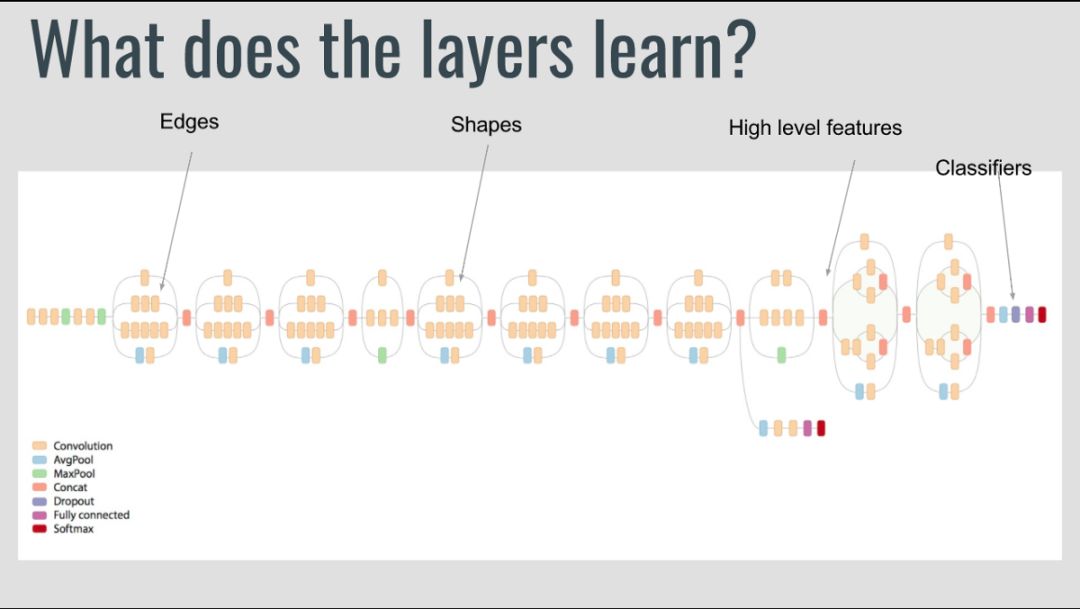
当你观察这些深度学习网络学习的内容时,它们会尝试在早期的层中检测边缘,在中间层中检测形状,在后期层中检测一些高级数据的特定特征。这些训练有素的网络通常有助于解决其他计算机视觉问题。让我们来看看如何使用Keras进行迁移学习,以及迁移学习中的各种情况。

from keras import applications
from keras.preprocessing.image importImageDataGenerator
from keras import optimizers
from keras.models importSequential, Model
from keras.layers importDropout, Flatten, Dense, GlobalAveragePooling2D
from keras import backend as k
from keras.callbacks importModelCheckpoint, LearningRateScheduler, TensorBoard, EarlyStopping
img_width, img_height = 256, 256
train_data_dir = "data/train"
validation_data_dir = "data/val"
nb_train_samples = 4125
nb_validation_samples = 466
batch_size = 16
epochs = 50
model = applications.VGG19(weights = "imagenet", include_top=False, input_shape = (img_width, img_height, 3))
"""
Layer (type) Output Shape Param #
=================================================================
input_1 (InputLayer) (None, 256, 256, 3) 0
_________________________________________________________________
block1_conv1 (Conv2D) (None, 256, 256, 64) 1792
_________________________________________________________________
block1_conv2 (Conv2D) (None, 256, 256, 64) 36928
_________________________________________________________________
block1_pool (MaxPooling2D) (None, 128, 128, 64) 0
_________________________________________________________________
block2_conv1 (Conv2D) (None, 128, 128, 128) 73856
_________________________________________________________________
block2_conv2 (Conv2D) (None, 128, 128, 128) 147584
_________________________________________________________________
block2_pool (MaxPooling2D) (None, 64, 64, 128) 0
_________________________________________________________________
block3_conv1 (Conv2D) (None, 64, 64, 256) 295168
_________________________________________________________________
block3_conv2 (Conv2D) (None, 64, 64, 256) 590080
_________________________________________________________________
block3_conv3 (Conv2D) (None, 64, 64, 256) 590080
_________________________________________________________________
block3_conv4 (Conv2D) (None, 64, 64, 256) 590080
_________________________________________________________________
block3_pool (MaxPooling2D) (None, 32, 32, 256) 0
_________________________________________________________________
block4_conv1 (Conv2D) (None, 32, 32, 512) 1180160
_________________________________________________________________
block4_conv2 (Conv2D) (None, 32, 32, 512) 2359808
_________________________________________________________________
block4_conv3 (Conv2D) (None, 32, 32, 512) 2359808
_________________________________________________________________
block4_conv4 (Conv2D) (None, 32, 32, 512) 2359808
_________________________________________________________________
block4_pool (MaxPooling2D) (None, 16, 16, 512) 0
_________________________________________________________________
block5_conv1 (Conv2D) (None, 16, 16, 512) 2359808
_________________________________________________________________
block5_conv2 (Conv2D) (None, 16, 16, 512) 2359808
_________________________________________________________________
block5_conv3 (Conv2D) (None, 16, 16, 512) 2359808
_________________________________________________________________
block5_conv4 (Conv2D) (None, 16, 16, 512) 2359808
_________________________________________________________________
block5_pool (MaxPooling2D) (None, 8, 8, 512) 0
=================================================================
Total params: 20,024,384.0
Trainable params: 20,024,384.0
Non-trainable params: 0.0
"""
# Freeze the layers which you don't want to train. Here I am freezing the first 5 layers.
for layer in model.layers[:5]:
layer.trainable = False
#Adding custom Layers
x = model.output
x = Flatten()(x)
x = Dense(1024, activation="relu")(x)
x = Dropout(0.5)(x)
x = Dense(1024, activation="relu")(x)
predictions = Dense(16, activation="softmax")(x)
# creating the final model
model_final = Model(input = model.input, output = predictions)
# compile the model
model_final.compile(loss = "categorical_crossentropy", optimizer = optimizers.SGD(lr=0.0001, momentum=0.9), metrics=["accuracy"])
# Initiate the train and test generators with data Augumentation
train_datagen = ImageDataGenerator(
rescale = 1./255,
horizontal_flip = True,
fill_mode = "nearest",
zoom_range = 0.3,
width_shift_range = 0.3,
height_shift_range=0.3,
rotation_range=30)
test_datagen = ImageDataGenerator(
rescale = 1./255,
horizontal_flip = True,
fill_mode = "nearest",
zoom_range = 0.3,
width_shift_range = 0.3,
height_shift_range=0.3,
rotation_range=30)
train_generator = train_datagen.flow_from_directory(
train_data_dir,
target_size = (img_height, img_width),
batch_size = batch_size,
class_mode = "categorical")
validation_generator = test_datagen.flow_from_directory(
validation_data_dir,
target_size = (img_height, img_width),
class_mode = "categorical")
# Save the model according to the conditions
checkpoint = ModelCheckpoint("vgg16_1.h5", monitor='val_acc', verbose=1, save_best_only=True, save_weights_only=False, mode='auto', period=1)
early = EarlyStopping(monitor='val_acc', min_delta=0, patience=10, verbose=1, mode='auto')
# Train the model
model_final.fit_generator(
train_generator,
samples_per_epoch = nb_train_samples,
epochs = epochs,
validation_data = validation_generator,
nb_val_samples = nb_validation_samples,
callbacks = [checkpoint, early])
请记住,convnet的特性在早期的层中更通用,在后期的层中更具体于原始数据集,这里有一些4个主要场景的通用经验规则:
1. 新数据集很小,和原始数据集相似:
如果我们试图训练整个网络,就会出现过拟合的问题。由于数据与原始数据相似,我们希望ConvNet中的高级特性也与此数据集相关。因此,最好的方法是在CNN代码上训练一个线性分类器。
因此,让我们冻结所有的VGG19层,只训练分类器
for layer in model.layers:
layer.trainable = False
#Now we will be training only the classifiers (FC layers)
2. 新数据集很大,和原始数据集相似:
因为我们有更多的数据,所以如果我们试图通过整个网络进行微调,我们就会更有信心不会过拟合。
for layer in model.layers:
layer.trainable = True
#The default is already set to True. I have mentioned it here to make things clear.
如果你想冻结前几层,因为这些层将检测边缘和区块,你可以使用以下代码冻结它们。
for layer in model.layers[:5]:
layer.trainable = False.
# Here I am freezing the first 5 layers
3. 新数据集很小,但与原始数据集非常不同
由于数据集非常小,我们可能希望从较早的层提取特性,并在此基础上训练分类器。这需要一些h5py的知识。
from keras import applications
from keras.preprocessing.image importImageDataGenerator
from keras import optimizers
from keras.models importSequential, Model
from keras.layers importDropout, Flatten, Dense, GlobalAveragePooling2D
from keras import backend as k
from keras.callbacks importModelCheckpoint, LearningRateScheduler, TensorBoard, EarlyStopping
img_width, img_height = 256, 256
### Build the network
img_input = Input(shape=(256, 256, 3))
x = Conv2D(64, (3, 3), activation='relu', padding='same', name='block1_conv1')(img_input)
x = Conv2D(64, (3, 3), activation='relu', padding='same', name='block1_conv2')(x)
x = MaxPooling2D((2, 2), strides=(2, 2), name='block1_pool')(x)
# Block 2
x = Conv2D(128, (3, 3), activation='relu', padding='same', name='block2_conv1')(x)
x = Conv2D(128, (3, 3), activation='relu', padding='same', name='block2_conv2')(x)
x = MaxPooling2D((2, 2), strides=(2, 2), name='block2_pool')(x)
model = Model(input = img_input, output = x)
model.summary()
"""
_________________________________________________________________
Layer (type) Output Shape Param #
=================================================================
input_1 (InputLayer) (None, 256, 256, 3) 0
_________________________________________________________________
block1_conv1 (Conv2D) (None, 256, 256, 64) 1792
_________________________________________________________________
block1_conv2 (Conv2D) (None, 256, 256, 64) 36928
_________________________________________________________________
block1_pool (MaxPooling2D) (None, 128, 128, 64) 0
_________________________________________________________________
block2_conv1 (Conv2D) (None, 128, 128, 128) 73856
_________________________________________________________________
block2_conv2 (Conv2D) (None, 128, 128, 128) 147584
_________________________________________________________________
block2_pool (MaxPooling2D) (None, 64, 64, 128) 0
=================================================================
Total params: 260,160.0
Trainable params: 260,160.0
Non-trainable params: 0.0
"""
layer_dict = dict([(layer.name, layer) for layer in model.layers])
[layer.name for layer in model.layers]
"""
['input_1',
'block1_conv1',
'block1_conv2',
'block1_pool',
'block2_conv1',
'block2_conv2',
'block2_pool']
"""
import h5py
weights_path = 'vgg19_weights.h5'# ('https://github.com/fchollet/deep-learning-models/releases/download/v0.1/vgg19_weights_tf_dim_ordering_tf_kernels.h5)
f = h5py.File(weights_path)
list(f["model_weights"].keys())
"""
['block1_conv1',
'block1_conv2',
'block1_pool',
'block2_conv1',
'block2_conv2',
'block2_pool',
'block3_conv1',
'block3_conv2',
'block3_conv3',
'block3_conv4',
'block3_pool',
'block4_conv1',
'block4_conv2',
'block4_conv3',
'block4_conv4',
'block4_pool',
'block5_conv1',
'block5_conv2',
'block5_conv3',
'block5_conv4',
'block5_pool',
'dense_1',
'dense_2',
'dense_3',
'dropout_1',
'global_average_pooling2d_1',
'input_1']
"""
# list all the layer names which are in the model.
layer_names = [layer.name for layer in model.layers]
"""
# Here we are extracting model_weights for each and every layer from the .h5 file
>>> f["model_weights"]["block1_conv1"].attrs["weight_names"]
array([b'block1_conv1/kernel:0', b'block1_conv1/bias:0'],
dtype='|S21')
# we are assiging this array to weight_names below
>>> f["model_weights"]["block1_conv1"]["block1_conv1/kernel:0]
<HDF5 dataset "kernel:0": shape (3, 3, 3, 64), type "<f4">
# The list comprehension (weights) stores these two weights and bias of both the layers
>>>layer_names.index("block1_conv1")
1
>>> model.layers[1].set_weights(weights)
# This will set the weights for that particular layer.
With a for loop we can set_weights for the entire network.
"""
for i in layer_dict.keys():
weight_names = f["model_weights"][i].attrs["weight_names"]
weights = [f["model_weights"][i][j] for j in weight_names]
index = layer_names.index(i)
model.layers[index].set_weights(weights)
import cv2
import numpy as np
import pandas as pd
from tqdm import tqdm
import itertools
import glob
features = []
for i in tqdm(files_location):
im = cv2.imread(i)
im = cv2.resize(cv2.cvtColor(im, cv2.COLOR_BGR2RGB), (256, 256)).astype(np.float32) / 255.0
im = np.expand_dims(im, axis =0)
outcome = model_final.predict(im)
features.append(outcome)
## collect these features and create a dataframe and train a classfier on top of it.
上面的代码应该会有所帮助。它将提取“block2_pool”特性。一般来说,这是没有用的,因为这一层有(64x64x128)的特征,并且在它上面训练分类器可能对我们没有帮助。我们可以添加几个FC层,并在其上训练一个神经网络。这应该是直截了当的。
添加几个FC层和输出层。
设置早期图层的权重并将其冻结。
训练网络。
4. 新数据集很大,与原始数据集非常不同
这很简单。由于你拥有大型数据集,你可以设计自己的网络或使用现有的网络。
使用随机初始化训练网络或使用预先训练的网络权重作为初始化器。第二种方法通常是首选的。
如果你使用的是不同的网络,或者对现有网络进行了一些小的修改,请注意命名约定。
cs231n.github.io/transfer-learning/
keras.io
https://github.com/fchollet/keras

英文原文:https://medium.com/@14prakash/transfer-learning-using-keras-d804b2e04ef8
交流群
欢迎加入公众号读者群一起和同行交流,目前有SLAM、三维视觉、传感器、自动驾驶、计算摄影、检测、分割、识别、医学影像、GAN、算法竞赛等微信群(以后会逐渐细分),请扫描下面微信号加群,备注:”昵称+学校/公司+研究方向“,例如:”张三 + 上海交大 + 视觉SLAM“。请按照格式备注,否则不予通过。添加成功后会根据研究方向邀请进入相关微信群。请勿在群内发送广告,否则会请出群,谢谢理解~

