createContext & useContext 上下文 跨组件透传与性能优化篇
createContext
createContext api 可以创建一个 React 的 上下文对象,如果使用了这个上下文对象中Provider组件,就可以拿到上下文中提供的数据或者其它信息。 使用方式:
        const defaultValue = {}


        const MyContext = React.createContext(defaultValue)
如果要使用创建的上下文,需要通过 Context 对象上的 Provider 最外层包装组件,使用方式如下:
        <MyContext.Provider value={{ a: 123, b: 222, fn: () => console.log('fn1')))) }}>


            <A>


                <MyContext1.Provider value={{ fn: () => console.log('fn2'))) }}>


                    <B>


                        <C></C>


                    </B>


                </MyContext1.Provider>


            </A>


          </MyContext.Provider>
需要通过上面的方式传入value值,指定 Context 要暴露的信息。
子组件在匹配过程中只会匹配最新的 Provider,如果 MyContext 和 MyContext1 提供了相同的方法,则 C 组件只会选择 MyContext1 提供的方法。
默认值的作用?
如果匹配不到最新的 Provider 就会使用默认值,默认值一般只有在 对组件进行单元测试 (组件并未嵌入到父组件中)的时候比较有用。 使用useContext获取上下文
通过 createContext 创建出来的上下文对象,在子组件中可以通过 useContext 获取 Provider 提供的内容
const { fn, a, b } = useContext(MyContext);
可以发现useContext 需要将 MyContext 这个
Context 实例传入
。
这种用法会存在一个比较尴尬的地方,就是父子组件如果不在一个目录中,如何共享 MyContext 这个 Context 实例呢?
一般这种情况下,可以通过 Context Manager 统一管理上下文的实例,然后通过 export 将实例导出,在子组件中将实例 import 进来。
示例:
创建一个contextmanager文件进行统一管理Context创建实例然后将其导出;
        import React from 'react';


        export const MyContext = React.createContext();


        export const MyContext1 = React.createContext();
在需要使用到对应实例的组件中分别去将对应Context实例导入进去使用
        import { useContext } from 'react';


        import { MyContext1 } from '@/utils/contextmanager'


        const Component = () => {


            const { fn } = useContext(MyContext1);


            return <>Component</>


        }
createContext和useContext实现数据共享
例子:比如子组件中需要修改父组件的 state 状态 一般的做法是将父组件的方法比如 setXXX 通过 props 的方式传给子组件,而一旦子组件多层级的话,就要层层透传。 如果使用 Context 就可以避免这种层层透传 父组件Provider提供上下文value
        import React, { useState } from 'react';


        import Child from './Child';


        import { MyContext } from '@/utils/contextmanager';


        const Parent = (props = {}) => {


            const [step, setStep] = useState(0);


            const [count, setCount] = useState(0);


            const [number, setNumber] = useState(0);


            return (


                <MyContext.Provider value={{ setStep, setCount, setNumber }}>


                    <A>


                        <Child step={step} number={number} count={count} />


                    </A>


                </MyContext.Provider>


            );


        }


        export default Parent;
子组件 useContext 使用上下文
        import React, { useContext, memo } from 'react';


        import { MyContext } from '@/utils/contextmanager';


        const Child = memo((props = {}) => {


            const { setStep, setNumber, setCount } = useContext(MyContext);


            return (


                <>


                    <p>step is : {props.step}</p>


                    <p>number is : {props.number}</p>


                    <p>count is : {props.count}</p>


                    <hr />


                    <div>


                        <button onClick={() => { setStep(props.step + 1) }}>step ++</button>


                        <button onClick={() => { setNumber(props.number + 1) }}>number ++</button>


                        <button onClick={() => { setCount(props.step + props.number) }}>number + step</button>


                    </div>


                </>


            );


        });


        export default Child;
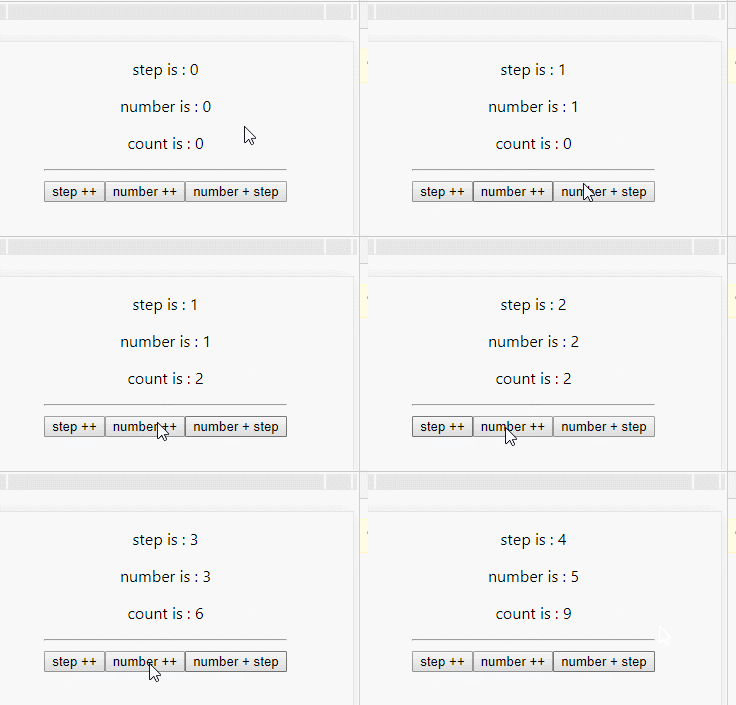
效果

使用useReducer优化Context复杂度
上面的示例虽然实现了多级组件方法共享,但是暴露出一个问题。 就是把所有的方法都放在了 MyContext.Provider.value 属性中传递,必然造成整个 Context Provider 提供的方法越来越多,让维护变的就更复杂了。 这里其实可以通过useReducer包装,通过dispatch去触发action进行数据更新,所以我们可以如下优化一下上面代码 父组件
        import React, { useReducer } from 'react';


        import Child from './Child';


        import { MyContext } from '@/utils/contextmanager';


        const initState = { count: 0, step: 0, number: 0 };


        const reducer = (state, action) => {


            switch (action.type) {


                case 'step': return Object.assign({}, state, { step: state.step + 1 });


                case 'number': return Object.assign({}, state, { number: state.number + 1 });


                case 'count': return Object.assign({}, state, { count: state.step + state.number });


                default: return state;


            }


        }


        const Parent = (props = {}) => {


            const [state: { step, number, count }, dispatch] = useReducer(reducer, initState);


            return (


                <MyContext.Provider value={{ dispatch }}>


                    <Child step={step} number={number} count={count} />


                </MyContext.Provider>


            );


        }


        export default Parent;
子组件
        import React, { useContext, memo } from 'react';


        import { MyContext } from '@/utils/contextmanager';


        const Child = memo((props = {}) => {


            const { dispatch } = useContext(MyContext);


            return (


                <>


                    <p>step is : {props.step}</p>


                    <p>number is : {props.number}</p>


                    <p>count is : {props.count}</p>


                    <hr />


                    <div>


                        <button onClick={() => { dispatch({ type: 'setp' }) }}>step ++</button>


                        <button onClick={() => { dispatch({ type: 'number' }) }}>number ++</button>


                        <button onClick={() => { dispatch({ type: 'count' }) }}>number + step</button>


                    </div>


                </>


            );


        });


        export default Child;
将state也通过Context传递给子组件
其实上面的例子,子组件获取父组件的 state 还是通过 props传递的,其实也会存在层层嵌套
如果将整个 state 通过 Context 传入就无需层层组件的 props 传递(如果不需要整个state,可以只将某几个 state 给 Provider)
优化后,父组件
        import React, { useReducer, useCallback } from 'react';


        import Child from './Child';


        import { MyContext } from '@/utils/contextmanager';


        const initState = { count: 0, step: 0, number: 0 };


        const reducer = (state, action) => {


            switch (action.type) {


                case 'step': return Object.assign({}, state, { step: state.step + 1 });


                case 'number': return Object.assign({}, state, { number: state.number + 1 });


                case 'count': return Object.assign({}, state, { count: state.step + state.number });


                default: return state;


            }


        }


        const Parent = (props = {}) => {


            const [state, dispatch] = useReducer(reducer, initState);


            const parentStepHandler = useCallback(() => {


               dispatch({ type: 'step' })


            }, [])


            return (


                <MyContext.Provider value={{ dispatch, state }}>


                    <button onClick={parentStepHandler}>parent step ++</button>


                    <Child />


                </MyContext.Provider>


            );


        }


        export default Parent;
优化后,子组件
        import React, { useContext, memo } from 'react';


        import { MyContext } from '@/utils/contextmanager';


        const Child = memo((props = {}) => {


            const { state: { step, number, count }, dispatch } = useContext(MyContext);


            return (


                <>


                    {console.log('[Child] RELOAD-RENDER')}


                    <p>step is : { step }</p>


                    <p>number is : { number }</p>


                    <p>count is : { count }</p>


                    <hr />


                    <div>


                        <button onClick={() => { dispatch({ type: 'setp' }) }}>step ++</button>


                        <button onClick={() => { dispatch({ type: 'number' }) }}>number ++</button>


                        <button onClick={() => { dispatch({ type: 'count' }) }}>number + step</button>


                    </div>


                </>


            );


        });


        export default Child;
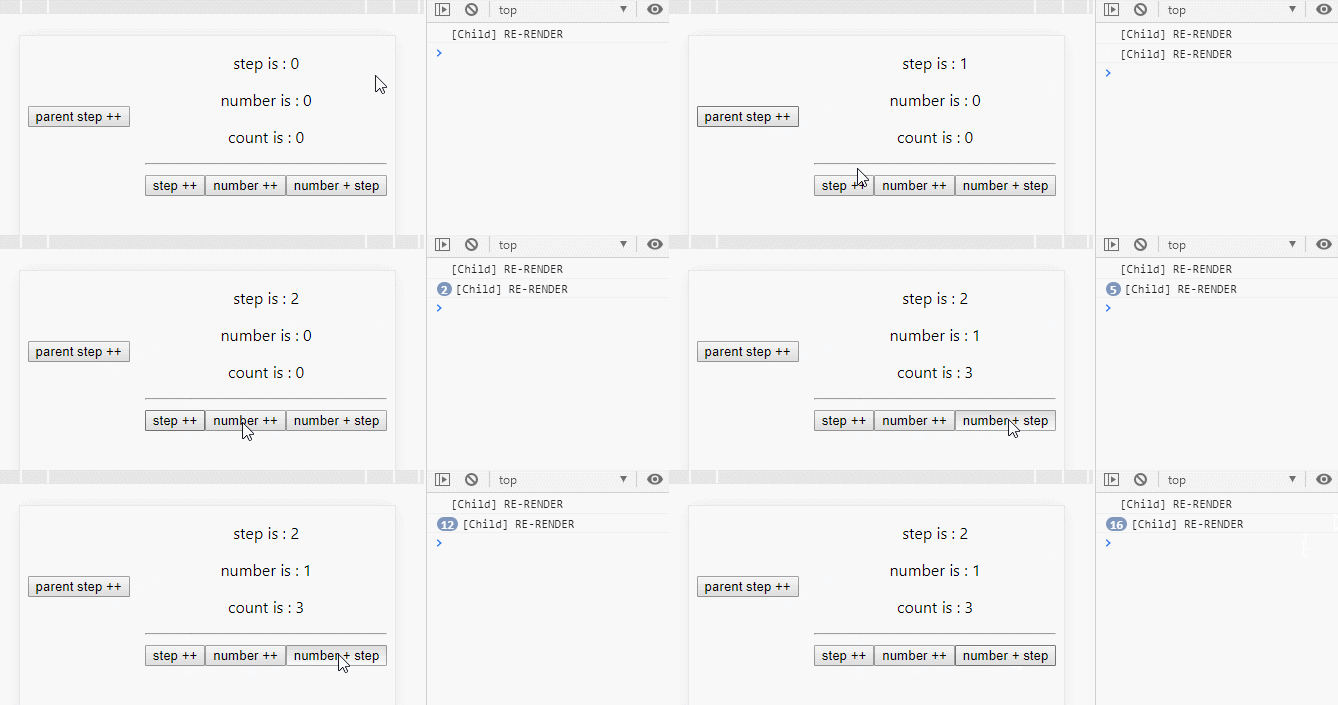
效果

直接使用父组件 state 的性能问题 注意看上面的动图,在点击子组件的 【number + step】 按钮的时候,虽然 count 的值没有发生任何变化,但是一直触发[Child] RELOAD-RENDER 的打印,即使子组件是通过 memo 包装过的。 出现这个问题原因是 memo 只会对 props 进行浅比较,而我们直接将 state 注入到了组件内部,因此 state 的变化必然会触发[Child] RELOAD-RENDER,整个 state 变化是绕过了 memo。
使用useMemo方式来解决上面state透传性能问题
使用 useMemo 优化子组件渲染
        import React, { useContext, useMemo } from 'react';


        import { MyContext } from '@/utils/contextmanager';


        const Child = (props = {}) => {


            const { state: { step, number, count }, dispatch } = useContext(MyContext);


            const Content = useMemo(() => {


                return <>


                    {console.log('[Child] RELOAD-RENDER')}


                    <p>step is : { step }</p>


                    <p>number is : { number }</p>


                    <p>count is : { count }</p>


                    <hr />


                    <div>


                        <button onClick={() => { dispatch({ type: 'setp' }) }}>step ++</button>


                        <button onClick={() => { dispatch({ type: 'number' }) }}>number ++</button>


                        <button onClick={() => { dispatch({ type: 'count' }) }}>number + step</button>


                    </div>


                </>


            }, [step, number, count, dispatch]);


            return Content;


        };


        export default Child;
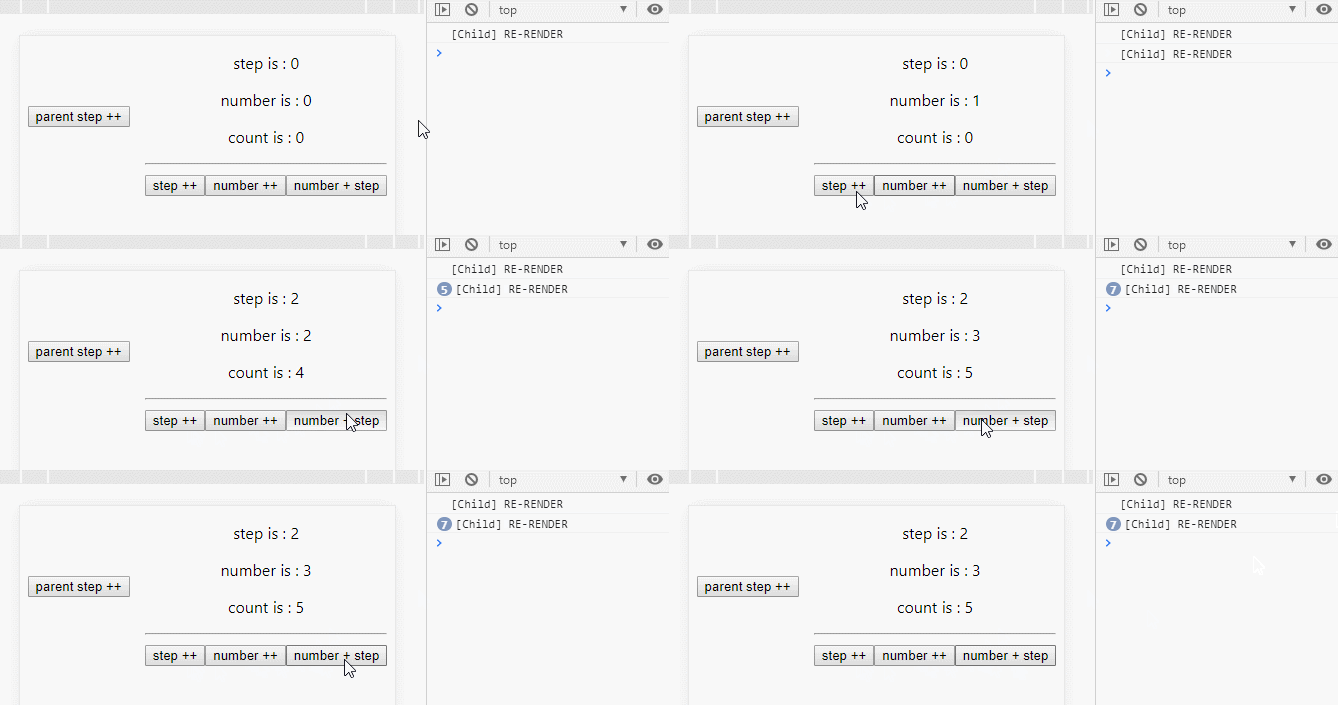
效果

通过上面效果可以看到,点击 number + step 按钮不变的时候是不会再触发打印的,所以DOM是没有被重新渲染的。
猜你爱看
vue的$nextTick的使用+源码分析
一文弄懂React 16.8 新特性React Hooks的使用
深入理解JavaScript位运算符
微 博:前端吴佳
QQ群:856363266
长按识别二维码
关注 「前端技术专栏」 加星标
每天给您推送最新原创技术文章
好看,帮点击 在看 ❤️
