
聊聊SpringAOP那些不为人知的秘密
点击关注公众号,Java干货及时送达

引出AOP
SpringAOP是Spring框架中非常重要的一个概念,AOP,意为面向切面编程。
AOP是OOP的延续,是软件开发中的一个热点,也是Spring框架中的一个重要内容,是函数式编程的一种衍生范型。利用AOP可以对业务逻辑的各个部分进行隔离,从而使得业务逻辑各部分之间的耦合度降低,提高程序的可重用性,同时提高了开发的效率。
来看一个例子,首先我们创建一个接口:
public interface CalculateService {
    int add(int x, int y);
    int reduce(int x, int y);
    int multi(int x, int y);
    int division(int x, int y);
}
然后创建实现类:
@Service
public class CalculateServiceImpl implements CalculateService {
    @Override
    public int add(int x, int y) {
        System.out.println(x + " + " + y + " = " + (x + y));
        return x + y;
    }

    @Override
    public int reduce(int x, int y) {
        System.out.println(x + " - " + y + " = " + (x - y));
        return x - y;
    }

    @Override
    public int multi(int x, int y) {
        System.out.println(x + " * " + y + " = " + (x * y));
        return x * y;
    }

    @Override
    public int division(int x, int y) {
        System.out.println(x + " / " + y + " = " + (x / y));
        return x / y;
    }
}
此时我们从容器中获取这个组件并调用计算方法:
public static void main(String[] args) throws Exception {
    ApplicationContext context = new AnnotationConfigApplicationContext(MyConfiguration.class);
    CalculateService calculateService = context.getBean("calculateServiceImpl", CalculateService.class);
    calculateService.add(1,1);
    calculateService.reduce(1,1);
    calculateService.multi(1,1);
    calculateService.division(1,1);
}
运行结果:
1 + 1 = 2
1 - 1 = 0
1 * 1 = 1
1 / 1 = 1
现在需求变了,我们需要在输出语句的前后分别打印当前系统的时间,如果让你实现,你会怎么做呢?最笨的办法就是硬编码,直接在每个方法里添加打印时间的代码即可:
@Service
public class CalculateServiceImpl implements CalculateService {
    @Override
    public int add(int x, int y) {
        System.out.println("计算前的时间:" + LocalDateTime.now());
        System.out.println(x + " + " + y + " = " + (x + y));
        System.out.println("计算后的时间:" + LocalDateTime.now());
        return x + y;
    }

    @Override
    public int reduce(int x, int y) {
        System.out.println("计算前的时间:" + LocalDateTime.now());
        System.out.println(x + " - " + y + " = " + (x - y));
        System.out.println("计算后的时间:" + LocalDateTime.now());
        return x - y;
    }

    @Override
    public int multi(int x, int y) {
        System.out.println("计算前的时间:" + LocalDateTime.now());
        System.out.println(x + " * " + y + " = " + (x * y));
        System.out.println("计算后的时间:" + LocalDateTime.now());
        return x * y;
    }

    @Override
    public int division(int x, int y) {
        System.out.println("计算前的时间:" + LocalDateTime.now());
        System.out.println(x + " / " + y + " = " + (x / y));
        System.out.println("计算后的时间:" + LocalDateTime.now());
        return x / y;
    }
}
运行结果:
计算前的时间:2022-01-21T14:35:21.806
1 + 1 = 2
计算后的时间:2022-01-21T14:35:21.806
计算前的时间:2022-01-21T14:35:21.806
1 - 1 = 0
计算后的时间:2022-01-21T14:35:21.806
计算前的时间:2022-01-21T14:35:21.806
1 * 1 = 1
计算后的时间:2022-01-21T14:35:21.806
计算前的时间:2022-01-21T14:35:21.806
1 / 1 = 1
计算后的时间:2022-01-21T14:35:21.806
这样虽然实现了需求,但是不够优雅,而且如果接口方法有变动,我们就需要修改实现类的代码,那么有没有一种办法能够将这些打印时间的需求抽离出来,然后让其在指定的方法执行前后分别执行呢?SpringAOP就能够帮助我们完成这一想法。
SpringAOP改造代码实现
@Aspect
@Component
public class CalculateAspectJ {
    @Before("execution(* com.wwj.spring.demo.aop.CalculateService.add(..))")
    public void printBefore(){
        System.out.println("计算前的时间:" + LocalDateTime.now());
    }
}
这段代码里面涉及到的知识点比较多,下面我会一一介绍,先来看看效果:
计算前的时间:2022-01-21T14:45:41.579
1 + 1 = 2
1 - 1 = 0
1 * 1 = 1
1 / 1 = 1
看输出结果好像打印时间只在add方法生效了,这是为什么呢?我们主要的关注点就是下面的这个组件:
@Aspect
@Component
public class CalculateAspectJ {
    @Before("execution(int com.wwj.spring.demo.aop.CalculateService.add(..))")
    public void printBefore(){
        System.out.println("计算前的时间:" + LocalDateTime.now());
    }
}
对于传统的OOP编程,我们的开发流程是从上至下的,比如转账操作,我们需要在取款、查询业务、转账三个操作中验证用户的信息是否正确: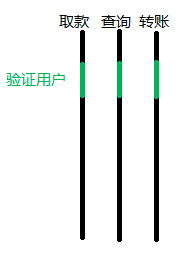 而AOP打破了这种限定,它以一种横向的方式进行编程,就像砍树一样,如下图:
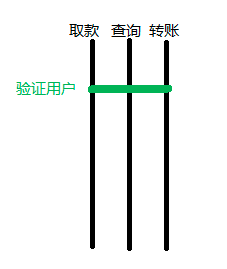 可以看到经过AOP的改造后,原先要写三遍的验证用户代码只需要写一次了,它就像一根针,把代码织入到了业务中。再回过头来看看刚才的组件:
@Aspect
@Component
public class CalculateAspectJ {

    @Before("execution(int com.wwj.spring.demo.aop.CalculateService.add(int,int))")
    public void printBefore(){
        System.out.println("计算前的时间:" + LocalDateTime.now());
    }
}
其中@Aspect注解用于声明当前类为一个切面,当一个类被声明为切面后,Spring便会将该类切入到某个切点中,而切点就是我们需要改造的方法,那么如何指定切面作用于哪些切点上呢,我们需要借助切点表达式:
execution(int com.wwj.spring.demo.aop.CalculateService.add(int,int))
切点表达式以execution开头,值为方法的全名,包括返回值、包名、方法名、参数,Spring将根据切点表达式去匹配需要切入的方法,不过一般情况下切点表达式并不会写得这么精确,通常配合通配符一起使用,如:
execution(* com.wwj.spring.demo.aop.CalculateService.*(..))
它表示匹配CalculateService接口下任意返回值任意参数的任意方法,也就是说,该接口下的所有方法都将被处理,当我们使用通配符方式配置时,运行结果如下:
计算前的时间:2022-01-21T16:07:23.250
1 + 1 = 2
计算前的时间:2022-01-21T16:07:23.250
1 - 1 = 0
计算前的时间:2022-01-21T16:07:23.250
1 * 1 = 1
计算前的时间:2022-01-21T16:07:23.250
1 / 1 = 1
通知类型
将代码逻辑织入到业务中的流程还有一个专业的概念,叫通知,从上面的运行结果我们不难发现,切面只在方法执行之前生效了,这是因为我们使用了@Before注解,它表示的是通知类型中的前置通知,Spring中共有5种通知类型:
@Before:前置通知,在目标方法执行前执行 @After:后置通知,在目标方法执行后执行,无论是否出现异常 @AfterReturning:返回通知,在目标方法执行后执行,出现异常则不执行 @AfterThrowing:异常通知,在目标方法出现异常后执行 @Around:环绕通知,围绕方法执行,它能实现以上四种通知的效果
由此可知,若是想在目标方法执行之后实现某些功能,则需要使用后置通知,添加一个配置:
@After("execution(* com.wwj.spring.demo.aop.CalculateService.*(..))")
public void printAfter() {
    System.out.println("计算前的时间:" + LocalDateTime.now());
}
运行结果:
计算前的时间:2022-01-21T16:14:00.002
1 + 1 = 2
计算后的时间:2022-01-21T16:14:00.002
计算前的时间:2022-01-21T16:14:00.002
1 - 1 = 0
计算后的时间:2022-01-21T16:14:00.002
计算前的时间:2022-01-21T16:14:00.002
1 * 1 = 1
计算后的时间:2022-01-21T16:14:00.002
计算前的时间:2022-01-21T16:14:00.002
1 / 1 = 1
计算后的时间:2022-01-21T16:14:00.002
其它几种类型的通知用法也是如此,只需改变注解名字即可,不过在每种通知中都有一些其它细节,下面我们一一介绍。
前置通知
前置通知@Before,它会在目标方法执行之前执行,所以按道理我们可以在前置通知中获取目标方法的一些信息,比如方法名、方法入参等,好在Spring已经考虑到了,为我们提供了JoinPoint来获取,来看例子:
@Before("execution(* com.wwj.spring.demo.aop.CalculateService.*(..))")
public void printBefore(JoinPoint joinPoint) {
String methodName = joinPoint.getSignature().getName();
List
运行结果:
执行前置通知,方法名:add,方法入参:[1, 1]
1 + 1 = 2
执行前置通知,方法名:reduce,方法入参:[1, 1]
1 - 1 = 0
执行前置通知,方法名:multi,方法入参:[1, 1]
1 * 1 = 1
执行前置通知,方法名:division,方法入参:[1, 1]
1 / 1 = 1
但是在前置通知中是无法获取到目标方法的返回值的,因为此时目标方法还未执行。
后置通知
后置通知会在目标方法执行后执行,所以也可以获取到目标方法的信息:
@After("execution(* com.wwj.spring.demo.aop.CalculateService.*(..))")
public void printAfter(JoinPoint joinPoint) {
String methodName = joinPoint.getSignature().getName();
List
运行结果:
1 + 1 = 2
执行后置通知,方法名:add,方法入参:[1, 1]
1 - 1 = 0
执行后置通知,方法名:reduce,方法入参:[1, 1]
1 * 1 = 1
执行后置通知,方法名:multi,方法入参:[1, 1]
1 / 1 = 1
执行后置通知,方法名:division,方法入参:[1, 1]
那么后置通知能否获取到目标方法的返回值呢?其实也是不可以的,因为后置通知无论目标方法是否出现异常都会执行,所以它也是无法获取到方法的返回值的。
返回通知
返回通知会在目标方法成功执行后执行,所以它不光能够获取到目标方法的方法名、方法入参等信息,也能够获取到方法的返回值:
@AfterReturning(value = "execution(* com.wwj.spring.demo.aop.CalculateService.*(..))"
, returning = "result")
public void printAfterReturning(JoinPoint joinPoint, Object result) {
String methodName = joinPoint.getSignature().getName();
List
在@AfterReturning中配置returning属性,然后在方法入参中定义一个与其名字相同的变量,Spring将会自动把目标方法的返回值注入进来,运行结果如下:
1 + 1 = 2
执行返回通知,方法名:add,方法入参:[1, 1],返回值:2
1 - 1 = 0
执行返回通知,方法名:reduce,方法入参:[1, 1],返回值:0
1 * 1 = 1
执行返回通知,方法名:multi,方法入参:[1, 1],返回值:1
1 / 1 = 1
执行返回通知,方法名:division,方法入参:[1, 1],返回值:1
异常通知
异常通知会在目标方法出现异常后执行,所以异常通知也是无法获取到目标方法的返回值的,但是异常通知可以获取到目标方法出现的异常信息:
@AfterThrowing(value = "execution(* com.wwj.spring.demo.aop.CalculateService.*(..))"
, throwing = "e")
public void printAfterThrowing(JoinPoint joinPoint, Exception e) {
String methodName = joinPoint.getSignature().getName();
List
指定@AfterThrowing注解的throwing属性,即可得到目标方法出现的异常信息,我们故意产生一个异常,让除法操作的除数为0,查看运行结果:
1 + 1 = 2
1 - 1 = 0
1 * 1 = 1
执行异常通知,方法名:division,方法入参:[1, 0],异常:java.lang.ArithmeticException: / by zero
环绕通知
最后是环绕通知,环绕通知是围绕着目标方法执行的,所以它能够实现前面4个通知的所有功能,如下:
@Around("execution(* com.wwj.spring.demo.aop.CalculateService.*(..))")
public Object printAround(ProceedingJoinPoint joinPoint) {
Object result = null;
String methodName = joinPoint.getSignature().getName();
List
运行结果:
执行前置通知,方法名:add,方法入参:[1, 1]
1 + 1 = 2
执行返回通知,方法名:add,方法入参:[1, 1],返回值:2
执行后置通知,方法名:add,方法入参:[1, 1]
执行前置通知,方法名:reduce,方法入参:[1, 1]
1 - 1 = 0
执行返回通知,方法名:reduce,方法入参:[1, 1],返回值:0
执行后置通知,方法名:reduce,方法入参:[1, 1]
执行前置通知,方法名:multi,方法入参:[1, 1]
1 * 1 = 1
执行返回通知,方法名:multi,方法入参:[1, 1],返回值:1
执行后置通知,方法名:multi,方法入参:[1, 1]
执行前置通知,方法名:division,方法入参:[1, 0]
执行异常通知,方法名:division,方法入参:[1, 0],异常:java.lang.ArithmeticException: / by zero
执行后置通知,方法名:division,方法入参:[1, 0]
异常通知需要注意几点,首先必须有返回值,其次方法入参为ProceedingJoinPoint而不是JoinPoint,result = joinPoint.proceed();表示执行目标方法,在目标方法执行前后分别执行对应的通知逻辑。
自己实现通知
不知道大家在看到环绕通知时有没有发现它有点像JDK的动态代理,那能不能借助JDK的动态代理来自己实现一下通知呢?代码如下:
public class MyInvocationHandler implements InvocationHandler {
    private Object target;
    public MyInvocationHandler(Object target) {
        this.target = target;
    }

    @Override
    public Object invoke(Object proxy, Method method, Object[] args) throws Throwable {
        Object result = null;
        try {
            System.out.println("执行前置通知,方法名:" + method.getName() + ",方法入参:" + Arrays.asList(args));
            result = method.invoke(target, args);
            System.out.println("执行返回通知,方法名:" + method.getName() + ",方法入参:" + Arrays.asList(args) + ",返回值:" + result);
        } catch (Throwable e) {
            System.out.println("执行异常通知,方法名:" + method.getName() + ",方法入参:" + Arrays.asList(args) + ",异常:" + e);
        } finally {
            System.out.println("执行后置通知,方法名:" + method.getName() + ",方法入参:" + Arrays.asList(args));
        }
        return result;
    }
}
public static void main(String[] args) throws Exception {
    ApplicationContext context = new AnnotationConfigApplicationContext(MyConfiguration.class);
    CalculateService calculateService = context.getBean("calculateServiceImpl", CalculateService.class);
    MyInvocationHandler myInvocationHandler = new MyInvocationHandler(calculateService);
    calculateService = (CalculateService) Proxy.newProxyInstance(calculateService.getClass().getClassLoader(), calculateService.getClass().getInterfaces(), myInvocationHandler);
    calculateService.add(1, 1);
    calculateService.reduce(1, 1);
    calculateService.multi(1, 1);
    calculateService.division(1, 0);
}
运行结果:
执行前置通知,方法名:add,方法入参:[1, 1]
1 + 1 = 2
执行返回通知,方法名:add,方法入参:[1, 1],返回值:2
执行后置通知,方法名:add,方法入参:[1, 1]
执行前置通知,方法名:reduce,方法入参:[1, 1]
1 - 1 = 0
执行返回通知,方法名:reduce,方法入参:[1, 1],返回值:0
执行后置通知,方法名:reduce,方法入参:[1, 1]
执行前置通知,方法名:multi,方法入参:[1, 1]
1 * 1 = 1
执行返回通知,方法名:multi,方法入参:[1, 1],返回值:1
执行后置通知,方法名:multi,方法入参:[1, 1]
执行前置通知,方法名:division,方法入参:[1, 0]
执行异常通知,方法名:division,方法入参:[1, 0],异常:java.lang.reflect.InvocationTargetException
执行后置通知,方法名:division,方法入参:[1, 0]
借助JDK的动态代理,我们也能够实现通知,事实上,SpringAOP底层的实现就是JDK的动态代理,不过动态代理有局限性,就是目标方法所在的类必须实现了接口。
为此,SpringAOP还引入了另外一种动态代理方式:CgLib,CgLib是通过继承的方式实现的代理,所以它能够适应任何场景。
往 期 推 荐
1、Windows新功能太“社死”!教你一键快速禁用 2、发现竞争对手代码中的低级Bug后,我被公司解雇并送上了法庭 3、为什么说技术人一定要有产品思维 4、操作系统联合创始人反目成仇,这个Linux发行版危在旦夕 5、Java8八年不倒、IntelliJ IDEA力压Eclipse 点分享
点收藏
点点赞
点在看


