
SpringCloud微服务架构开发实战:微服务的集中化配置
微服务的集中化配置:为什么需要集中化配置
应用一般都会有配置文件,即便号称是“零配置”的Spring Boot应用,也无法完全做到不使用配置文件,毕竟配置文件就是为了迎合软件的个性化需求。一个带配置的应用程序,部署了多个实例在若干台机器上,如果配置发生了变化,那么,就需要对该应用所有的实例进行配置的变更。
随着单块架构向微服务架构演进之后,微服务的应用数量也会剧增。同时,每个微服务都有自己的配置文件,这些文件如果都散落在各自的应用中,必然会对应用的升级和配置管理带来挑战,毕竟谁也没有能力去手工配置那么多微服务的配置文件。而且,对运维来说,一方面手工配置单工作量很大,几乎不可能完成;另-方面,相对而言,人为的操作会加大出错的几率。所以,外部化和中心化的配置中心,变成了解决微服务配置问题的一一个有力的途径。
配置分类
在我们了解了集中化配置的必要性之后,来看看配置到底有哪几种分类。
1.按配置的来源划分
按配置的来源划分,主要有源代码、文件、数据库连接、远程调用等。
2.按适用的环境划分
按配置的适用环境划分,可分为开发环境、测试环境、预发布环境、生产环境等。
3.按配置的集成阶段划分
按配置的集成阶段划分,可分为编译时、打包时和运行时。编译时,最常见的有两种,一 是源代码级的配置,二是把配置文件和源代码-起提交到代码仓库中。打包时,即在应用打包阶段通过某种方式将配置(一般是文件形式)打入最终的应用包中。运行时,是指应用启动前并不知道具体的配置,而是在启动时,先从本地或远程获取配置,然后再正常启动。
4.按配置的加载方式划分
按配置的加载方式划分,可分为启动加载和动态加载配置。
启动加载是指应用在启动时获取配置,并且只获取-次,在应用运行过程中不会再去加载。这类配置通常是不会经常变更的,如端口号、线程池大小等。
动态加载是指应用在运行过程中,随时都可以获取到的配置,这些配置意味着会在应用运行过程中经常被修改。
配置中心的需求
创建符合要求的、易于使用的配置中心,至少需要满足以下几个核心需求。
面向可配置的编码。编码过程中,应及早考虑将后期可能经常变更的数据,设置为可以配置的配置项,从而避免在代码里面硬编码。
●隔离性。不同部署环境下,应用之间的配置是相互隔离的,例如,非生产环境的配置不能用于
生产环境。
●一致性。相同部署环境下的服务器应用配置应该具有一致性,即同个应用的所有的实例使用同一份配置。
●集中化配置。在分布式环境下,应用配置应该具备可管理性,即提供远程管理配置的能力。
Spring Cloud Config
Spring Cloud Config致力于为分布式系统中的外部化配置提供支持。其中,Spring Cloud Config又分为了供服务器( Config Server )和客户端( Config Client )两个版本。借助Config Server,可以在所有环境中管理应用程序的外部属性。SpringCloudConfig的客户端和服务器上的概念都与Spring的Environment 和PropertySource抽象-致, 所以它们非常适合Spring应用程序,但也可以与任何运行在任何语言的应用程序-起使用。当应用程序从开发到测试转移到部署管道时,你可以通过管理这些环境之间的配置,来确保应用程序具有在迁移时所需运行的所有内容。
Config Server存储后端的默认实现使用了Git,因此它可以轻松地支持标记版本的配置环境,
并且可以通过广泛的工具来访问管理内容。
本文将着重介绍如何使用Spring Cloud Config来实现集中化的配置中心。
使用Config实现的配置中心
本节将在
micro-weather-eureka-client基础上,创建- - 个以micro- weather-configserver作为配置
中心的服务端,创建一- 个以micro- weather- config client作为配置中心的客户端。
开发环境
●Gradle 4.0。
●Spring Boot 2.0.0.M3。
●Spring Cloud Starter Netfix Eureka Client Finchley.M2。
●Spring Cloud Config Server Finchley.M2。
●Spring Cloud Config Client Finchley.M2。
创建配置中心的服务端
micro-weather- config- server是作为配置中心的服务端。
1.更改配置
要使用Spring Cloud Config Server,最简单的方式莫过于添加Spring Cloud Config Server依赖。
dependencies {
//添加Spring Cloud Config Server 依赖
compile ('org. spr ingf r amework. cloud: spring-cloud-config-server')
}
2.一个简单的Config Server
要使用Config Server,只需要在程序的人口Application类加上
org.springframework.cloud.config.server.EnableConfigServer注解,开启配置中心的功能既可。
package com. waylau . spring. cloud. weather;
import org. springframework. boot . SpringApplication;
import org. springf ramework. boot . autoconfigure .SpringBootApplication;
import org. springfr amework . cloud. client .discovery . EnableDiscovery
Client;
import org. springframework. cloud. config . server . EnableConfigServer;
/**
主应用程序.
★@since 1.0.0 2017年11月06日
@author Way Lau
*/
@SpringBootApplication
@EnableDiscoveryClient
@EnableConfigServer
public class Application {
public static void main(String[] args) {
SpringAppl ication. run (Application.class, args) ;
}
}
其中,@EnableConfigServer 启用了Config Server作为配置中心。
最后,修改application.properties。修改为如下配置。
spring. application. name: micro-weather-config- server
server .port=8888
eureka. client. serviceUrl . defaultZone: http://localhost: 8761/eureka/
spring. cloud. config . server .git.uri-https://github . com/waylau/
spring-cloud-microservices-development
spring. cloud. config . server.git.searchPaths=config-repo
其中:
spring.
cloud.config.server.git.uri:配置Git仓库地址;
spring. cloud.config. server.gitsearchPaths:配置查找配置的路径。
3.测试
启动应用,访问ht:taho://88atherev,应能看到如下输出内容,说明服务启动正常。
{"name":"auther", "profiles": ["dev"],"label":nu1l, "version":" alf1e9b
8711754 f58 6dbed1513fc99acc25b7904", "state" :null, "property Sources":[]
}
创建配置中心的客户端
micro- weather-config-client是作为配置中心的客户端。
1.更改配置
要使用Spring Cloud Confg Client,最简单的方式莫过于添加Spring Cloud Config Client依赖。
dependencies {
//添加Spring Cloud Config Client依赖
compile('org. springf ramework. cloud:spring-cloud-config-client')
}
2.一个简单的Config Client
主应用程序并不需要做特别的更改,与旧的micro-weather eureka-client应用的源码- -致。
@SpringBootApplication
@EnableDiscoveryClient
public class Application {
public static void main(String[] args) {
Spr ingApplication. run (Application.class, args) ;
}
}
最后,修改application.propertieso修改为如下配置。
spring.application. name: micro-weather -config-clienteureka. client. serviceUrl . defaultZone: http://localhost :8761/eureka/
spring. cloud. config. profile=dev
spring. cloud. config.uri= http:/ /localhost: 8888/
其中,spring.cloud.config.uri 指向了配置中心micro-weather config server的位置。
如何测试
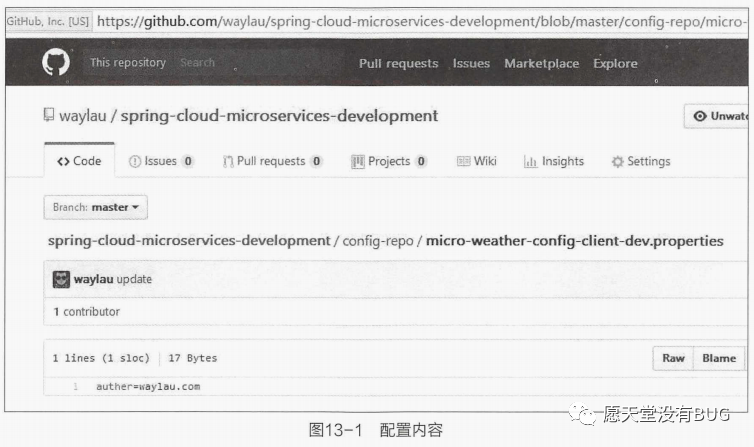
在
htp/github.on/waylau/spring-cloud-microcrvices-development的config-repo 目录下,我们事先已经放置了一个配置文件micro-weather-config-client de.properties,里面简单地放置了micro-weather- config-client应用的待测试的配置内容。
auther=waylau . com读者也可以在线查看该文件,看到如图13-1所示的配置内容。
其中,在配置中心的文件命名规则如下。
/ {application}/ {profile}[/ {label}]
/ {application}- {profile} . yml
/ {label}/ {application}-{profile} . yml
/ {application}-{profile} .properties
/ {label}/ {application}-{profile} . properties
1.编写测试用例
在micro-weather config-client应用中编写测试用例。
package com. waylau. spring. cloud. weather;
import static org.junit. Assert.assertEquals;
import org. junit. Test;
import org. junit. runner . RunWith;
import org. springframework. beans. factory . annotation. Value;
import org.springframework . boot. test. context. SpringBootTest;
import org. spr ingframework. test. context. junit4. Spr ingRunner;
/★★
*主应用测试用例.
★@since 1.0.0 2017年11月06日
* @author "https://waylau. com">Way Lau
*/
@RunWi th (Spr ingRunner .class)
@SpringBootTest
public class ApplicationTests {
@Value ("${auther}")
private String auther;
@Test
public void contextLoads () {
assertEquals ("waylau. com", auther) ;
}
}
2.运行和测试
启动在之前章节中搭建的micro- weather-eureka-server和
micro-weather-config-server两个项目。
启动micro-weather- config client应用中编写测试用例ApplicationTests,如果一切正常, 说明我们拿到了auther在配置中心中的内容。
源码
本节示例所涉及的源码,见
micro-weather-eureka-server. micro-weather- eureka-client及mi-cro-weather-config-server和micro-weather-config-client。
本篇文章内容给大家讲解的是微服务的集中化配置
下篇文章给大家讲解的是微服务的高级主题一自动扩展;
觉得文章不错的朋友可以转发此文关注小编;
感谢大家的支持!
本文就是愿天堂没有BUG给大家分享的内容,大家有收获的话可以分享下,想学习更多的话可以到微信公众号里找我,我等你哦。