微服务架构实战:商家管理后台与sso设计:SSO设计
SSO设计
Spring Security是一个功能强大、可定制的身份验证和访问控制框架.Spring Security OAuth2是一个基于Spring框架支持第三方应用授权的工具组件。通过使用Spring Security OAuth2,我们可以在商家后台中进行单点登录(SSO)设计,从而为多个微服务应用的系统集成,使用统一的安全控制管理。
SSO设计分为服务端和客户端两大部分。SSO服务端为每个应用提供了统一的访问控制和授权认证服务,是一个Web UI微服务应用,在模块merchant-sso中进行开发,包含了用户登录设计、主页设计和认证服务设计等方面的内容。SSO客户端是指为用户提供本地服务的程序
SSO的基本配置
SSO的基本配置与一般的Web UI应用项目配置基本相同,即在 Web UI应用项目配置的基础上,增加 Spring Cloud OAuth2的依赖引用,代码如下所示:
<dependency>
<group Id>org.springframework.cloudgroupId>
<artifactId>spring-cloud-starter-oauth2artifactId>
dependency>
这个组件已经包含了Security 和OAuth2两套组件体系,其中,Security提供了访问控制功能,OAuth2提供了第三方应用授权认证的服务。
在应用的配置文件 application.yml中,设定SSO应用的服务端口,并设置一个cookie保存用户的登录信息,代码如下所示:
server:
port:8000
session:
cookie:
name: SESSIONID
为保证第三方应用在授权之后能够被正常访问,我们必须在配置文件中增加接入SSO客户端返回地址的列表,并使用正确的格式“http:/l域名或IP:端口/login”进行设定,代码如下所示;
#SSo客户端返回地址的列表ssoclient:
redirecturis:
- http://localhost:8081/login- http://127.0.0.1:8081/1ogin
sso第三方应用授权设计
为了给接入SSO的第三方应用(这里指接入SSO服务的其他微服务应用)进行授权,我们创建了一个配置类AuthServerConfig,它继承了
AuthorizationServerConfigurerAdapter,代码如下所示:
@Configuration
@EnableAuthorizationServer
@EnableConfigurationProperties(clienturls.class)
public class authServerConfig extends AuthorizationServerConfigurerAdapter
CAutowired
private Clienturls clienturls;
@Override
public void configure (AuthorizationServerSecurityConfigurer oauthServer)throws Exception {
oauthServer.tokenKeyAccess( "permitAll ()")
.checkTokenAccess("isAuthenticated()");
@override
public void configure (ClientDetailsServiceConfigurer clients) throwsException {
clients.inMemory()
.withClient ( "ssoclient")
.secret(passwordEncoder ().encode ("ssosecret")).authorizedGrantTypes ("authorization_code").scopes ( "user_info")
.autoApprove(true)
.redirectUris(clienturls.getRedirecturis());
@Bean
public JwtAccessTokenConverter jwtAccessTokenConverter() {
JwtAccessTokenConverter converter = new JwtAccessTokenConverter();converter. setSigningKey ( "demoSige");
return converter;
}
aoverride
public void configure(AuthorizationServerEndpointsConfigurer endpoints)throws Exception {
endpoints.accessTokenConverter(jwtAccessTokenConverter());
}
@Bean
public BCryptPasswordEncoder passwordEncoder(){
return new BCryptPasswordEncoder();
}
}
在上面的配置类中,包含以下主要功能:
(1)使用注解@EnableAuthorizationServer 开启 SSO服务器的功能。(2)重写第一个configure,开启使用Token进行授权的功能。
(3)重写第二个 configure,为客户端指定表单页面授权的方式,即 authorization_code,并且设定客户端授权时使用的用户名和密码分别为ssoclient和 ssosecret。同时,导入配置中的客户端返回地址列表,并设定客户端返回地址列表为redirectUris。另外,通过 autoApprove(true)设定为自动确认授权,省略了客户端授权时必须手动确认的步骤。
(4)重写第三个configure,使用安全的JwtAccessToken。这里有关密钥的使用,我们只简单地使用一个文本 demoSige,如果想使用更加安全的方式,则可以使用KeyStore生成密钥进行配置。
sso登录认证设计
下面提供一个登录界面,用来接收用户输入的用户名和密码等信息,实现用户登录操作。在登录认证中,使用Spring Security对用户名和密码进行验证。
创建一个MyUserDetails类,实现Spring Security 的 UserDetails,代码如下所示:
public class MyUserDetails implements UserDetails {
private string username;
private String password;
private Collectionextends GrantedAuthority> authorities;
private User user;
public MyUserDetails(String username, String password, collectionauthorities, User user){
this.username = username;
this.password = password;
this.authorities = authorities;this.user = user;
}
...
}
这样就可以导入我们自定义的用户体系,提供给Spring Security进行认证了。
创建一个MyUserDetailsService类,实现Spring Security 的UserDetailsService,为接下来的认证服务提供用户信息和导入用户的角色,代码如下所示:
@component
public class MyUserDetailsService implements UserDetailsService {
@Autowired
private UserService userService;
@override
public UserDetails loadUserByUsername (String username) throwsUsernameNotFoundException {
User user = userService.findByName (username);
if(user==nul1){
throw new UsernameNotFoundException("用户不存在!");
}
List authorities = new ArrayList<>();
List roles =user.getRoles ();
if(roles !=null)
{
for(Role role : roles) {
SimpleGrantedAuthority authority = new
SimpleGrantedAuthority(role.getName ());
authorities.add(authority);
}
}
MyUserDetails myUserDetails = new MyUserDetails (username,
user.getPassword(),authorities, user);
return myUserDetails;
}
}
这样,当Spring Security进行认证时,就会调用我们的用户并且取得相关的角色,从而完成登录时的用户名和密码验证,并且为用户配置相应的权限。
为了让上面的设计生效,我们还需要创建一个配置类,即 SecurityConfng 尖o匕继承」SprngSecurity 的
WebSecurityConfigurerAdapter,代码如下所示:
@Configuration
public class SecurityConfig extends webSecurityConfigurerAdapter
@Autowired
private MyUserDetailsService myUserDetailsService;
@Autowired
@Qualifier("dataSource")
private DataSource dataSource;
@Bean(name = BeanIds.AUTHENTICATION MANAGER)Goverride
public AuthenticationManager authenticationManagerBean () throws Exception
return super.authenticationManagerBean();
@override
protected void configure (AuthenticationManagerBuilder auth)
throws Exception {
auth //lremember me
.eraseCredentials(false)
.userDetailsService (myUserDetailsService).passwordEncoder (new
BCryptPasswordEncoder());
@Override
protected void configure(HttpSecurity http) throws Exception
http.antMatcher("/**")
.authorizeRequests().antMatchers( "/login").permitAl1()
.antMatchers(" /images/**", "/checkcode", "/scripts/*
"/styles/**")
.permitAll().anyRequest().authenticated()
.and ().sessionManagement ().sessionCreationPolicy(SessionCreati
onPolicy.NEVER)
.and(.exceptionHandling().accessDeniedPage ("/deny")
.and().rememberMe ().tokenValiditySeconds (86400).tokenRepositor
y(tokenRepository())
.and()
.formLogin().loginPage ("/login" ).permitAll ().successHandler(lo
ginsuccessHandler())
.and() .logout()
.logoutUrl("/logout").permitAll().logoutSuccessUrl ("/signout");
}
@Bean
public JdbcTokenRepositoryImpl tokenRepository()
JdbcTokenRepositoryImpl jtr = new JdbcTokenRepositoryImpl()jtr.setDataSource(dataSource);
return jtr;
}
@Bean
public LoginSuccessHandler loginsuccessHandler(){
return new LoginSuccessHandler();
}
}
在这个配置类中,做了如下设定:
(1)设定用户服务为上面定义的MyUserDetailsService。
(2)指定登录页面链接为/login,这样可以通过控制器设计指定视图文件。
(3)指定登录成功的处理程序loginSuccessHandler。
4)忽略对图片等静态资源的验证。
(5)指定拒绝访问的错误提示链接/deny。
(6)使用rememberMe()设定来记住用户的登录状态。
(7)指定使用本地数据源存储用户登录状态的临时数据。
针对上面的配置类设计,我们创建一个控制器,设定一个登录链接/login,并为其指定一个界面设计页面login.html,代码如下所示:
@Controller
public class LoginController {
@RequestMapping( "/1ogin")public String login(){
return "login";
)
}
在界面设计页面login.html中,主要使用一个表单设计,提供具有用户名和密码等输入控件的登录界面,代码如下所示:
...
<form th:action="@{/login}" id="loginForm" method="post">
<div class="loginTit png">div>
<ul class="infList">
<li class="grayBox">
<label for="username" class="username-icon">label><input id="username" class="username" name="username"
type="text" placeholder="您的用户名"/>
<div class="close png hide">div>li>
<li class="grayBox">
<label class="pwd-icon" id="pwd">label>
<input id="password" name="password" class="pwd"
type="password" placeholder="登录密码"/>
<div class="close png hide">div>li>
<li class="" id="isCheckCode" style="display: none; ">
<label class="validateLabel" >label>
<input id="checkCode" name=" checkCode" class="checkCo
type-"text" placeholder="验证码"/>
<img onclick="reloadImg ();" style="cursor: pointer"
th:src="e{/images/imagecode)" id="validateImg" alt="验证码"class="codePic"title-"验证码。点击此处更新验证码。"/>
<a class="getother" href="javascript:void(0);"
onclick="reloadImg ();" title="点击此处可以更新验证码。">更新a>
li>
ul>
<ul class="infList reloadBtn" style="display: none; ">
<li>
<a href="javascript:void(0);" onclick="tologin();">本页面
已经失效。请点击此处重新登录。a>
li>
u.l>
<divclass="loginBtnBo×">
div class="check-box"><input type="hidden" value="O"
id="remember-me" name="remember-me" onclick="if(this.checked) {this.value
1}else {this.value=0}"/>span class="toggleCheck no-check" id="repwd">span>记住我div>
<input type="button" id="loginBtn" onclick="verSubmit()
value="登录"class="loginBtn png"/>
div>
form>
...
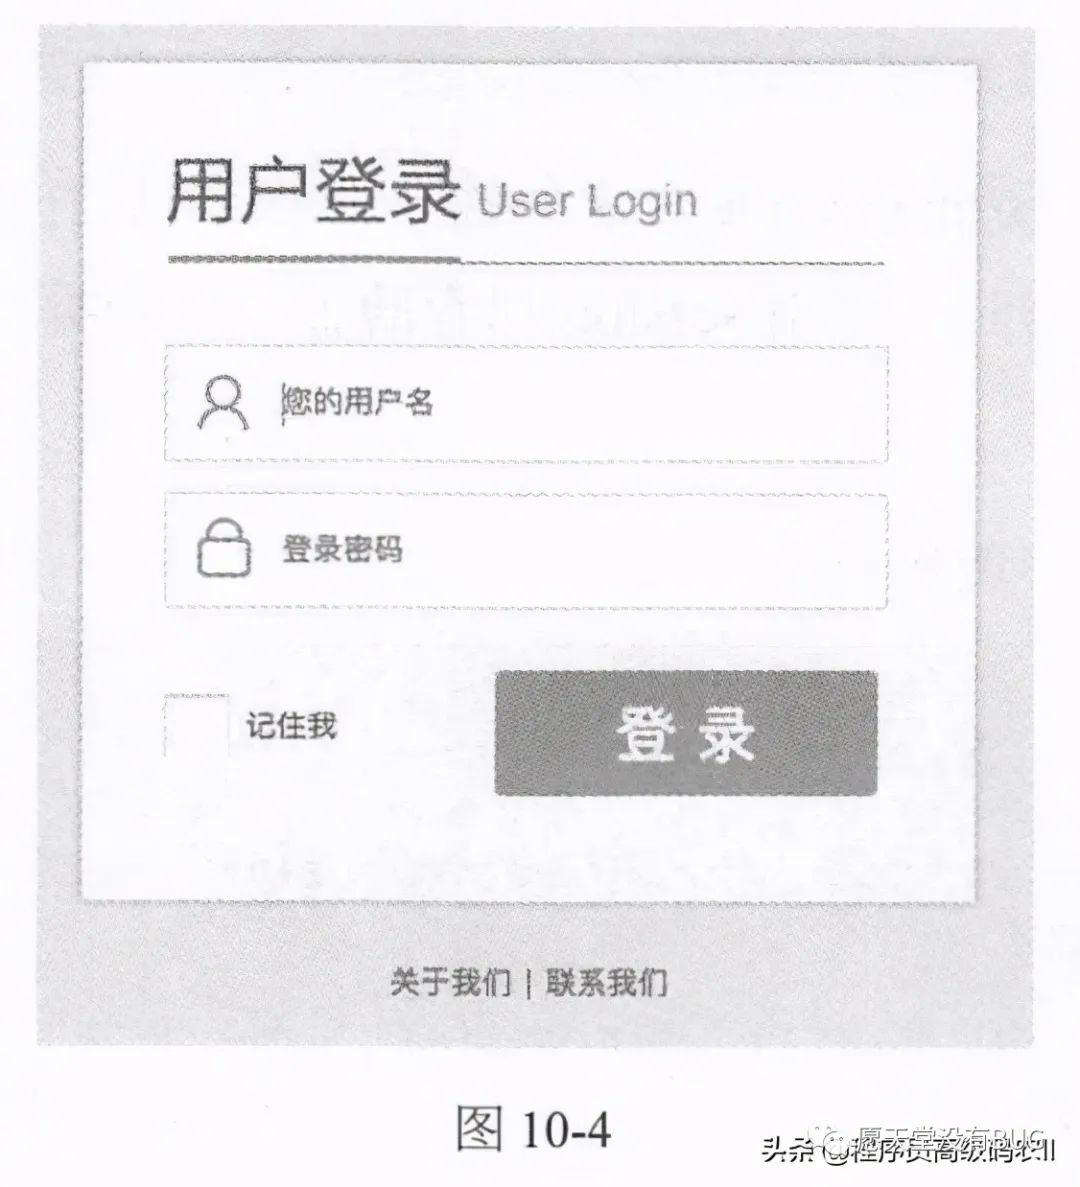
完成设计的登录界面,其显示效果类似于一个浮动窗口,如图10-4所示。

有关验证码的说明
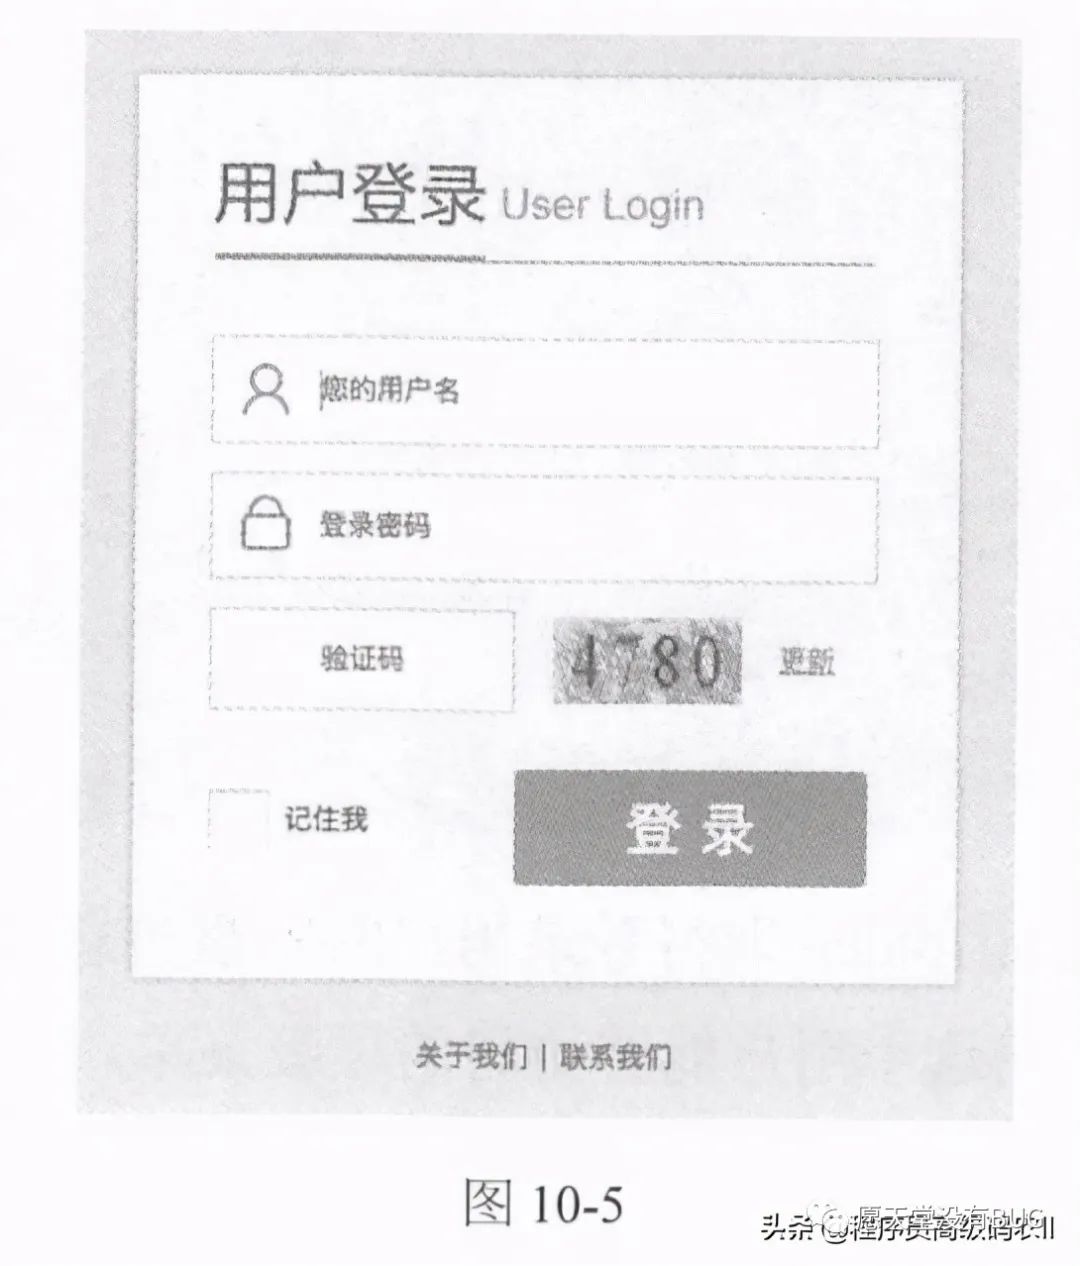
当用户第一次登录时,是看不到验证码的;当用户第一次登录失败需要再次登录时,将被要求输入验证码。
有关验证码的实现,这里主要做两点说明,即验证码的输出和验证码的检验。
验证码的输出是一个图像,代码如下所示:
@RequestMapping (value = " /images/imagecode")
public String imagecode (HttpServletRequest request, HttpServletResponseresponse)
throws Exception {
OutputStream os = response.getOutputStream();
Map<String, 0bject> map = ImageCode.getImageCode(60,20,os);
String simpleCaptcha = "simpleCaptcha";
request.getSession().setAttribute(simpleCaptcha,map.get("strEnsure") .toString().toLowerCase());
request.getSession().setAttribute ("codeTime", new Date() .getTime());
try {
ImageIO.write ((BufferedImage)map.get ("image"),"JPEG",0S);]catch(IOException e){
return "";
}
return null;
}
即在页面上使用“limages/imagecode”这个链接,就可以返回一个含有几个随机数字组成的验证码图像。在输出验证码时,使用session保存验证码的数据,为下一环节检验验证码提供依据。
关于验证码的检验,其实现代码如下所示:
@RequestMapping(value ="/checkcode")CResponseBody
public String checkcode (HttpServletRequest request,HttpSession session)
throws Exception {
String checkCode = request.getParameter("checkCode");
Object simple = session.getAttribute ("simpleCaptcha");//验证码对象if(simple == null){
request.setAttribute ("errorMsg","验证码已失效,请重新输入!");return"验证码已失效,请重新输入!";
String captcha = simple.toString();Date now = new Date();
Long codeTime = Long.valueof(session.getAttribute ("codeTime")+"");if(StringUtils.isEmpty(checkCode) l captcha ==
null !(checkCode.equalsIgnoreCase(captcha))){
request.setAttribute( "errorMsg","验证码错误!");return"验证码错误!";
}else if ((now.getTime ()-codeTime)/ 1000/60 >5)(//验证码有效长度为5mi
request.setAttribute("errorMsg"","验证码已失效,请重新输入!");
return"验证码已失效,请重新输入!";
}else {
session.removeAttribute( "simpleCaptcha");return "1";
}
}
把用户输入的内容与上面session保存的数据进行对比,如果相同,则可检验通过。
在完成上面的设计之后,当用户第一次登录失败时,会显示如图10-5所示的登录界面。

ssO的主页设计
如果是在一个接入了SSO服务的第三方应用中进行登录,则登录成功之后,SSO服务端会根据应用的链接地址返回到相关的应用中。如果是在SSO服务端中进行登录,则默认返回SSO服务端的主页。在主页设计中,我们提供了访问其他应用的链接。
SSO的主页设计,大体上由两部分组成。第一部分是一个控制器的设计,实现代码如下所示:
@controller
public class LoginController {
@ReguestMapping ("/")
public String index (ModelMap model, Principal principal) throws Exception{
MyUserDetails myUserDetails = (MyUserDetails)
SecurityContextHolder.getContext () .getAuthentication().getPrincipal();
User user = myUserDetails.getUser();
//分类列表(顶级菜单)
List kindList =new ArrayList<>();List kindIds = new ArrayList<>();for(Role role : user.getRoles ()){
for(Resource resource : role.getResources()){
//去重,获取分类列表
Long kindId = resource.getModel().getKind().getId();if(! kindIds.contains(kindId)){
kindList.add(resource.getModel ().getKind());
kindIds.add (kindId);
}
}
}
model .addAttribute("kinds", kindList);
model . addAttribute("principal", principal);return "home";
}
}
首先,通过SecurityContextHolder 取得登录用户的完整信息。然后,根据登录用户,围绕用户的关联关系,就可以整理出这个用户能够访问的顶级菜单。最后,使用分类列表kinds 将这个顶级菜单提供给主页视图使用。
第二部分是一个页面视图设计,其中有关处理分类列表部分的设计,在SSO主页home.html的导航部分实现,代码如下所示:
class="new-icon" th:each="kind: $ {kinds}">
<div class="icon-pic">
<p><a
th:href="${'javascript:gotoService ("'+kind.link+' ", "
");')" class="linka" ><img src="/images/home/BigIconFirm. png" /a>p>
div>
<div class="icon-txt">
<dl>
<dt><p><a
th:hrefe"'javascript:gotoService (1''+$(kind.link}+'\',N' ');'" class="linka"th:text="${kind.name}">a>p>
<span><img
srC=" /images/home/FourStar.jpg"/>span>
dt>dl>div>div>这里使用了Thymeleaf的一个循环语句 th:each,将分类列表中包含的每一条记录在页面中展示出来。每条记录都包含一个图像和一个文本链接。其中,对于每一个链接的访问,使用gotoService函数进行页面跳转。
在完成上面的设计之后,可以进行一个简单的测试。
启动merchant-sso应用,在浏览器上输入如下所示的链接:http://localhost:8000
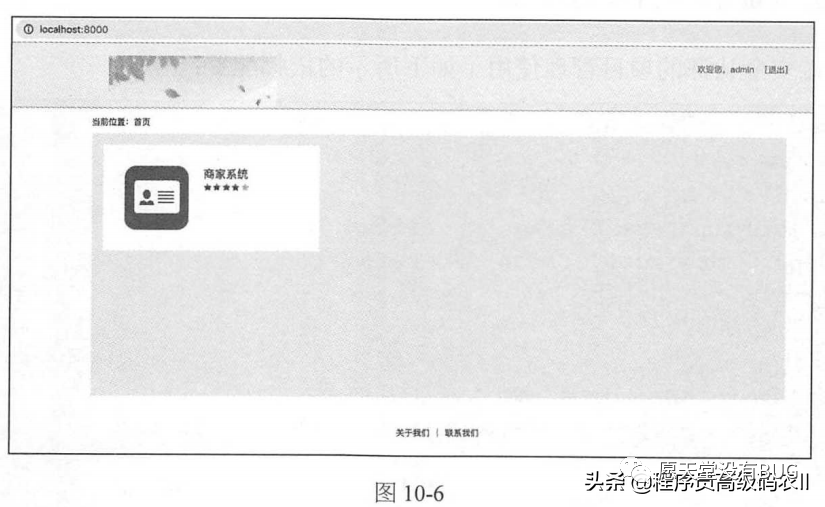
打开链接后,即可进入登录界面。在登录界面上输入前面单元测试中生成的用户名和密码,即“admin/123456”。登录成功后,即可打开SSO的主页,如图10-6所示。

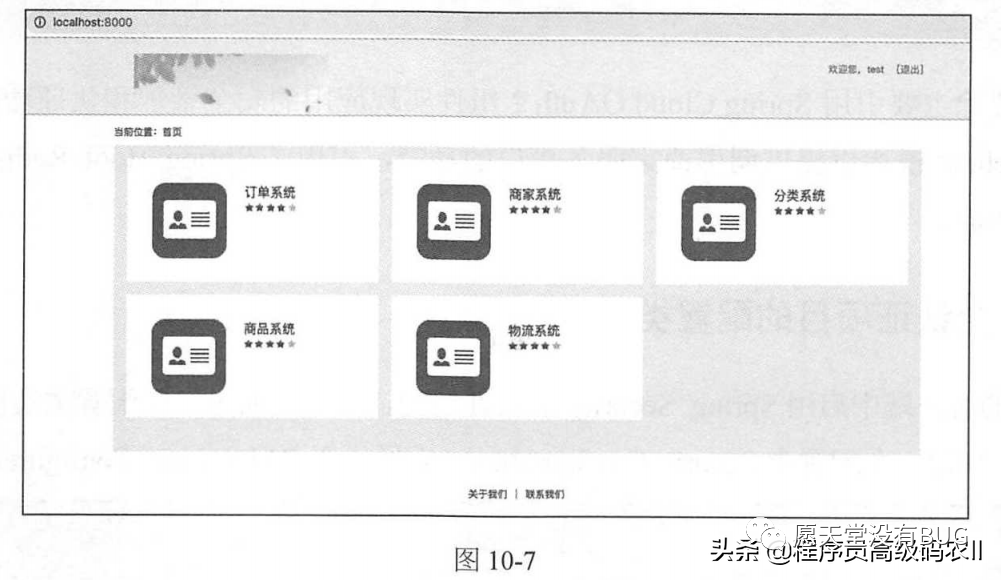
注意:图10-6中显示的应用列表,将由用户拥有的权限决定。假如我们为一个用户指定了更多的权限,那么这个用户就会获得更多的访问资源,如图10-7所示。

本文给大家讲解的内容商家管理后台与sso设计:SSO设计
下篇文章给大家讲解的是商家管理后台与sso设计:SSO客户端设计;
觉得文章不错的朋友可以转发此文关注小编;
感谢大家的支持!
本文就是愿天堂没有BUG给大家分享的内容,大家有收获的话可以分享下,想学习更多的话可以到微信公众号里找我,我等你哦。
