60分钟入门PyTorch全集(附下载链接)
 来源:机器学习初学者
前言
翻译:林不清(https://www.zhihu.com/people/lu-guo-92-42-88)
https://github.com/fengdu78/machine_learning_beginner/tree/master/PyTorch_beginner
目录
(一)Tensors
%matplotlib inlineimport torchimport numpy as np初始化Tensor
直接从数据创建
data = [[1, 2],[3, 4]]x_data = torch.tensor(data)从Numpy创建
np_array = np.array(data)x_np = torch.from_numpy(np_array)从其他tensor创建
x_ones = torch.ones_like(x_data) # retains the properties of x_dataprint(f"Ones Tensor: \n {x_ones} \n")
x_rand = torch.rand_like(x_data, dtype=torch.float) # overrides the datatype of x_dataprint(f"Random Tensor: \n {x_rand} \n")
Ones Tensor: tensor([[1, 1], [1, 1]])
Random Tensor: tensor([[0.6075, 0.4581], [0.5631, 0.1357]])shape = (2,3,)rand_tensor = torch.rand(shape)ones_tensor = torch.ones(shape)zeros_tensor = torch.zeros(shape)
print(f"Random Tensor: \n {rand_tensor} \n")print(f"Ones Tensor: \n {ones_tensor} \n")print(f"Zeros Tensor: \n {zeros_tensor}")
Random Tensor: tensor([[0.7488, 0.0891, 0.8417], [0.0783, 0.5984, 0.5709]])
Ones Tensor: tensor([[1., 1., 1.], [1., 1., 1.]])
Zeros Tensor: tensor([[0., 0., 0.], [0., 0., 0.]])Tensor的属性
tensor = torch.rand(3,4)
print(f"Shape of tensor: {tensor.shape}")print(f"Datatype of tensor: {tensor.dtype}")print(f"Device tensor is stored on: {tensor.device}")
Shape of tensor: torch.Size([3, 4])Datatype of tensor: torch.float32Device tensor is stored on: cpuTensor的操作
# We move our tensor to the GPU if availableif torch.cuda.is_available(): tensor = tensor.to('cuda')标准的numpy类索引和切片:
tensor = torch.ones(4, 4)tensor[:,1] = 0print(tensor)
tensor([[1., 0., 1., 1.], [1., 0., 1., 1.], [1., 0., 1., 1.], [1., 0., 1., 1.]])合并tensors
t1 = torch.cat([tensor, tensor, tensor], dim=1)print(t1)
tensor([[1., 0., 1., 1., 1., 0., 1., 1., 1., 0., 1., 1.], [1., 0., 1., 1., 1., 0., 1., 1., 1., 0., 1., 1.], [1., 0., 1., 1., 1., 0., 1., 1., 1., 0., 1., 1.], [1., 0., 1., 1., 1., 0., 1., 1., 1., 0., 1., 1.]])增加tensors
# This computes the element-wise productprint(f"tensor.mul(tensor) \n {tensor.mul(tensor)} \n")# Alternative syntax:print(f"tensor * tensor \n {tensor * tensor}")
tensor.mul(tensor) tensor([[1., 0., 1., 1.], [1., 0., 1., 1.], [1., 0., 1., 1.], [1., 0., 1., 1.]])
tensor * tensor tensor([[1., 0., 1., 1.], [1., 0., 1., 1.], [1., 0., 1., 1.], [1., 0., 1., 1.]])print(f"tensor.matmul(tensor.T) \n {tensor.matmul(tensor.T)} \n")# Alternative syntax:print(f"tensor @ tensor.T \n {tensor @ tensor.T}")
tensor.matmul(tensor.T) tensor([[3., 3., 3., 3.], [3., 3., 3., 3.], [3., 3., 3., 3.], [3., 3., 3., 3.]])
tensor @ tensor.T tensor([[3., 3., 3., 3.], [3., 3., 3., 3.], [3., 3., 3., 3.], [3., 3., 3., 3.]])原地操作
print(tensor, "\n")tensor.add_(5)print(tensor)
tensor([[1., 0., 1., 1.], [1., 0., 1., 1.], [1., 0., 1., 1.], [1., 0., 1., 1.]])
tensor([[6., 5., 6., 6.], [6., 5., 6., 6.], [6., 5., 6., 6.], [6., 5., 6., 6.]])注意
Tensor转换为Numpt 数组
t = torch.ones(5)print(f"t: {t}")n = t.numpy()print(f"n: {n}")
t: tensor([1., 1., 1., 1., 1.])n: [1. 1. 1. 1. 1.]t.add_(1)print(f"t: {t}")print(f"n: {n}")
t: tensor([2., 2., 2., 2., 2.])n: [2. 2. 2. 2. 2.]Numpy数组转换为Tensor
n = np.ones(5)t = torch.from_numpy(n)np.add(n, 1, out=n)(二)Autograd:自动求导
torch.autograd是pytorch自动求导的工具,也是所有神经网络的核心。我们首先先简单了解一下这个包如何训练神经网络。
[3Blue1Brown]:
https://www.youtube.com/watch?v=tIeHLnjs5U8
%matplotlib inline
import torch, torchvisionmodel = torchvision.models.resnet18(pretrained=True)data = torch.rand(1, 3, 64, 64)labels = torch.rand(1, 1000)prediction = model(data) # 前向传播loss = (prediction - labels).sum()loss.backward() # 反向传播optim = torch.optim.SGD(model.parameters(), lr=1e-2, momentum=0.9)optim.step() #梯度下降import torch
a = torch.tensor([2., 3.], requires_grad=True)b = torch.tensor([6., 4.], requires_grad=True)
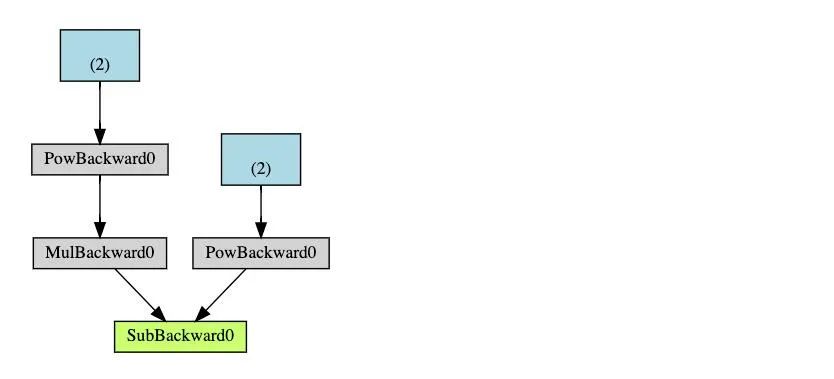
Q = 3*a**3 - b**2

external_grad = torch.tensor([1., 1.])Q.backward(gradient=external_grad)# 检查一下存储的梯度是否正确print(9*a**2 == a.grad)print(-2*b == b.grad) 然后根据链式法则,雅可比向量乘积将是𝑙相对于𝑥⃗ 的梯度
 .
.运行所请求的操作来计算结果tensor 保持DAG中操作的梯度
计算每一个.grad_fn的梯度 将它们累加到各自张量的.grad属性中 利用链式法则,一直传播到叶节点

注意
x = torch.rand(5, 5)y = torch.rand(5, 5)z = torch.rand((5, 5), requires_grad=True)
a = x + yprint(f"Does `a` require gradients? : {a.requires_grad}")b = x + zprint(f"Does `b` require gradients?: {b.requires_grad}")from torch import nn, optim
model = torchvision.models.resnet18(pretrained=True)
# 冻结网络中所有的参数for param in model.parameters(): param.requires_grad = Falsemodel.fc = nn.Linear(512, 10)# 只优化分类器optimizer = optim.SGD(model.fc.parameters(), lr=1e-2, momentum=0.9)[就地修改操作以及多线程Autograd]: (https://pytorch.org/docs/stable/notes/autograd.html) [反向模式autodiff的示例]: (https://colab.research.google.com/drive/1VpeE6UvEPRz9HmsHh1KS0XxXjYu533EC)
(三)神经网络

定义神经网络模型,它有一些可学习的参数(或者权重); 在数据集上迭代; 通过神经网络处理输入; 计算损失(输出结果和正确值的差距大小) 将梯度反向传播会网络的参数; 更新网络的参数,主要使用如下简单的更新原则:weight = weight - learning_rate * gradient
定义网络
import torchimport torch.nn as nnimport torch.nn.functional as F
class Net(nn.Module):
def __init__(self): super(Net, self).__init__() # 1 input image channel, 6 output channels, 3x3 square convolution # kernel self.conv1 = nn.Conv2d(1, 6, 3) self.conv2 = nn.Conv2d(6, 16, 3) # an affine operation: y = Wx + b self.fc1 = nn.Linear(16 * 6 * 6, 120) # 6*6 from image dimension self.fc2 = nn.Linear(120, 84) self.fc3 = nn.Linear(84, 10)
def forward(self, x): # Max pooling over a (2, 2) window x = F.max_pool2d(F.relu(self.conv1(x)), (2, 2)) # If the size is a square you can only specify a single number x = F.max_pool2d(F.relu(self.conv2(x)), 2) x = x.view(-1, self.num_flat_features(x)) x = F.relu(self.fc1(x)) x = F.relu(self.fc2(x)) x = self.fc3(x) return x
def num_flat_features(self, x): size = x.size()[1:] # all dimensions except the batch dimension num_features = 1 for s in size: num_features *= s return num_features
net = Net()print(net)
Net( (conv1): Conv2d(1, 6, kernel_size=(3, 3), stride=(1, 1)) (conv2): Conv2d(6, 16, kernel_size=(3, 3), stride=(1, 1)) (fc1): Linear(in_features=576, out_features=120, bias=True) (fc2): Linear(in_features=120, out_features=84, bias=True) (fc3): Linear(in_features=84, out_features=10, bias=True))params = list(net.parameters())print(len(params))print(params[0].size()) # conv1's .weight
10torch.Size([6, 1, 3, 3])input = torch.randn(1, 1, 32, 32)out = net(input)print(out)
tensor([[-0.0765, 0.0522, 0.0820, 0.0109, 0.0004, 0.0184, 0.1024, 0.0509, 0.0917, -0.0164]], grad_fn=) net.zero_grad()out.backward(torch.randn(1, 10))注意
回顾
torch.Tensor-支持自动编程操作(如backward())的多维数组。同时保持梯度的张量。 nn.Module-神经网络模块.封装参数,移动到GPU上运行,导出,加载等 nn.Parameter-一种张量,当把它赋值给一个Module时,被自动的注册为参数. autograd.Function-实现一个自动求导操作的前向和反向定义, 每个张量操作都会创建至少一个Function节点,该节点连接到创建张量并对其历史进行编码的函数。
现在,我们包含了如下内容:
定义一个神经网络 处理输入和调用backward
剩下的内容:
计算损失值 更新神经网络的权值
损失函数
output = net(input)target = torch.randn(10) # a dummy target, for exampletarget = target.view(1, -1) # make it the same shape as outputcriterion = nn.MSELoss()
loss = criterion(output, target)print(loss)
tensor(1.5801, grad_fn=) print(loss.grad_fn) # MSELossprint(loss.grad_fn.next_functions[0][0]) # Linearprint(loss.grad_fn.next_functions[0][0].next_functions[0][0]) # ReLU
反向传播
net.zero_grad() # zeroes the gradient buffers of all parameters
print('conv1.bias.grad before backward')print(net.conv1.bias.grad)
loss.backward()
print('conv1.bias.grad after backward')print(net.conv1.bias.grad)
conv1.bias.grad before backwardtensor([0., 0., 0., 0., 0., 0.])conv1.bias.grad after backwardtensor([ 0.0013, 0.0068, 0.0096, 0.0039, -0.0105, -0.0016])稍后阅读:
唯一剩下的内容:
更新网络的权重
更新权重
weight=weight−learning_rate∗gradientlearning_rate = 0.01for f in net.parameters(): f.data.sub_(f.grad.data * learning_rate)import torch.optim as optim
# create your optimizeroptimizer = optim.SGD(net.parameters(), lr=0.01)
# in your training loop:optimizer.zero_grad() # zero the gradient buffersoutput = net(input)loss = criterion(output, target)loss.backward()optimizer.step() # Does the update(四)训练一个分类器
你已经学会如何去定义一个神经网络,计算损失值和更新网络的权重。
关于数据
对于图像,有诸如Pillow,OpenCV包等非常实用 对于音频,有诸如scipy和librosa包 对于文本,可以用原始Python和Cython来加载,或者使用NLTK和SpaCy 对于视觉,我们创建了一个torchvision包,包含常见数据集的数据加载,比如Imagenet,CIFAR10,MNIST等,和图像转换器,也就是torchvision.datasets和torch.utils.data.DataLoader。

训练一个图像分类器
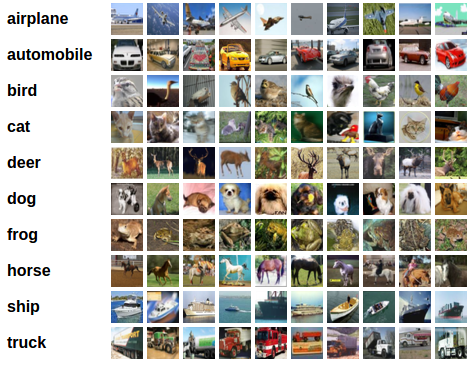
使用torchvision加载和归一化CIFAR10训练集和测试集. 定义一个卷积神经网络 定义损失函数 在训练集上训练网络 在测试集上测试网络
1. 加载和归一化CIFAR10
%matplotlib inlineimport torchimport torchvisionimport torchvision.transforms as transforms注意
transform = transforms.Compose( [transforms.ToTensor(), transforms.Normalize((0.5, 0.5, 0.5), (0.5, 0.5, 0.5))])
trainset = torchvision.datasets.CIFAR10(root='./data', train=True, download=True, transform=transform)trainloader = torch.utils.data.DataLoader(trainset, batch_size=4, shuffle=True, num_workers=2)
testset = torchvision.datasets.CIFAR10(root='./data', train=False, download=True, transform=transform)testloader = torch.utils.data.DataLoader(testset, batch_size=4, shuffle=False, num_workers=2)
classes = ('plane', 'car', 'bird', 'cat', 'deer', 'dog', 'frog', 'horse', 'ship', 'truck')#这个过程有点慢,会下载大约340mb图片数据。import matplotlib.pyplot as pltimport numpy as np
# functions to show an image
def imshow(img): img = img / 2 + 0.5 # unnormalize npimg = img.numpy() plt.imshow(np.transpose(npimg, (1, 2, 0))) plt.show()
# get some random training imagesdataiter = iter(trainloader)images, labels = dataiter.next()
# show imagesimshow(torchvision.utils.make_grid(images))# print labelsprint(' '.join('%5s' % classes[labels[j]] for j in range(4)))2. 定义一个卷积神经网络
import torch.nn as nnimport torch.nn.functional as F
class Net(nn.Module): def __init__(self): super(Net, self).__init__() self.conv1 = nn.Conv2d(3, 6, 5) self.pool = nn.MaxPool2d(2, 2) self.conv2 = nn.Conv2d(6, 16, 5) self.fc1 = nn.Linear(16 * 5 * 5, 120) self.fc2 = nn.Linear(120, 84) self.fc3 = nn.Linear(84, 10)
def forward(self, x): x = self.pool(F.relu(self.conv1(x))) x = self.pool(F.relu(self.conv2(x))) x = x.view(-1, 16 * 5 * 5) x = F.relu(self.fc1(x)) x = F.relu(self.fc2(x)) x = self.fc3(x) return x
net = Net()3. 定义损失函数和优化器
import torch.optim as optim
criterion = nn.CrossEntropyLoss()optimizer = optim.SGD(net.parameters(), lr=0.001, momentum=0.9)4. 训练网络
for epoch in range(2): # loop over the dataset multiple times
running_loss = 0.0 for i, data in enumerate(trainloader, 0): # get the inputs; data is a list of [inputs, labels] inputs, labels = data
# zero the parameter gradients optimizer.zero_grad()
# forward + backward + optimize outputs = net(inputs) loss = criterion(outputs, labels) loss.backward() optimizer.step()
# print statistics running_loss += loss.item() if i % 2000 == 1999: # print every 2000 mini-batches print('[%d, %5d] loss: %.3f' % (epoch + 1, i + 1, running_loss / 2000)) running_loss = 0.0
print('Finished Training')PATH = './cifar_net.pth'torch.save(net.state_dict(), PATH)5. 在测试集上测试网络
dataiter = iter(testloader)images, labels = dataiter.next()
# print imagesimshow(torchvision.utils.make_grid(images))print('GroundTruth: ', ' '.join('%5s' % classes[labels[j]] for j in range(4)))net = Net()net.load_state_dict(torch.load(PATH))outputs = net(images)_, predicted = torch.max(outputs, 1)
print('Predicted: ', ' '.join('%5s' % classes[predicted[j]] for j in range(4)))correct = 0total = 0with torch.no_grad(): for data in testloader: images, labels = data outputs = net(images) _, predicted = torch.max(outputs.data, 1) total += labels.size(0) correct += (predicted == labels).sum().item()
print('Accuracy of the network on the 10000 test images: %d %%' % ( 100 * correct / total))class_correct = list(0. for i in range(10))class_total = list(0. for i in range(10))with torch.no_grad(): for data in testloader: images, labels = data outputs = net(images) _, predicted = torch.max(outputs, 1) c = (predicted == labels).squeeze() for i in range(4): label = labels[i] class_correct[label] += c[i].item() class_total[label] += 1
for i in range(10): print('Accuracy of %5s : %2d %%' % ( classes[i], 100 * class_correct[i] / class_total[i]))在GPU上训练
device = torch.device("cuda:0" if torch.cuda.is_available() else "cpu")# Assume that we are on a CUDA machine, then this should print a CUDA device:#假设我们有一台CUDA的机器,这个操作将显示CUDA设备。print(device)net.to(device)inputs, labels = inputs.to(device), labels.to(device)实践:
实现的目标:
深入了解了PyTorch的张量库和神经网络 训练了一个小网络来分类图片
在多GPU上训练
如果你希望使用所有GPU来更大的加快速度,请查看选读:[数据并行]:
(https://pytorch.org/tutorials/beginner/blitz/data_parallel_tutorial.html)
接下来做什么?
训练神经网络玩电子游戏 在ImageNet上训练最好的ResNet 使用对抗生成网络来训练一个人脸生成器 使用LSTM网络训练一个字符级的语言模型 更多示例 更多教程 在论坛上讨论PyTorch 在Slack上与其他用户聊天
https://github.com/fengdu78/machine_learning_beginner/tree/master/PyTorch_beginner


评论
