Android实现登录邮箱的自动补全功能
Android SDK 提供了MultiAutoCompleteTextView 控件,可以支持从指定字符开始联想,MultiAutoCompleteTextView 通过分词器 Tokenizer,可以支持连续提示
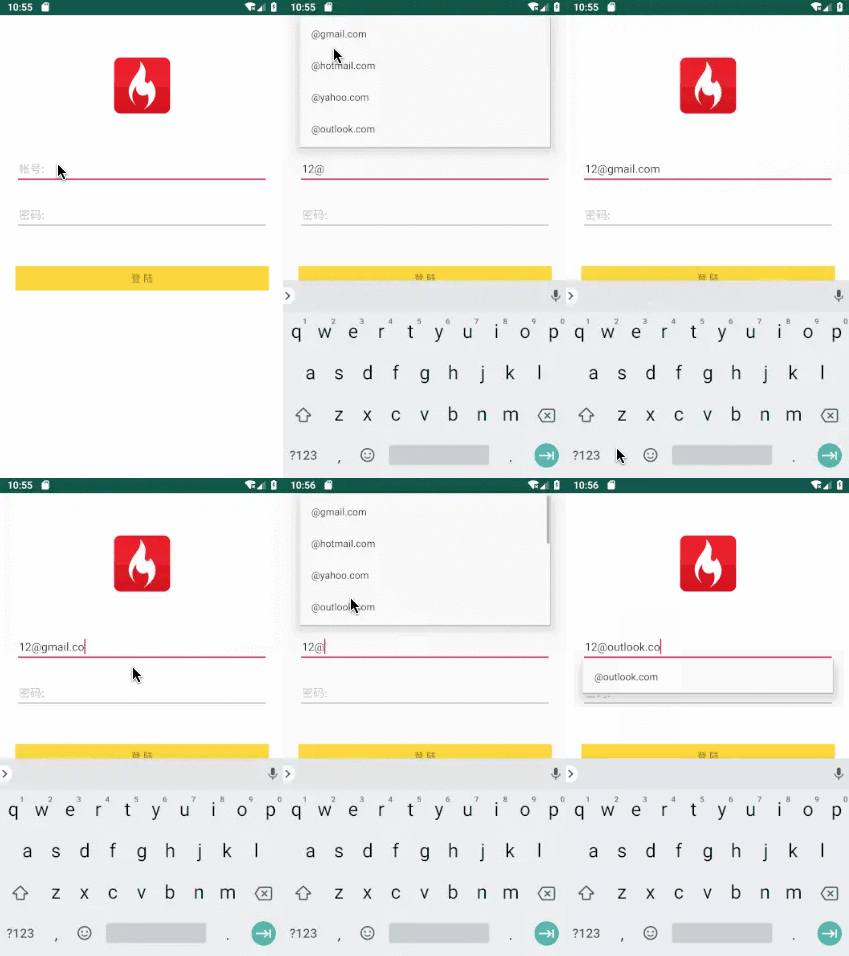
下面是运行效果图:

只要输入“@”符号就会自动联想邮箱。
下面是自定义的 MailBoxAssociateView 类继承于AppCompatMultiAutoCompleteTextView 控件,来实现联想邮箱组件。
/*** @desciption: 邮箱联想控件,输入 @ 符后开始联想*/public class MailBoxAssociateView extends AppCompatMultiAutoCompleteTextView {public MailBoxAssociateView(Context context) {super(context);}public MailBoxAssociateView(Context context, AttributeSet attrs) {super(context, attrs);}public MailBoxAssociateView(Context context, AttributeSet attrs, int defStyleAttr) {super(context, attrs, defStyleAttr);}/*** 当输入@符号时,就会去调用Tokenizer.findTokenStart()方法一次* 当点击下拉提示框中的某个信息时,会再次调用Tokenizer.findTokenStart()方法一次,然后再调用terminateToken()方法一次*/@Overridepublic boolean enoughToFilter() {// 若用户输入的文本字符串中包含'@'字符且不在第一位,则满足条件返回true,否则返回falsereturn getText().toString().contains("@") && getText().toString().indexOf("@") > 0;}}
如果需要输入的第一个字符是“@”就联想邮箱只需要改为以下代码即可。
@Overridepublic boolean enoughToFilter() {return getText().toString().contains("@") ;}
自定义分词器 MailBoxAssociateTokenizer 类,指定从哪个地方开始联想字符。
/*** @desciption: 指定从哪个地方开始联想字符*/public class MailBoxAssociateTokenizer implements MultiAutoCompleteTextView.Tokenizer {/*** 用于查找当前光标位置之前的分隔符的位置并返回** @param text 用户已经输入的文本内容* @param cursor 当前光标的位置,在文本内容后面* @return*/@Overridepublic int findTokenStart(CharSequence text, int cursor) {int index = text.toString().indexOf("@");if (index < 0) {index = text.length();}if (index > findTokenEnd(text, cursor)) {index = 0;}return index;}/*** 用于查找当前光标位置之后的分隔符的位置并返回,向后查询** @param text 用户已经输入的文本内容* @param cursor 当前光标的位置,在文本内容之间* @return*/@Overridepublic int findTokenEnd(CharSequence text, int cursor) {int i = cursor;int len = text.length();// 向后查找'@'字符,若找到则直接返回其所在位置while (i < len) {if (text.charAt(i) == '@') {return i;} else {i++;}}return len;}/*** 用于返回提示信息加上分隔符后的文本内容** @param text* @return*/@Overridepublic CharSequence terminateToken(CharSequence text) {int i = text.length();//去掉原始匹配的数据的末尾空格while (i > 0 && text.charAt(i - 1) == ' ') {i--;}//判断原始匹配的数据去掉末尾空格后是否含有'@',有则立即返回if (i > 0 && text.charAt(i - 1) == '@') {return text;} else {// CharSequence类型的数据有可能是富文本SpannableString类型// 故需要进行判断if (text instanceof Spanned) {SpannableString sp = new SpannableString(text);// 故需要借助TextUtils.copySpansFrom从text中复制原来的样式到新的sp中,// 以保持原先样式不变情况下添加一个逗号和空格TextUtils.copySpansFrom((Spanned) text, 0, text.length(), Object.class, sp, 0);return sp;} else {return text;}}}}
布局文件 :
android:id="@+id/associate_email_input"android:layout_width="match_parent"android:layout_height="wrap_content"android:layout_marginTop="57dp"android:hint="@string/account"android:paddingLeft="5dp"android:paddingBottom="12dp"android:popupBackground="@drawable/bg_recommend_mail_list"android:singleLine="true"android:textColor="@color/color_333333"android:textColorHint="@color/color_bfbfbf"android:textSize="16sp"/>
使用方式
在 values 中创建 arrays.xml 文件
- \@gmail.com
- \@hotmail.com
- \@yahoo.com
- \@outlook.com
- \@aol.com
- \@hotmail.co.uk
- \@yahoo.co.uk
- \@mail.ru
- \@rediffmail.com
- \@live.com
- \@msn.com
在 Activity中使用
mUserNameAssociateView = findViewById(R.id.associate_email_input);String[] recommendMailBox = getResources().getStringArray(R.array.recommend_mail_box);ArrayAdapteradapter = new ArrayAdapter<>(this, R.layout.item_associate_mail_list, R.id.tv_recommend_mail, recommendMailBox);mUserNameAssociateView.setAdapter(adapter);mUserNameAssociateView.setTokenizer(new MailBoxAssociateTokenizer());
到这里就结束啦。
评论
