(附代码)目标检测实战 | 4种YOLO的C++和Python两种版本实现
全网搜集目标检测文章,人工筛选最优价值知识,避免垃圾信息轰炸
2020年,新出了几个新版本的YOLO目标检测,在微信朋友圈里转发的最多的有YOLOv4,Yolo-Fastest,YOLObile以及百度提出的PP-YOLO。在此之前,我已经在github发布过YOLOv4,Yolo-Fastest,YOLObile这三种YOLO基于OpenCV做目标检测的程序,但是这些程序是用Python编写的。接下来,我就使用C++编写一套基于OpenCV的YOLO目标检测,这个程序里包含了经典的YOLOv3,YOLOv4,Yolo-Fastest和YOLObile这4种YOLO目标检测的实现。
1. 实现思路
用面向对象的思想定义一个类,类的构造函数会调用opencv的dnn模块读取输入的.cfg和.weights文件来初始化YOLO网络,类有一个成员函数detect对输入的图像做目标检测,主要包括前向推理forward和后处理postprocess。这样就把YOLO目标检测模型封装成了一个类。最后在主函数main里设置一个参数可以选择任意一种YOLO做目标检测,读取一幅图片,调用YOLO类里的detect函数执行目标检测,画出图片中的物体的类别和矩形框。
2. 实现步骤
定义类的构造函数和成员函数和成员变量,如下所示。其中confThreshold是类别置信度阈值,nmsThreshold是重叠率阈值,inpHeight和inpWidth使输入图片的高和宽,netname是yolo模型名称,classes是存储类别的数组,本套程序是在COCO数据集上训练出来的模型,因此它存储有80个类别。net是使用opencv的dnn模块读取配置文件和权重文件后返回的深度学习模型,postprocess是后处理函数,drawPred是在检测到图片里的目标后,画矩形框和类别名。
class YOLO{public:YOLO(Net_config config);void detect(Mat& frame);private:float confThreshold;float nmsThreshold;int inpWidth;int inpHeight;char netname[20];vector<string> classes;Net net;void postprocess(Mat& frame, const vector<Mat>& outs);void drawPred(int classId, float conf, int left, int top, int right, int bottom, Mat& frame);};
接下来,定义一个结构体和结构体数组,如下所示。结构体里包含了类别置信度阈值,重叠率阈值,模型名称,配置文件和权重文件的路径,存储所有类别信息的文档的路径,输入图片的高和宽。然后在结构体数组里,包含了四种YOLO模型的参数集合。
struct Net_config{float confThreshold; // Confidence thresholdfloat nmsThreshold; // Non-maximum suppression thresholdint inpWidth; // Width of network's input imageint inpHeight; // Height of network's input imagestring classesFile;string modelConfiguration;string modelWeights;string netname;};Net_config yolo_nets[4] = {{0.5, 0.4, 416, 416,"coco.names", "yolov3/yolov3.cfg", "yolov3/yolov3.weights", "yolov3"},{0.5, 0.4, 608, 608,"coco.names", "yolov4/yolov4.cfg", "yolov4/yolov4.weights", "yolov4"},{0.5, 0.4, 320, 320,"coco.names", "yolo-fastest/yolo-fastest-xl.cfg", "yolo-fastest/yolo-fastest-xl.weights", "yolo-fastest"},{0.5, 0.4, 320, 320,"coco.names", "yolobile/csdarknet53s-panet-spp.cfg", "yolobile/yolobile.weights", "yolobile"}};
接下来是YOLO类的构造函数,如下所示,它会根据输入的结构体Net_config,来初始化成员变量,这其中就包括opencv读取配置文件和权重文件后返回的深度学习模型。
YOLO::YOLO(Net_config config){cout << "Net use " << config.netname << endl;this->confThreshold = config.confThreshold;this->nmsThreshold = config.nmsThreshold;this->inpWidth = config.inpWidth;this->inpHeight = config.inpHeight;strcpy_s(this->netname, config.netname.c_str());ifstream ifs(config.classesFile.c_str());string line;while (getline(ifs, line)) this->classes.push_back(line);this->net = readNetFromDarknet(config.modelConfiguration, config.modelWeights);this->net.setPreferableBackend(DNN_BACKEND_OPENCV);this->net.setPreferableTarget(DNN_TARGET_CPU);}
接下来的关键的detect函数,在这个函数里,首先使用blobFromImage对输入图像做预处理,然后是做forward前向推理和postprocess后处理。
void YOLO::detect(Mat& frame){Mat blob;blobFromImage(frame, blob, 1 / 255.0, Size(this->inpWidth, this->inpHeight), Scalar(0, 0, 0), true, false);this->net.setInput(blob);vector<Mat> outs;this->net.forward(outs, this->net.getUnconnectedOutLayersNames());this->postprocess(frame, outs);vector<double> layersTimes;double freq = getTickFrequency() / 1000;double t = net.getPerfProfile(layersTimes) / freq;string label = format("%s Inference time : %.2f ms", this->netname, t);putText(frame, label, Point(0, 30), FONT_HERSHEY_SIMPLEX, 1, Scalar(0, 0, 255), 2);//imwrite(format("%s_out.jpg", this->netname), frame);}
postprocess后处理函数的代码实现如下,在这个函数里,for循环遍历所有的候选框outs,计算出每个候选框的最大类别分数值,也就是真实类别分数值,如果真实类别分数值大于confThreshold,那么就对这个候选框做decode计算出矩形框左上角顶点的x, y,高和宽的值,然后把真实类别分数值,真实类别索引id和矩形框左上角顶点的x, y,高和宽的值分别添加到confidences,classIds和boxes这三个vector里。在for循环结束后,执行NMS,去掉重叠率大于nmsThreshold的候选框,剩下的检测框就调用drawPred在输入图片里画矩形框和类别名称以及分数值。
void YOLO::postprocess(Mat& frame, const vector<Mat>& outs) // Remove the bounding boxes with low confidence using non-maxima suppression{vector<int> classIds;vector<float> confidences;vector<Rect> boxes;for (size_t i = 0; i < outs.size(); ++i){// Scan through all the bounding boxes output from the network and keep only the// ones with high confidence scores. Assign the box's class label as the class// with the highest score for the box.float* data = (float*)outs[i].data;for (int j = 0; j < outs[i].rows; ++j, data += outs[i].cols){Mat scores = outs[i].row(j).colRange(5, outs[i].cols);Point classIdPoint;double confidence;// Get the value and location of the maximum scoreminMaxLoc(scores, 0, &confidence, 0, &classIdPoint);if (confidence > this->confThreshold){int centerX = (int)(data[0] * frame.cols);int centerY = (int)(data[1] * frame.rows);int width = (int)(data[2] * frame.cols);int height = (int)(data[3] * frame.rows);int left = centerX - width / 2;int top = centerY - height / 2;classIds.push_back(classIdPoint.x);confidences.push_back((float)confidence);boxes.push_back(Rect(left, top, width, height));}}}// Perform non maximum suppression to eliminate redundant overlapping boxes with// lower confidencesvector<int> indices;NMSBoxes(boxes, confidences, this->confThreshold, this->nmsThreshold, indices);for (size_t i = 0; i < indices.size(); ++i){int idx = indices[i];Rect box = boxes[idx];this->drawPred(classIds[idx], confidences[idx], box.x, box.y,box.x + box.width, box.y + box.height, frame);}}void YOLO::drawPred(int classId, float conf, int left, int top, int right, int bottom, Mat& frame) // Draw the predicted bounding box{//Draw a rectangle displaying the bounding boxrectangle(frame, Point(left, top), Point(right, bottom), Scalar(0, 0, 255), 3);//Get the label for the class name and its confidencestring label = format("%.2f", conf);if (!this->classes.empty()){CV_Assert(classId < (int)this->classes.size());label = this->classes[classId] + ":" + label;}//Display the label at the top of the bounding boxint baseLine;Size labelSize = getTextSize(label, FONT_HERSHEY_SIMPLEX, 0.5, 1, &baseLine);top = max(top, labelSize.height);//rectangle(frame, Point(left, top - int(1.5 * labelSize.height)), Point(left + int(1.5 * labelSize.width), top + baseLine), Scalar(0, 255, 0), FILLED);putText(frame, label, Point(left, top), FONT_HERSHEY_SIMPLEX, 0.75, Scalar(0, 255, 0), 1);}
最后是主函数main,代码实现如下。在主函数里的第一行代码,输入参数yolo_nets[2]表示选择了四种YOLO模型里的第三个yolo-fastest,使用者可以自由设置这个参数,从而能自由选择YOLO模型。接下来是定义输入图片的路径,opencv读取图片,传入到yolo_model的detect函数里做目标检测,最后在窗口显示检测结果。
int main(){YOLO yolo_model(yolo_nets[2]);string imgpath = "person.jpg";Mat srcimg = imread(imgpath);yolo_model.detect(srcimg);static const string kWinName = "Deep learning object detection in OpenCV";namedWindow(kWinName, WINDOW_NORMAL);imshow(kWinName, srcimg);waitKey(0);destroyAllWindows();}
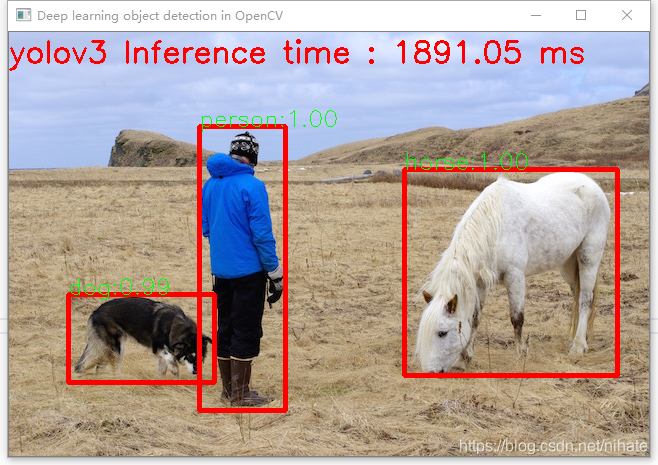
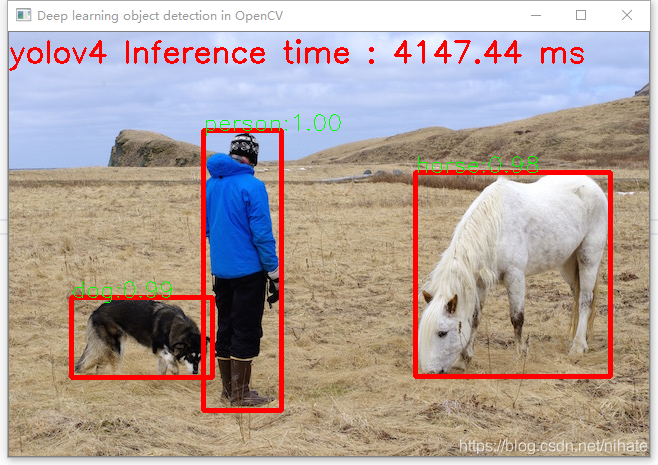
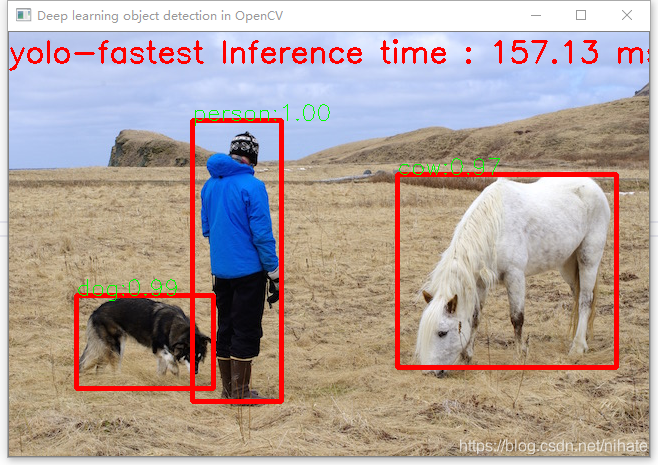
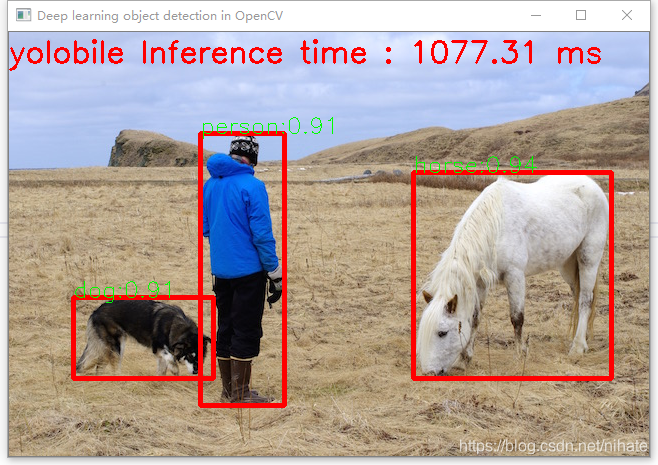
在编写并调试完程序后,我多次运行程序来比较这4种YOLO目标检测网络在一幅图片上的运行耗时。运行程序的环境是win10-cpu,VS2019+opencv4.4.0,这4种YOLO目标检测网络在同一幅图片上的运行耗时的结果如下:


可以看到Yolo-Fastest运行速度最快,YOLObile号称是实时的,但是从结果看并不如此。并且查看它们的模型文件,可以看到Yolo-Fastest的是最小的。如果在ubuntu-gpu环境里运行,它还会更快。

整个程序的运行不依赖任何深度学习框架,只需要依赖OpenCV4这个库就可以运行整个程序,做到了YOLO目标检测的极简主义,这个在硬件平台部署时是很有意义的。建议在ubuntu系统里运行这套程序,上面展示的是在win10-cpu机器上的运行结果,而在ubuntu系统里运行,一张图片的前向推理耗时只有win10-cpu机器上的十分之一。
我把这套程序发布在github上,这套程序包含了C++和Python两种版本的实现,地址是 https://github.com/hpc203/yolov34-cpp-opencv-dnn
此外,我也编写了使用opencv实现yolov5目标检测,程序依然是包含了C++和Python两种版本的实现,地址是
https://github.com/hpc203/yolov5-dnn-cpp-python 和 https://github.com/hpc203/yolov5-dnn-cpp-python-v2
考虑到yolov5的模型文件是在pytorch框架里从.pt文件转换生成的.onnx文件,而之前的yolov3,v4都是在darknet框架里生成的.cfg和.weights文件,还有yolov5的后处理计算与之前的yolov3,v4有所不同,因此我没有把yolov5添加到上面的4种YOLO目标检测程序里。
双一流高校研究生团队创建 ↓
专注于目标检测原创并分享相关知识 ☞
整理不易,点赞三连!
