Pytorch 网络结构可视化
点击上方“小白学视觉”,选择加"星标"或“置顶”
重磅干货,第一时间送达
本文转自:深度学习这件小事
可以通过以下的命令进行安装
conda install pytorch-nightly -c pytorch
conda install graphviz
conda install torchvision
conda install tensorwatch
本教程基于以下的版本:
torchvision.__version__   '0.2.1'
torch.__version__         '1.2.0.dev20190610'
sys.version               '3.6.8 |Anaconda custom (64-bit)| (default, Dec 30 2018, 01:22:34)
[GCC 7.3.0]'import sys
import torch
import tensorwatch as tw
import torchvision.modelsalexnet_model = torchvision.models.alexnet()
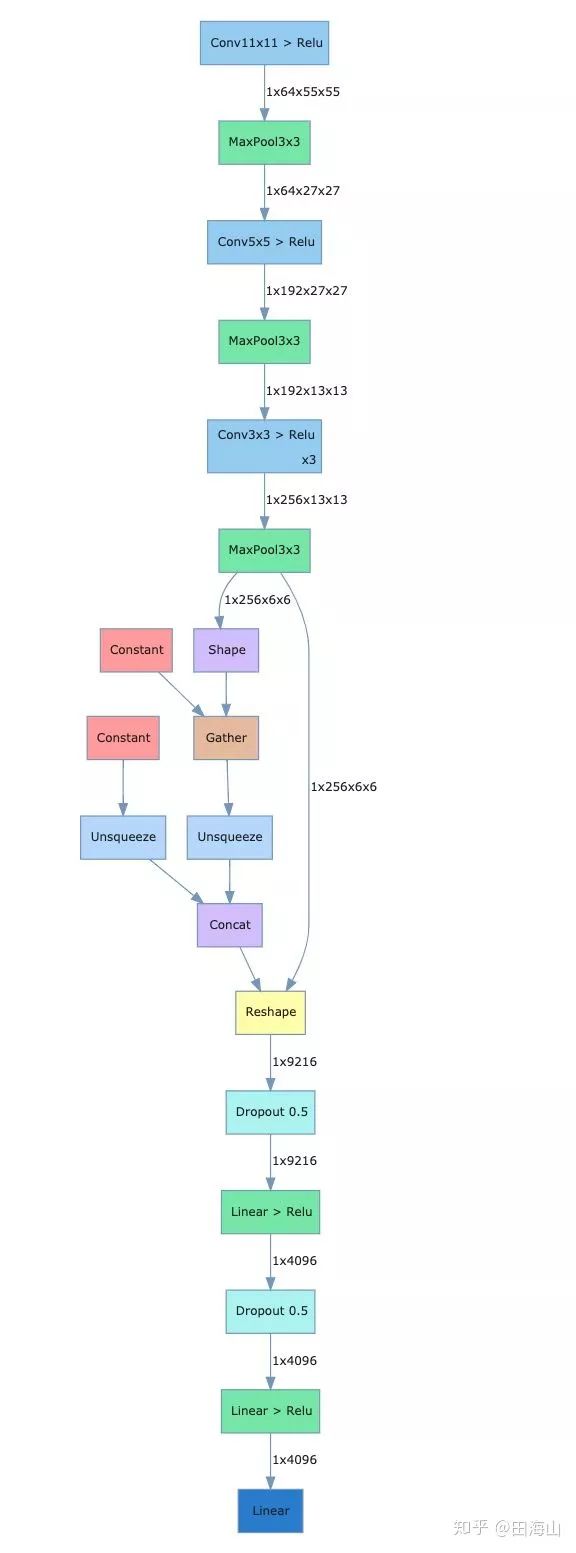
tw.draw_model(alexnet_model, [1, 3, 224, 224])载入alexnet,draw_model函数需要传入三个参数,第一个为model,第二个参数为input_shape,第三个参数为orientation,可以选择'LR'或者'TB',分别代表左右布局与上下布局。
在notebook中,执行完上面的代码会显示如下的图,将网络的结构及各个层的name和shape进行了可视化。

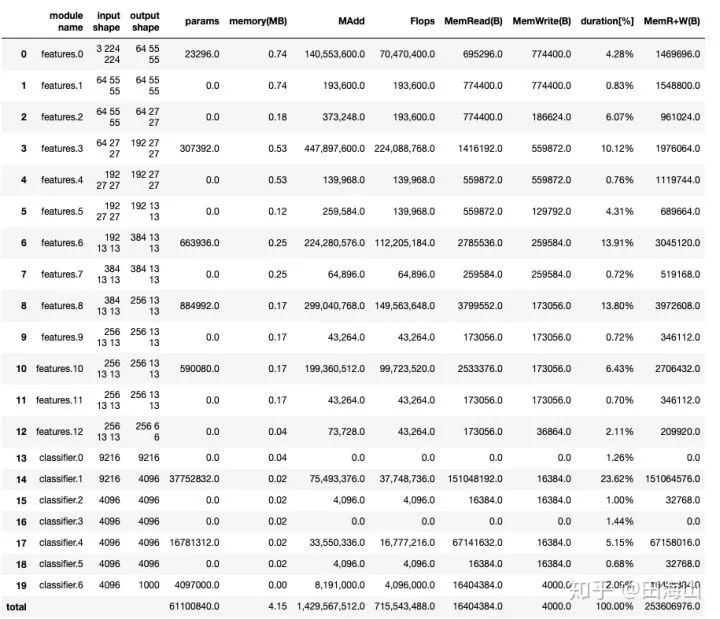
可以通过model_stats方法统计各层的参数情况。
tw.model_stats(alexnet_model, [1, 3, 224, 224])

[MAdd]: Dropout is not supported!
[Flops]: Dropout is not supported!
[Memory]: Dropout is not supported!
[MAdd]: Dropout is not supported!
[Flops]: Dropout is not supported!
[Memory]: Dropout is not supported!
[MAdd]: Dropout is not supported!
[Flops]: Dropout is not supported!
[Memory]: Dropout is not supported!
[MAdd]: Dropout is not supported!
[Flops]: Dropout is not supported!
[Memory]: Dropout is not supported!
[MAdd]: Dropout is not supported!
[Flops]: Dropout is not supported!
[Memory]: Dropout is not supported!
[MAdd]: Dropout is not supported!
[Flops]: Dropout is not supported!
[Memory]: Dropout is not supported!
alexnet_model.features

Sequential(
  (0): Conv2d(3, 64, kernel_size=(11, 11), stride=(4, 4), padding=(2, 2))
  (1): ReLU(inplace=True)
  (2): MaxPool2d(kernel_size=3, stride=2, padding=0, dilation=1, ceil_mode=False)
  (3): Conv2d(64, 192, kernel_size=(5, 5), stride=(1, 1), padding=(2, 2))
  (4): ReLU(inplace=True)
  (5): MaxPool2d(kernel_size=3, stride=2, padding=0, dilation=1, ceil_mode=False)
  (6): Conv2d(192, 384, kernel_size=(3, 3), stride=(1, 1), padding=(1, 1))
  (7): ReLU(inplace=True)
  (8): Conv2d(384, 256, kernel_size=(3, 3), stride=(1, 1), padding=(1, 1))
  (9): ReLU(inplace=True)
  (10): Conv2d(256, 256, kernel_size=(3, 3), stride=(1, 1), padding=(1, 1))
  (11): ReLU(inplace=True)
  (12): MaxPool2d(kernel_size=3, stride=2, padding=0, dilation=1, ceil_mode=False)
)

alexnet_model.classifier

Sequential(
  (0): Dropout(p=0.5)
  (1): Linear(in_features=9216, out_features=4096, bias=True)
  (2): ReLU(inplace=True)
  (3): Dropout(p=0.5)
  (4): Linear(in_features=4096, out_features=4096, bias=True)
  (5): ReLU(inplace=True)
  (6): Linear(in_features=4096, out_features=1000, bias=True)
)参考:
https://github.com/microsoft/tensorwatch
交流群
欢迎加入公众号读者群一起和同行交流,目前有SLAM、三维视觉、传感器、自动驾驶、计算摄影、检测、分割、识别、医学影像、GAN、算法竞赛等微信群(以后会逐渐细分),请扫描下面微信号加群,备注:”昵称+学校/公司+研究方向“,例如:”张三 + 上海交大 + 视觉SLAM“。请按照格式备注,否则不予通过。添加成功后会根据研究方向邀请进入相关微信群。请勿在群内发送广告,否则会请出群,谢谢理解~
评论

