一个完整的 GUI 自动化测试程序

在介绍了 GUI 测试、辅助特性、报表生成等技术点之后,现在可以将它们串联起来,实现一个较为完整的自动化测试程序。
以常见的用户登录为例,要进行自动化测试,需要考虑以下场景:
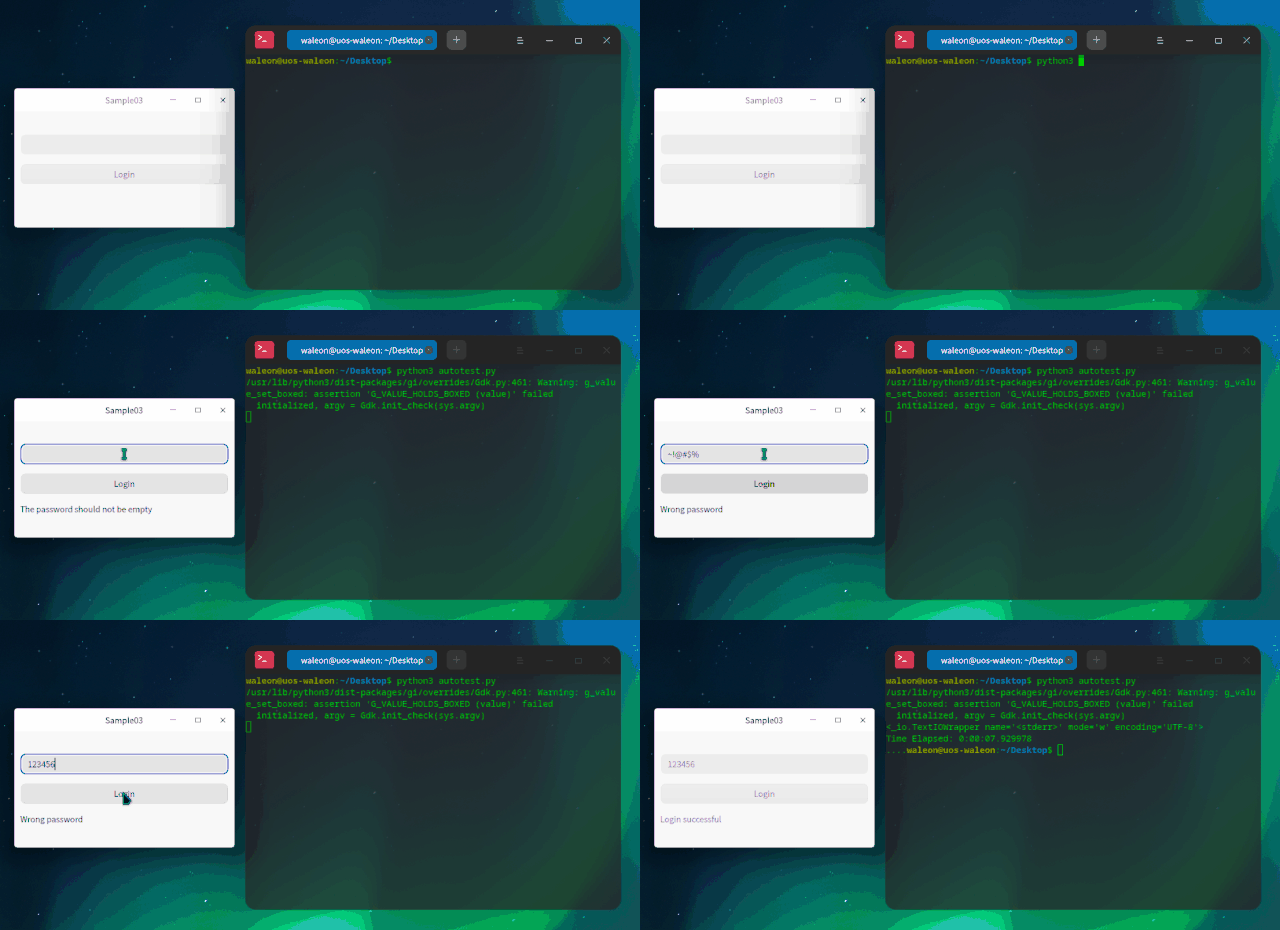
模拟键盘输入密码(空密码、错误密码、正确密码);
模拟鼠标点击登录按钮;
校验错误提示信息,判断是否与预期相符;
......
自动生成测试报告。
先来看一下我们的程序,以及自动化脚本执行效果:

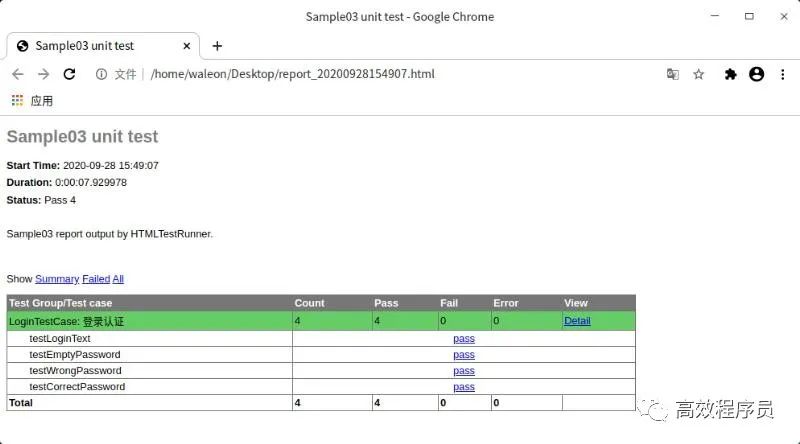
当脚本跑完之后,会生成一个自动化测试报告:

里面包含了所有的测试结果,分析起来特别方便!
1
登录界面
来看具体的实现,登录界面包含了密码框、登录按钮、提示标签:
#ifndef WIDGET_H
#define WIDGET_H

#include
#include

class QLabel;
class QLineEdit;
class QPushButton;

class Widget : public QWidget
{
    Q_OBJECT

public:
    // 错误状态
    typedef enum ErrorStatus {
        NoError = 0,
        EmptyPassword,
        WrongPassword
    } ErrorStatus;

    explicit Widget(QWidget *parent = Q_NULLPTR);
    ~Widget() Q_DECL_OVERRIDE;

private Q_SLOTS:
    void login();

private:
    void initUi();
    void retranslateUi();
    void initConnections();
    void initAccessible();

private:
    QLineEdit *m_lineEdit;
    QPushButton *m_button;
    QLabel *m_tipLabel;
    QMap m_errorMap;
};

#endif // WIDGET_H
当点击登录按钮后,会触发槽函数 login(),此时会校验输入的密码,并进行错误提示:
#include "widget.h"
#include
#include
#include
#include

Widget::Widget(QWidget *parent)
    : QWidget(parent)
{
    initUi();
    retranslateUi();
    initConnections();
    initAccessible();
}

Widget::~Widget()
{

}

void Widget::initUi()
{
    m_lineEdit = new QLineEdit(this);
    m_button = new QPushButton(this);
    m_tipLabel = new QLabel(this);

    QVBoxLayout *layout = new QVBoxLayout();
    layout->addStretch();
    layout->addWidget(m_lineEdit);
    layout->addWidget(m_button);
    layout->addWidget(m_tipLabel);
    layout->addStretch();
    layout->setSpacing(15);
    layout->setContentsMargins(10, 10, 10, 10);
    setLayout(layout);
}

void Widget::retranslateUi()
{
    m_button->setText("Login");

    if (m_errorMap.isEmpty()) {
        m_errorMap.insert(NoError, "Login successful");
        m_errorMap.insert(EmptyPassword, "The password should not be empty");
        m_errorMap.insert(WrongPassword, "Wrong password");
    }
}

void Widget::initConnections()
{
    connect(m_button, &QPushButton::clicked, this, &Widget::login);
}

void Widget::initAccessible()
{
    // 将被辅助技术识别
    m_lineEdit->setAccessibleName("passwordEdit");
    m_button->setAccessibleName("loginButton");
    m_tipLabel->setAccessibleName("tipLabel");
    m_lineEdit->setAccessibleDescription("this is a password line edit");
    m_button->setAccessibleDescription("this is a login button");
    m_tipLabel->setAccessibleDescription("this is a tip label");
}

void Widget::login()
{
    QString password = m_lineEdit->text();

    if (password.isEmpty()) {
        m_tipLabel->setText(m_errorMap.value(EmptyPassword));
    } else if (QString::compare(password, "123456") != 0) {
        m_tipLabel->setText(m_errorMap.value(WrongPassword));
    } else {
        m_tipLabel->setText(m_errorMap.value(NoError));
    }
}
注意:有一点很关键,需要调用 setAccessibleName() 为控件设置可访问的名称,这样才能被辅助技术所识别!
由于在自动化脚本中需要进行文本校验,所以应为 QPushButton、QLabel 等 UI 元素实现 QAccessibleInterface 接口,然后定义接口工厂并进行安装:
// 接口工厂
QAccessibleInterface *accessibleFactory(const QString &classname, QObject *object)
{
    QAccessibleInterface *interface = nullptr;

    if (object && object->isWidgetType()) {
        if (classname == "QLabel")
            interface = new AccessibleLabel(qobject_cast(object));

        if (classname == "QPushButton")
            interface = new AccessibleButton(qobject_cast(object));
    }

    return interface;
}
至于细节内容,可参考《让 dogtail 识别 UI 中的元素》。
2
自动化测试脚本
当一切准备就绪,就可以编写自动化测试脚本了,来看看 autotest.py 都有些什么:
通过 root.application() 找到应用程序;
定义枚举 ErrorStatus,以表示登录时的错误状态;
定义一个通用函数 set_text(),用于设置输入框的文本;
注意:直接调用 typeText() 只会追加,所以要输入新内容,必须先清空原有内容。
继承 TestCase 类,实现具体的测试用例;
构造测试集,并生成测试报告。
#!/usr/bin/env python3
# -*- coding: utf-8 -*-
import unittest
import HTMLTestRunner
from dogtail.tree import *
import time
from enum import Enum, unique
app = root.application(appName="Sample03", description="/home/waleon/workspace/demos/build-Samples-unknown-Debug/Sample03/Sample03")
# 错误状态
@unique
class ErrorStatus(Enum):
NoError = 0
EmptyPassword = 1
WrongPassword = 2
# 设置文本
def set_text(line_edit, text):
line_edit.click()
line_edit.keyCombo('a' )
line_edit.keyCombo('del')
line_edit.typeText(text)
class LoginTestCase(unittest.TestCase):
"""登录认证"""
def setUp(self):
print('========== begin ==========')
self.tips = {
ErrorStatus.EmptyPassword: 'The password should not be empty',
ErrorStatus.WrongPassword: 'Wrong password',
ErrorStatus.NoError: 'Login successful'
}
self.password_edit = app.child('passwordEdit')
self.login_btn = app.child('loginButton')
self.tip_label = app.child('tipLabel')
# 登录文本内容
def testLoginText(self):
self.assertEqual(self.login_btn.text, 'Login')
# 密码为空
def testEmptyPassword(self):
set_text(self.password_edit, '')
self.login_btn.click()
self.assertEqual(self.tip_label.text, self.tips[ErrorStatus.EmptyPassword])
# 密码不合法(特殊字符)
def testWrongPassword(self):
set_text(self.password_edit, '~!@#$%')
self.login_btn.click()
self.assertEqual(self.tip_label.text, self.tips[ErrorStatus.WrongPassword])
# 密码正确
def testCorrectPassword(self):
set_text(self.password_edit, '123456')
self.login_btn.click()
self.assertEqual(self.tip_label.text, self.tips[ErrorStatus.NoError])
def tearDown(self):
print('========== end ==========')
if __name__ == '__main__':
# 构造测试集
suite = unittest.TestSuite()
# 添加测试用例
suite.addTest(LoginTestCase("testLoginText"))
suite.addTest(LoginTestCase("testEmptyPassword"))
suite.addTest(LoginTestCase("testWrongPassword"))
suite.addTest(LoginTestCase("testCorrectPassword"))
# 报告路径
date_time = time.strftime('%Y%m%d%H%M%S', time.localtime(time.time()))
report_path = 'report_' + date_time + '.html'
# 执行测试
with open(report_path, 'wb') as f:
runner = HTMLTestRunner.HTMLTestRunner(
stream=f,
title='Sample03 unit test',
description='Sample03 report output by HTMLTestRunner.'
)
runner.run(suite)
看到这里,是不是觉得自动化测试其实也蛮简单的,并不像很多人说的那么难!
最后,说一下 dogtail 这个东西,虽然文档资料比较少,但用起来很不错。综合来说,值得推荐!
·END·

