React 之生命周期实现原理
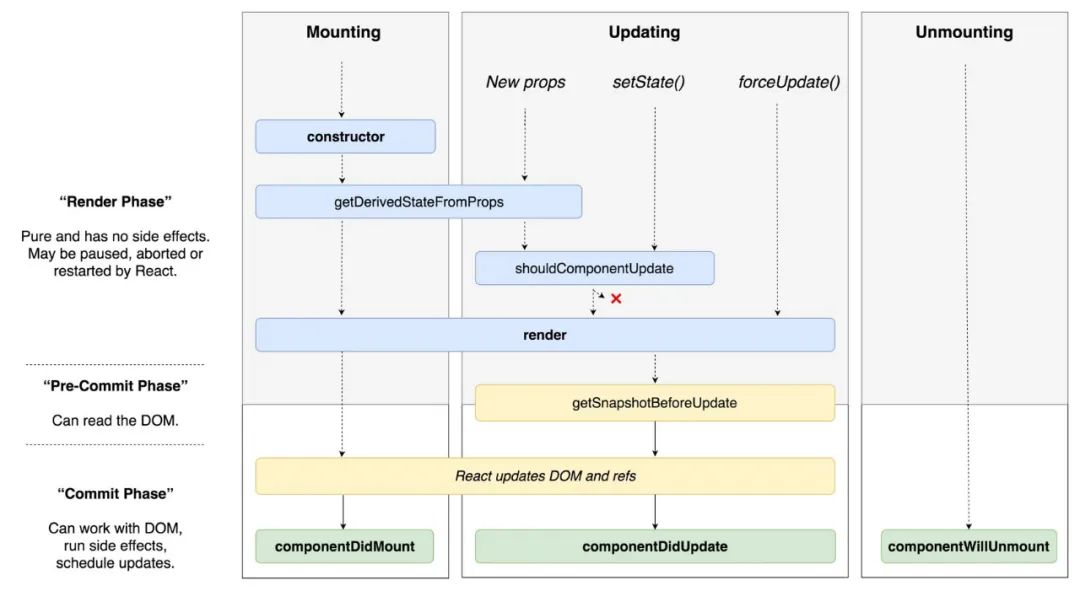
生命周期是指组件从创建、更新到最终销毁的完整过程。在不同的阶段,React 内置了一些函数以便开发者用来执行不同的逻辑处理。
装载阶段
-
constructor -
static getDerivedStateFromProps -
UNSAFE_componentWillMount -
render -
componentDidMount
更新阶段
-
UNSAFE_componentWillReceiveProps -
static getDerivedStateFromProps -
shouldComponentUpdate -
UNSAFE_componentWillUpdate -
render -
getSnapshotBeforeUpdate -
componentDidUpdate
卸载阶段
-
componentWillUnMount
错误捕获
-
static getDerivedStateFromError -
componentDidCatch
React 的作者 Dan Abramov 画了一张图来帮助我们更好地理解 React 的生命周期。
为什么部分生命周期要加 UNSAFE_
在 React 16 之前,React 的更新都是采用递归的方式同步更新。生命周期一但开始,结束结束之前是不会停止的,所以像 componentWillMount、componentWillReceiveProps、componentWillUpdate 都能顺序地正常执行。
而在 React16 中,采用 Fiber + Time Slice 的方式处理每个任务,任务是可以暂停和继续执行的。这意味着一次完整的执行中,挂载和更新之前的生命周期可能多次执行。所以在 React 16.3.0 中,将 componentWillMount、componentWillReceiveProps、componentWillUpdate 前面加上了 UNSAFE_,一来是为了渐进式升级 React,不能一刀切。二来来提示使用者,这几个方法在新版本的 React 中使用起来可能会存在一些风险,建议使用最新的生命周期来开发,以防止出现一些意外的 bug。
对于不同生命周期的作用,想必大家都有所了解,不清楚的可以查看 官方文档 https://zh-hans.reactjs.org/docs/react-component.html 进行学习。
接下来,我们从一个简单的例子入手,顺着它的执行来看看生命周期在源码中是如何实现的。
Demo 组件代码
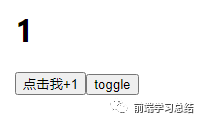
初始化一个简单组件,组件会展示一个数字和一个按钮,每次点击按钮时,数字都会 + 1。
// App.jsx

import { useState } from 'react';
import ChildComponent from './ChildComponent';

function App() {
  const [show, setShow] = useState(true);
  return (
 <>
      { show && <ChildComponent count={count} />}
      <button onClick={() => setShow(pre => !pre)}>toggle</button>
    </>
  )
}

export default App;
// ChildComponent.jsx

import { Component } from 'react';

export default class ChildComponent extends Component {
  constructor(props) {
    super(props);
    this.state = {
      num: 1
    }
  }

  render() {
    const { num } = this.state;
    return (
      <>
        <h1>{num}</h1>
        <button onClick={() => this.setState({ num: num + 1 })}>点击我+1</button>
      </>
    )
  }
}
效果截图如下所示:
当首次进来时,会进入装载 Mounting 阶段。
装载阶段
从 第一棵 Fiber 树是如何生成的? 我们了解到,第一个组件、节点都会经历 beginWork、completeWork,首先来看一下,最早执行的 constructor 是在什么地方实现的。
constructor
beginWork 中判断当前 workInProgress.tag 的类型,由于 ChildComponent 的 tag 是 ClassComponent,所以进入:
// packages\react-reconciler\src\ReactFiberBeginWork.old.js

function beginWork(
  current: Fiber | null,
  workInProgress: Fiber,
  renderLanes: Lanes,
): Fiber | null {
    // ...
    switch (workInProgress.tag) {
        // ...
        case ClassComponent: {
        // ...
          return updateClassComponent(
            current,
            workInProgress,
            Component,
            resolvedProps,
            renderLanes,
          );
        }
    }
    // ...
}
这个方法是返回 updateClassComponent 方法执行后的返回值。
// packages\react-reconciler\src\ReactFiberBeginWork.old.js

function updateClassComponent(
  current: Fiber | null,
  workInProgress: Fiber,
  Component: any,
  nextProps: any,
  renderLanes: Lanes,
) {
    // ...
    const instance = workInProgress.stateNode;
    let shouldUpdate;
    // 根据组件 stateNode(组件实例)的值是否为 null,以此来判断应该创建组件还是更新组件
    if (instance === null) {
        // In the initial pass we might need to construct the instance.
        // 实例化组件,将组件实例与对应的 fiber 节点关联
        constructClassInstance(workInProgress, Component, nextProps);
        // 将 fiber 上的 state 和 props 更新至组件上
        // 并且会检查是否声明了 getDervedStateFromProps 生命周期
        // 有的话则会调用并且使用 getDerivedStateFromProps 生命周期函数中返回的 state 来更新组件实例上的 state
        // 检查是否声明了 componentDidMount 生命周期,有的话则会收集标示添加到 fiber 的 flags 属性上
        mountClassInstance(workInProgress, Component, nextProps, renderLanes);
        // 创建组件肯定是需要更新的,所以直接为 shouldUpdate 赋值为 true
        shouldUpdate = true;
    }
    // ...
}
这里我们能看到两个关键方法,constructClassInstance、mountClassInstance。从字面意思上看,我们大概能猜出,这里可能会和 React 生命周期的 constructor 有关。
// packages\react-reconciler\src\ReactFiberClassComponent.old.js

function constructClassInstance(
  workInProgress: Fiber,
  ctor: any, // ChildComponent
  props: any,
): any {
    // ...
    // 实例化组件
    let instance = new ctor(props, context);

    // 将获取到的组件上的 state 属性复制给 workInProgress.memoizedState
    const state = (workInProgress.memoizedState =
        instance.state !== null && instance.state !== undefined
          ? instance.state
          : null);
    // 将 fiber 节点与组件实例相互关联,在之前更新时可复用
    adoptClassInstance(workInProgress, instance);
    // ...
    if (__DEV__) {
        if (
      typeof ctor.getDerivedStateFromProps === 'function' ||
      typeof instance.getSnapshotBeforeUpdate === 'function'
    ) {
        if (
        foundWillMountName !== null ||
        foundWillReceivePropsName !== null ||
        foundWillUpdateName !== null
      ) {
        const componentName = getComponentNameFromType(ctor) || 'Component';
        const newApiName =
          typeof ctor.getDerivedStateFromProps === 'function'
            ? 'getDerivedStateFromProps()'
            : 'getSnapshotBeforeUpdate()';
        if (!didWarnAboutLegacyLifecyclesAndDerivedState.has(componentName)) {
          didWarnAboutLegacyLifecyclesAndDerivedState.add(componentName);
          console.error(
            'Unsafe legacy lifecycles will not be called for components using new component APIs.\n\n' +
              '%s uses %s but also contains the following legacy lifecycles:%s%s%s\n\n' +
              'The above lifecycles should be removed. Learn more about this warning here:\n' +
              'https://reactjs.org/link/unsafe-component-lifecycles',
            componentName,
            newApiName,
            foundWillMountName !== null ? `\n  ${foundWillMountName}` : '',
            foundWillReceivePropsName !== null
              ? `\n  ${foundWillReceivePropsName}`
              : '',
            foundWillUpdateName !== null ? `\n  ${foundWillUpdateName}` : '',
          );
        }
      }
    }
    // ...
    return instance;
}
这个方法中,调用 new ctor(props, context) 方法,向上找 ctor 是什么?在 beginWork 对就的 case ClassComponent 中可以看到,ctor 其它就是 const Component = workInProgress.type;,而 workInProgress.type 指向的就是 ChildComponent 这个 class。
通过 new ctor(props, context) 新建一个 class 的实例,自然,也就会执行这个 class 对应的 constructor 构造函数了。
此外,在开发环境中,如果我们使用了 getDerivedStateFromProps 或者 getSnapshotBeforeUpdate,同时又使用了 UNSAFE_componentWillMount、UNSAFE_componentWillReceiveProps、UNSAFE_componentWillUpdate 钩子方法,控制台中会进行报错提示,这也是在 constructClassInstance 方法中执行的。

小结:
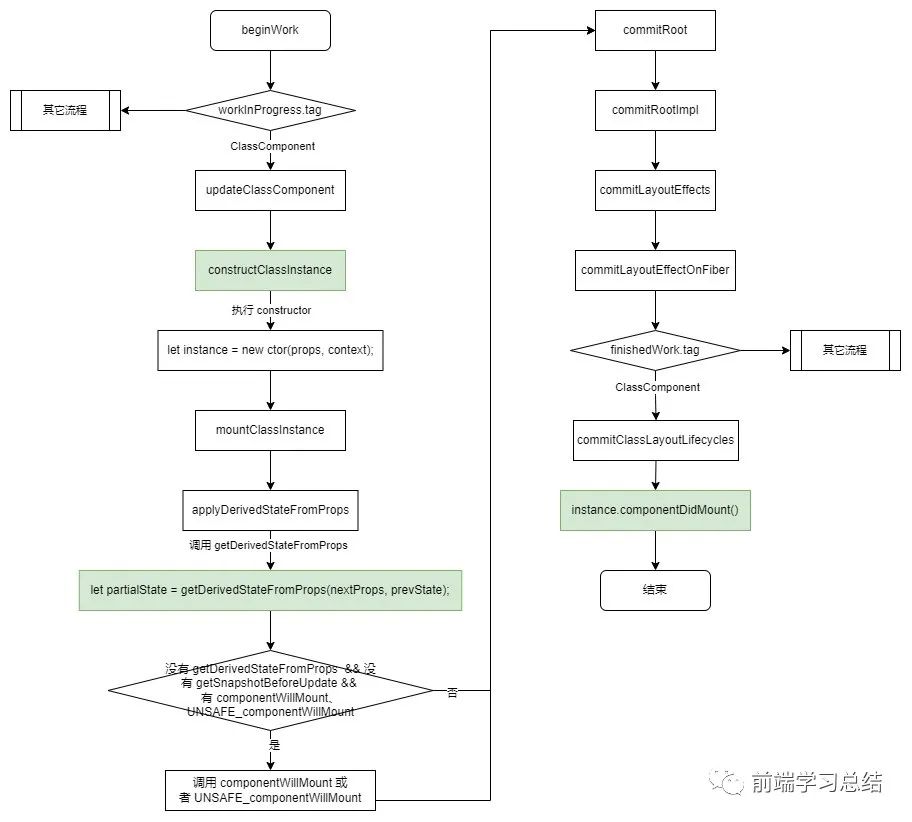
constructor的执行位置是:beginWork > updateClassComponent > constructClassInstance。
getDerivedStateFromProps & UNSAFE_componentWillMount
执行完 constructor 生命周期后,继续执行 mountClassInstance(workInProgress, Component, nextProps, renderLanes);。
// packages\react-reconciler\src\ReactFiberClassComponent.old.js

function mountClassInstance(
  workInProgress: Fiber,
  ctor: any,
  newProps: any,
  renderLanes: Lanes,
): void {
  // ...
  // 检查当前组件是否声明了 getDerivedStateFromProps 生命周期函数
  const getDerivedStateFromProps = ctor.getDerivedStateFromProps;
  if (typeof getDerivedStateFromProps === 'function') {
    // 有声明的话则会调用并且使用 getDerivedStateFromProps 生命周期函数中返回的 state 来更新 workInProgress.memoizedState
    applyDerivedStateFromProps(
      workInProgress,
      ctor,
      getDerivedStateFromProps,
      newProps,
    );
    // 将更新了的 state 赋值给组件实例的 state 属性
    instance.state = workInProgress.memoizedState;
  }
}
这个方法会判断组件中是否定义了 getDerivedStateFromProps,如果有就会执行 applyDerivedStateFromProps 方法:
applyDerivedStateFromProps(
  workInProgress,
  ctor,
  getDerivedStateFromProps,
  newProps,
);
在 applyDerivedStateFromProps 这个方法中,会调用组件的 getDerivedStateFromProps 方法,将方法的返回值赋值给 workInProgress.memoizedState,具体的实现方法如下所示:
// packages\react-reconciler\src\ReactFiberClassComponent.old.js

function applyDerivedStateFromProps(
  workInProgress: Fiber,
  ctor: any,
  getDerivedStateFromProps: (props: any, state: any) => any,
  nextProps: any,
) {
  const prevState = workInProgress.memoizedState;
  let partialState = getDerivedStateFromProps(nextProps, prevState);

  // Merge the partial state and the previous state.
  const memoizedState =
    partialState === null || partialState === undefined
      ? prevState
      : assign({}, prevState, partialState);
  workInProgress.memoizedState = memoizedState;
  // ...
}
在 mountClassInstance 方法中,还有这样的判断
// packages\react-reconciler\src\ReactFiberClassComponent.old.js

function mountClassInstance(
  workInProgress: Fiber,
  ctor: any,
  newProps: any,
  renderLanes: Lanes,
): void {
  // ...
  // In order to support react-lifecycles-compat polyfilled components,
  // Unsafe lifecycles should not be invoked for components using the new APIs.
  // 调用 componentWillMount 生命周期
  if (
    typeof ctor.getDerivedStateFromProps !== 'function' &&
    typeof instance.getSnapshotBeforeUpdate !== 'function' &&
    (typeof instance.UNSAFE_componentWillMount === 'function' ||
      typeof instance.componentWillMount === 'function')
  ) {
    callComponentWillMount(workInProgress, instance);
    // If we had additional state updates during this life-cycle, let's
    // process them now.
    processUpdateQueue(workInProgress, newProps, instance, renderLanes);
    instance.state = workInProgress.memoizedState;
  }

  // 判断是否声明了 componentDidMount 声明周期,声明了则会添加标识 Update 至 flags 中,在 commit 阶段使用
  if (typeof instance.componentDidMount === 'function') {
    const fiberFlags: Flags = Update | LayoutStatic;
    workInProgress.flags |= fiberFlags;
  }
  // ...
}
它的意思是,如果组件没有定义过 getDerivedStateFromProps、getSnapshotBeforeUpdate 方法,并且有定义 componentWillMount || UNSAFE_componentWillMount 方法,就会调用 callComponentWillMount 去执行 componentWillMount || UNSAFE_componentWillMount 方法。
function callComponentWillMount(workInProgress, instance) {
  const oldState = instance.state;

  if (typeof instance.componentWillMount === 'function') {
    instance.componentWillMount();
  }
  if (typeof instance.UNSAFE_componentWillMount === 'function') {
    instance.UNSAFE_componentWillMount();
  }

  if (oldState !== instance.state) {
    classComponentUpdater.enqueueReplaceState(instance, instance.state, null);
  }
}
执行会判断 oldState 和 instance.state 是否相等,如果不相等,就会执行 classComponentUpdater.enqueueReplaceState(instance, instance.state, null);。
小结:
getDerivedStateFromProps()的调用位置是beginWork > updateClassComponent > mountClassInstance > applyDerivedStateFromProps。如果没有定义
getDerivedStateFromProps、getSnapshotBeforeUpdate,有定义componentWillMount、UNSAFE_componentWillMount钩子会在beginWork > updateClassComponent > mountClassInstance > callComponentWillMount调用。
执行完对应的 beginWork 和 completeWork 后,就会进入到 commit 阶段。
引用一下 React 的核心思想
const state = reconcile(update);
const UI = commit(state);
通过 const UI = commit(state); 我们可以看出,render 应该是和 commit 阶段有关。
render
beginWork 阶段执行了 constructor、static getDerivedStateFromProps、UNSAFE_componentWillMount 生命周期。如何将 Fiber 渲染到页面上,这就是 render 阶段。
具体将 Fiber 渲染到页面上的逻辑在 commitRootImpl > commitMutationEffects 处。完整的流程可以查看上一篇文章 React 之第一棵树是如何渲染到页面上的?,这里不再赘述。
componentDidMount
在 commitRootImpl 方法中执行完 commitMutationEffects 将 Fiber 渲染到页面上后,继续执行 commitRootImpl 方法中的 commitLayoutEffects 方法。
// packages\react-reconciler\src\ReactFiberCommitWork.old.js
export function commitLayoutEffects(
  finishedWork: Fiber,
  root: FiberRoot,
  committedLanes: Lanes,
): void {
  // ...
  commitLayoutEffectOnFiber(root, current, finishedWork, committedLanes);
}
commitLayoutEffects 方法里执行 commitLayoutEffectOnFiber 方法。
// packages\react-reconciler\src\ReactFiberCommitWork.old.js

function commitLayoutEffectOnFiber(
  finishedRoot: FiberRoot,
  current: Fiber | null,
  finishedWork: Fiber,
  committedLanes: Lanes,
): void {
    // ...
    case ClassComponent: {
      recursivelyTraverseLayoutEffects(
        finishedRoot,
        finishedWork,
        committedLanes,
      );
      if (flags & Update) {
        commitClassLayoutLifecycles(finishedWork, current);
      }
      // ...
    }
    // ...
}
经历过一些判断以及遍历,最后会进入 case ClassComponent 阶段的 commitClassLayoutLifecycles 中。
// packages\react-reconciler\src\ReactFiberCommitWork.old.js
function commitClassLayoutLifecycles(
  finishedWork: Fiber,
  current: Fiber | null,
) {
  const instance = finishedWork.stateNode;
  if (current === null) {
    if (shouldProfile(finishedWork)) {
      // ...
    } else {
      try {
        instance.componentDidMount();
      } catch (error) {
        captureCommitPhaseError(finishedWork, finishedWork.return, error);
      }
    }
  } else {
    const prevProps =
      finishedWork.elementType === finishedWork.type
        ? current.memoizedProps
        : resolveDefaultProps(finishedWork.type, current.memoizedProps);
    const prevState = current.memoizedState;
    if (shouldProfile(finishedWork)) {
      // ...
    } else {
      try {
        instance.componentDidUpdate(
          prevProps,
          prevState,
          instance.__reactInternalSnapshotBeforeUpdate,
        );
      } catch (error) {
        captureCommitPhaseError(finishedWork, finishedWork.return, error);
      }
    }
  }
}
从这个方法中可以看出,如果 current === null (首次加载),就会调用 instance.componentDidMount();。如果 current !== null(更新),就会调用 instance.componentDidUpdate。
小结:
componentDidMount的执行位置是:commitRoot > commitRootImpl > commitLayoutEffects > commitLayoutEffectOnFiber > recursivelyTraverseLayoutEffects > commitClassLayoutLifecycles。
完成的代码执行流程图如下所示:
到目前为止,装载阶段的生命周期就完成了,下面,来看一下更新阶段的生命周期是如何实现的。
更新阶段
当我们点击 Demo 中的 点击我+1 按钮,数字 1 将变成 2,在此期间,会怎样执行呢?
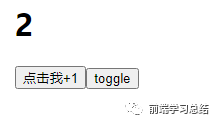
通过 setState 触发 React 更新。React 会从 FiberRoot 开始进行处理。
提个问题:为什么每次更新
React都要从根节点开始执行?它是如何保证性能的?这样做的原因是什么?为什么它不从更新的组件开始?这个问题先提到这里,后面再单独总结。
为方便理解,这里将代码的执行流程做成了一个流程图,具体如下所示:
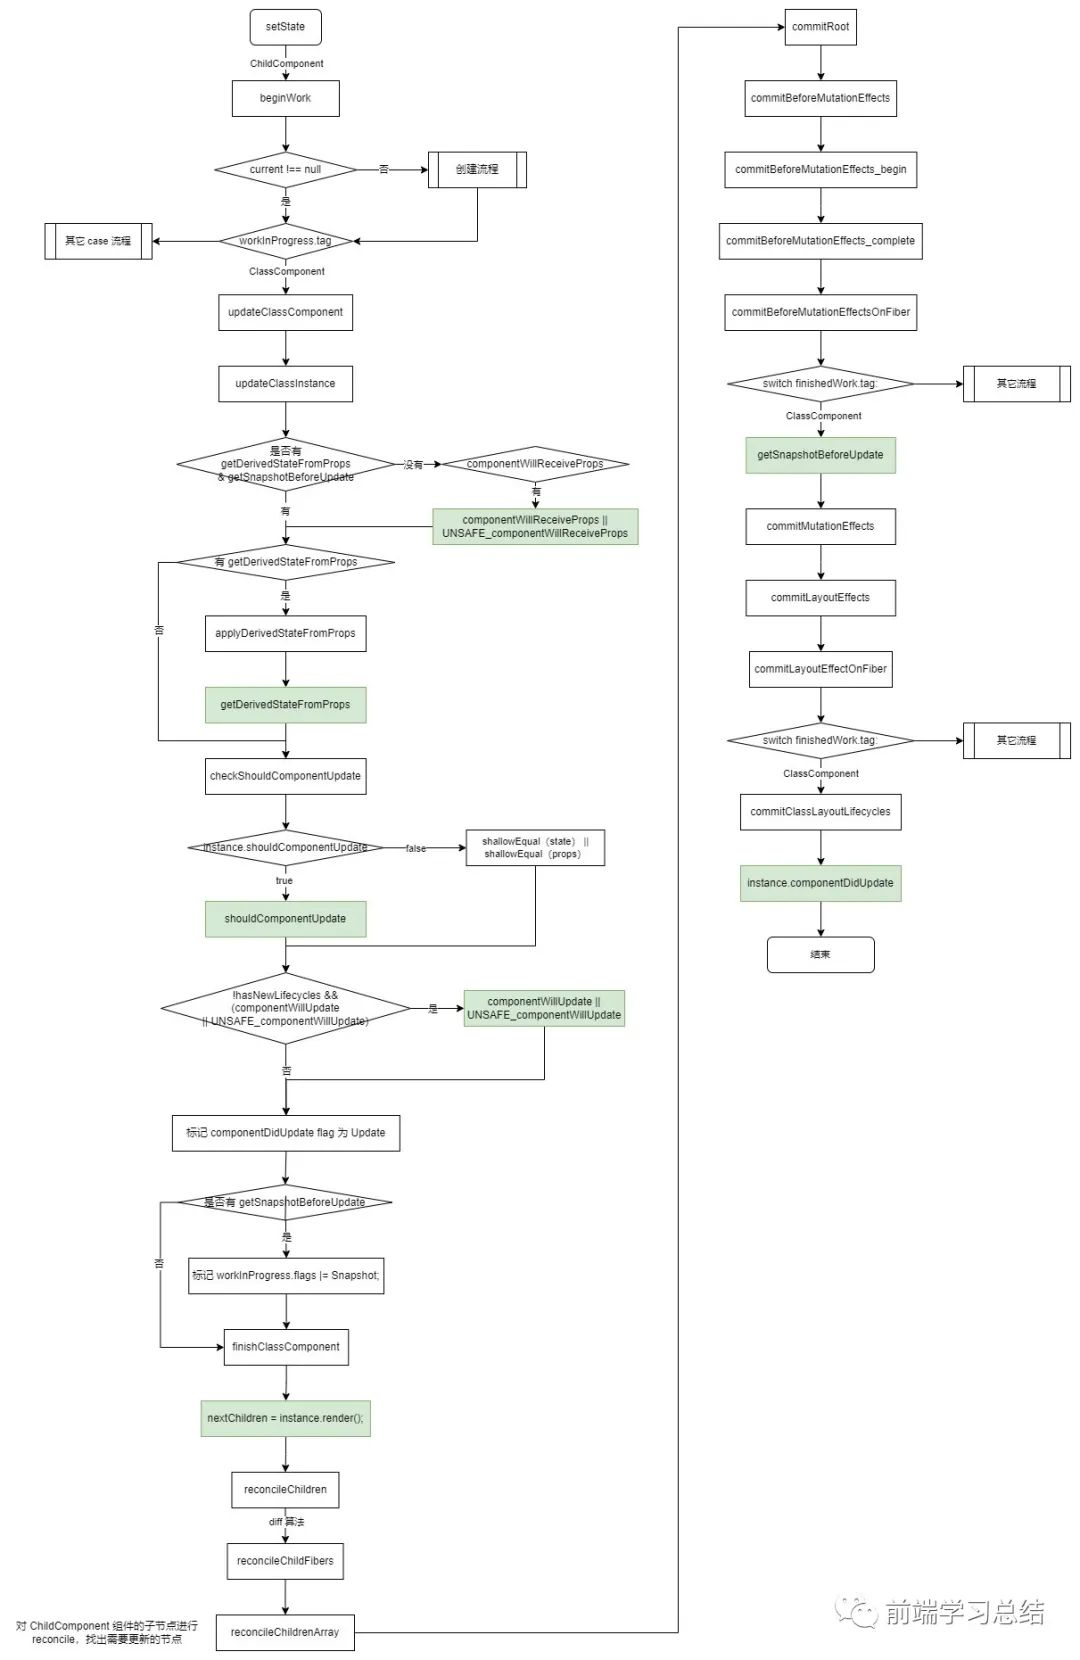
当 workInProgress 经过 workLoop 遍历到 ChildComponent 时,又会开始进入它的 beginWork。通过之前的学习,我们了解到,在 Mounting 阶段,current 为 null,更新阶段 current 不为 null。再加上 ChildComponent 的 type 类型为 ClassComponent,所以 ChildComponent 会执行 updateClassComponent 方法。
执行 updateClassInstance 方法,在这个方法中会判断组件中是否定义了 getDerivedStateFromProps 或者 getSnapshotBeforeUpdate。如果没有定义,才会检查是否有定义 *_componentWillReceiveProps 方法并执行它。如果这两种都存在,在 Mounting 阶段执行 constructClassInstance 就会打印 error 信息。

继续执行后面的代码,发现如果组件中有定义 getDerivedStateFromProps 就会执行 getDerivedStateFromProps 方法,将方法的返回值挂载到 workInProgress.memoizedState,所以这个方法可以用来在渲染前根据新的 props 和旧的 state 计算衍生数据。
执行完 getDerivedStateFromProps 就会开始检查是否定义了 shouldComponentUpdate,如果有定义,执行 shouldComponentUpdate 方法,并将方法的返回值用于判断页面是否需要更新的依据。如果返回 true,说明需要更新,如果此时组件中有定义 componentWillUpdate 也会执行它,然后根据条件修改 workInProgress.flags 的值为 Update 或者 Snapshot。在 commit 阶段,会根据不同的 flags 对组件进行不同的处理。
调用 render 方法,拿到当前组件的子节点内容。
在将新的内容 commitMutationEffects (将新节点渲染到页面之前),调用 getSnapshotBeforeUpdate。所以在 getSnapshotBeforeUpdate 中,我们可以访问更新前的 props 和 state 以及旧的 DOM 节点信息,并且它的返回值会绑定到当前 Fiber 节点的 __reactInternalSnapshotBeforeUpdate 属性上面,这个参数会作为后面的 componentDidUpdate 钩子的第三个参数调用。
这个特性在处理渲染页面前,需要获取之前的页面信息,并根据之前的页面信息执行一些新的交互上有奇效。比如:收到新消息时,需要自动滚动到新消息处。
执行完 getSnapshotBeforeUpdate,继续执行 commitLayoutEffects,然后在 commitLayoutEffectOnFiber 里面经过不同的 case 调用 recursivelyTraverseLayoutEffects 方法,这个方法又会将 parentFiber.child 作为参数继续调用 commitLayoutEffectOnFiber,直到找到 ChildComponent。执行完 case ClassComponent 里面的 recursivelyTraverseLayoutEffects 方法,就会开始调用 commitClassLayoutLifecycles 方法,这个方法中就会判断,如果有定义 componentDidUpdate 就会执行它。如果有执行 getSnapshotBeforeUpdate,还会将它的返回值作为第三个参数传给 componentDidUpdate 来执行。
小结:到目前为止,更新阶段就执行完了。有一些不再维护的生命周期,会根据组件中是否有定义最新的一些生命周期来判断是否需要执行。
卸载阶段
当点击 Demo 中的 toggle 按钮时,会触发 setShow(false)。此时页面的展示代码如下:
<div style={{ padding: 20 }}>
    { false && <ChildComponent count={count} />}
    <button onClick={() => setShow(pre => !pre)}>toggle</button>
</div>
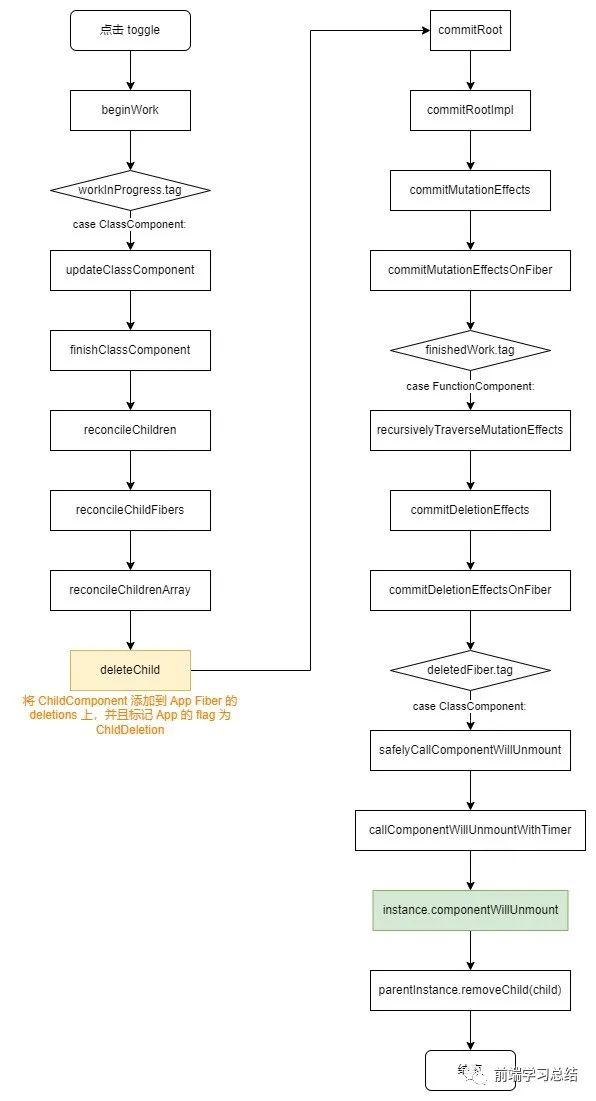
React 又开始对每个节点进行 beginWork。当遍历到 App 节点时,它下面有两个子节点,false & <button> 按钮。进入 reconcileChildrenArray 进行 diff 算法的比较。当比较 { false && <ChildComponent count={count} />} 时,发现这个节点的值是 boolean,它是一个条件判断值,和需要渲染的任何类型都不相关,此时,会将这个节点对应的原来的 <ChildComponent count={count} /> 添加到它的 returnFiber 也就是 App Fiber 的 deleteChild 属性中,并添加 App Fiber 的 Flag 为 ChildDeletion。这个在 commit 阶段,也会遍历节点,如果发现节点有 deleteChild 值,在 commitMutationEffects 时就会对这个节点进行删除。
真正执行删除前,如果组件中有定义 componentWillUnmount,会对 componentWillUnmount 进行调用。调用结束后,会执行 parentInstance.removeChild(child) 将节点从页面中真正的移除。
完整的执行流程图如下所示:
总结
通过上面的学习以及每个步骤的小结,我们知道了 装载、更新、卸载 的具体实现原理。但也留下了几个疑问:
-
为什么每次更新都要从 FiberRoot节点开始? -
错误处理是如何实现的? -
diff算法的具体实现逻辑是什么? -
现在都推荐使用 Hooks写法,Class写法以及它的生命周期还有什么作用,还需要这样深入学习吗? -
Hooks的生命周期是如何实现的?
这里的每一个疑问都值得好好思考,后面再单独总结。
最后,文章如果有写得不对的地方,欢迎指正、一起探讨!!!
