Android实现炫酷的图片展示效果
效果展示

实现原理

实现步骤
这里我们选择在onSizeChanged方法中初始化Bitmap,
@Overrideprotected void onSizeChanged(int w, int h, int oldw, int oldh) {mBitmap = Bitmap.createScaledBitmap(BitmapFactory.decodeResource(getResources(), R.mipmap.timg), w, h, false);//根据控件大小创建一个与控件宽高相同的Bitmap对象postInvalidate();//创建完Bitmap后对控件进行刷新super.onSizeChanged(w, h, oldw, oldh);}
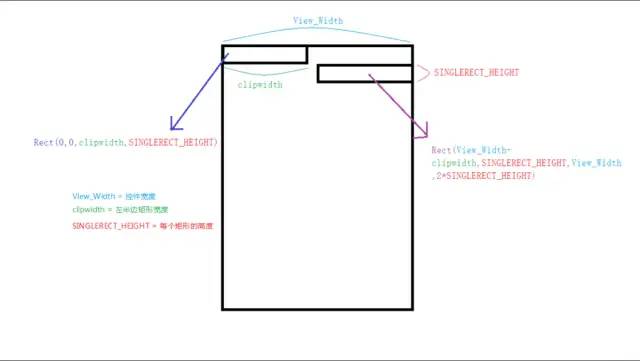
2. 构建矩形裁剪区域并添加到Path中

左边矩形的构建参数:
右边矩形的构建参数:
根据如上构建参数的规律我们总结出如下公式(其中i代表由上到下第几个矩形):
左边矩形构建公式:
RectF rectleft = new RectF(0,i * SINGLEREGION_HEIGHT,cilpWidth,(i + 1) * SINGLEREGION_HEIGHT)
右边矩形构建公式:
RectF rectright = new RectF(View_Width - cilpWidth,i * SINGLEREGION_HEIGHT,getWidth(),(i + 1) * SINGLEREGION_HEIGHT)
根据如上公式我们在代码中添加路径:
//根据控件的高度来添加矩形路径for(int i=0;i*SINGLEREGION_HEIGHT<getHeight();i++){if(i%2==0){mPath.addRect(new RectF(0,i*SINGLEREGION_HEIGHT,cilpWidth,(i+1)*SINGLEREGION_HEIGHT), Path.Direction.CCW);}else {mPath.addRect(new RectF(getWidth()-cilpWidth,i*SINGLEREGION_HEIGHT,getWidth(),(i+1)*SINGLEREGION_HEIGHT), Path.Direction.CCW);}}
这里使用Canvas的clipPath方法将画布裁切成路径的形状,
canvas.clipPath(mPath);//根据路径裁切画布canvas.drawBitmap(mBitmap,0,0,mPaint);//在裁切后的画布上绘制图片
4. 利用递归实现动画效果
if(cilpWidth>getWidth()){//当矩形的宽度等于控件宽度时停止重绘return;}cilpWidth+=5;//每次绘制完需要增加clipWidth的宽度invalidate();//重绘(运用递归)
图片完全显示也是cilpWidth>控件宽度的时候。
if(cilpWidth>getWidth()){//当图片完全展示时替换图片mBitmap=Bitmap.createScaledBitmap(BitmapFactory.decodeResource(getResources(), R.mipmap.baozou), getWidth(), getHeight(), false);canvas.drawBitmap(mBitmap,0,0,mPaint);return;}
完整代码展示
public class View_ClipAnim extends View {private Paint mPaint;private Path mPath;private final float SINGLEREGION_HEIGHT=30;//每个长条的高度private Bitmap mBitmap;float cilpWidth=0;//矩形宽度public View_ClipAnim(Context context) {this(context,null);}public View_ClipAnim(Context context, @Nullable AttributeSet attrs) {this(context, attrs,0);}public View_ClipAnim(Context context, @Nullable AttributeSet attrs, int defStyleAttr) {super(context, attrs, defStyleAttr);init();}/*** 初始化画笔等*/private void init() {mPaint = new Paint(Paint.ANTI_ALIAS_FLAG);mPath = new Path();}@Overrideprotected void onSizeChanged(int w, int h, int oldw, int oldh) {mBitmap = Bitmap.createScaledBitmap(BitmapFactory.decodeResource(getResources(), R.mipmap.timg), w, h, false);cilpWidth=0;postInvalidate();super.onSizeChanged(w, h, oldw, oldh);}@Overrideprotected void onDraw(Canvas canvas) {super.onDraw(canvas);mPath.reset();//每次绘制之前先将Path重置for(int i=0;i*SINGLEREGION_HEIGHT<getHeight();i++){if(i%2==0){mPath.addRect(new RectF(0,i*SINGLEREGION_HEIGHT,cilpWidth,(i+1)*SINGLEREGION_HEIGHT), Path.Direction.CCW);}else {mPath.addRect(new RectF(getWidth()-cilpWidth,i*SINGLEREGION_HEIGHT,getWidth(),(i+1)*SINGLEREGION_HEIGHT), Path.Direction.CCW);}}canvas.clipPath(mPath);//根据路径裁切画布canvas.drawBitmap(mBitmap,0,0,mPaint);//在裁切后的画布上绘制图片if(cilpWidth>getWidth()){//当图片完全展示时替换图片mBitmap=Bitmap.createScaledBitmap(BitmapFactory.decodeResource(getResources(), R.mipmap.baozou), getWidth(), getHeight(), false);canvas.drawBitmap(mBitmap,0,0,mPaint);return;}cilpWidth+=5;//每次绘制完需要增加clipWidth的宽度invalidate();//重绘(运用递归)}}
扩展
扫描式图片展示


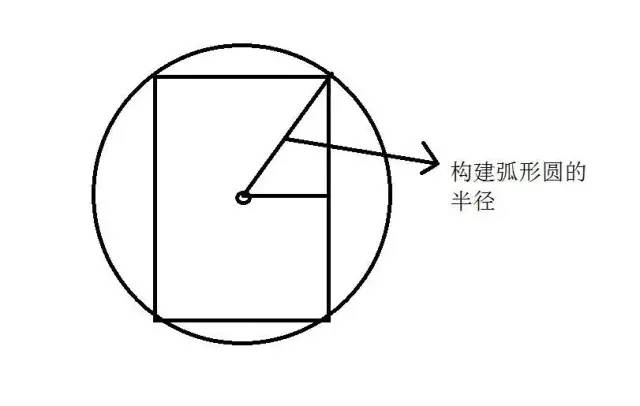
public class View_ClipCircleAnim extends View {private Paint mPaint;private float mRadius;//圆形的半径private Path mPath;private Bitmap mBitmap;private int mAngle=0;//圆形角度public View_ClipCircleAnim(Context context) {this(context,null);}public View_ClipCircleAnim(Context context, @Nullable AttributeSet attrs) {this(context, attrs,0);}public View_ClipCircleAnim(Context context, @Nullable AttributeSet attrs, int defStyleAttr) {super(context, attrs, defStyleAttr);init();}private void init() {mPaint = new Paint(Paint.ANTI_ALIAS_FLAG);mPath = new Path();}protected void onSizeChanged(int w, int h, int oldw, int oldh) {float a = w/2;float b = h/2;mRadius = (float) Math.sqrt(a*a+b*b);//根据勾股定理算出圆形的半径mBitmap = Bitmap.createScaledBitmap(BitmapFactory.decodeResource(getResources(), R.mipmap.timg), w, h, false);super.onSizeChanged(w, h, oldw, oldh);}protected void onDraw(Canvas canvas) {super.onDraw(canvas);canvas.translate(getWidth()/2,getHeight()/2);//将(0,0)点移动到画布中心if(mAngle>=360){canvas.drawBitmap(Bitmap.createScaledBitmap(BitmapFactory.decodeResource(getResources(), R.mipmap.baozou), getWidth(), getHeight(), false),-getWidth()/2,-getHeight()/2,mPaint);return;}mPath.reset();//清空路径mPath.moveTo(0,0);mPath.arcTo(new RectF(-mRadius,-mRadius,mRadius,mRadius),0,mAngle,false);//添加闭合的弧形canvas.clipPath(mPath);//裁剪画布为路径的形状canvas.drawBitmap(mBitmap,-getWidth()/2,-getHeight()/2,mPaint);mAngle++;postInvalidate();}}
评论
