
别再用GDB了,一文掌握Go最好用的调试器Delve
2024年我们将全面开启线下meetup,为了确保我们的活动能够满足大家的需求和兴趣,希望邀请大家一起参与投票,选择最适合的城市。
另外我们开放2024议题征集通道,欢迎各位有实战经验、独特观点的小伙伴勇跃分享~
议题提交扫这里~
👉 导读
Delve 是 Go 中使用最多的调试器,本文基于 Delve 对 Go 的调试进行了介绍。如果你对基于日志的调试感到无奈,不妨看一下本文。读完全文还可以参加文末龙年红包封面抽奖活动哦!👉 目录
1 Delve 1.1 dlv 安装1.2 内联和优化的关闭
1.3 dlv 中位置的定义
1.4 dlv 支持的表达式
1.5 使用 dlv 开启 debug 的几种方式
2 dlv 中相关命令 2.1 dlv 的配置 2.2 运行相关命令
2.3 断点相关命令 2.4 变量、内存查看相关
2.5 堆栈相关
2.6 查询相关命令
3 Goland 的支持 3.1 断点相关
3.2 变量、内存查看相关 3.3 协程、堆栈相关
01
Delve
Go 语言支持 GDB、LLDB 和 Delve 几种调试器。其中 GDB 是最早支持的调试工具,Delve 则是专门为 Go 语言设计开发的调试工具。在调试 Go 程序时,Delve 是 GDB 的更好替代方案,它比 GDB 更了解 Go 的运行时、数据结构和表达式。其源码位于 Delve 源码。
1.1 dlv 安装
参见 dlv 安装:https://github.com/go-delve/delve/tree/master/Documentation/installation
1.2 内联和优化的关闭
使用 dlv 进行调试,需要关闭编译器的内联、优化:
-
1.10及以后,编译时需指定-gcflags="all=-N -l"
-
1.10之前,编译时需指定-gcflags="-N -l"
1.3 dlv 中位置的定义
dlv 中多数命令涉及位置(下文的 locspec),位置的定义支持以下几种方式:
-
通过 Go 文件和行号指定,其格式为 filename:lineNo,如:
list aa/aa.go:15 // 打印aa.go:15上下5行的代码
- 通过包名和和函数名指定,其格式为 package.function,如:
trace content-service/iteminfo.GetItemV2 // 为包content-service/iteminfo中函数GetItemV2添加trace断点
- 通过当前文件中绝对、相对位置指定,其格式为 lineNo 或者 +offset/-offset,如:
> iteminfo..GetItemV2()./iteminfo/itemv2.go:52 (hits goroutine(970048):1 total:1) (PC: 0x22e0f46)47: rsp.Code = 048: return nil49: }50:51: // GetItemV2 _=> 52: func (i *ItemInfoServiceImpl) GetItemV2(ctx context.Context,53: req *iteminfopb.GetItemV2Request, rsp *iteminfopb.GetItemV2Reply) (err error) {54:55: debug.Stack()56:57: err = i.getItemV2Impl(ctx, req, rsp)(dlv) b 55 // 命中断点后,再次在本文件的55行添加断点,其id为2Breakpoint 2 set at 0x22e0f73 for iteminfo.GetItemV2() ./api/iteminfo/itemv2.go:55(dlv) b +5 // 命中断点后,再次在本文件的52+5行添加断点,其id为3Breakpoint 3 set at 0x22e0f78 for iteminfo..GetItemV2() ./api/iteminfo/itemv2.go:57(dlv) b -5 // 命中断点后,再次在本文件的52-5行添加断点,其id为4Breakpoint 4 set at 0x22e0ecc for iteminfo.getItemV2Impl() ./api/iteminfo/itemv2.go:47
1.4 dlv 支持的表达式
目前 dlv 中支持表达式(下文中 expr),包括:
-
基本类型的一元、二元操作(不支持++ 、--)、比较运算等,如 p 1+1、p 1<<2、p 1<2 等;
-
类型转换,包括数值类型间转换、string 和 []byte 间转换等,如 p float32(1)、p []byte("aaa") ;
-
成员访问,包括结构体、map、数组类型成员的访问,如 p mp["k"]、p arr[1] 。需要注意默认对于结构体,只打印2级的数据,如需多级数据访问,需要通过成员访问;
-
指针的相关操作,包括获取访问地址、指针的解引用等,如 p x.i、p *(x.i) 等
-
一些内建的函数,包括 cap、len 等,如 p len("aaa") ;
-
Interface 类型的断言,如 p iface1.(*struct astruct).B 或者 p iface1.(data).B ,需要注意两种表达方式是等价的;
-
一些内建的变量,如 p runtime.curg.sched ,具体可以通过 vars 命令查看,常用参数具体参见下表:
| 内置变量 | 说明 |
| runtime.defaultGOROOT | Go默认root路径 |
| runtime.buildVersion | 构建代码的Go版本号 |
| runtime.argc、runtime.argv | argc、argv信息 |
| runtime.gomaxprocs | 逻辑处理器数目 |
| runtime.ncpu | cpu数目 |
| runtime.curg | 当前线程的相关信息,具体参见curg定义 |
| time.Local | 当前时区信息 |
| .......... | |
需要注意,上述 p 命令为 print 命令简写,具体可参见2.3.1节
如下:
(dlv) c main.go:48Breakpoint 1 set at 0x4bf4a7 for main.main() ./main.go:48> main.main() ./main.go:48 (hits goroutine(1):1 total:1) (PC: 0x4bf4a7)43: a = uint8(i)44: x.TestC(i)45: }46: }47:=> 48: x.TestB()49:50: mp := make(map[string]string)51: var intData int52: if reflect.TypeOf(intData).AssignableTo(reflect.TypeOf(mp).Elem()) {53: log.Println("no")(dlv) p a9(dlv) p -a // 一元操作符,打印负a-9(dlv) p %3.2f float32(a) // 强制类型转换, 打印强制类型转换后结果9.00(dlv) p []byte("aaa") // string和byte的转换, 打印[]byte类型"aaa"[]uint8 len: 3, cap: 3, [97,97,97](dlv) p x.i // 成员的访问, 打印x.i的值0(dlv) p &x.i // 获取变量地址, 打印x.i的地址(*int)(0xc000193e30)(dlv) p *((*int)(0xc000193e30)) // 指针的解引用, 打印x.i的值0(dlv) p len("abc") // 内置函数调用,打印abc的长度3(dlv) p animial.(*main.Cat).s // interface的断言"test"(dlv) p animial.(data).s // interface的断言、成员访问"test"(dlv) p runtime.curg.sched // 内置变量的访问, 打印runtime.curg.sched的值runtime.gobuf {sp: 0, pc: 4438237, g: 824633745824, ctxt: unsafe.Pointer(0x0), ret: 0, lr: 0, bp: 0}
1.5 使用 dlv 开启 debug 的几种方式
1.5.1 开启 debug 时的一些可选参数
- 参数传递,debug 时传递参数需要通过--(其主要作用为分割命令和参数)。如下:
[]
也可在 restart 时指定参数,如下:
[]Type 'help' for list of commands.(dlv) r -cfg config.yaml // 此时不需要--Process restarted with PID 29548(dlv) c
- --headless, --listen 启动 debug server、设定 debug server 监听地址,--headless、--listen 通常会与 dlv attach 联合用于远程调试。
目前123的测试环境(测试、pre)与 devCloud 网络是连通的,能够进行远程调试。其操作步骤,参见1.5.3 节
1.5.2 开启 debug 的方式
需要注意本节中 flags 参数指的是1.5.1中参数。
-
#### dlv debug、dlv exec
默认 dlv debug 会查找当前目录中的 main.main,编译、并开启 debug。其格式如下:
dlv debug [package] [flags]
需要注意,可以通过 package 指定要 debug 的包
与之对应,dlv exec 需要指定一个可执行程序。如下:
dlv exec <path/to/binary>
-
#### dlv attach
dlv 提供了进程的 attach 支持,使用 dlv 可以对运行中的进程进行调试。考虑到123测试环境和 devCloud 的网络已经打通,使用该机制可以非常方便的进行远程调试,如下:
dlv attach pid
在123和 devCloud 间进行远程调试步骤:
-
123开启 debug server:
dlv attach pid - devCloud 链接到远程服务器进行调试:
root /mnt/code/content_service]# dlv connect xx.xx.xx.xx:2346 // 链接到远程debug serverType 'help' for list of commands.(dlv) funcs GetItemV2git.code.oa.com/ForwardIndex/content-service/api/service/iteminfo.(*ItemInfoServiceImpl).GetItemV2git.code.oa.com/ForwardIndex/content-service/api/service/iteminfo.(*ItemInfoServiceImpl).GetItemV2Data......
需注意,devCloud 只能连接到123的测试、预发布环境,无法连接到正式环境。办公网无法连接到123环境
-
#### dlv core
dlv 也对 coredump 调试提供了支持,使用 dlv core 可以方便的对线上 coredump 进行调试、分析,发现相关问题。其使用方法如下:
          dlv core <executable> <core> [flags]


          // executeable 即为可执行程序 core为相关coredump文件
Go 中使用 dlv 进行 core dump 调试一般步骤:
1.修改操作系统限制, 略。目前相关镜像都已经进行了配置;
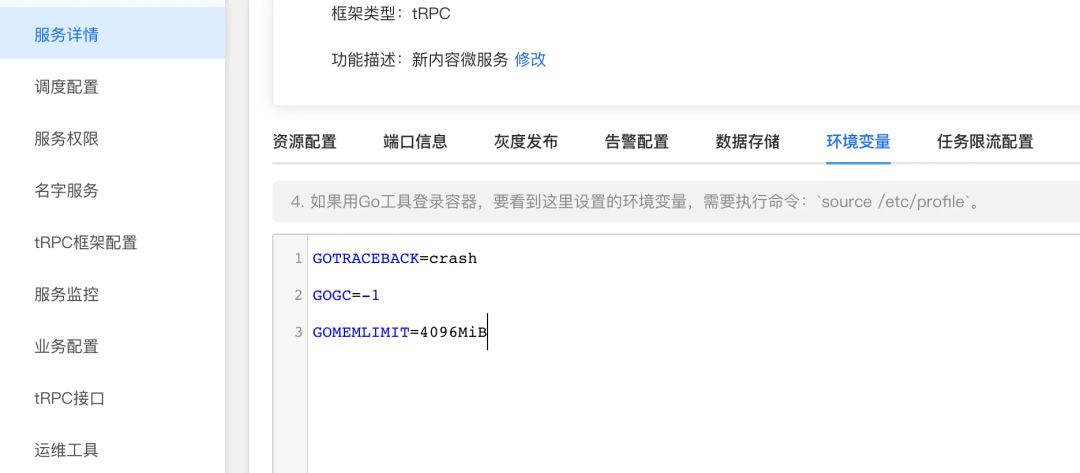
2.设置 GOTRACEBACK,123为服务配置环境变量 GOTRACEBACK=crash,如下:
需要注意,如果此时启用了 recovery 相关机制,协程内的 panic 并不会导致 coredump,此时可在 /usr/local/app/serverHistory.log 中查看相关原因
需要注意,默认 coredump 文件会在可执行程序所在目录,如果需改变位置请修改 /proc/sys/kernel/core_pattern
3.通过 bt ,查看调用堆栈,定位可能的问题发生的位置。
[root@b0f67f8932a2 /mnt/code/gotest667]# dlv core main core.28183Type 'help' for list of commands.(dlv) bt0 0x0000000000460fe1 in runtime.raiseat /usr/local/go1.20/go/src/runtime/sys_linux_amd64.s:154.........10 0x0000000000497358 in gotest667/aa.(*Xxx).TestC // 离panic最近的用户逻辑是最有可能导致panic的位置at ./aa/aa.go:2611 0x0000000000497358 in main.mainat ./main.go:4412 0x0000000000434507 in runtime.mainat /usr/local/go1.20/go/src/runtime/proc.go:25013 0x000000000045f6c1 in runtime.goexitat /usr/local/go1.20/go/src/runtime/asm_amd64.s:1598
4.通过 frame 命令,移动到相关栈帧,通过 args -v、locals -v 等收集问题发生时各种数据。
(dlv) frame 10 // 移动到可能的函数栈帧> runtime.raise() /usr/local/go1.20/go/src/runtime/sys_linux_amd64.s:154 (PC: 0x460fe1)Warning: debugging optimized functionFrame 10: ./aa/aa.go:26 (PC: 497358)21:22: func (x *Xxx) TestC(i int) {23: x.TestA(i)24: j := 025: for ; j < i; j++ {=> 26: y[j] = i27: }28: }29:30: func (x *Xxx) TestE() {31: x.i++(dlv) locals -v // 查看局部变量j = (unreadable could not find loclist entry at 0x7076 for address 0x497358)(dlv) args -v // 查看函数入参i = (unreadable could not find loclist entry at 0x6ff1 for address 0x497358)(dlv) vars -v gotest667/aa.y // 查看全局变量gotest667/aa.y = []int len: 3, cap: 3, [4,4,4]
5.根据已有相关数据,对问题进行定位、分析。
02
dlv 中相关命令
2.1 dlv 的配置
dlv 配置默认包含2种方式,基于命令、基于配置文件。需要注意,基于命令的修改是 session 级的,重启 debug 相关配置会丢失。
linux 下 dlv 配置文件默认位于$HOME/.config/dlv/config.yml,其常用配置项包含:
substitute-path: // 用于配置代码查找、替换路径。比如mac发布代码,devcloud进行调试- {from: $HOME/go/src/content-service, to: /mnt/code/content_service}max-string-len: 99999 // 打印string的最大长度,如果调试时候无法打印string的全部值,可修改此变量max-array-values: 99999 // 打印array等的最大长度aliases:command: ["alias"] // 为命令command设置别名alias,如display: ["dis"]
对应的相应命令包括:
config -list // 列出所有配置项config -save // 保存配置信息至文件config max-string-len 9999 // 设置打印最大string长度为9999config max-array-values 9999 // 设置打印最大数组长度为9999config substitute-path <from> <to> // 设置代码查找、替换路径。需要注意此时不执行save命令,相关配置不会更新
以 substitute-path 为例(mac 编译发布、devCloud 调试,二者路径不同),配置前后对比如下:
配置前:
(dlv) b api/service/iteminfo.(*ItemInfoServiceImpl).GetItemV2Breakpoint 1 set at 0x183d006 for api/service/iteminfo.(*ItemInfoServiceImpl).GetItemV2() api/service/iteminfo/itemv2.go:51(dlv) c> api/service/iteminfo.(*ItemInfoServiceImpl).GetItemV2() api/service/iteminfo/itemv2.go:51 (hits goroutine(6999):1 total:1) (PC: 0x183d006) // 此时命中断点未打印任何信息Warning: debugging optimized function
配置后:
(dlv) b api/service/iteminfo.(*ItemInfoServiceImpl).GetItemV2Breakpoint 1 set at 0x183d006 for api/service/iteminfo.(*ItemInfoServiceImpl).GetItemV2() ./api/service/iteminfo/itemv2.go:51(dlv) c> api/service/iteminfo.(*ItemInfoServiceImpl).GetItemV2() ./api/service/iteminfo/itemv2.go:51 (hits goroutine(5462):1 total:1) (PC: 0x183d006) // 命中断点,打印了相关调试信息Warning: debugging optimized function46: rsp.Code = 047: return nil48: }49:50: // GetItemV2 _=> 51: func (i *ItemInfoServiceImpl) GetItemV2(ctx context.Context,52: req *iteminfopb.GetItemV2Request, rsp *iteminfopb.GetItemV2Reply) (err error) {53:54: err = i.getItemV2Impl(ctx, req, rsp)55: return err56: }(dlv)
2.2 运行相关命令
2.2.1 restart、exit
restart、exit 分 别用于重启进程、退出调试,其命令格式分别如下:
restart // 重启被调试进程,此时并未开始debug,还需要运行continue命令exit // 退出调试
需注意,restart 只会重启进程,并不会真正开始调试。启动调试需要用 continue
其相关别名(简写)如下:
| 命令 | 简写 | 说明 |
| restart | r | 重启调试进程 |
| exit | q | 退出调试 |
2.2.2 continue
continue 会持续运行直到断点、位置或者程序结束,其命令格式如下:
continue [locspec]
需要注意,continue 命令支持直接运行到文件中某行、或者某个函数
continue 命令的别名为: c。
其用法如下:
(dlv) c main.go:48 // 运行调试,直至main.go:48Breakpoint 1 set at 0x4bf4a7 for main.main() ./main.go:48> main.main() ./main.go:48 (hits goroutine(1):1 total:1) (PC: 0x4bf4a7)43: a = uint8(i)44: x.TestC(i)45: }46: }47:=> 48: x.TestB() // 此时会在main.go:48行暂停运行.........
2.2.3 next、step、step out
| 命令 | 简写 | 说明 |
| next | n | 单步调试 |
| step | s | 单步调试(进入调试函数) |
| step out | so | 单步调试(退出调试函数) |
其效果略。
2.3 断点相关命令
2.3.1 dlv 中断点
dlv 中断点包含以下几种:
-
trace 断点
trace 断点用于在命中断点时,打印相关提示信息。在查看实现、或者调用路径时比较有用。
trace 断点命令格式如下:
trace [name] [locspec]
// name为断点名// 省略所有参数,默认会在当前行添加trace断点
其效果如下:
(dlv) trace test api/service/iteminfo.(*ItemInfoServiceImpl).GetItemV2 // 设置名为test的trace断点Tracepoint test set at 0x1843446 for api/service/iteminfo.(*ItemInfoServiceImpl).GetItemV2() ./api/service/iteminfo/itemv2.go:51(dlv) c> goroutine(2935359): [test] api/service/iteminfo.(*ItemInfoServiceImpl).GetItemV2(("*api/service/iteminfo.ItemInfoServiceImpl")(0x3da4940), context.Context(*context.valueCtx) 0xbeef000000000108, ("*fwd_content_service_iteminfo.GetItemV2Request")(0xc02ebbf5c0), ("*fwd_content_service_iteminfo.GetItemV2Reply")(0xc06eae7b30)) // trace断点命中,打印相关信息,未暂停程序运行>> goroutine(2935359): => ((unreadable empty OP stack))
需要注意,trace断点只会打印相关信息,不会暂停程序的运行
-
break 断点
break 断点(即 breakpoint,其简写为 b)会在命中断点时,暂停程序的运行。其命令格式如下:
          break [name] [locspec]


            // name为断点名
其效果如下:
(dlv) b test api/service/iteminfo/itemv2.go:51 // 新增名为test的断点位于itemv2.go:51Breakpoint test set at 0x1843446 for api/service/iteminfo.(*ItemInfoServiceImpl).GetItemV2() ./api/service/iteminfo/itemv2.go:51(dlv) c> [test] api/service/iteminfo.(*ItemInfoServiceImpl).GetItemV2() ./api/service/iteminfo/itemv2.go:51 (hits goroutine(2941592):1 total:1) (PC: 0x1843446)Warning: debugging optimized function46: rsp.Code = 047: return nil48: }49:50: // GetItemV2 _=> 51: func (i *ItemInfoServiceImpl) GetItemV2(ctx context.Context,52: req *iteminfopb.GetItemV2Request, rsp *iteminfopb.GetItemV2Reply) (err error) { // 命中断点,暂停程序运行.......
需要注意,无论是 trace 断点、break 断点,都可在添加断点时候,为断点命名
-
watch 断点
watch 断点,会在被监视对象(或者地址),在发生读、写时暂停程序运行并打印相关信息,其命令如下:
watch [-r|-w|-rw] <expr>
-r stops when the memory location is read-w stops when the memory location is written-rw stops when the memory location is read or written
// expr为1.4中表达式
其执行效果如下:
(dlv) c main.go:41Breakpoint 1 set at 0x4bf48a for main.main() ./main.go:41default> main.main() ./main.go:41 (hits goroutine(1):1 total:1) (PC: 0x4bf48a)36: x := aa.Xxx{}37: t := true38:39: time.Sleep(1 * time.Second)40:=> 41: if t {42: for i := 0; i < 10; i++ {43: a = uint8(i)44: x.TestC(i)45: }46: }(dlv) p a(*uint8)(0x59d241)(dlv) watch -rw * (*uint8) (0x59d241) // 添加watch pointWatchpoint * (*uint8) (0x59d241) set at 0x59d241(dlv) c> watchpoint on [* (*uint8) (0x59d241)] main.main() ./main.go:44 (hits goroutine(1):1 total:1) (PC: 0x4bf70f)39: time.Sleep(1 * time.Second)40:41: if t {42: for i := 0; i < 10; i++ {43: a = uint8(i)=> 44: x.TestC(i) // 在a被第一次写时,程序暂停运行45: }46: }.......
2.3.2 断点相关命令
-
condition 命令
condition(其简写为 cond)命令用于只在条件满足后暂停程序执行,比如要调试的 slice 或者 map 含有较多元素,我们只关心其中某个。其命令如下:
condition <breakpoint name or id> <boolean expression>
// <breakpoint name or id> 为已经存在的breakpoint名或者id// dlv会在<boolean expression>为true时暂停程序运行
需要注意,cond 命令必须作用于已存在的断点上
如下:
(dlv) b main.go:43 // 在main.go:43添加断点,其id为1Breakpoint 1 set at 0x4bf704 for main.main() ./main.go:43(dlv) cond 1 i==3 // 断点1在i==3时暂停(dlv) c> main.main() ./main.go:43 (hits goroutine(1):1 total:1) (PC: 0x4bf704)38:39: time.Sleep(1 * time.Second)40:41: if t {42: for i := 0; i < 10; i++ {=> 43: a = uint8(i) // i==3时暂停程序执行44: x.TestC(i)45: }46: }47:48: x.TestB()(dlv) p i3.........
-
on 命令
on 命令用于在命中断点时执行一些操作,目前支持的操作包括:print、stack、goroutine、trace、cond。
其命令格式如下:
on <name or id> <command>
需要注意,on 命令也只能作用于已经存在的断点
需要注意,on 命令是可以用于 trace 断点的
以命中断点,打印某些变量值为例,其具体操作如下:
(dlv) b main.go:43 // 添加断点,其id为1Breakpoint 1 set at 0x4bf704 for main.main() ./main.go:43(dlv) on 1 p a // 命中断点1时 打印a的值(dlv) c> main.main() ./main.go:43 (hits goroutine(1):1 total:1) (PC: 0x4bf704)a: 10 // 先打印a的值38:39: time.Sleep(1 * time.Second)40:41: if t {42: for i := 0; i < 10; i++ {=> 43: a = uint8(i)44: x.TestC(i)45: }46: }47:48: x.TestB()(dlv)
-
其他
其他断点相关命令如下:
| 命令 | 简写 | 使用方法 | 说明 |
| breakpoints | bp | bp | 打印当前所有断点(所有类型)信息 |
| toggle | - | toggle <breakpoint name or id> | 禁用breakpoint |
| clear | - | clear <breakpoint name or id> | 删除breakpoint |
| clearall | - | clearall | 删除所有(所有类型)断点 |
2.4 变量、内存查看相关
2.4.1 print
print 用于打印变量或表达式的值,其用法如下:
print [%format] <expr>
需要注意 print 支持 fmt 系列的选项,常用包含:%f %x %v %T 等
其执行效果参见1.4
2.4.2 args、locals、vars
args 命令用于打印函数的入参,其用法如下
args -v [<regex>] // args命令在-v参数下会打印更详细数据
locals 用于打印局部变量,其用法如下:
locals [-v] [<regex>] // -v用于打印更详细信息
vars 用于打印包级变量,其用法如下:
vars [-v] [<regex>] // -v参数能够打印更详细数据
需要注意,vars 不只能打印自定义的包级别变量,也可以打印内置的包级变量,如 runtime.curg 等
以 args 为例,其输出如下:
(dlv) argsi = ("*api/service/iteminfo.ItemInfoServiceImpl")(0x3da4940)ctx = context.Context(*context.valueCtx) 0xbeef000000000108req = ("*fwd_content_service_iteminfo.GetItemV2Request")(0xc03b80aa80)rsp = ("*fwd_content_service_iteminfo.GetItemV2Reply")(0xc03bf10960)err = (unreadable empty OP stack)(dlv) args -vi = ("*api/service/iteminfo.ItemInfoServiceImpl")(0x3da4940)*api/service/iteminfo.ItemInfoServiceImpl {}ctx = context.Context(*context.valueCtx) *{Context: context.Context(*context.valueCtx) *{Context: context.Context(*context.valueCtx) ...,key: interface {}(go.opentelemetry.io/otel/trace.traceContextKeyType) *(*interface {})(0xc0cf8d6e20),val: interface {}(go.opentelemetry.io/otel/trace.nonRecordingSpan) *(*interface {})(0xc0cf8d6e30),},key: interface {}(go.opentelemetry.io/otel/trace.traceContextKeyType) currentSpanKey (0),val: interface {}(*go.opentelemetry.io/otel/sdk/trace.recordingSpan) *{mu: (*sync.Mutex)(0xc03b1a0f00),.........
需要注意,args、locals、vars 等通常与 dlv core 一起用于问题的定位与分析
以 args 为例,其输出如下:
2.4.3 display
display -a [%format] <expr> // 添加需要展示的表达式或者变量display -d <number> // 删除相关display信息
// %format为fmt系列格式化字符串
其执行效果如下:
(dlv) display -a %v tools.isProdEnv // 每次程序暂停打印tool.isProdEnv值, 其id为00: pkg/tools.isProdEnv = true(dlv) c> api/service/iteminfo.(*ItemInfoServiceImpl).GetItemV2() ./api/service/iteminfo/itemv2.go:51 (hits goroutine(2945141):1 total:1) (PC: 0x1843446)Warning: debugging optimized function46: rsp.Code = 047: return nil48: }49:50: // GetItemV2 _=> 51: func (i *ItemInfoServiceImpl) GetItemV2(ctx context.Context,52: req *iteminfopb.GetItemV2Request, rsp *iteminfopb.GetItemV2Reply) (err error) {53:54: err = i.getItemV2Impl(ctx, req, rsp)55: return err56: }0: pkg/tools.isProdEnv = true // 打印pkg/tools.isProdEnv(dlv) display -d 0 // 移除相关display机制
display 相关机制类似于 on 命令的 print,但 on 命令比 print 支持更多功能
2.4.4 set
set <variable> = <value>
需要注意,如果相关变量的 set 是可以影响函数的执行路径的,但 set 命令需要提前执行
(dlv) cdefault> main.main() ./main.go:39 (hits goroutine(1):1 total:1) (PC: 0x4bf480)34: a = 1035:36: x := aa.Xxx{}37: t := false38:=> 39: time.Sleep(1 * time.Second)40:41: if t {42: for i := 0; i < 10; i++ {43: a = uint8(i)44: x.TestC(i)(dlv) p t // t的值此时为falsefalse(dlv) set t=true // 设置t的值为true(dlv) c main.go:42> main.main() ./main.go:42 (PC: 0x4bf493)37: t := false38:39: time.Sleep(1 * time.Second)40:41: if t {=> 42: for i := 0; i < 10; i++ { // 此时已经可以进入到if43: a = uint8(i)44: x.TestC(i)45: }46: }47:(dlv)
2.4.5 whatis
whatis <expr>
如下:
(dlv) c main.go:30Breakpoint 1 set at 0x4bf46f for main.main() ./main.go:30> main.main() ./main.go:30 (hits goroutine(1):1 total:1) (PC: 0x4bf46f)25:26: func main() {27: var animial Animial = Cat{s: "test"}28: animial.bark()29:=> 30: flag.StringVar(cfg, "cfg", "default", "-cfg")31: flag.Parse()32:33: fmt.Println(cfg)34: a = 1035:(dlv) whatis animial // 打印animial类型main.AnimialConcrete type: *main.Cat(dlv) whatis animial.s // 打印animial.s类型string
2.4.6 examinemem
examinemem [-fmt <format>] [-count <count>] [-size <size>] <address>
其中 fmt 支持 bin、hex、oct,-count 和 -size 分别用于指定要打印的次数、空间大小,用法如下:
(dlv) c main.go:43Breakpoint 1 set at 0x4bf704 for main.main() ./main.go:43default> main.main() ./main.go:43 (hits goroutine(1):1 total:1) (PC: 0x4bf704)38:39: time.Sleep(1 * time.Second)40:41: if t {42: for i := 0; i < 10; i++ {=> 43: a = uint8(i)44: x.TestC(i)45: }46: }47:48: x.TestB()(dlv) p a10(dlv) p &a(*uint8)(0x59d241)(dlv) x -fmt hex -count 2 -size 1 0x59d241 // 以16机制打印0x59d241地址开始内容2次,每次1byte0x59d241: 0x0a 0x01(dlv) x -fmt hex -count 1 -size 2 0x59d241 // 以16机制打印0x59d241地址开始内容1次,每次2byte0x59d241: 0x010a(dlv)
2.5 堆栈相关
2.5.1 stack
stack 命令用于打印调用堆栈,其简写命令为 bt,用法如下:
[] stack [<depth>] [-full]
// goroutine <n> 指定要打印堆栈的协程// depth 打印0-depth层堆栈// -full 打印相关入参、局部变量
其用法如下:
(dlv) grs // 列出所有协程.......Goroutine 19 - User: /root/go/pkg/mod/github.com/panjf2000/ants/v2@v2.4.6/pool.go:69 github.com/panjf2000/ants/v2.(*Pool).purgePeriodically (0x95552b) [chan receive]......(dlv) gr 19 bt 3 -full // 打印协程19的前0-3个函数栈帧信息0 0x000000000043de36 in runtime.goparkat /usr/local/go1.20/go/src/runtime/proc.go:382.......
1 0x0000000000408cbd in runtime.chanrecvat /usr/local/go1.20/go/src/runtime/chan.go:583c = (*runtime.hchan)(0xc000168060)ep = unsafe.Pointer(0xc00013a798)block = trueselected = (unreadable empty OP stack)received = (unreadable empty OP stack)~R0 = (unreadable empty OP stack)t0 = 0gp = (*runtime.g)(0xc000207380)mysg = (*runtime.sudog)(0xc0001680c0)
2 0x00000000004087f8 in runtime.chanrecv2at /usr/local/go1.20/go/src/runtime/chan.go:447c = (unreadable could not find loclist entry at 0x10dde for address 0x4087f8)elem = (unreadable could not find loclist entry at 0x10e11 for address 0x4087f8)received = (unreadable empty OP stack)
3 0x000000000095552b in github.com/panjf2000/ants/v2.(*Pool).purgePeriodicallyat /root/go/pkg/mod/github.com/panjf2000/ants/v2@v2.4.6/pool.go:69p = ("*github.com/panjf2000/ants/v2.Pool")(0xc0002cdb20)heartbeat = (unreadable could not find loclist entry at 0x7668bf for address 0x95552b)
2.5.2 frame、up、down
frame、up、down 都用于移动栈帧并执行命令,frame 用于移动到指定栈帧、up 和 down 分别用于向上和向下移动栈帧。其用法如下:
frame <m> command // 移动到栈帧m,执行commandup <m> command // 向上移动m个栈帧,执行commanddown <m> command // 向下移动m个栈帧,执行command
其执行效果如下图:
bt........6 0x0000000001cffc5d in main.glob..func1at ./main.go:99.......frame 6 args -v // 打印栈帧6的入参ctx = context.Context(*context.valueCtx) *{...}req = interface {}(*git.woa.com/trpcprotocol/forwardindex/fwd_content_service_iteminfo.GetItemV2Request) *{state: google.golang.org/protobuf/internal/impl.MessageState {NoUnkeyedLiterals: google.golang.org/protobuf/internal/pragma.NoUnkeyedLiterals {},DoNotCompare: google.golang.org/protobuf/internal/pragma.DoNotCompare [],DoNotCopy: google.golang.org/protobuf/internal/pragma.DoNotCopy [],atomicMessageInfo: *(*"google.golang.org/protobuf/internal/impl.MessageInfo")(0xc001323fb0),},sizeCache: 0,unknownFields: []uint8 len: 0, cap: 0, nil。。。。。。。。。
2.6 查询相关命令
2.6.1 常用查询命令
注意以下命令都支持正则匹配。
| 命令 | 简写 | 说明 |
| funcs | - | 打印所有函数信息 |
| goroutines | grs | 打印所有协程信息 |
| threads | - | 列出所有线程信息 |
| sources | - | 列出所有源文件 |
| types | - | 列出所有类型 |
2.6.2 groutine
groutine 命令用于打印当前协程信息、或者切换到指定协程执行命令,其使用方式如下:
goroutine [<id>] [<command>] // 切换到相应groutine,执行command
(dlv) gr 6 bt 2 -full // 打印id为6的协程的堆栈信息0 0x000000000043de36 in runtime.gopark.......
1 0x000000000044e51e in runtime.selectgo........
2 0x000000000118dc87 in github.com/RussellLuo/timingwheel.(*TimingWheel).Start.func2at /root/go/pkg/mod/github.com/!russell!luo/timingwheel.0.0-20191022104228-f534fd34a762/timingwheel.go:145
2.6.3 list
list 命令用于打印源码,list 会打印指定位置上下5行源码,其用法如下:
[goroutine <n>] [frame <m>] list [<locspec>] // 查看到某个goroutine的某个函数调用栈帧的源码
(dlv) gr 6 frame 1 listGoroutine 6 frame 1 at /usr/local/go1.20/go/src/runtime/select.go:327 (PC: 0x44e51e)322: // Signal to anyone trying to shrink our stack that we're about323: // to park on a channel. The window between when this G's status324: // changes and when we set gp.activeStackChans is not safe for325: // stack shrinking.326: gp.parkingOnChan.Store(true)=> 327: gopark(selparkcommit, nil, waitReasonSelect, traceEvGoBlockSelect, 1)328: gp.activeStackChans = false329:330: sellock(scases, lockorder)331:332: gp.selectDone.Store(0)
03
Goland 的支持
Goland 对 dlv 相关机制提供了支持。
Goland 中 debug 相关机制都位于 debug 面板,可通过 view->tool windows->debug 打开。debug 面板默认包含2部分,分别用于展示协程信息、堆栈信息、数据信息,如下:

3.1 断点相关
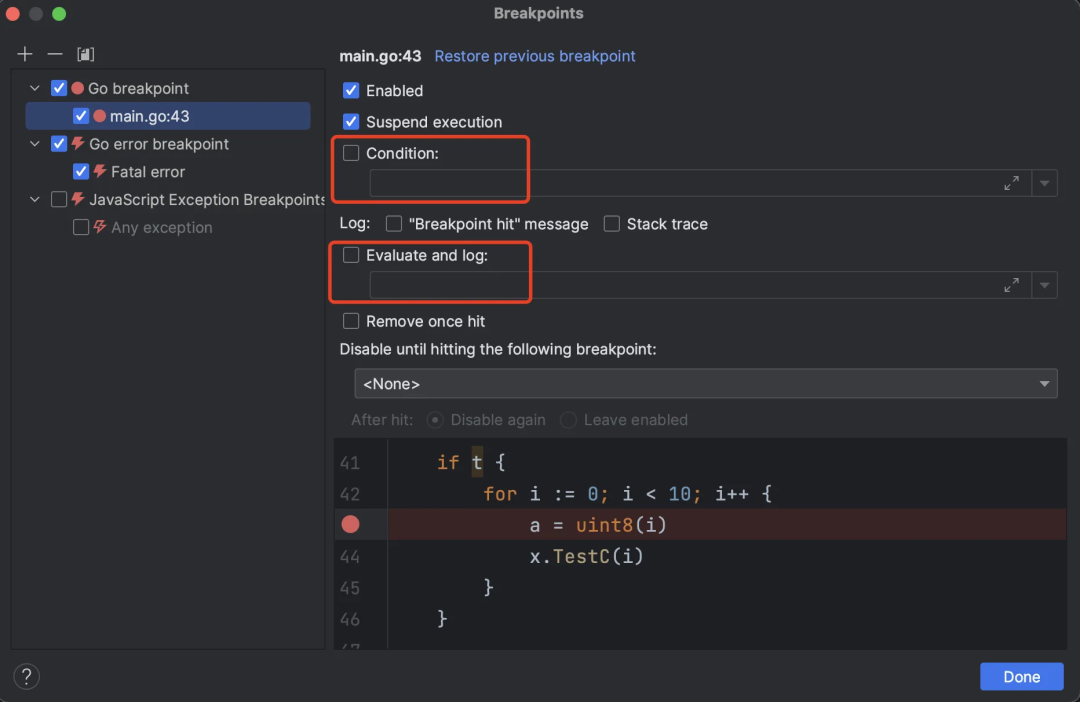
Goland 中断点相关支持,主要是 evaluate and log、condition 相关机制,具体如下:
-
evaluate and log,调试过程中 console 打印相关表达式或变量的值;
-
condition,只有在命中断点 && 相关条件成立时才会暂停程序运行。
在 Goland 中添加断点后,只需要在相关断点右键并单击 More,在弹出对话框中既可使用相关机制:
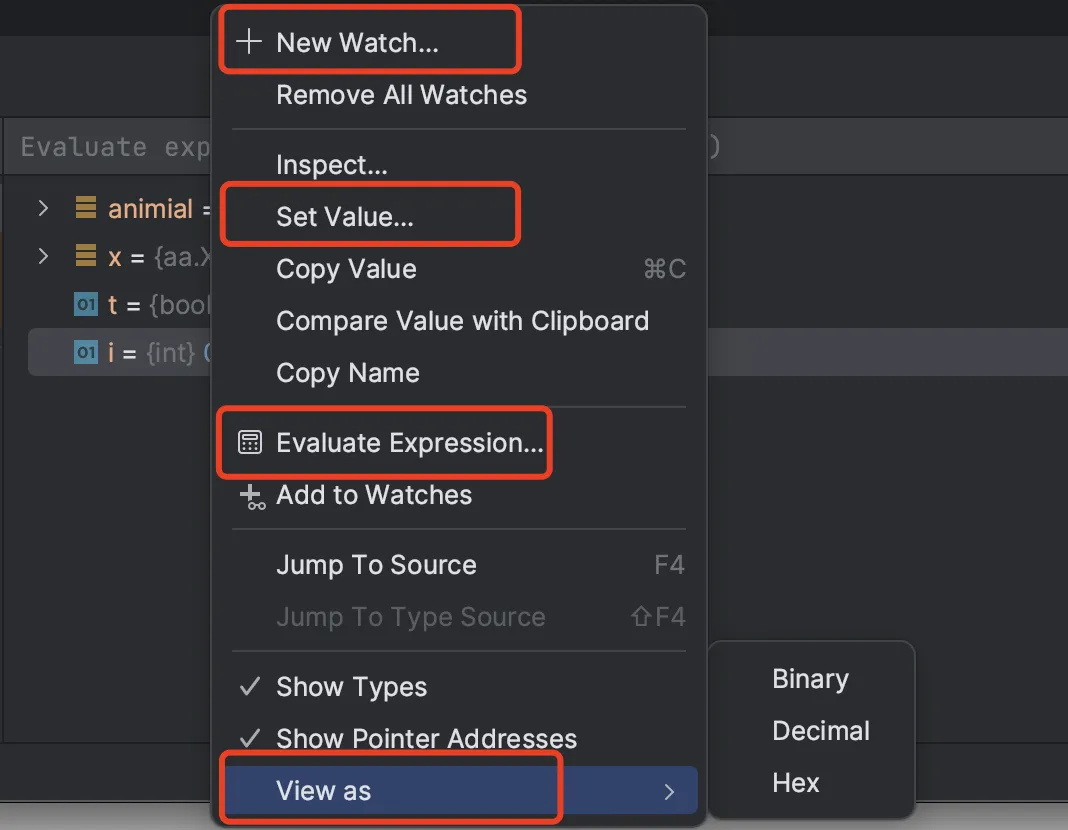
3.2 变量、内存查看相关
Goland 对 debug 中变量、内存查看的支持,主要是 evalute expression、watch、view as、set 相关机制,在 debug 面板右键即可添加相关机制,如下:
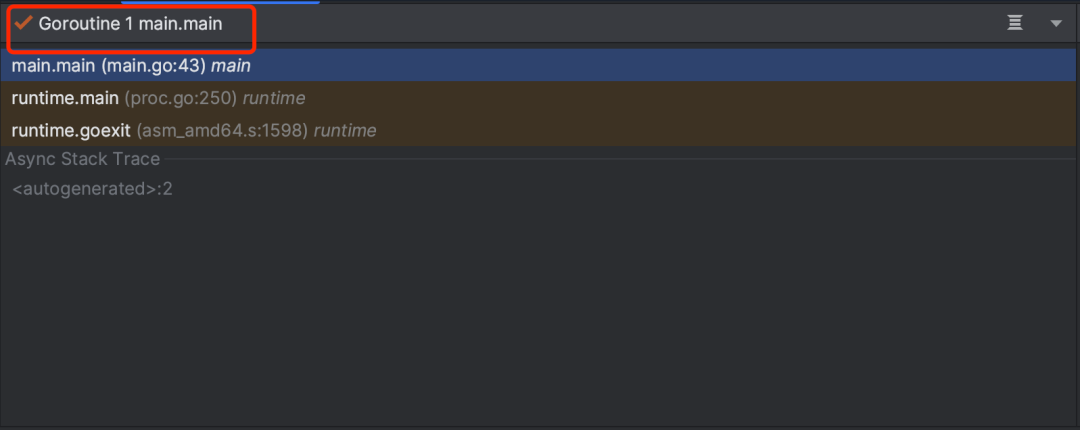
3.3 协程、堆栈相关
Goland 对 debug 中协程、堆栈等也提供了支持,默认展示的是当前协程的调用堆栈,可通过下拉列表进行选择,如下:
-End- 原创作者|张玉新
推荐阅读:
想要了解Go更多内容,欢迎扫描下方👇关注公众号, 回复关键词 [实战群] ,就有机会进群和我们进行交流
分享、在看与点赞Go
