天气数据采集微服务的实现:数据采集组件、数据存储组件
天气数据采集微服务的实现
天气数据采集服务包含数据采集组件、数据存储组件。其中,数据采集组件是通用的用于采集天气数据的组件,而数据存储组件是用于存储天气数据的组件。
在micro-weather-report应用的基础上,我们将对其进行逐步的拆分,形成一个新的微服务
msa-weather-collection-server应用。

所需环境
为了演示本例子,需要采用如下开发环境。
. JDK8。
. Gradle 4.0。
. Spring Boot Web Starter 2.0.0.M4。
.Apache HttpClient 4.5.3。
. Spring Boot Data Redis Starter 2.0.0.M4。
.Redis 3.2.100。
. Spring Boot Quartz Starter 2.0.0.M4。
. Quartz Scheduler 2.3.0。
新增天气数据采集服务接口及实现
在
com.waylau.spring.cloud.weather.service包下,我们定义了该应用的天气数据采集服务接口WeatherDataCollectionService。
public interface WeatherDataCollectionService {
/**
*根据城市工D同步天气数据
*
*@param cityId
*@return
*/
void syncDataByCityId(String cityId);
}
WeatherDataCollectionService只有一个同步天气数据的方法。WeatherDataCollectionServicelmpl是对WeatherDataCollectionService接口的实现。
package com.waylau.spring.cloud.weather.service;
import java.util.concurrent.TimeUnit;
import org.slf4j.Logger;
import org.slf4j-LoggerFactory;
import org.springframework.beans.factory.annotation.Autowired;
import org.springframework.data.redis.core.StringRedisTemplate;
import org.springframework.data.redis.core.ValueOperations;
import org.springframework.http.ResponseEntity;
import org.springframework.stereotype.Service;
import org.springframework.web.client.RestTemplate;
/*★
*天气数据采集服务.
*
*@since 1.o.0 2017年10月29日
* @author Way Lau
*/
@service
public class WeatherDataCollectionServicelmpl implements WeatherData
CollectionService {
private final static Logger logger = LoggerFactory.getLogger(Weather
DatacollectionServicelmpl.class);
@Autowired
private RestTemplate restTemplate;
@Autowired
private stringRedisTemplate stringRedisTemplate;
private final String WEATHER_API = "http://wthrcdn.etouch.cn/weather_mini";
private final Long TIME_OUT = 1800L;//缓存超时时间
@override
public void syncDataByCityId(String cityId) {
logger.info ("Start同步天气.cityId: "+cityId);
String uri = WEATHER_API +"?citykey=" +cityId;
this.saveweatherData (uri);
logger.info("End同步天气");
private void saveWeatherData(String uri) {
ValueOperations ops= this.stringRedisTemplate.
opsForValue() ;
String key = uri;
String strBody = null;
ResponseEntity response = restTemplate.getForEntity(uri,
String.class);
if(response.getStatusCodeValue()=-200) f
strBody=response.getBody(;
ops.set(key,strBody,TIME_OUT,TimeUnit.SECONDS);
}
}
WeatherDataCollectionServiceImpl的实现过程,我们在之前的章节中也已经详细介绍过,大家也已经非常熟悉了。无非就是通过REST客户端去调用第三方的天气数据接口,并将返回的数据直接放入Redis存储中。
同时,我们需要设置Redis数据的过期时间。
修改天气数据同步任务
对于天气数据同步任务WeatherDataSyncJob,我们要做一些调整。把之前所依赖的CityData-Service、WeatherDataService改为
WeatherDataCollectionService。
import java.util.ArrayList;
import java.util.List;
import org.quartz.JobExecutionContext;
import org.quartz.JobExecutionException;
import org.slf4j-Logger;
import org.slf4j.LoggerFactory;
import org.springframework.beans.factory.annotation.Autowired;
import org.springframework.scheduling.quartz.QuartzJobBean;
import com.waylau.spring.cloud.weather.service.WeatherDataCollection
service;
import com.waylau.spring.cloud.weather.vo.City;
*★
天气数据同步任务.
*
*@since 1.0.0 2017年10月29日
* author "https://waylau.com">Way Lau
*/
public class WeatherDataSyncJob extends QuartzJobBean
private final static Logger logger = LoggerFactory.getLogger(Weather
DatasyncJob.class);
@Autowired
private WeatherDataCollectionService weatherDataCollectionService;
@override
protected void executeInternal (JobExecutionContext context) throws
JobExecutionException{
logger.info("'Start天气数据同步任务");
/TODO改为由城市数据API微服务来提供数据
工istcityList =null;
trY {
//TODO 调用城市数据APT
cityList = new ArrayEist<>();
City city = new City();
city.setCityId("101280601");
cityList.add(city);
}catch(Exception e){
logger.error("获取城市信息异常!",e);
throw new RuntimeException("获取城市信息异常!",e);
}
for(City city : cityList){
String cityld = city.getCityld(;
logger.info("天气数据同步任务中,cityId:" +cityId);
//根据城市ID同步天气数据
weatherDataCollectionService.syncDataByCityId(cityId);
logger.info("End 天气数据同步任务");
}
}
这里需要注意的是,定时器仍然对城市ID列表有依赖,只不过这个依赖最终会由其他应用(城市数据API微服务)来提供,所以这里暂时还没有办法完全写完,先用“TODO”来标识这个方法,后期还需要改进。但为了能让整个程序可以完整地走下去,我们在程序里面假设返回了一个城市ID为“101280601”的城市信息。
配置类
配置类仍然保留之前的RestConfiguration、QuartzConfiguration的代码不变,如下所示。
1.RestConfiguration
RestConfiguration用于配置REST客户端。
import org.springframework.beans.factory.annotation.Autowired;
import org.springframework.boot.web.client.RestTemplateBuilder;
import org.springframework.context.annotation.Bean;
import org.springframework.context.annotation.Configuration;
import org.springframework.web.client.RestTemplate;
/**
*REST 配置类.
*
*@since 1.0.0 2017年10月18日
* @author Way Lau
*/
@configuration
public class RestConfiguration {
@Autowired
private RestTemplateBuilder builder;
CBean
public RestTemplate restTemplate(){
return builder.build();
}
}
2.QuartzConfiguration
QuartzConfiguration类用于定时任务。
import org.quartz.JobBuilder;
import org.quartz.JobDetail;
import org.quartz.SimpleScheduleBuilder;
import org.quartz.Trigger;
import org.quartz.TriggerBuilder;
import org.springframework.context.annotation.Bean;
import org.springframework.context.annotation.Configuration;
import com.waylau.spring.cloud.weather.job.WeatherDataSyncJob;
/*★
*Quartz配置类.
*
*since 1.0.0 2017年10月23日
* author Way Lau
*/
@configuration
public class QuartzConfiguration
private final int TIME=1800;1/更新频率
@Bean
public JobDetail weatherDataSyncJobJobDetail(){
return JobBuilder.newJob(WeatherDataSyncJob.class).withIdentity
("weatherDataSyncJob")
.storeDurably() .build(;
}
CBean
public Trigger sampleJobTrigger({
SimpleScheduleBuilder scheduleBuilder = SimpleScheduleBuilder.
simpleschedule()
.withIntervalInSeconds (TIME).repeatForever();
return TriggerBuilder.newTrigger().forJob(weatherDataSyncJob-
JobDetail())
.withIdentity("weatherDataSyncTrigger").withSchedule
(scheduleBuilder).build();
}
}
值对象
值对象我们只需要保留City即可,其他值对象都可以删除了。需要注意的是,由于天气数据采集微服务并未涉及对XML数据的解析,所以之前在City上添加的相关的JABX注解,都是可以一并删除的。
以下是新的City类。
public class City {
private String cityId;
private string cityName;
private string cityCode;
private String province;
1/省略getter/setter方法}
工具类
工具类XmlBuilder的代码都可以删除了。
清理前端代码、配置及测试用例
已经删除的服务接口的相关测试用例自然也是要一并删除的。
同时,之前所编写的页面HTML、JS文件也要一并删除。
最后,要清理Thymeleaf在 application.properties文件中的配置,以及build.gradle文件中的依赖。
测试和运行
首先,在进行测试前,需要将Redis服务器启动起来。
而后再启动应用。启动应用之后,定时器就自动开始执行。整个同步过程可以通过以下控制台信息看到。
2017-10-29 22:26:41.748 INFO 13956---[eduler_Worker-1] c.w.s.c.weather.
job.WeatherDatasyncJob
:Start天气数据同步任务
2017-10-29 22:26:41.749 INFO 13956---[eduler_Worker-1] c.w.s.c.weather.
job.weatherDataSyncJob:天气数据同步任务中,cityId:101280601
2017-10-29 22:26:41.749 INFO 13956---[eduler_Worker-1] s.c.w.s.Weather
DataCollectionServiceImpl: Start同步天气.cityId:101280601
2017-10-29 22:26:41.836 INFO 13956 ---[
main]o.s.b.w.embedded.
tomcat.TomcatwebServer: Tomcat started on port(s):8080 (http)
2017-10-29 22:26:41.840 INFO 13956 ---[
main]c.w.spring.
cloud.weather.Application:Started Application in 4.447 seconds
(JVM running for 4.788)
2017-10-29 22:26:41.919 INFO 13956---[eduler_Worker-1] S.c.w.s.eather
DatacollectionServiceImpl :End同步天气
2017-10-29 22:26:41.920 INFO 13956---[eduler Worker-1] C.W.s.c.weather.
job.WeatherDataSyncJob:End 天气数据同步任务
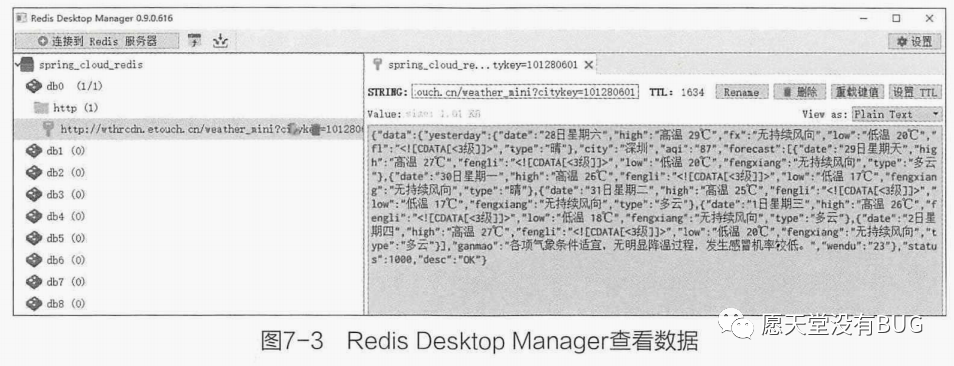
由于我们只是在代码里面“硬编码”了一个城市ID为“101280601”的城市信息,所以,只有一条同步记录。
当然,我们也能通过Redis Desktop Manager,来方便查看存储到Redis里面的数据,如图7-3所示。

本篇内容给大家讲解的是天气数据采集微服务的实现
下篇文章给大家讲解天气数据API微服务的实现;
觉得文章不错的朋友可以转发此文关注小编;
感谢大家的支持!!
本文就是愿天堂没有BUG给大家分享的内容,大家有收获的话可以分享下,想学习更多的话可以到微信公众号里找我,我等你哦。
