再见 MybatisPlus,阿里推出新 ORM 框架更牛X
最近看到一个 ORM 框架 Fluent Mybatis 挺有意思的,整个设计理念非常符合工程师思维。
我对官方文档的部分内容进行了简单整理,通过这篇文章带你看看这个新晋 ORM 框架。
官方文档:https://gitee.com/fluent-mybatis/fluent-mybatis/wikis
提前声明一下:对于这类个人维护和开发的框架,如果没有充分的了解,一定一定一定不要用在正式的项目上!不然后续遇到问题会很麻烦的!!!我目前对于 Fluent Mybatis 这个框架也仅仅是感兴趣,想要学习一下它的内部设计。
Fluent Mybatis, 是一款 Mybatis 语法增强框架, 综合了 Mybatis Plus, Dynamic SQL, JPA 等框架特性和优点, 利用 annotation processor 生成代码。
Fluent Mybatis 有什么亮点?
使用 Fluent Mybatis 可以不用写具体的 XML 文件,通过 Java API 可以构造出比较复杂的业务 SQL 语句,做到代码逻辑和 SQL 逻辑的合一。不再需要在 Dao 中组装查询或更新操作,在 XML 或 Mapper 中再组装参数。
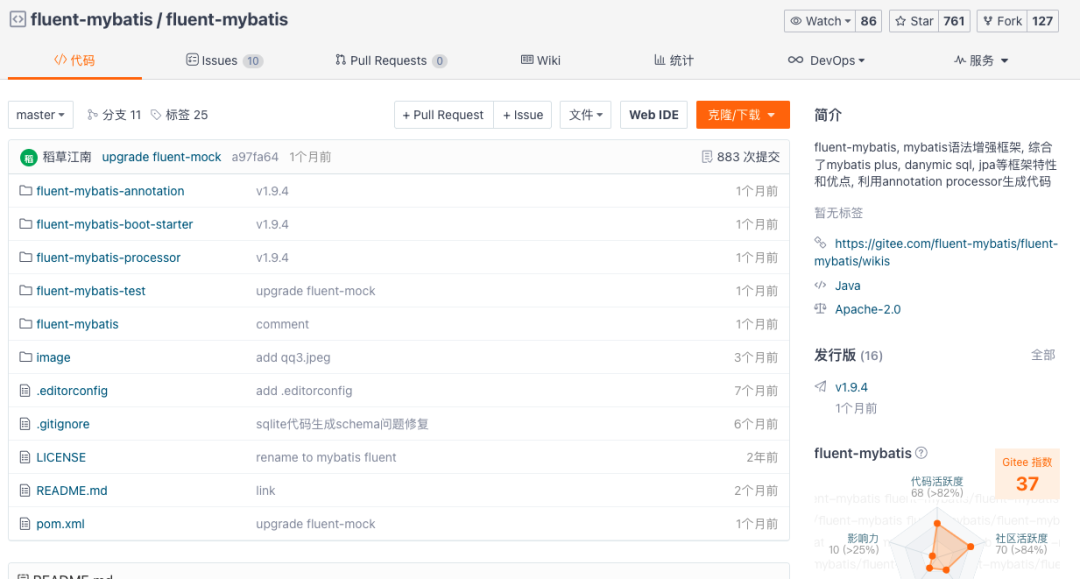
项目地址:https://gitee.com/fluent-mybatis/fluent-mybatis
 # Fluent Mybatis vs Mybatis vs Mybatis Plus
对比原生 Mybatis, Mybatis Plus 或者其他框架,FluentMybatis 提供了哪些便利呢?
我们通过一个比较典型的业务需求来具体实现和对比下,假如有学生成绩表结构如下:
现在有需求: 统计 2000 年三门学科('英语', '数学', '语文')及格分数按学期,学科统计最低分,最高分和平均分, 且样本数需要大于 1 条,统计结果按学期和学科排序
我们可以写 SQL 语句如下:
使用 Fluent Mybatis 来实现上面的功能 :
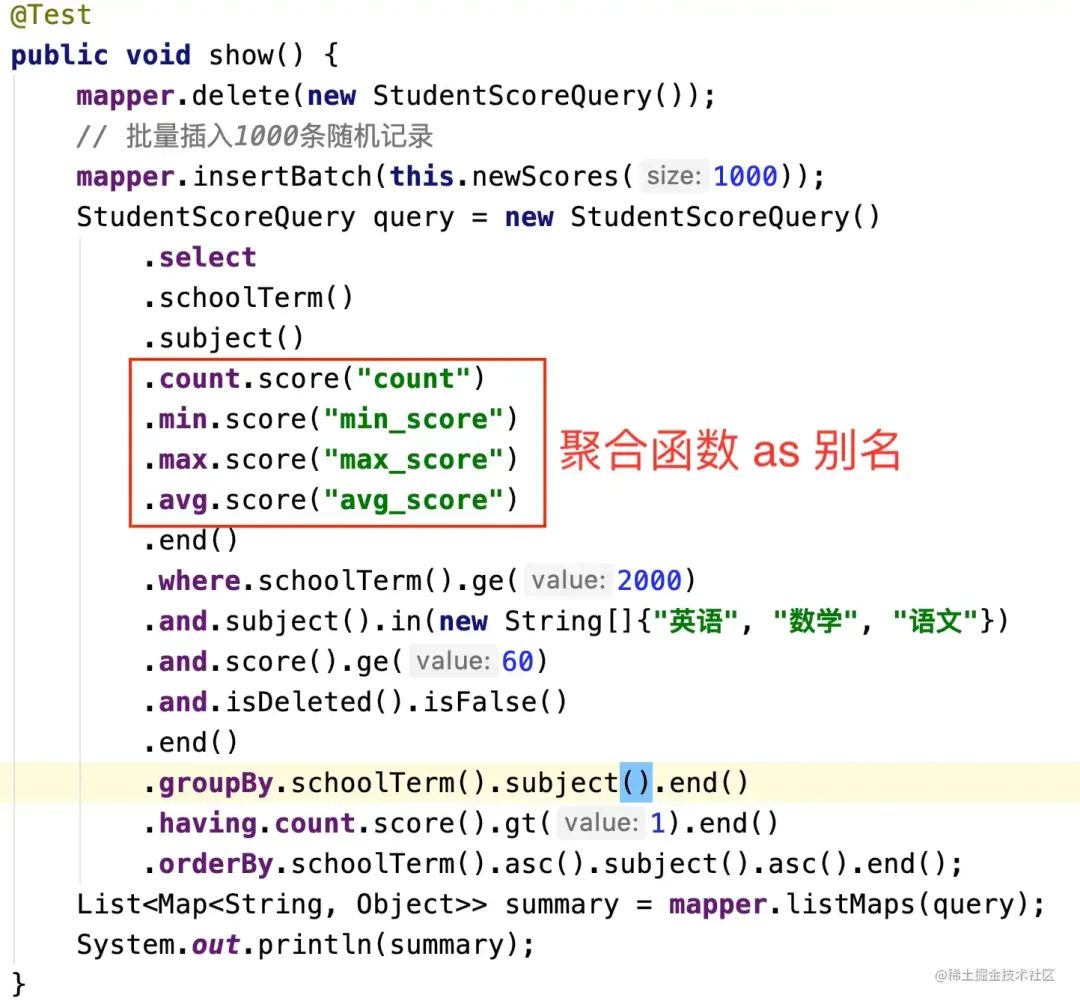 我们可以看到 fluent api 的能力,以及 IDE 对代码的渲染效果。
换成 Mybatis 原生实现上面的功能 :
1、定义 Mapper 接口
2、定义接口需要用到的参数实体 SummaryQuery
3、定义实现业务逻辑的 mapper xml 文件
4、实现业务接口(这里是测试类, 实际应用中应该对应 Dao 类)
换成 Mybatis Plus 实现上面的功能 :
Mybatis Plus 的实现比 Mybatis 会简单比较多,实现效果如下
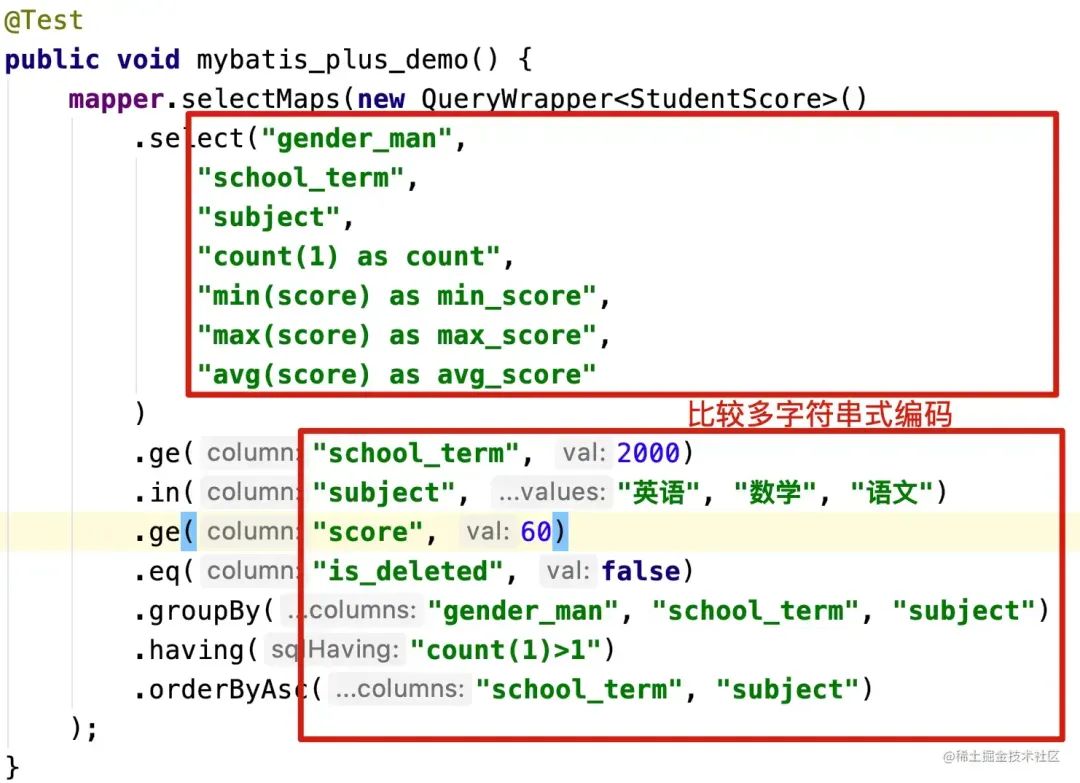 如红框圈出的,写 Mybatis Plus 实现用到了比较多字符串的硬编码(可以用 Entity 的 get lambda 方法部分代替字符串编码)。字符串的硬编码,会给开发同学造成不小的使用门槛,个人觉的主要有 2 点:
其他框架,比如 TkMybatis 在封装和易用性上比 Mybatis Plus 要弱,就不再比较了。
Fluent Mybatis 生成代码设置 :
Mybatis Plus :
接下来,我们来看看如何使用 Fluent Mybatis 来实现增删改查。
执行编译。
IDE 编译:
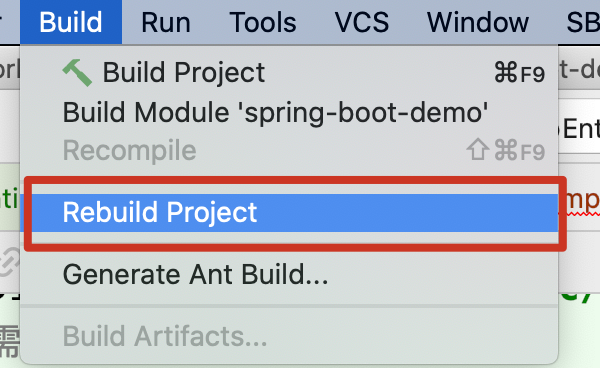 Maven 编译:mvn clean compile Gradle 编译:gradle clean compile
输出: 现在,我们已经通过一个简单例子演示了 Fluent Mybatis 的强大功能, 在进一步介绍 Fluent Mybatis 更强大功能前,我们揭示一下为啥我们只写了一个数据表对应的 Entity 类, 却拥有了一系列增删改查的数据库操作方法。
Fluent Mybatis 根据 Entity 类上 @FluentMybatis 注解在编译时, 会在 target 目录 class 目录下自动编译生成一系列文件:
没错,不是机器人 记得一定要等待,等待才有好东西
我对官方文档的部分内容进行了简单整理,通过这篇文章带你看看这个新晋 ORM 框架。
官方文档:https://gitee.com/fluent-mybatis/fluent-mybatis/wikis
提前声明一下:对于这类个人维护和开发的框架,如果没有充分的了解,一定一定一定不要用在正式的项目上!不然后续遇到问题会很麻烦的!!!我目前对于 Fluent Mybatis 这个框架也仅仅是感兴趣,想要学习一下它的内部设计。
# Fluent Mybatis 介绍
何为 Fluent Mybatis?
Fluent Mybatis, 是一款 Mybatis 语法增强框架, 综合了 Mybatis Plus, Dynamic SQL, JPA 等框架特性和优点, 利用 annotation processor 生成代码。
Fluent Mybatis 有什么亮点?
使用 Fluent Mybatis 可以不用写具体的 XML 文件,通过 Java API 可以构造出比较复杂的业务 SQL 语句,做到代码逻辑和 SQL 逻辑的合一。不再需要在 Dao 中组装查询或更新操作,在 XML 或 Mapper 中再组装参数。
项目地址:https://gitee.com/fluent-mybatis/fluent-mybatis

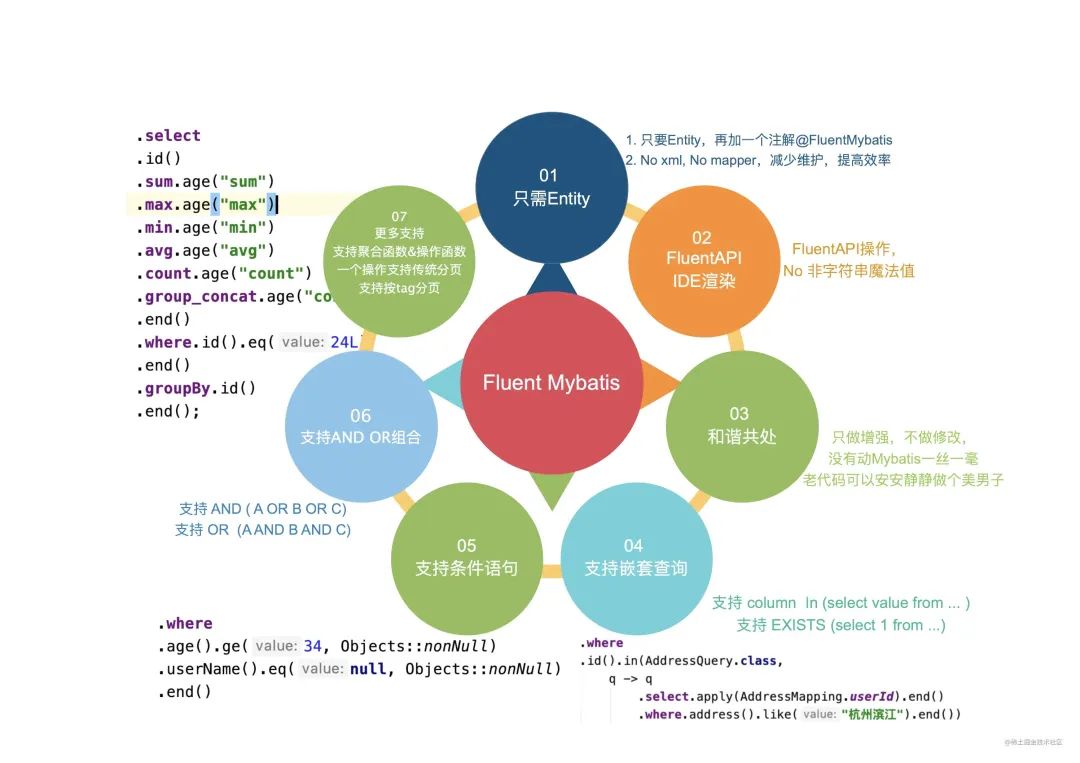
# Fluent Mybatis 特性一览

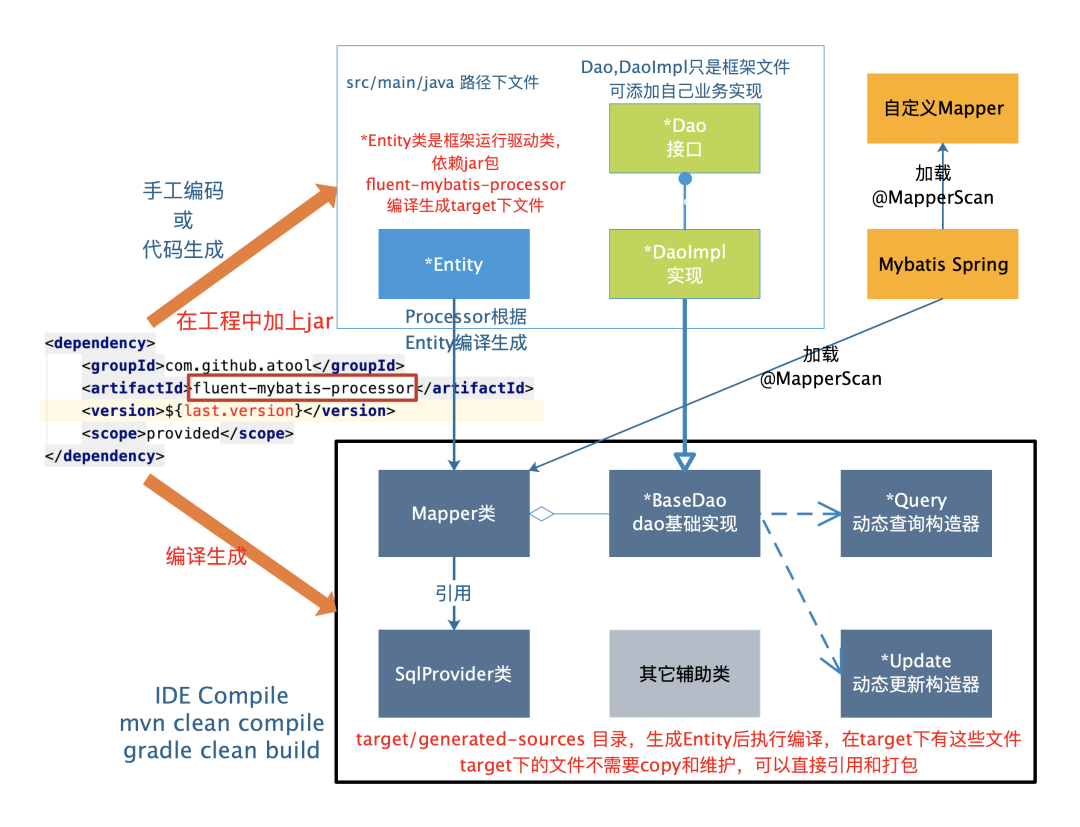
# Fluent Mybatis 原理
 # Fluent Mybatis vs Mybatis vs Mybatis Plus
对比原生 Mybatis, Mybatis Plus 或者其他框架,FluentMybatis 提供了哪些便利呢?
一、实现需求比较
我们通过一个比较典型的业务需求来具体实现和对比下,假如有学生成绩表结构如下:
create table `student_score`(id bigint auto_increment comment '主键ID' primary key,student_id bigint not null comment '学号',gender_man tinyint default 0 not null comment '性别, 0:女; 1:男',school_term int null comment '学期',subject varchar(30) null comment '学科',score int null comment '成绩',gmt_create datetime not null comment '记录创建时间',gmt_modified datetime not null comment '记录最后修改时间',is_deleted tinyint default 0 not null comment '逻辑删除标识') engine = InnoDB default charset=utf8;
现在有需求: 统计 2000 年三门学科('英语', '数学', '语文')及格分数按学期,学科统计最低分,最高分和平均分, 且样本数需要大于 1 条,统计结果按学期和学科排序
我们可以写 SQL 语句如下:
那上面的需求,分别用 Fluent Mybatis, 原生 Mybatis 和 Mybatis Plus 来实现一番。select school_term,subject,count(score) as count,min(score) as min_score,max(score) as max_score,avg(score) as max_scorefrom student_scorewhere school_term >= 2000and subject in ('英语', '数学', '语文')and score >= 60and is_deleted = 0group by school_term, subjecthaving count(score) > 1order by school_term, subject;
使用 Fluent Mybatis 来实现上面的功能 :
 我们可以看到 fluent api 的能力,以及 IDE 对代码的渲染效果。
换成 Mybatis 原生实现上面的功能 :
1、定义 Mapper 接口
public interface MyStudentScoreMapper {List<Map<String, Object>> summaryScore(SummaryQuery paras);}
2、定义接口需要用到的参数实体 SummaryQuery
(chain = true)public class SummaryQuery {private Integer schoolTerm;
private List<String> subjects;
private Integer score;
private Integer minCount;}
3、定义实现业务逻辑的 mapper xml 文件
<select id="summaryScore" resultType="map" parameterType="cn.org.fluent.Mybatis.springboot.demo.mapper.SummaryQuery">select school_term,subject,count(score) as count,min(score) as min_score,max(score) as max_score,avg(score) as max_scorefrom student_scorewhere school_term >=and subject in<foreach collection="subjects" item="item" open="(" close=")" separator=","></foreach>and score >=and is_deleted = 0group by school_term, subjecthaving count(score) > #{minCount}order by school_term, subject</select>
4、实现业务接口(这里是测试类, 实际应用中应该对应 Dao 类)
总之,直接使用 Mybatis,实现步骤还是相当的繁琐,效率太低。那换成 Mybatis Plus 的效果怎样呢?(SpringRunner.class)(classes = QuickStartApplication.class)public class MybatisDemo {private MyStudentScoreMapper mapper;
public void Mybatis_demo() {// 构造查询参数SummaryQuery paras = new SummaryQuery().setSchoolTerm(2000).setSubjects(Arrays.asList("英语", "数学", "语文")).setScore(60).setMinCount(1);
List<Map<String, Object>> summary = mapper.summaryScore(paras);System.out.println(summary);}}
换成 Mybatis Plus 实现上面的功能 :
Mybatis Plus 的实现比 Mybatis 会简单比较多,实现效果如下
 如红框圈出的,写 Mybatis Plus 实现用到了比较多字符串的硬编码(可以用 Entity 的 get lambda 方法部分代替字符串编码)。字符串的硬编码,会给开发同学造成不小的使用门槛,个人觉的主要有 2 点:
 - 字段名称的记忆和敲码困难
- Entity 属性跟随数据库字段发生变更后的运行时错误
其他框架,比如 TkMybatis 在封装和易用性上比 Mybatis Plus 要弱,就不再比较了。
二、生成代码编码比较
Fluent Mybatis 生成代码设置 :
public class AppEntityGenerator {static final String url = "jdbc:mysql://localhost:3306/fluent_Mybatis_demo?useSSL=false&useUnicode=true&characterEncoding=utf-8";
public static void main(String[] args) {FileGenerator.build(Abc.class);}
@Tables(/** 数据库连接信息 **/url = url, username = "root", password = "password",/** Entity类parent package路径 **/basePack = "cn.org.fluent.Mybatis.springboot.demo",/** Entity代码源目录 **/srcDir = "spring-boot-demo/src/main/java",/** Dao代码源目录 **/daoDir = "spring-boot-demo/src/main/java",/** 如果表定义记录创建,记录修改,逻辑删除字段 **/gmtCreated = "gmt_create", gmtModified = "gmt_modified", logicDeleted = "is_deleted",/** 需要生成文件的表 ( 表名称:对应的Entity名称 ) **/tables = @Table(value = {"student_score"}))static class Abc {}}
Mybatis Plus :
public class CodeGenerator {
static String dbUrl = "jdbc:mysql://localhost:3306/fluent_Mybatis_demo?useSSL=false&useUnicode=true&characterEncoding=utf-8";
public void generateCode() {GlobalConfig config = new GlobalConfig();DataSourceConfig dataSourceConfig = new DataSourceConfig();dataSourceConfig.setDbType(DbType.MYSQL).setUrl(dbUrl).setUsername("root").setPassword("password").setDriverName(Driver.class.getName());StrategyConfig strategyConfig = new StrategyConfig();strategyConfig.setCapitalMode(true).setEntityLombokModel(false).setNaming(NamingStrategy.underline_to_camel).setColumnNaming(NamingStrategy.underline_to_camel).setEntityTableFieldAnnotationEnable(true).setFieldPrefix(new String[]{"test_"}).setInclude(new String[]{"student_score"}).setLogicDeleteFieldName("is_deleted").setTableFillList(Arrays.asList(new TableFill("gmt_create", FieldFill.INSERT),new TableFill("gmt_modified", FieldFill.INSERT_UPDATE)));
config.setActiveRecord(false).setIdType(IdType.AUTO).setOutputDir(System.getProperty("user.dir") + "/src/main/java/").setFileOverride(true);
new AutoGenerator().setGlobalConfig(config).setDataSource(dataSourceConfig).setStrategy(strategyConfig).setPackageInfo(new PackageConfig().setParent("com.mp.demo").setController("controller").setEntity("entity")).execute();}}
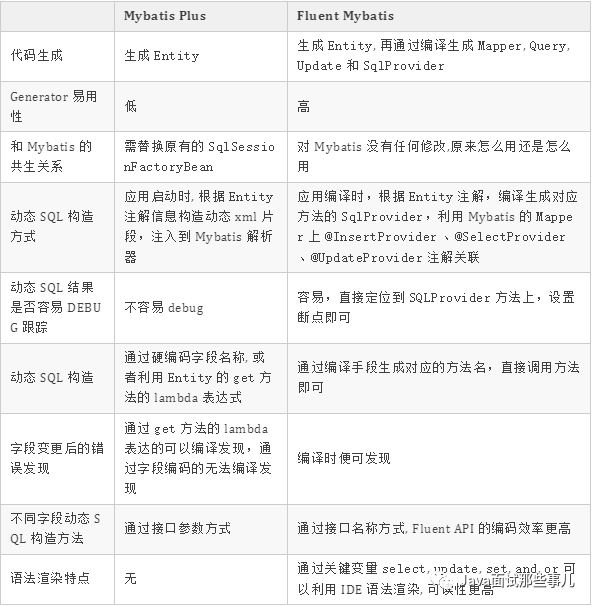
三、三者对比总结
看完 3 个框架对同一个功能点的实现, 各位看官肯定会有自己的判断,笔者这里也总结了一份比较。
# Fluent Mybatis 实战
接下来,我们来看看如何使用 Fluent Mybatis 来实现增删改查。
引入依赖
新建 Maven 工程,设置项目编译级别为 Java8 及以上,引入 Fluent Mybatis 依赖包。
<dependencies><!-- 引入fluent-mybatis 运行依赖包, scope为compile --><dependency><groupId>com.github.atool</groupId><artifactId>fluent-mybatis</artifactId><version>1.9.3</version></dependency><!-- 引入fluent-mybatis-processor, scope设置为provider 编译需要,运行时不需要 --><dependency><groupId>com.github.atool</groupId><artifactId>fluent-mybatis-processor</artifactId><version>1.9.3</version></dependency></dependencies>
创建表
create schema fluent_mybatis;
create table hello_world(id bigint unsigned auto_increment primary key,say_hello varchar(100) null,your_name varchar(100) null,gmt_created datetime DEFAULT NULL COMMENT '创建时间',gmt_modified datetime DEFAULT NULL COMMENT '更新时间',is_deleted tinyint(2) DEFAULT 0 COMMENT '是否逻辑删除') ENGINE = InnoDBCHARACTER SET = utf8 comment '简单演示表';
# 创建数据库表对应的 Entity 类
创建数据库表对应的 Entity 类: HelloWorldEntity, 你只需要简单的做 3 个动作:
- 根据驼峰命名规则命名 Entity 类和字段
- HelloWorldEntity 继承 IEntity 接口类
- 在 HelloWorldEntity 类上加注解 @FluentMybatis
public class HelloWorldEntity extends RichEntity {private Long id;
private String sayHello;
private String yourName;
private Date gmtCreated;
private Date gmtModified;
private Boolean isDeleted;
// get, set, toString 方法
public Class<? extends IEntity> entityClass() {return HelloWorldEntity.class;}}
执行编译。
IDE 编译:
 Maven 编译:mvn clean compile Gradle 编译:gradle clean compile
# 配置数据源
1.数据源 DataSource 配置
2.Mybatis 的 mapper 扫描路径 3.Mybatis 的 SqlSessionFactoryBean很简单吧,在这里,你即不需要配置任何 Mybatis xml 文件, 也不需要写任何 · 接口, 但你已经拥有了强大的增删改查的功能,并且是 Fluent API,让我们写一个测试来见证一下 Fluent Mybatis 的魔法力量!(basePackages = "cn.org.atool.fluent.mybatis.demo1")("cn.org.atool.fluent.mybatis.demo1.entity.mapper")public class HelloWorldConfig {/*** 设置dataSource属性** @return*/public DataSource dataSource() {BasicDataSource dataSource = new BasicDataSource();dataSource.setDriverClassName("com.mysql.jdbc.Driver");dataSource.setUrl("jdbc:mysql://localhost:3306/fluent_mybatis?useUnicode=true&characterEncoding=utf8");dataSource.setUsername("root");dataSource.setPassword("password");return dataSource;}
/*** 定义mybatis的SqlSessionFactoryBean** @param dataSource* @return*/public SqlSessionFactoryBean sqlSessionFactoryBean(DataSource dataSource) {SqlSessionFactoryBean bean = new SqlSessionFactoryBean();bean.setDataSource(dataSource);return bean;}
public MapperFactory mapperFactory() {return new MapperFactory();}}
# 测试
注入 HelloWorldEntity 对应的 Mapper 类: HelloWorldMapper, 这个类是 Fluent Mybatis 编译时生成的。
使用 HelloWorldMapper 进行删除、插入、查询、修改操作。
@RunWith(SpringJUnit4ClassRunner.class)@ContextConfiguration(classes = HelloWorldConfig.class)public class HelloWorldTest {/*** Fluent Mybatis编译时生成的Mapper类*/@AutowiredHelloWorldMapper mapper;
@Testpublic void testHelloWorld() {/*** 为了演示方便,先删除数据*/mapper.delete(mapper.query().where.id().eq(1L).end());/*** 插入数据*/HelloWorldEntity entity = new HelloWorldEntity();entity.setId(1L);entity.setSayHello("hello world");entity.setYourName("Fluent Mybatis");entity.setIsDeleted(false);mapper.insert(entity);/*** 查询 id = 1 的数据*/HelloWorldEntity result1 = mapper.findOne(mapper.query().where.id().eq(1L).end());/*** 控制台直接打印出查询结果*/System.out.println("1. HelloWorldEntity:" + result1.toString());/*** 更新id = 1的记录*/mapper.updateBy(mapper.updater().set.sayHello().is("say hello, say hello!").set.yourName().is("Fluent Mybatis is powerful!").end().where.id().eq(1L).end());/*** 查询 id = 1 的数据*/HelloWorldEntity result2 = mapper.findOne(mapper.query().where.sayHello().like("hello").and.isDeleted().eq(false).end().limit(1));/*** 控制台直接打印出查询结果*/System.out.println("2. HelloWorldEntity:" + result2.toString());}}
输出:
HelloWorldEntity:HelloWorldEntity{id=1, sayHello='hello world', yourName='Fluent Mybatis', gmtCreate=null, gmtModified=null, isDeleted=false}HelloWorldEntity:HelloWorldEntity{id=1, sayHello='say hello, say hello!', yourName='Fluent Mybatis is powerful!', gmtCreate=null, gmtModified=null, isDeleted=false}
神奇吧!我们再到数据库中查看一下结果
 现在,我们已经通过一个简单例子演示了 Fluent Mybatis 的强大功能, 在进一步介绍 Fluent Mybatis 更强大功能前,我们揭示一下为啥我们只写了一个数据表对应的 Entity 类, 却拥有了一系列增删改查的数据库操作方法。
 Fluent Mybatis 根据 Entity 类上 @FluentMybatis 注解在编译时, 会在 target 目录 class 目录下自动编译生成一系列文件:
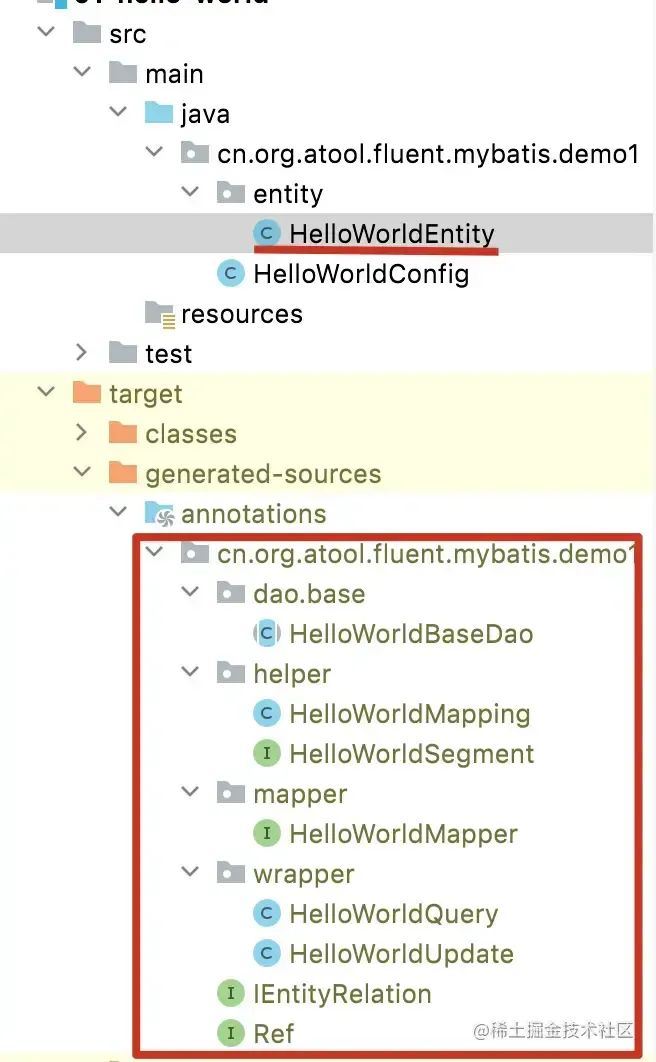
- mapper/*Mapper : Mybatis 的 Mapper 定义接口, 定义了一系列通用的数据操作接口方法。
- dao/*BaseDao : Dao 实现基类, 所有的 DaoImpl 都继承各自基类 根据分层编码的原则,我们不会在 Service 类中直接使用 Mapper 类,而是引用 Dao 类。我们在 Dao 实现类中根据条件实现具体的数据操作方法。
- wrapper/*Query : Fluent Mybatis 核心类, 用来进行动态 sql 的构造, 进行条件查询。
- wrapper/*Updater : Fluent Mybatis 核心类, 用来动态构造 update 语句。
- helper/*Mapping : Entity 表字段和 Entity 属性映射定义类
- helper/*Segment: Query 和 Updater 具体功能实现, 包含几个实现: select, where, group by, having by, order by, limit
- IEntityRelation : 处理 Entity 关联(一对一, 一对多, 多对多)关系的接口
- Ref : 引用 Fluent Mybatis 生成的对象的快捷入口工具类
# 总结
上面只是 Fluent Mybatis 常规实现增删改查的方式,Fluent Mybatis 现在又推出了专门面向表单级的增删改查,声明即实现。
官方说明:https://juejin.cn/post/7033388050012962852
加小编微信,回复 40 白嫖40套 java/spring/kafka/redis/netty 教程/代码/视频 等
扫二维码,加我微信,回复: 40
注意,不要乱回复没错,不是机器人 记得一定要等待,等待才有好东西
评论

