沉寂了一周,我开发了一个聊天室
前言
最近一周没有发文章了,我在这里向大家说一声抱歉。今天,我们来从零开始开发一款聊天室。好,我们现在就开始。
了解WebSocket
开发聊天室,我们需要用到WebSocket这个网络通信协议,那么为什么会用到它呢?
我们首先来引用阮一峰大佬的一篇文章一段话:
初次接触 WebSocket 的人,都会问同样的问题:我们已经有了 HTTP 协议,为什么还需要另一个协议?它能带来什么好处?
答案很简单,因为 HTTP 协议有一个缺陷:通信只能由客户端发起。
举例来说,我们想了解今天的天气,只能是客户端向服务器发出请求,服务器返回查询结果。HTTP 协议做不到服务器主动向客户端推送信息。
这种单向请求的特点,注定了如果服务器有连续的状态变化,客户端要获知就非常麻烦。我们只能使用"轮询":每隔一段时候,就发出一个询问,了解服务器有没有新的信息。最典型的场景就是聊天室。
轮询的效率低,非常浪费资源(因为必须不停连接,或者 HTTP 连接始终打开)。因此,工程师们一直在思考,有没有更好的方法。WebSocket 就是这样发明的。
我们来借用MDN网站上的官方介绍总结一下:
WebSockets 是一种先进的技术。它可以在用户的浏览器和服务器之间打开交互式通信会话。使用此API,您可以向服务器发送消息并接收事件驱动的响应,而无需通过轮询服务器的方式以获得响应。
WebSocket 协议在2008年诞生,2011年成为国际标准。
WebSocket特点
服务器可以主动向客户端推送信息,客户端也可以主动向服务器发送信息,是真正的双向平等对话,属于服务器推送技术的一种。 建立在 TCP 协议之上,服务器端的实现比较容易。 与 HTTP 协议有着良好的兼容性。默认端口也是80和443,并且握手阶段采用 HTTP 协议,因此握手时不容易屏蔽,能通过各种 HTTP 代理服务器。 数据格式比较轻量,性能开销小,通信高效。 可以发送文本,也可以发送二进制数据。 没有同源限制,客户端可以与任意服务器通信。 协议标识符是 ws(如果加密,则为wss),即ws对应http,wss对应https。服务器网址就是 URL。即ws://www.xx.com或wss://www.xx.com
WebSocket客户端常用API
WebSocket 对象提供了用于创建和管理 WebSocket连接,以及可以通过该连接发送和接收数据的 API。
使用WebSocket()构造函数来构造一个WebSocket 。
属性
WebSocket.onopen用于指定连接成功后的回调函数。
WebSocket.onmessage用于指定当从服务器接受到信息时的回调函数。
WebSocket.onclose用于指定连接关闭后的回调函数。
WebSocket.onerror用于指定连接失败后的回调函数。
方法
WebSocket.close()
关闭当前链接。
WebSocket.send(data)
客户端发送数据到服务器,对要传输的数据进行排队。
客户端举例
// Create WebSocket connection.const socket = new WebSocket('ws://localhost:8080'); // 这里的地址是服务器的websocket服务地址// Connection openedsocket.onopen = function(evt) {console.log("Connection open ...");ws.send("Hello WebSockets!");};// Listen for messagessocket.onmessage = function(evt) {console.log( "Received Message: " + evt.data);socket.close();};// Connection closedsocket.onclose = function(evt) {console.log("Connection closed.");};
常用的WebSocket服务端
这里服务端我们使用Node.js,这里向大家介绍几个常用的库。
wssocket.ionodejs-websocket
具体用法,大家可以上网浏览详细文档,这里就不一一介绍啦。不过在这篇文章中。我将会给大家使用ws与nodejs-websocket这两个模块来分别进行项目开发。
客户端与服务端都介绍完啦!我们就赶快行动起来吧!
开发本地端(或局域网)聊天室(第一种)
我们将基于Vue.js@3.0开发聊天室,原因是拥抱新技术。怎么搭建vue脚手架,这里就不介绍了,想必大家也会。我们直接就上代码。
客户端
<template><div class="home"><div class="count"><p>在线人数:{{ count }}p>div><div class="content"><div class="chat-box" ref="chatBox"><divv-for="(item, index) in chatArr":key="index"class="chat-item"><div v-if="item.name === name" class="chat-msg mine"><p class="msg mineBg">{{ item.txt }}p><p class="user" :style="{ background: bg }">{{ item.name.substring(item.name.length - 5, item.name.length) }}p>div><div v-else class="chat-msg other"><p class="user" :style="{ background: item.bg }">{{ item.name.substring(item.name.length - 5, item.name.length) }}p><p class="msg otherBg">{{ item.txt }}p>div>div>div>div><div class="footer"><textareaplaceholder="说点什么..."v-model="textValue"autofocusref="texta"@keyup.enter="send">textarea><div class="send-box"><p class="send active" @click="send">发送p>div>div>div>template><script>import { onMounted, onUnmounted, ref, reactive, nextTick } from "vue";export default {name: "Home",setup() {let socket = null;const path = "ws://localhost:3000/"; // 本地服务器地址const textValue = ref("");const chatBox = ref(null);const texta = ref(null);const count = ref(0);const name = new Date().getTime().toString();const bg = randomRgb();const chatArr = reactive([]);function init() {if (typeof WebSocket === "undefined") {alert("您的浏览器不支持socket");} else {socket = new WebSocket(path);socket.onopen = open;socket.onerror = error;socket.onclose = closed;socket.onmessage = getMessage;window.onbeforeunload = function(e) {e = e || window.event;if (e) {e.returnValue = "关闭提示";socket.close();}socket.close();return "关闭提示";};}}function open() {alert("socket连接成功");}function error() {alert("连接错误");}function closed() {alert("socket关闭");}async function getMessage(msg) {if (typeof JSON.parse(msg.data) === "number") {console.log(JSON.parse(msg.data));count.value = msg.data;} else {const obj = JSON.parse(msg.data);chatArr.push(obj);}await nextTick();chatBox.value.scrollTop = chatBox.value.scrollHeight;}function randomRgb() {let R = Math.floor(Math.random() * 130 + 110);let G = Math.floor(Math.random() * 130 + 110);let B = Math.floor(Math.random() * 130 + 110);return "rgb(" + R + "," + G + "," + B + ")";}function send() {if (textValue.value.trim().length > 0) {const obj = {name: name,txt: textValue.value,bg: bg,};socket.send(JSON.stringify(obj));textValue.value = "";texta.value.focus();}}function close() {alert("socket已经关闭");}onMounted(() => {init();});onUnmounted(() => {socket.onclose = close;});return {send,textValue,chatArr,name,bg,chatBox,texta,randomRgb,count,};},};script>
至于样式文件,这里我也贴出来。
html,body{background-color: #e8e8e8;user-select: none;}::-webkit-scrollbar {width: 8px;height: 8px;display: none;}::-webkit-scrollbar-thumb {background-color: #D1D1D1;border-radius: 3px;-webkit-border-radius: 3px;border-left: 2px solid transparent;border-top: 2px solid transparent;}*{margin: 0;padding: 0;}.mine {justify-content: flex-end;}.other {justify-content: flex-start;}.mineBg {background: #98e165;}.otherBg {background: #fff;}.home {position: fixed;top: 0;left: 50%;transform: translateX(-50%);width: 100%;height: 100%;min-width: 360px;min-height: 430px;box-shadow: 0 0 24px 0 rgb(19 70 80 / 25%);}.count{height: 5%;display: flex;justify-content: center;align-items: center;background: #EEEAE8;font-size: 16px;}.content {width: 100%;height: 80%;background-color: #f4f4f4;overflow: hidden;}.footer {position: fixed;bottom: 0;width: 100%;height: 15%;background-color: #fff;}.footer textarea {width: 100%;height: 50%;background: #fff;border: 0;box-sizing: border-box;resize: none;outline: none;padding: 10px;font-size: 16px;}.send-box {display: flex;height: 40%;justify-content: flex-end;align-items: center;}.send {margin-right: 20px;cursor: pointer;border-radius: 3px;background: #f5f5f5;z-index: 21;font-size: 16px;padding: 8px 20px;}.send:hover {filter: brightness(110%);}.active {background: #98e165;color: #fff;}.chat-box {height: 100%;padding:0 20px;overflow-y: auto;}.chat-msg {display: flex;align-items: center;}.user {font-weight: bold;color: #fff;position: relative;word-wrap: break-word;box-shadow: 0 2px 12px 0 rgba(0, 0, 0, 0.1);width: 60px;height: 60px;line-height: 60px;border-radius:8px ;text-align: center;}.msg {margin: 0 5px;max-width: 74%;white-space: normal;word-break: break-all;color: #333;border-radius: 8px;padding: 10px;text-align: justify;font-size: 16px;box-shadow: 0px 0px 10px #f4f4f4;}.chat-item {margin: 20px 0;animation: up-down 1s both;}@keyframes up-down {0% {opacity: 0;transform: translate3d(0, 20px, 0);}100% {opacity: 1;transform: none;}}
服务端
这里使用的是Node.js。
nodejs-websocket:websocket服务器和客户端的nodejs模块。
const ws = require("nodejs-websocket");const server = ws.createServer((conn) => {conn.on("text", (str) => {broadcast(str);});conn.on("error", (err) => {console.log(err);});});server.listen(3000, function () {console.log("open");});// 群发消息function broadcast(data) {server.connections.forEach((conn) => {conn.sendText(data);});}
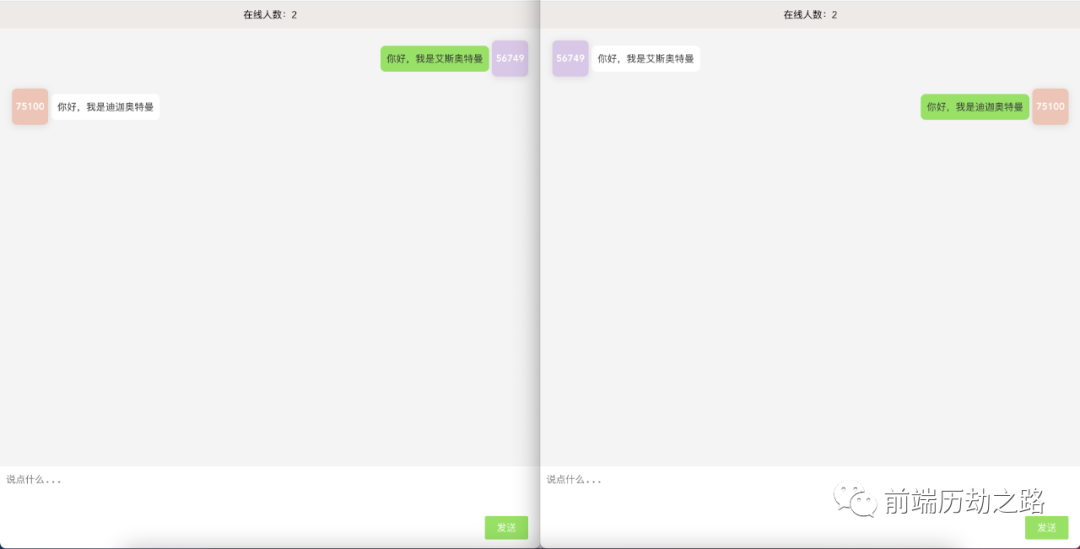
项目一览

在线人数为零,这不是bug,是因为当时在本地端没有做,只是放上了这个版块。不过,在云服务端我已经放上了这个功能。那么,我们来看一下吧。
开发云端聊天室(第二种)
客户端
<template><div class="home"><div class="count"><p>在线人数:{{ count }}p>div><div class="content"><div class="chat-box" ref="chatBox"><divv-for="(item, index) in chatArr":key="index"class="chat-item"><div v-if="item.name === name" class="chat-msg mine"><p class="msg mineBg">{{ item.txt }}p><p class="user" :style="{ background: bg }">{{ item.name.substring(item.name.length - 5, item.name.length) }}p>div><div v-else class="chat-msg other"><p class="user" :style="{ background: item.bg }">{{ item.name.substring(item.name.length - 5, item.name.length) }}p><p class="msg otherBg">{{ item.txt }}p>div>div>div>div><div class="footer"><textareaplaceholder="说点什么..."v-model="textValue"autofocusref="texta"@keyup.enter="send">textarea><div class="send-box"><p class="send active" @click="send">发送p>div>div>div>template><script>import { onMounted, onUnmounted, ref, reactive, nextTick } from "vue";export default {name: "Home",setup() {let socket = null;const path = "wss:/xxx.com/wsline/"; // 这个网址只是测试网址,这里只是说明云服务地址const textValue = ref("");const chatBox = ref(null);const texta = ref(null);const count = ref(0);const name = new Date().getTime().toString();const bg = randomRgb();const chatArr = reactive([]);function init() {if (typeof WebSocket === "undefined") {alert("您的浏览器不支持socket");} else {socket = new WebSocket(path);socket.onopen = open;socket.onerror = error;socket.onclose = closed;socket.onmessage = getMessage;window.onbeforeunload = function(e) {e = e || window.event;if (e) {e.returnValue = "关闭提示";socket.close();}socket.close();return "关闭提示";};}}function open() {alert("socket连接成功");}function error() {alert("连接错误");}function closed() {alert("socket关闭");}async function getMessage(msg) {if (typeof JSON.parse(msg.data) === "number") {console.log(JSON.parse(msg.data));count.value = msg.data;} else {const obj = JSON.parse(msg.data);chatArr.push(obj);}await nextTick();chatBox.value.scrollTop = chatBox.value.scrollHeight;}function randomRgb() {let R = Math.floor(Math.random() * 130 + 110);let G = Math.floor(Math.random() * 130 + 110);let B = Math.floor(Math.random() * 130 + 110);return "rgb(" + R + "," + G + "," + B + ")";}function send() {if (textValue.value.trim().length > 0) {const obj = {name: name,txt: textValue.value,bg: bg,};socket.send(JSON.stringify(obj));textValue.value = "";texta.value.focus();}}function close() {alert("socket已经关闭");}onMounted(() => {init();});onUnmounted(() => {socket.onclose = close;});return {send,textValue,chatArr,name,bg,chatBox,texta,randomRgb,count,};},};script>
样式文件同本地端样式,可以查看上方的代码。
服务端
这里我使用了ws模块,并且我也搭建了https服务器,并使用了更为安全的wss协议。接下来,我们来看下是怎么操作的。
const fs = require("fs");const httpServ = require("https");const WebSocketServer = require("ws").Server; // 引用Server类const cfg = {port: 3456,ssl_key: "../../https/xxx.key", // 配置https所需的文件2ssl_cert: "../../https/xxx.crt", // 配置https所需的文件1};// 创建request请求监听器const processRequest = (req, res) => {res.writeHead(200);res.end("Websocket linked successfully");};const app = httpServ.createServer({// 向server传递key和cert参数key: fs.readFileSync(cfg.ssl_key),cert: fs.readFileSync(cfg.ssl_cert),},processRequest).listen(cfg.port);// 实例化WebSocket服务器const wss = new WebSocketServer({server: app,});// 群发wss.broadcast = function broadcast(data) {wss.clients.forEach(function each(client) {client.send(data);});};// 如果有WebSocket请求接入,wss对象可以响应connection事件来处理wss.on("connection", (wsConnect) => {console.log("Server monitoring");wss.broadcast(wss._server._connections);wsConnect.on("message", (message) => {wss.broadcast(message);});wsConnect.on("close", function close() {console.log("disconnected");wss.broadcast(wss._server._connections);});});
我们在云服务上启动命令。
启动成功!

这里还没有结束,因为你使用的是ip地址端口,必须转发到域名上。所以我使用的nginx进行转发,配置如下参数。
location /wsline/ {proxy_pass https://xxx:3456/;proxy_http_version 1.1;proxy_set_header Upgrade $http_upgrade;proxy_set_header Connection "Upgrade";proxy_set_header X-Forwarded-For $proxy_add_x_forwarded_for;proxy_set_header Host $http_host;proxy_set_header X-Real-IP $remote_addr;proxy_set_header X-Forwarded-Proto https;proxy_redirect off;}
那么,重启云端服务器,看下效果。
项目一览
那么,到这里一款云端聊天室就这么做成了,可以实时显示在线人数,这样你就可以知道有多少人在这里跟你聊天。
结语
谢谢阅读,希望我没有浪费你的时间。看完文章了,那么赶快行动起来吧,开发一款属于自己的聊天室。
有朋自远方来,不亦乐乎。
欢迎关注我的公众号
前端历劫之路回复关键词
电子书,即可获取12本前端热门电子书。回复关键词
红宝书第4版,即可获取最新《JavaScript高级程序设计》(第四版)电子书。我创建了一个技术交流、文章分享群,群里有很多大厂的前端大佬,关注公众号后,点击下方菜单了解更多即可加我微信,期待你的加入。
作者:Vam的金豆之路
微信公众号:前端历劫之路