前端实用程序包utils - 开发工作流(一)
写在前面
早年间有幸在Raychee哥门下当小弟,学到两把刷子。在编程路上,他的很多思想深深影响了我,比如笔者今天要分享的主题。在程序开发中,有个utils包,叫做实用程序包,程序员们会把项目中通用的东西抽离出来放到这个里面,这有利于项目工程化的落地,提高项目的可维护性,减少代码冗余,锻炼编码能力,提高编码效率,理解编程思想。
在开始之前,我们先思考下,创建一个规范的项目我们需要关注哪些点?我觉得吧,第一个是创建信息的完整性,一个信息完整的项目可以引导读者与作者交流与合作,这个在后面的package.json里面向大家介绍;第二个是代码的规范性和兼容性,正所谓,没有规矩不成方圆,良好的代码规范会巧妙地杜绝屎上雕花的行为发生,这个后面跟大家介绍下eslint+prettier+babal的知识点;第三个项目目录的规范性,这个也会在后面介绍。基于前面三点,我们可以做出一个自产自销的项目,如果把这个过程比作拉翔,那它会很通畅,拉的很舒服,不会便秘。但是远远不够,就比如程序员A拿到程序员B写的项目,那么程序员B怎么去证明给A看,我的枪好使且我的话可信。这就引入了后面两个话题,第四点就是把你的作品发出去让别人能看得到,《何以笙箫默》中有句台词,“如果我们走散你找不到我,那我就站在最高的舞台中央让你看见我。”男同胞们听懂了吗?你想要脱单,一个不成熟的建议,站在舞台中央,发出滋滋滋的求偶声,跳出Michael Jackson妖娆的舞步,just beat it,just beat it.喜欢你的说不定就有了,主动一点就会有故事。这个后面笔者介绍下git工作流以及npm的发包;第五点就是测试,提高可信度。这里我会结合karma、mocha、chai、travis、codecov来向大家介绍单元测试、持续集成、代码覆盖率测试。最后的话,我会结合相关的开发工具做一个简单的搭配使用介绍吧。好的,我们开始吧。

项目创建
注意: 因为笔者目前前端接触的比较多,所以这个库的定义就是给前端环境用的,不是很推荐用在nodejs开发上使用,因为其后面涉及到了一些DOM之类的操作是对nodjs没什么卵用的,所以采用ES Module的语法来书写,若想在node环境使用,请配合babel,webpack等工具使用,请确保电脑上安装了nodejs环境。
举个例子,比如我要创建一个项目叫utils,可以怎么做?(考虑到0基础的同学,我会讲的比较细,老司机请直接跳过这章节)
如果你只是想玩玩,不想一步一步去配置,那么你只需要执行mkdir utils && npm init -y, 这句话的意思是说创建了一个文件夹叫utils,然后初始化一个npm管理的项目,-y表示yes,也就是都选是。这个时候它就会在项目文件夹下创建一个粗糙的package.json文件。
新手我还是建议你一步一个脚印走一遍,执行mkdir utils && npm init,它会一步一步让你确认该项目的相关描述啊,协议啊,联系方式啊,项目地址啥的,这里笔者贴出一份该项目的npm配置。
配置说明:
name: 项目名version: 项目版本号description: 项目描述main: 项目主入口文件scripts: 项目执行npm命令repository: 项目仓库keywords: 项目关键词author: 项目作者license: 授权协议bugs: bug反馈homepages: 项目主页devDependencies: 开发环境依赖,不会随项目打包, 使用npm i @ataola/utils -D安装dependencies: 开发环境依赖,会随着项目打包,使用npm i @ataola/utils -S安装husky: 在本地提交之前,做一次lint反馈,这个需要安装相关npm包再配置lint-staged: 只会校验提交修改的部分,这个也是需要安装相关npm包再配置,建议你和楼上那位一起用
{
  "name": "@ataola/utils",
  "version": "0.1.5",
  "description": "ataola's utils: maybe publish a feature one week, to record something i think or meet.",
  "main": "index.js",
  "scripts": {
    "push": "./push",
    "pull": "./pull",
    "codecov": "codecov",
    "eslint": "eslint . --ext .js --fix",
    "husky:prepare": "husky install",
    "husky:add": "husky add .husky/pre-commit 'npm run lint'",
    "git:add": "git add -A",
    "lint": "lint-staged",
    "karma:init": "karma init ./karma.conf.js",
    "karma:test": "karma start ./karma.conf.js",
    "format": "prettier --write '**/*.{js,jsx,ts,tsx,json,md}'"
  },
  "repository": {
    "type": "git",
    "url": "git+https://github.com/ataola/utils.git"
  },
  "keywords": [
    "javascript",
    "utils"
  ],
  "author": "ataola (zjt613@gmail.com)",
  "license": "MIT",
  "bugs": {
    "url": "https://github.com/ataola/utils/issues"
  },
  "homepage": "https://github.com/ataola/utils#readme",
  "devDependencies": {
    "@babel/core": "^7.13.15",
    "@babel/eslint-parser": "^7.13.14",
    "@babel/plugin-proposal-class-properties": "^7.13.0",
    "@babel/plugin-transform-arrow-functions": "^7.13.0",
    "@babel/plugin-transform-async-to-generator": "^7.13.0",
    "@babel/plugin-transform-runtime": "^7.13.15",
    "@babel/polyfill": "^7.12.1",
    "@babel/preset-env": "^7.13.15",
    "@babel/runtime": "^7.13.10",
    "babel-eslint": "^10.1.0",
    "babel-loader": "^8.2.2",
    "babel-plugin-istanbul": "^6.0.0",
    "chai": "^4.3.4",
    "codecov": "^3.8.1",
    "core-js": "^3.11.0",
    "eslint": "^7.24.0",
    "eslint-config-prettier": "^8.1.0",
    "eslint-plugin-prettier": "^3.3.1",
    "husky": "^6.0.0",
    "karma": "^6.3.2",
    "karma-chai": "^0.1.0",
    "karma-chrome-launcher": "^3.1.0",
    "karma-coverage": "^2.0.3",
    "karma-mocha": "^2.0.1",
    "karma-mocha-reporter": "^2.2.5",
    "karma-webpack": "^5.0.0",
    "lint-staged": "^10.5.4",
    "mocha": "^8.3.2",
    "prettier": "^2.2.1",
    "webpack": "^5.31.2"
  },
  "husky": {
    "hooks": {
      "pre-commit": "lint-staged"
    }
  },
  "lint-staged": {
    "*.{js,ts,jsx,tsx}": [
      "eslint . --fix",
      "prettier --config .prettierrc --write ."
    ]
  }
}
查询npm的相关命令是npm --help, 比如我不知道npm init后面可以跟什么,那么执行npm init --help就可以罗列出相关信息。
➜  ~ npm init --help

npm init [--force|-f|--yes|-y|--scope]
npm init <@scope> (same as `npx <@scope>/create`)
npm init [<@scope>/]<name> (same as `npx [<@scope>/]create-<name>`)

aliases: create, innit
➜  ~
如果你发现npm install很慢,多半是长城的问题,建议你改成国内的淘宝源npm install --registry=https://registry.npm.taobao.org, 如果发现也还是不好使,终极解决方案: 科X学X上X网,逃~。
代码规范
努力做好六件事:
不同编辑器下的代码规范 eslint作语法规范 prettier作格式规范 做好代码兼容性处理 手动挡控制单文件格式化 提交代码前确认所修改文件或者整个项目代码规范
EditorConfig
这个对应我们上面努力做好的第一件事 - 不同编辑器下的代码规范。在现实多人开发中,由于开发者的行为习惯不同可以会导致代码的风格有所不同,有些人喜欢用vscode,有些人喜欢用webstorm,也许他们用的编辑器是一样的,但是由于开发者在全局配置了一些设置,会导致整个项目代码不符合预期,所以,我们需要一个在编辑器层面去协调各个编辑器环境下的代码风格,EditorConfig是一个不错的选择,这个是本项目用到的关于EditorConfig的一些配置。
配置说明:
root=true: 表示是最顶层的配置文件,发现设为true时,才会停止查找.editorconfig文件
When opening a file, EditorConfig plugins look for a file named .editorconfig in the directory of the opened file and in every parent directory. A search for .editorconfig files will stop if the root filepath is reached or an EditorConfig file with root=true is found.
EditorConfig files are read top to bottom and the most recent rules found take precedence. Properties from matching EditorConfig sections are applied in the order they were read, so properties in closer files take precedence.
原文地址:https://github.com/editorconfig/editorconfig/issues/376
[*]: 表示所有文件end_of_line = lf注意这个不是if,而是lf, 表示换行符,它有lf、crlf、cr等等,跟系统关系比较大,反正大家都统一一下用lf,可以看下这个有名的故事-GitHub 第一坑:换行符自动转换insert_final_newline = true: 表示在末尾插入新行[*.{js,py}]: 表示js和python文件charset = utf-8: 表示字符集为utf-8indent_style = space: 表示代码锁进格式用空格indent_size = 2: 表示一个缩进大小两个空格quote_type = single: 字符串设置为单引号trim_trailing_whitespace = true: 表示是否在行尾修剪空白
# This file is for unifying the coding style for different editors and IDEs
# editorconfig.org

# top-most EditorConfig file
root = true

# Unix-style newlines with a newline ending every file
[*]
end_of_line = lf
insert_final_newline = true

# Denotes whether to trim whitespace at the end of lines
trim_trailing_whitespace = true

# Matches multiple files with brace expansion notation
[*.{js}]
charset = utf-8
quote_type = single
indent_style = space
indent_size = 2

[{package.json,.travis.yml}]
indent_style = space
indent_size = 2
额,我觉得学这部分是有捷径的,就是去嫖名项目它们的配置,然后把它们搞懂再应用到自己或者团队的项目中。比如JQuery, Bootstrap的,跟对项目,做对事可以少走很多弯路的。
ESLint
这个对应第二件事 -eslint作语法规范。eslint用来做一些js语法规范,避免一些语法上的错误,当然也可以做格式上的规范。这个是本项目用到的关于eslint的一些配置。
配置说明:
extends: 继承,表示它继承了某些配置, 比如eslint:recommended表示继承了其推荐的配置,可以继承多个的,用数组表示plugins: 表示安装的插件, 写配置的时候可以省略前面的前缀eslint-plugin-parserOptions: 表示解析选项ecmaVersion: 表示es语法的版本, 默认为 3, 5。2015表示es6, 后面可自推sourceType: 默认是scirpt,如果是ES模块用moduleecmaFeatures: 表示额外的语言特性parser: 解析器,比如babel-eslint, 表示一个对Babel解析器的包装,使其能够与 ESLint 兼容rules: 表示 启用的规则及其各自的错误级别,0, 1,2分别对应off, warn, errorno-console: 表示禁止调用console对象的方法func-names: 禁止命名的 function 表达式no-unused-vars: 表示禁止未使用的变量object-shorthand: 要求变量自变量简写prettier/prettier: 表示eslint下prettier的规则兼容arrow-body-style: 要求箭头函数使用大括号prefer-arrow-callback: 要求使用箭头函数作为回调camelcase: 使用驼峰拼写法space-before-function-paren: 禁止函数圆括号之前有空格env: 指定脚本的运行环境,比如在其里面写"es6": true, 表示自动启动es6语法,"browser": true表示支持浏览器环境
{
  "extends": ["prettier", "plugin:prettier/recommended"],
  "plugins": ["prettier"],
  "parserOptions": {
    "ecmaVersion": 2015,
    "sourceType": "module",
    "ecmaFeatures": {
      "jsx": true,
      "globalReturn": true,
      "impliedStrict": true
    }
  },
  "parser": "babel-eslint",
  "rules": {
    "no-console": "off",
    "func-names": "off",
    "no-unused-vars": "warn",
    "object-shorthand": "off",
    "prettier/prettier": [
      "error",
      {
        "endOfLine": "auto",
        "singleQuote": true,
        "trailingComma": "es5"
      }
    ],
    "arrow-body-style": "off",
    "prefer-arrow-callback": "off",
    "camelcase": "off",
    "no-new": "off",
    "space-before-function-paren": "off"
  },
  "env": {
    "es6": true,
    "browser": true
  }
}
Prettier
这个对应第三件事 - prettier作代码的格式规范, 这个是本项目关于prettier的配置
配置说明:
semi: 句尾添加分号tabWidth: 缩进字节数singleQuote: 使用单引号代替双引号endOfLine: 结尾是\n \r \n\r autotrailingComma: 在对象或数组最后一个元素后面是否加逗号bracketSpacing:在对象,数组括号与文字之间加空格 "{ foo: bar }"alwaysParens:(x) => {}箭头函数参数只有一个时是否要有小括号。avoid:省略括号eslintIntegration: 不让prettier使用eslint的代码格式进行校验jsxSingleQuote: 在jsx中使用单引号代替双引号
{
  "semi": true,
  "tabWidth": 2,
  "singleQuote": true,
  "endOfLine": "lf",
  "trailingComma": "es5",
  "bracketSpacing": true,
  "alwaysParens": "always",
  "eslintIntegration": true,
  "jsxSingleQuote": true
}
看到这里,我们先停一停思考下,这么多配置,它们会不会产生冲突呢?那我要怎么去避免冲突,或者解决冲突呢?其实楼上已经提到了用eslintIntegration不让prettier使用eslint的代码风格校验。然后在之前的eslint学习中,也可以通过在rule下新增规则作为补充。
babel
这个对应第四件事 -做好代码兼容性处理。babel是一个Javascript编译器,可以将高版本的es语法,转换成低版本的,以便能够运行在低版本浏览器或者其他环境,楼下是这个项目的babel的配置文件
配置说明:
presets: 预设,进行相关语法转义plugins:插件,补丁转义器,弥补楼上先天不足env:环境变量
{
  "presets": [
    [
      "@babel/preset-env",
      {
        "targets": {
          "browsers": [">0.25%", "not ie 11", "not op_mini all"]
        },
        "exclude": [
          "@babel/plugin-transform-async-to-generator",
          "@babel/plugin-transform-arrow-functions"
        ],
        "corejs": { "version": "3.8", "proposals": true },
        "useBuiltIns": "usage"
      }
    ]
  ],
  "plugins": [
    "@babel/transform-runtime",
    "@babel/plugin-proposal-class-properties"
  ],
  "env": {
    "test": {
      "plugins": ["istanbul"]
    }
  }
}
可以看下我之前写的关于babel的一篇文章- Babel:下一代Javascript语法编译器
一般来讲有其配置文件,也会有其配置忽略文件, 比如``.prettierrc和.prettierignore`, 其它的读者自行触类旁通,然后配置的文件格式也有很多种,比如说json文件,js文件,rc结尾的文件等等, 这里纯粹是个人习惯, 笔者一般是用 .xxxrc
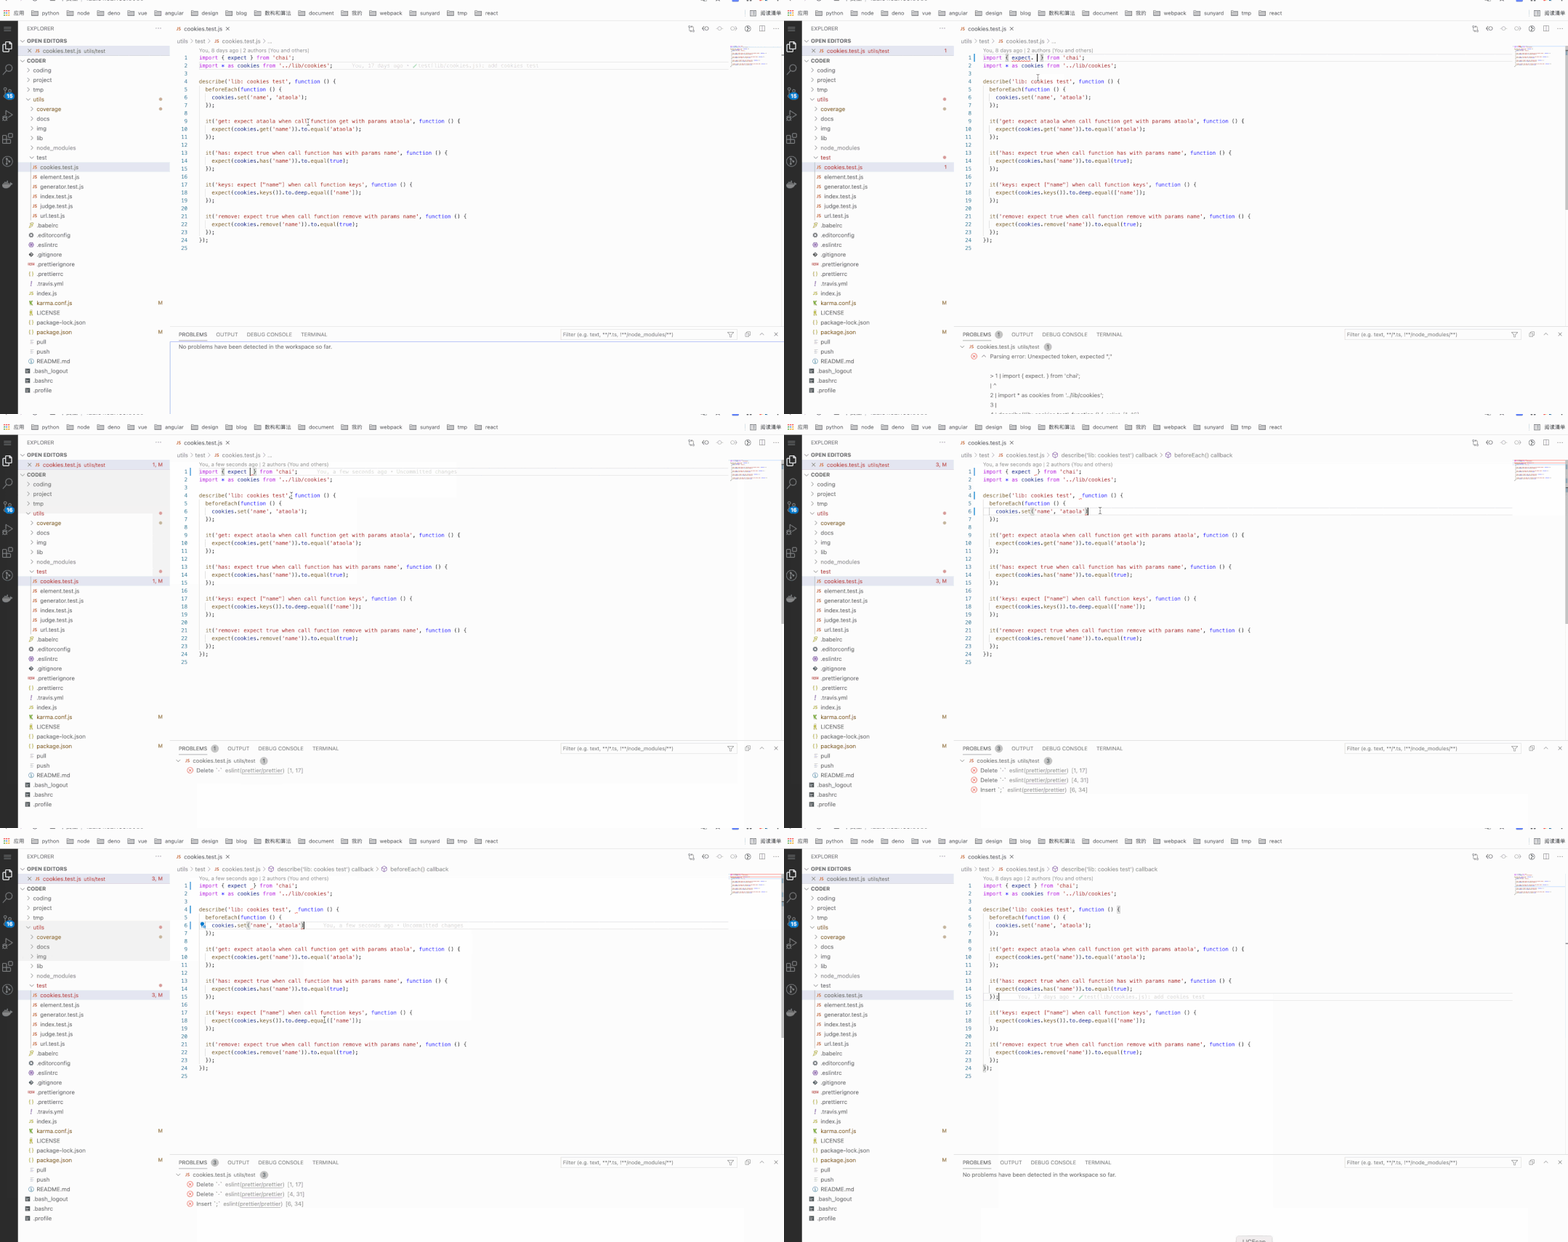
手动挡控制单文件格式化
这里笔者以手动挡开头,我觉得非常应景和带感。与之对应的便是自动挡智能格式化。举个例子吧,比如你选择边打边格式化,未免也太浪费资源了,而且可能它格式化的会和你当时的想法有冲突。所以每次按下CTRL + S进行格式化的话,是一个很好的方案。它就好比开车,停车的话,挂空挡,拉手刹,下车干饭,是一气呵成的,那个CTRL + S就好比驾驶员手握的挂挡器,带感。什么?刹车失灵?不存在的,阿Sir!!!
来看一下效果:

提交代码前确认所修改文件或者整个项目代码规范
前面我们提到的是我们在平时开发中,对于单个文件的代码规范手段,那么对于整个项目,我们应该在每次提交前再去检查确认一遍,这样子我们提交到远程的代码才有保障。细心的同学可能已经发现了,是的,在文章开头讲到的package.json中可以配置husky和lint-staged去做这件事。husky做提交前的检查, 而lint-staged则优化了检查的范围是要提交检查的,从而加快速度提高效率。
由于husky和lint-staged的版本不同配置也不同,这里笔者用的是最新的配置,具体的参考了这位国际友人的文章https://qiita.com/sprout2000/items/29e8a637dda259bab26d
我这里的话, 就是在每次提交的时候对js、ts等文件进行eslint和prettier格式化,配置如下:
 "husky": {
    "hooks": {
      "pre-commit": "lint-staged"
    }
  },
  "lint-staged": {
    "*.{js,ts,jsx,tsx}": [
      "eslint . --fix",
    ]
  }
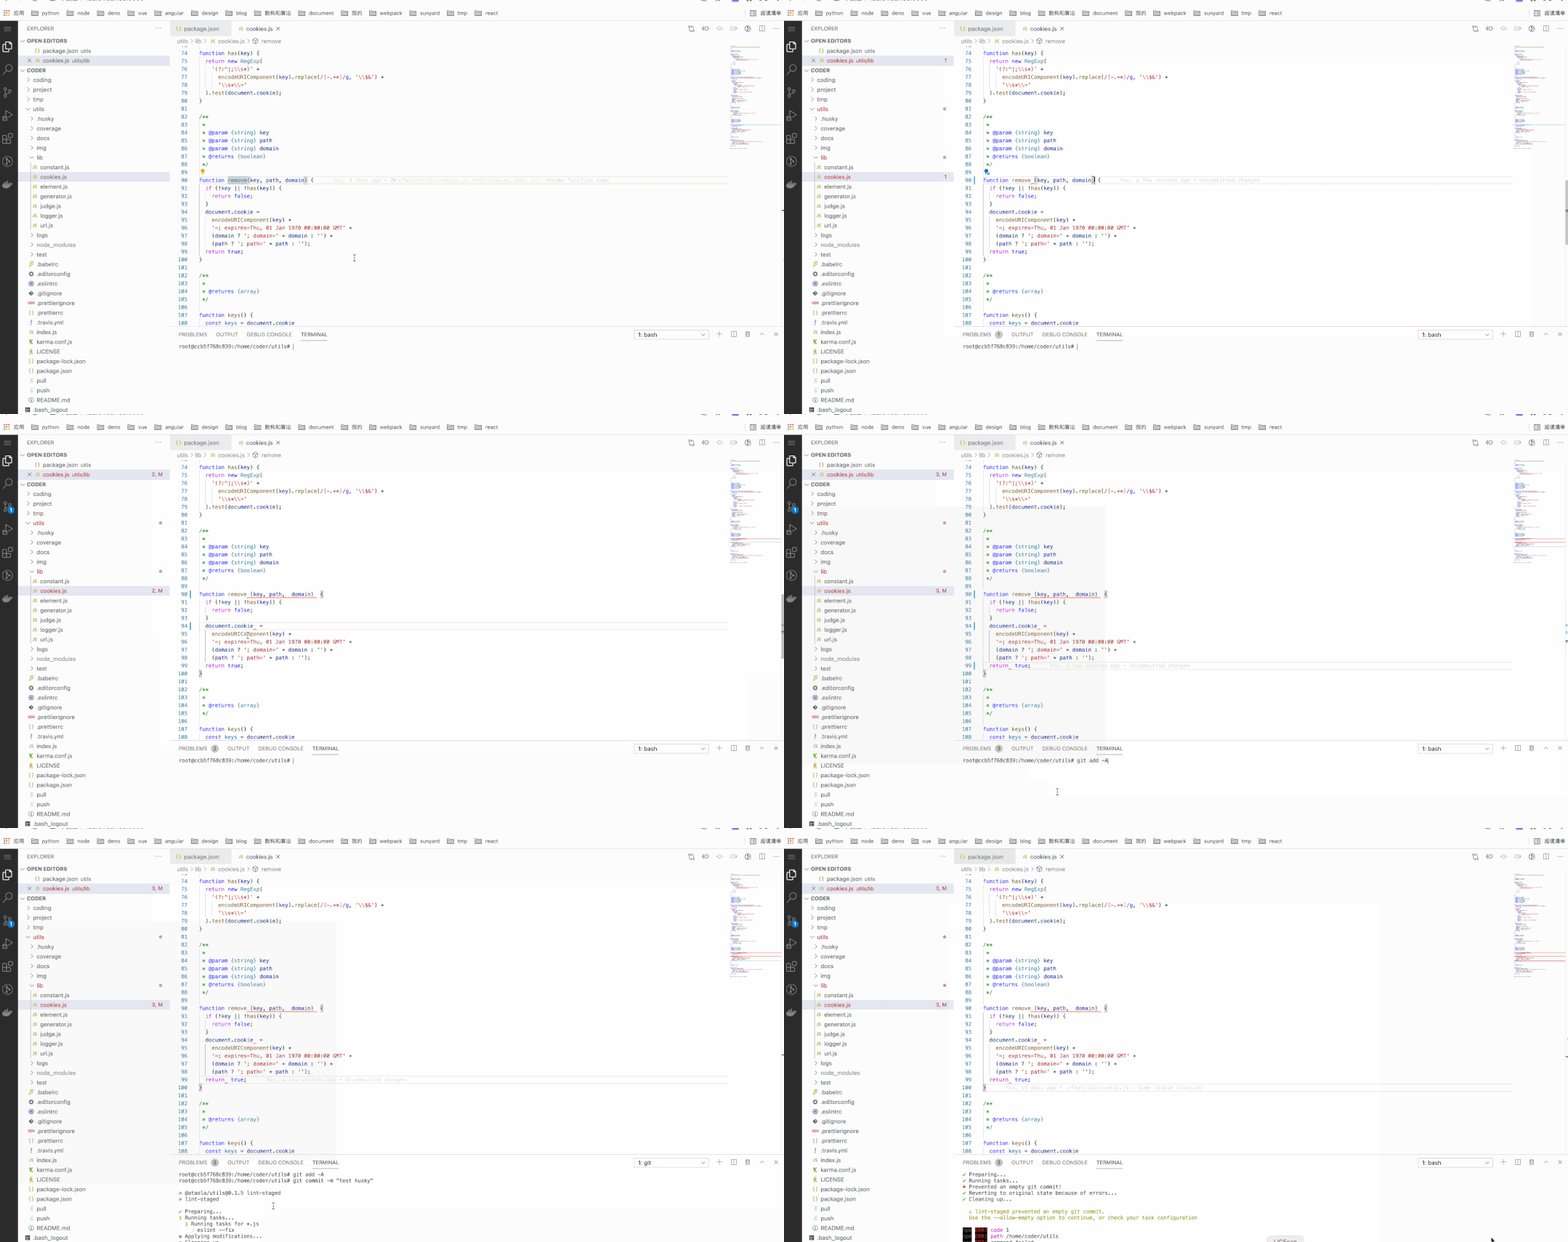
来看一下效果:

这里为了让大家更明显直观看到效果,笔者没有加prettier格式化那一句在lint-staged里面,后续加上后,关于格式的问题会被自动修复, 如下
 "husky": {
    "hooks": {
      "pre-commit": "lint-staged"
    }
  },
  "lint-staged": {
    "*.{js,ts,jsx,tsx}": [
      "eslint . --fix",
      "prettier --config .prettierrc --write ."
    ]
  }
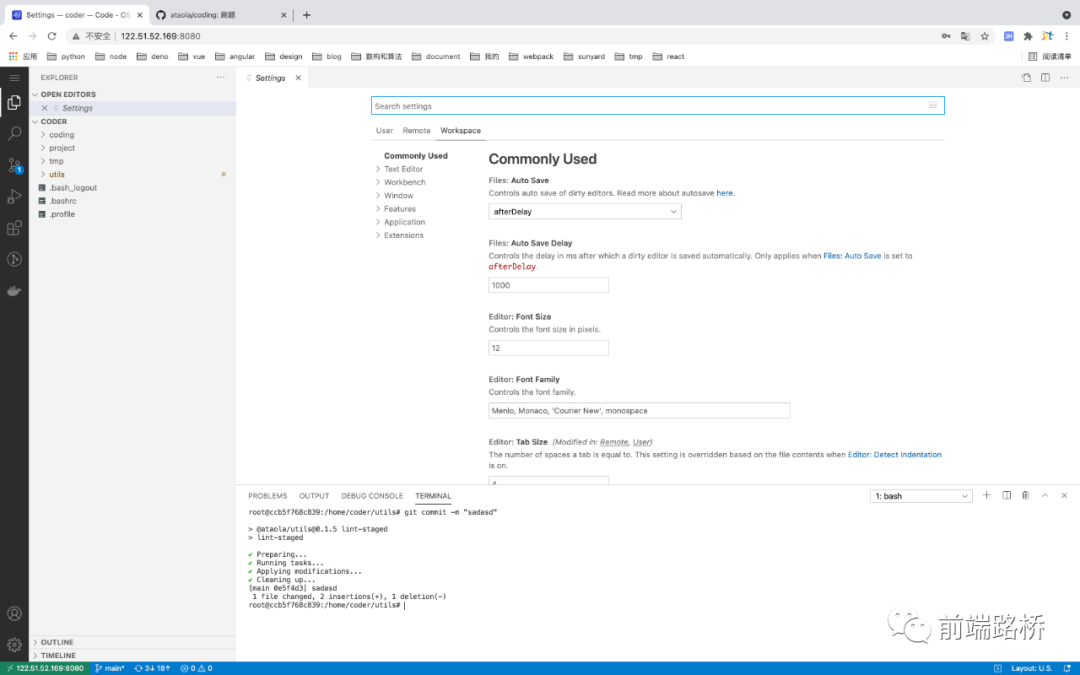
效果如下
root@ccb5f768c839:/home/coder/utils# git commit -m "test husky and lint-staged"

> @ataola/utils@0.1.5 lint-staged
> lint-staged

✔ Preparing...
✔ Running tasks...
✔ Applying modifications...
✔ Cleaning up...
[main 0e5f4d3] sadasd
 1 file changed, 2 insertions(+), 1 deletion(-)
root@ccb5f768c839:/home/coder/utils#
项目目录
目录说明:
LICENSE: 授权文件README.md: 说明文件coverage: 代码覆盖率文件夹docs: 文档文件夹img: 图片文件夹index.js: 入口文件log: 日志文件夹node_modules: 安装的npm依赖文件夹package-lock.json: npm的配置文件锁package.json: npm的配置文件pull: 拉取远程github仓库的脚本push: 上传远程github仓库以及npm发包的脚本test: 单元测试文件夹
➜  utils git:(main) tree -L 1
.
├── LICENSE
├── README.md
├── coverage
├── docs
├── img
├── index.js
├── karma.conf.js
├── lib
├── logs
├── node_modules
├── package-lock.json
├── package.json
├── pull
├── push
└── test

7 directories, 8 files
➜  utils git:(main)
项目命名规范建议:
应该使其文件或文件名命名具有语意,不会你就翻字典
推荐 城市 city鄙视 城市 chengshi严重鄙视 城市 cs要么用命名缩写,要么用全名,建议全名用复数形式
因为img是image的缩写,你再加个s就没有啥语意了,而全名的images表示图片,这里可能有读者会钻牛角尖,你那个
docs不是和楼上冲突了吗?不是的, doc英文单词是文档,docs是其复数形式, 这要和document区分开。推荐缩写 img不推荐缩写 imgs推荐全写 images不推荐全写 image
我们可以通过tree命令去查看项目文件结构,-L表示深度层数, mac用户可以通过brew install tree安装,ubuntu用户可以通过apt-get install tree -y安装,centos用户可以通过yum install tree -y安装,window用户请下载相关tree包并配置到path环境变量里去, 或者去搜下window下的包管理命令`
git工作流和npm
努力做两件事:
用脚本偷懒代替一行一行的敲命令,或者IDE点点点 把鸡蛋放在墙内和墙外两个篮子里
脚本一把梭,梭,梭哈
我们先思考下,在git工作流中,有这样三个概念, 萌萌哒的我, 远程仓库,本地仓库。那,以这三个概念造句子,可以这么玩。萌萌哒的我爽朗地把本地仓库推向了远程仓库,远程仓库被萌萌哒的我潇洒地拉到了本地仓库。是的,这个在生活中有很形象的例子,还是萌萌哒的我饥馋碌碌地推开肯德基的大门去干饭,半个小时过去了,满怀滋润的我拉开了肯德基的大门扬长而去。综上所述,我们大致可以概括出两个行为,推(push)和拉(pull),好上脚本。
push
#!/usr/bin/env bash

set -e

function git_branch_name() {
    git branch 2> /dev/null | sed -e '/^[^*]/d' -e 's/* \(.*\)/\1/'
}

function e() {
    echo "┏━━━━━━━━━━━━━━━━━━━━━━━━━━━━━━━━━━━━━━━━━━┓"
    printf "┃$(tput bold) %-40s $(tput sgr0)┃\n" "$*"
    echo "┗━━━━━━━━━━━━━━━━━━━━━━━━━━━━━━━━━━━━━━━━━━┛"
    "$@"
}

CURRENT_BRANCH=$(git_branch_name)

if [[ $CURRENT_BRANCH = feature/* ]]; then
  e git stash
  e git checkout main
  e git pull
  e git checkout "$CURRENT_BRANCH"
  e git merge main
  e git push
  e git stash pop || true
elif [[ $CURRENT_BRANCH = main ]]; then
  e git stash
  e git push
  e nrm use npm
  e npm publish --access public
  e nrm use taobao
  e git stash pop || true
fi
在push这个行为上,我们需要考虑两点。第一,远程代码有更新吗?跟我本地会有冲突吗?第二,我当前是在哪个分支,我代码才刚写到一半,我不想提交这么办?git stash就是将你当前的代码改动存入暂缓区,使得其恢复上一次提交的状态,这个时候你从远程拉下来代码,再去merge下,然后你执行git stash pop,git checkout是切换分支。
上面代码的意思是,如果我是在某个特性分支,那么就先把我目前的改动存入暂缓区,然后切到主分支main,去拉取远程代码,然后切回我当前的分支,再去对主分支进行merge,然后执行push,最后再把我的改动从暂缓区拿出来,然后就可以继续开发了。如果我当前是主分支,那太开心了,先把当前改动存入暂缓区,然后直接push,再来个npm发包,然后把当前改动弹出来。
pull
#!/usr/bin/env bash

set -e


function git_branch_name() {
    git branch 2> /dev/null | sed -e '/^[^*]/d' -e 's/* \(.*\)/\1/'
}

function e() {
    echo "┏━━━━━━━━━━━━━━━━━━━━━━━━━━━━━━━━━━━━━━━━━━┓"
    printf "┃$(tput bold) %-40s $(tput sgr0)┃\n" "$*"
    echo "┗━━━━━━━━━━━━━━━━━━━━━━━━━━━━━━━━━━━━━━━━━━┛"
    "$@"
}

CURRENT_BRANCH=$(git_branch_name)

if [[ $CURRENT_BRANCH = feature/* ]]; then
  e git stash
  e git checkout main
  e git pull
  e git checkout "$CURRENT_BRANCH"
  e git merge main
  e git stash pop || true
elif [[ $CURRENT_BRANCH = main ]]; then
  e git stash
  e git pull
  e git stash pop || true
fi
这个pull和上面的push类似的,就不赘述了,读者照着楼上的push去理解下pull吧。
多个remote的真香定律
为什么会有这个想法呢?由于不可描述的原因,墙对于天朝开发者来说始终是一个神秘的存在,当我们在使用GitHub的时候,有时会遇到DNS污染,有时可能是墙的问题,总之就是提交也很难提交上去,拉也拉不下来。特别是在自己的云服务器上去拉GitHub上的代码,等的花儿都谢了,算了放弃吧,先走为敬。这个时候码云是个神奇的存在,用它拉取代码速度是相当的快,于是我蠢蠢欲动地加了一个码云的remote,直接提交到码云了,这样子一个好处是,我本地就起一份代码就好了,用不着同一个项目搞两份代码。嗯,remote真香!!!
下面是我添加码云的remote地址,然后把它上传到码云的步骤:
git remote add gitee https://gitee.com/taoge2021/utils.git
git fetch gitee
git checkout -b gitee-main gitee/main
git merge main
git push gitee main
npm
这个其实在楼上代码已经有所体现了,这里简单讲下就是,你先去https://www.npmjs.com/去注册一个账号,然后本地npm login去登陆这个账号,如果你想发布一个形如@ataola/utils的包,那么执行npm publish --access public, 如果你不想的话npm publish就可以了。
注意:发包的时候不要切到淘宝源,是在npm源上提交,可以通过 npm config set registry作转化, 也可以用nrm这个包作源的管理
测试、持续集成和代码覆盖率
努力做三件事:
单元测试 持续集成测试 代码覆盖率测试
karma + mocha + chai
做测试的技术选型搭配其实有很多,我这里用到楼上这三位。是这样子的,因为我这个库定义是给前端用的,后续会涉及到一些DOM,BOM等等的相关测试,我期望它是真的开了个浏览器去测试我的代码。而Karma这个测试运行器它可以做到这点,而且它还是开源的。mocha是比较有名的测试框架,后面的chai是用来作断言的。
karam的配置创建可以看下package.json里面我配置的script脚本
 "karma:init": "karma init ./karma.conf.js",
 "karma:test": "karma start ./karma.conf.js",
npm run karma:init表示创建一个karma的配置文件,而npm run karma:test表示启动karma相关测试。
附上一份karma.conf.js, 由于配置较多,这里如果默认生成的话,大部分都不需要你动,就挑几个讲下,具体的还是要去看官方文档的http://karma-runner.github.io/6.3/config/configuration-file.html
framework: 表示你装的一些框架plugins: 故名思义,装的插件files: 表示要加载浏览器的文件preprocessors: 一些预处理操作browsers: 可提供的浏览器webpack: 暴露的webpack配置接口mochaReporter:暴露的mocha配置接口
// Karma configuration
// Generated on Sat Apr 10 2021 00:13:46 GMT+0800 (中国标准时间)

module.exports = function (config) {
  config.set({
    // base path that will be used to resolve all patterns (eg. files, exclude)
    basePath: '',

    // frameworks to use
    // available frameworks: https://npmjs.org/browse/keyword/karma-adapter
    frameworks: ['mocha', 'chai', 'webpack'],
    plugins: [
      'karma-chrome-launcher',
      'karma-mocha',
      'karma-mocha-reporter',
      'karma-chai',
      'karma-webpack',
      'karma-coverage',
    ],

    // list of files / patterns to load in the browser
    // test all
    files: ['lib/**/*.js', 'test/**/*.js'],
    // test single file
    // files: ['test/**/judge.test.js'],

    // list of files / patterns to exclude
    exclude: [],

    // preprocess matching files before serving them to the browser
    // available preprocessors: https://npmjs.org/browse/keyword/karma-preprocessor
    // test all
    preprocessors: {
      'lib/**/*.js': ['webpack', 'coverage'],
      'test/**/*.js': ['webpack'],
    },
    // test single file
    // preprocessors: {
    //   'test/**/judge.test.js': ['webpack'],
    // },

    // test results reporter to use
    // possible values: 'dots', 'progress'
    // available reporters: https://npmjs.org/browse/keyword/karma-reporter
    reporters: ['progress'],
    // https://github.com/litixsoft/karma-mocha-reporter
    reporters: ['mocha', 'coverage'],
    mochaReporter: {
      colors: {
        success: 'blue',
        info: 'bgGreen',
        warning: 'cyan',
        error: 'bgRed',
      },
      symbols: {
        success: '+',
        info: '#',
        warning: '!',
        error: 'x',
      },
      output: 'autowatch',
      showDiff: true,
      divider: '',
    },
    coverageReporter: {
      dir: 'coverage/',
      reporters: [
        { type: 'lcov', subdir: '.' },
        { type: 'text', subdir: '.', file: 'text.txt' },
        { type: 'text-summary', subdir: '.', file: 'text-summary.txt' },
      ],
    },

    // web server port
    port: 9876,

    // enable / disable colors in the output (reporters and logs)
    colors: true,

    // level of logging
    // possible values: config.LOG_DISABLE || config.LOG_ERROR || config.LOG_WARN || config.LOG_INFO || config.LOG_DEBUG
    logLevel: config.LOG_INFO,

    // enable / disable watching file and executing tests whenever any file changes
    autoWatch: true,

    // start these browsers
    // available browser launchers: https://npmjs.org/browse/keyword/karma-launcher
    browsers: ['Chrome', 'ChromeHeadless', 'ChromeHeadlessNoSandbox'],

    // you can define custom flags
    customLaunchers: {
      ChromeHeadlessNoSandbox: {
        base: 'ChromeHeadless',
        flags: ['--no-sandbox'],
      },
    },

    // Continuous Integration mode
    // if true, Karma captures browsers, runs the tests and exits
    singleRun: !!process.env.CI,

    // Concurrency level
    // how many browser should be started simultaneous
    concurrency: Infinity,
    webpack: {
      mode: 'development',
      //       entry: ['@babel/polyfill'],
      //       entry: ['./index.js'],
      module: {
        rules: [
          {
            test: /\.js$/,
            exclude: /node_modules/,
            use: {
              loader: 'babel-loader',
              options: {
                presets: [
                  [
                    '@babel/preset-env',
                    {
                      corejs: { version: '3.8', proposals: true },
                      useBuiltIns: 'usage',
                    },
                  ],
                ],
                plugins: ['istanbul'],
              },
            },
          },
        ],
      },
    },
  });
};
这里如果我是写Node的话,我会用jest,因为配置会简单些。具体的读者可以阅读下我之前写的文章使用jest进行单元测试, 附上一个完整实战的例子,这个是我刷leetcode做的单元测试的项目地址,https://github.com/ataola/coding
travis
travis是做持续集成的,贴一份笔者的配置,需要注意的是,版本的不同可能配置也不太一样,具体的还是要去看官方文档https://docs.travis-ci.com/
language: node_js
node_js: stable

notifications:
  email:
    recipients:
      - zjt613@gmail.com
    on_success: change
    on_failure: always

branches:
  only:
    - main

cache:
  apt: true
  directories:
    - node_modules

os: linux
# https://docs.travis-ci.com/user/reference/overview/
dist: xenial
addons:
  chrome: stable
services:
  - xvfb
sudo: required

# turn off the clone of submodules for change the SSH to HTTPS in .gitmodules to avoid the error
git:
  submodules: false

before_install:
  - 'export DISPLAY=:99.0'
  - sleep 3 # give xvfb some time to start
  - '/sbin/start-stop-daemon --start --quiet --pidfile /tmp/custom_xvfb_99.pid --make-pidfile --background --exec /usr/bin/Xvfb -- :99 -ac -screen 0 1280x1024x16'
  - google-chrome-stable --headless --disable-gpu --remote-debugging-port=9222 http://localhost &

install:
  - npm set progress=false
  - npm install

script:
  - npm run karma:test

after_script:
  - npm run codecov
codecov
codecov是做代码覆盖率测试的, 执行npm install codecov -D去安装它,然后在packge.json里面配置好script就好了"codecov": "codecov", 我们在做持续集成的时候,最下面在执行完相关karma测试后,最后会执行npm run codecov去读取 coverage 目录中的 lcov.info 文件,然后上传到 Codecov 网站
测试这块做了这么多工作,其实就是当了一回场面人,在仓库首页给它一个特写,这里加了travis持续集成的构建结果和codecov的代码覆盖率以增加项目的可信度和逼格。
VSCode 开发环境
思考两件事:
如何配置不同的开发环境,区分开发环境的共性和不同,以及其引起的不同(权衡不同项目利弊) 最小化插件原则,提高电脑运行效率,不搞花里胡哨,不装逼,把电脑当朋友
环境的共性和不同
为什么会有这个问题,也还是源自生活中遇到的事。笔者最开始为了一步到位,将相关的prettier、eslint等等的相关配置都写到了全局的,也就是user下面,后来在拉取项目的时候发现,很多时候特别是多人开发,由于eslint和prettier的配置不一样,或者根本就没有这块的配置,导致代码堆积如屎山难以维护,这促使我有了进一步的思考是,区分编辑器的共性和不同。举个例子,比如说terminal这个插件,它其实可以配置调节在终端光标的粗细,我就不是很喜欢那种肥肥的光标,就把它改成line,这种是属于不同,是你的个性,不会因为说你设置了这个会影响到整个项目,别人电脑里没设置还是肥肥的光标。那么什么是共性,就比如最开始笔者说的将prettier、eslint配置到全局的做法,违背了共性,这里需要说明的一点是,违背不代表我是错的,在这件事情上没有对错,大环境决定的,如果一只队伍里大家都认为 1 + 1 =3,那么即使你认为1 + 1 = 2,从大局上考虑,这里就姑且迁就下1 + 1 = 3吧,你可以沉默不说话,但你心里要有你坚定的真理的答案,这个叫站队。
具体的解决方案我认为是,你可以在全局里去配置以那种方式去做一件事,但是具体的规则和形式需要单独拎出来,不能写全局里面。可以新建一个.vscode文件夹,然后在这个项目里面单独配置,结合.prettierrc、.eslintrc等,可以参考下这个项目https://github.com/ataola/coding

推荐插件
prettier: 代码格式 eslint:语法格式 GitLens:git辅助 gi t-commit-plugin:规范git提交信息 Terminal:终端工具 Vetur:写vue辅助工具 vscode-icons:编辑器主题 TODO Highlight 高亮要做的事
笔者以前也是个使用插件狂魔,总喜欢去试试倒腾这个插件那个插件好不好使好不好玩,再后来我那个 多年前买的window不堪重负萎靡不振,我就没有这个想法了,插件只是个辅助工具,根据使用频繁度和实用性去考量吧,老罗有句话说得好, 又不是不能用?

示例讲解
关于处理url参数转成对象的格式,这个是前端开发面试的常考题,因为它实用性强,涉及基础的数组字符串处理,答案还不唯一,所以这里笔者抛砖引玉,就以它为例子去讲吧。
getQueryParameters如果对正则不熟悉的话,这里可以用字符串分割分割再分割来做,具体的如下
/**
 *
 * @param {string} url
 * @returns {object}
 */
function getQueryParameters(url) {
  const paramStr = decodeURIComponent(url).split('?')[1];
  if (!paramStr) {
    return {};
  }
  const paramArr = paramStr.split('&');
  const res = {};
  paramArr.forEach((param) => {
    const [key, value] = param.split('=');
    res[key] = value;
  });
  return res;
}
相关测试
import { expect } from 'chai';
import { getQueryParameters } from '../lib/url';

describe('lib: url test', function () {
  it('getQueryParameters: expect { name: "ataola", age: "24" } when call function with params "https://zhengjiangtao.cn?name=ataola&age=24"', function () {
    expect(
      getQueryParameters('https://zhengjiangtao.cn?name=ataola&age=24')
    ).to.deep.equals({ name: 'ataola', age: '24' });
  });
  });
});
最后
至此,笔者已经向读者们介绍了一个前端项目从有想法到去实践再到总结分享的心路历程。谢谢大家的赏脸阅读,谈起为什么写这个项目,第一是项目做多了,自然而然就会有些想法,明人不说暗话我想偷点懒划水,想早点下班哇,所以工作之余就勤快点把平时工作或者刷题常用到的总结整理下,打磨成一把瑞士军刀,提高战斗力;第二是像我们搞程序的,都挺单纯的,有句话说得好”no BB, show me the code!“,可能不是很会表达自己吧,那就上代码吧,希望面试官看了能够加点印象分或者综合得分,哈哈。
项目地址: https://github.com/ataola/utils
