动手实践!从零开始实现Springboot+Vue登录
作者:Eli Shaw
https://blog.csdn.net/xiaojinlai123/article/details/90694372
一、简述
最近学习使用 Vue 实现前端后端分离,在 Github 上有一个很好的开源项目:mall,正所谓百看不如一练,自己动手实现了一个 Springboot+Vue 的登录操作,在此记录一下踩过的坑。
文章最后补充两端的 GitHub 代码,之所以放在最后,是因为文章写的很细致了,动手操作一下会更有帮忙,如果有很大出入可以比对原码,找找问题。
二、开发工具
VSCode
IDEA
Vue 的安装就不说了,有很多文章,但是 Springboot+Vue 整合的完整文章相对较少,所以我主要记录一下这两端整合时的内容。
(Vue 安装后就会有 npm 或 cnpm,相应的介绍也不说了,Vue 官网可查看)
一、打开 cmd 创建 Vue 项目,并添加 Vue 依赖的框架:
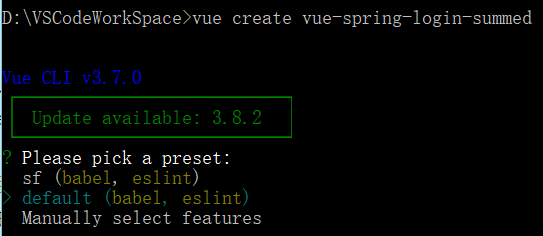
1. 创建 Vue 项目 (进入自己想创建的文件夹位置,我放在 D:\VSCodeWorkSpace),创建语句 vue create vue-spring-login-summed,方向键选择创建方式,我选择的默认
2. 进入到创建的 Vue 项目目录,添加依赖框架:
cd vue-spring-login-summed (进入到项目根目录)
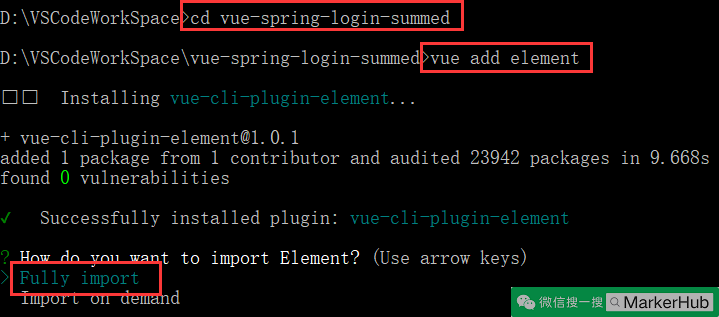
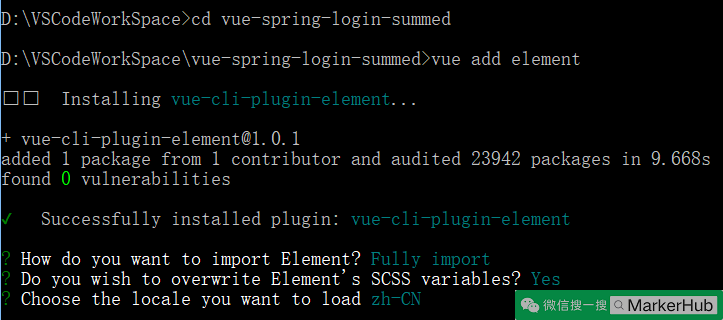
vue add element (添加 element,一个 element 风格的 UI 框架)
npm install axios (安装 axios,用于网络请求)
npm install vuex --save(安装 Vuex,用于管理状态)
npm install vue-router (安装 路由,用于实现两个 Vue 页面的跳转)
以上命令截图如下:
1) 添加 Element
2) 添加 axios

3) 添加 Vuex

4) 添加 路由

到此相关依赖的架包添加完毕,输入 code . 打开 VSCode

二、添加目录结构
在 VSCode 下看到 Vue 整体项目结构如下
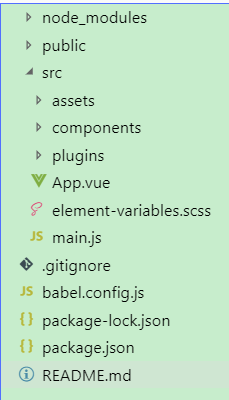
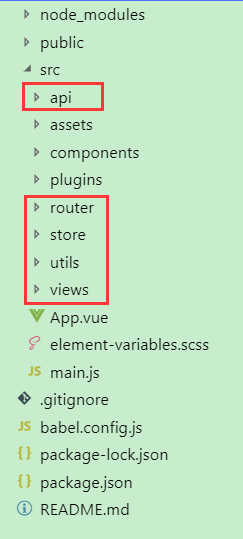
现在需要创建相应功能的目录结构,进行分层开发,需要在 src 目录下创建下面几个目录
api (网络请求接口包)
router (路由配置包)
store (Vuex 状态管理包)
utils (工具包)
views (vue 视图包,存放所有 vue 代码,可根据功能模块进行相应分包)
创建后的目录结构如下
三、运行项目
现在可以运行项目了,在 VSCode 菜单栏依次选择:终端 —— 运行任务...

这里使用的是 serve 模式,即开发模式运行的项目

在浏览器输入:http://localhost:8080/

这是 Vue 默认的页面,代表项目创建成功了,在进行代码开发前,先贴上项目整体结构,防止不知道在哪创建
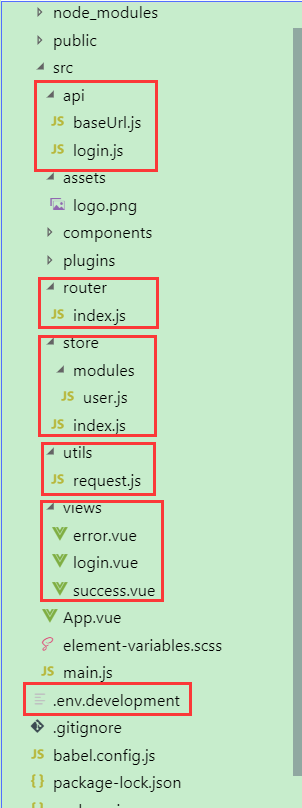
四、View 层代码编写
编写三个 vue 文件:login.vue(登录页面)、success.vue(登录成功页面)、error.vue(登录失败页面)
1.login.vue
代码如下 (比较懒,直接从 mall 扒下来的代码,去掉了一些功能)
autocomplete="on"
:model="loginForm"
ref="loginForm"
label-position="left"
>
class="login-mall">
mall-admin-web
"username">
type="text"
v-model="loginForm.username"
autocomplete="on"
placeholder="请输入用户名"
>
"prefix">
class="user">
"password">
:type="pwdType"
@keyup.enter.native="handleLogin"
v-model="loginForm.password"
autocomplete="on"
placeholder="请输入密码"
>
"prefix">
class="password">
"suffix" @click="showPwd">
class="eye">
type="primary"
:loading="loading"
@click.native.prevent="handleLogin"
>登录
2.success.vue
Welcome!{{msg}}
3.error.vue
登录错误:{{msg}}
五、路由
页面写好了,我们需要依次显示这三个页面,这里我们统一使用路由来管理显示页面,路由的官方文档见:vue 路由
本着先实践,后理解的码农学习方式。我们先使用路由显示三个页面后,再去理解 Vue 路由这个功能点。
1. 创建路由配置文件
在刚才建立的 router 文件夹下创建一个 index.js 文件,内容如下
import Vue from 'vue' //引入 Vue
import VueRouter from 'vue-router' //引入 Vue 路由

Vue.use(VueRouter); //安装插件

export const constantRouterMap = \[
    //配置默认的路径,默认显示登录页
    { path: '/', component: () => import('@/views/login')},

    //配置登录成功页面,使用时需要使用 path 路径来实现跳转
    { path: '/success', component: () => import('@/views/success')},

    //配置登录失败页面,使用时需要使用 path 路径来实现跳转
    { path: '/error', component: () => import('@/views/error'), hidden: true }
\]

export default new VueRouter({
    // mode: 'history', //后端支持可开
    scrollBehavior: () => ({ y: 0 }),
    routes: constantRouterMap //指定路由列表
})
2. 将路由添加到程序入口
路由配置文件写好,我们需要把他引入到 main.js 中,在项目的 src 目录根节点下,找到 main.js,添加内容如下:
import Vue from 'vue'
import App from './App.vue'
import './plugins/element.js'
import router from './router' //引入路由配置

Vue.config.productionTip = false

new Vue({
  render: h => h(App),
  router, //使用路由配置
}).$mount('#app')
3. 配置路由的出入口
现在路由已经完全引入到项目了,但是路由还需要一个出入口,这个出入口用来告诉路由将路由的内容显示在这里。上面 main.js 配置的第一个 vue 显示页面为 App.vue ,因此我们修改 App.vue 内容如下
现在保存 App.vue 文件后,当前项目会被重新装载运行,在刚才浏览的界面就会看到登录界面如下:
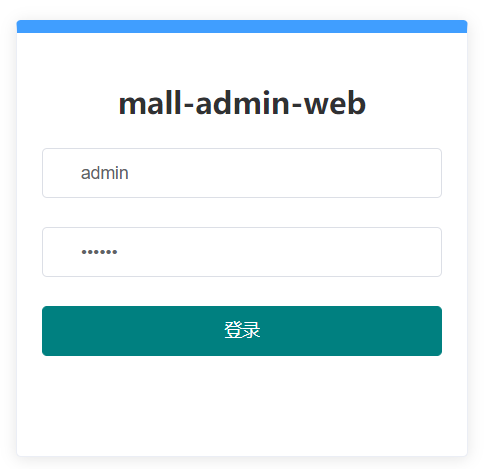
4. 路由跳转
在 login.vue 中可以使用 this.$router.push({path: "路径"}) 来跳转到指定路径的路由组件中,下面是通过路由跳转到 error.vue 与 success.vue 的代码
this.$router.push({path: "/success"}); //跳转到成功页
或
this.$router.push({path: "/error"}); //跳转到失败页
六、使用 Vuex + Axios 方式进行网络请求
1.Axios
axios 是一个网络请求构架,官方推荐使用这种方式进行 http 的请求。
1) 在 utils 包下封装一个请求工具类 request.js
import axios from 'axios' //引入 axios
import baseUrl from '../api/baseUrl' //使用环境变量 + 模式的方式定义基础URL

// 创建 axios 实例
const service = axios.create({
  baseURL: baseUrl, // api 的 base\_url
  timeout: 15000, // 请求超时时间
})

export default service
这里的 baseUrl 涉及 Vue CLI3 的环境变量与模式的概念,见:Vue 环境变量和模式 (设置通用 baseUrl)
2) 登录请求接口 API
在 api 文件夹下,创建一个登录 API 文件:login.js
import request from '@/utils/request' //引入封装好的 axios 请求

export function login(username, password) { //登录接口
  return request({ //使用封装好的 axios 进行网络请求
    url: '/admin/login',
    method: 'post',
    data: { //提交的数据
      username,
      password
    }
  })
}
2. 使用 Vuex 封装 axios
Vuex 是一个状态管理构架,官方文档:Vuex
1) 封装 Vuex 中的 module
在 store 文件夹下创建一个 modules 文件夹,然后在此文件夹下创建一个 user.js 文件
import { login } from '@/api/login'//引入登录 api 接口

const user = {
  actions: {
    // 登录
    Login({ commit }, userInfo) { //定义 Login 方法,在组件中使用 this.$store.dispatch("Login") 调用
      const username = userInfo.username.trim()
      return new Promise((resolve, reject) => { //封装一个 Promise
        login(username, userInfo.password).then(response => { //使用 login 接口进行网络请求
          commit('') //提交一个 mutation,通知状态改变
          resolve(response) //将结果封装进 Promise
        }).catch(error => {
          reject(error)
        })
      })
    },
  }
}
export default user
这里的代码值得解释一下:官方文档对应:Vuex actions
1. 首先引入 login 接口,之后使用登录接口进行网络请求。
2. 定义一个 名为 Login 的 action 方法,Vue 组件通过 this.$store.dispatch("Login") 调用
3.Promise,这个类很有意思,官方的解释是 “store.dispatch 可以处理被触发的 action 的处理函数返回的 Promise,并且 store.dispatch 仍旧返回 Promise”。这话的意思组件中的 dispatch 返回的仍是一个 Promise 类,因此推测 Promise 中的两个方法 resolve() 与 reject() 分别对应 dispatch 中的 then 与 catch。
2) 创建 Vuex
在 store 文件夹下创建一个 index.js 文件
import Vue from 'vue' //引入 Vue
import Vuex from 'vuex' //引入 Vuex
import user from './modules/user' //引入 user module

Vue.use(Vuex)

const store = new Vuex.Store({
  modules: {
    user //使用 user.js 中的 action
  }
})

export default store
3) 将 Vuex 添加到 main.js 文件
修改之前的 main.js 文件如下:
import Vue from 'vue'
import App from './App.vue'
import './plugins/element.js'
import router from './router' //引入路由配置
import store from './store' //引入 Vuex 状态管理

Vue.config.productionTip = false

new Vue({
  render: h => h(App),
  router, //使用路由配置
  store //使用 Vuex 进行状态管理
}).$mount('#app')
重新运行项目,在 Chrome 浏览器中进入调试模式,点击登录按钮
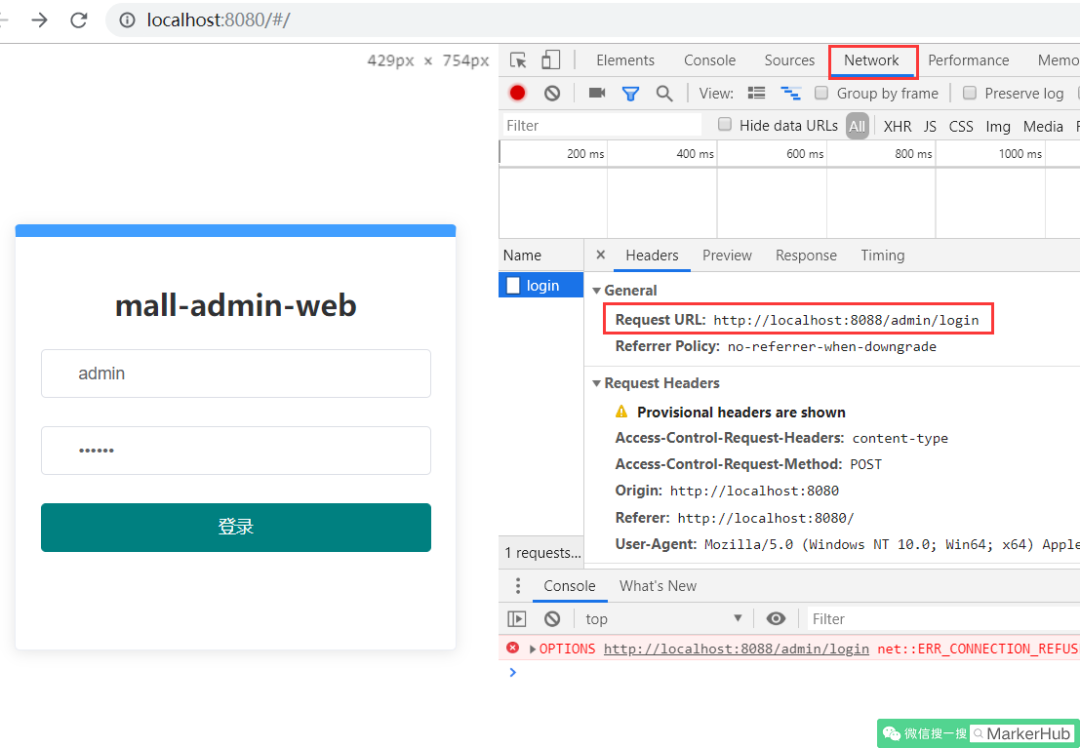
可以看到有发送一个 8088 端口的请求,至此 Vue 端的所有代码已经完成。
-------------------------------Springboot 开发 -------------------------------
项目创建就不提了,网上有很多,只要使用 Spring Assistant 创建就好。
整体目录结构如下
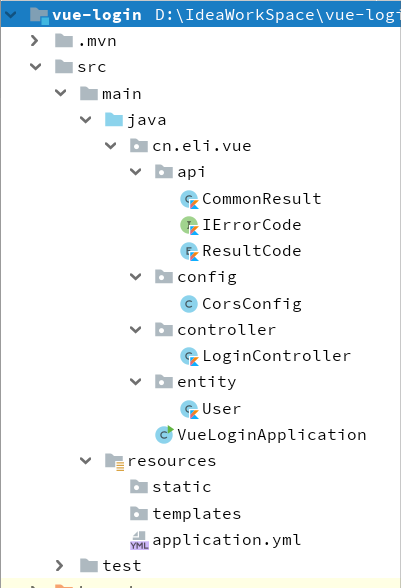
1. 在 application.yml 修改端口号
不要和 Vue 在一个 8080 端口上:
server:
  port: 8088
2. 解决跨域问题
这里有一个跨域问题,即 Vue 使用 8080 端口,要访问 8088 端口的服务器,会报错。错误信息如下:
Access to XMLHttpRequest at 'http://localhost:8088/admin/login' from origin 'http://localhost:8080' has been blocked by CORS policy: Response to preflight request doesn't pass access control check: No'Access-Control-Allow-Origin' header is present on the requested resource.
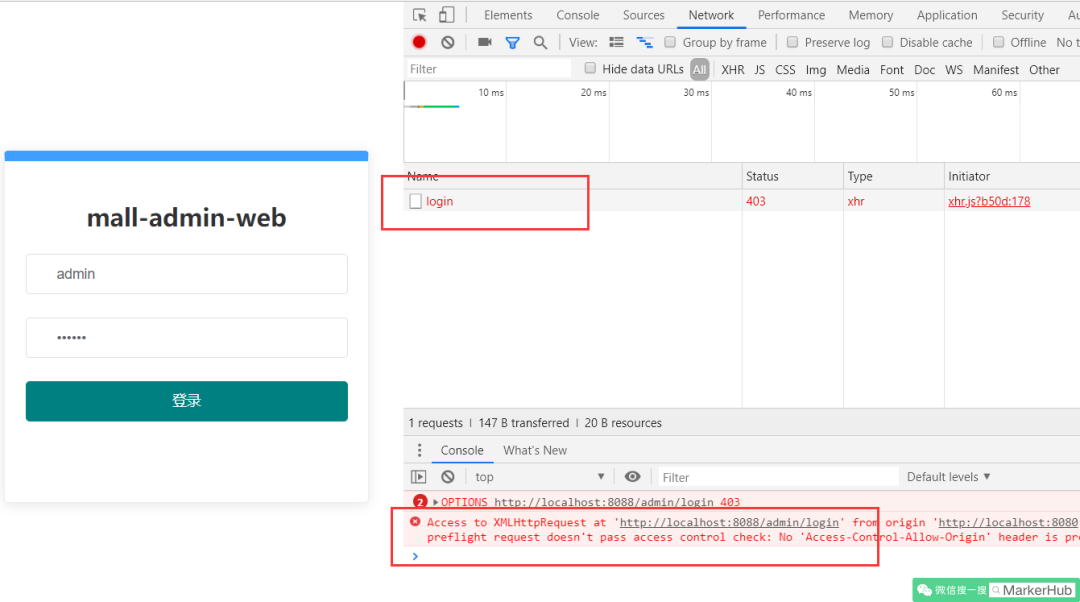
这个问题在 Vue 端或在 Springboot 端处理都可以,我在 Springboot 端处理的,写一个 CorsConfig 类内容如下,不要忘了 @Configuration 注解。
@Configuration
public class CorsConfig {
    private CorsConfiguration buildConfig() {
        CorsConfiguration corsConfiguration = new CorsConfiguration();
        corsConfiguration.addAllowedOrigin("\*"); // 1
        corsConfiguration.addAllowedHeader("\*"); // 2
        corsConfiguration.addAllowedMethod("\*"); // 3
        return corsConfiguration;
    }

    @Bean
    public CorsFilter corsFilter() {
        UrlBasedCorsConfigurationSource source = new UrlBasedCorsConfigurationSource();
        source.registerCorsConfiguration("/\*\*", buildConfig()); // 4
        return new CorsFilter(source);
    }
}
3.IErrorCode 接口
Java 版本
public interface IErrorCode {
    long getCode();
    String getMessage();
}
Kotlin 版本
interface IErrorCode {
    fun getCode(): Long
    fun getMessage(): String
}
4.CommonResult 类
Java 版本
public class CommonResult<T> {
    private long code;
    private String message;
    private T data;

    protected CommonResult() {
    }

    protected CommonResult(long code, String message, T data) {
        this.code = code;
        this.message = message;
        this.data = data;
    }

    /\*\*
     \* 成功返回结果
     \*
     \* @param data 获取的数据
     \*/
    public static  CommonResult success(T data) {
        return new CommonResult(ResultCode.SUCCESS.getCode(), ResultCode.SUCCESS.getMessage(), data);
    }

    /\*\*
     \* 成功返回结果
     \*
     \* @param data    获取的数据
     \* @param message 提示信息
     \*/
    public static  CommonResult success(T data, String message) {
        return new CommonResult(ResultCode.SUCCESS.getCode(), message, data);
    }

    /\*\*
     \* 失败返回结果
     \*
     \* @param errorCode 错误码
     \*/
    public static  CommonResult failed(IErrorCode errorCode) {
        return new CommonResult(errorCode.getCode(), errorCode.getMessage(), null);
    }

    /\*\*
     \* 失败返回结果
     \*
     \* @param message 提示信息
     \*/
    public static  CommonResult failed(String message) {
        return new CommonResult(ResultCode.FAILED.getCode(), message, null);
    }

    /\*\*
     \* 失败返回结果
     \*/
    public static  CommonResult failed() {
        return failed(ResultCode.FAILED);
    }

    /\*\*
     \* 参数验证失败返回结果
     \*/
    public static  CommonResult validateFailed() {
        return failed(ResultCode.VALIDATE\_FAILED);
    }

    /\*\*
     \* 参数验证失败返回结果
     \*
     \* @param message 提示信息
     \*/
    public static  CommonResult validateFailed(String message) {
        return new CommonResult(ResultCode.VALIDATE\_FAILED.getCode(), message, null);
    }

    /\*\*
     \* 未登录返回结果
     \*/
    public static  CommonResult unauthorized(T data) {
        return new CommonResult(ResultCode.UNAUTHORIZED.getCode(), ResultCode.UNAUTHORIZED.getMessage(), data);
    }

    /\*\*
     \* 未授权返回结果
     \*/
    public static  CommonResult forbidden(T data) {
        return new CommonResult(ResultCode.FORBIDDEN.getCode(), ResultCode.FORBIDDEN.getMessage(), data);
    }

    public long getCode() {
        return code;
    }

    public void setCode(long code) {
        this.code = code;
    }

    public String getMessage() {
        return message;
    }

    public void setMessage(String message) {
        this.message = message;
    }

    public T getData() {
        return data;
    }

    public void setData(T data) {
        this.data = data;
    }
}
Kotlin 版本
class CommonResult<T> {
    var code: Long = 0
    var message: String? = null
    var data: T? = null

    constructor(code: Long, message: String, data: T?) {
        this.code = code
        this.message = message
        this.data = data
    }

    companion object {

        /\*\*
         \* 成功返回结果
         \* @param data 获取的数据
         \*/
        fun  success(data: T): CommonResult {
            return CommonResult(ResultCode.SUCCESS.getCode(), ResultCode.SUCCESS.getMessage(), data)
        }

        /\*\*
         \* 成功返回结果
         \* @param data 获取的数据
         \* @param  message 提示信息
         \*/
        fun  success(data: T, message: String): CommonResult {
            return CommonResult(ResultCode.SUCCESS.getCode(), message, data)
        }

        /\*\*
         \* 失败返回结果
         \* @param errorCode 错误码
         \*/
        fun  failed(errorCode: IErrorCode): CommonResult {
            return CommonResult(errorCode.getCode(), errorCode.getMessage(), null)
        }

        /\*\*
         \* 失败返回结果
         \* @param message 提示信息
         \*/
        fun  failed(message: String): CommonResult {
            return CommonResult(ResultCode.FAILED.getCode(), message, null)
        }

        /\*\*
         \* 失败返回结果
         \*/
        fun failed(): CommonResult {
            return failed(ResultCode.FAILED)
        }

        /\*\*
         \* 参数验证失败返回结果
         \*/
        fun validateFailed(): CommonResult {
            return failed(ResultCode.VALIDATE\_FAILED)
        }

        /\*\*
         \* 参数验证失败返回结果
         \* @param message 提示信息
         \*/
        fun  validateFailed(message: String): CommonResult {
            return CommonResult(ResultCode.VALIDATE\_FAILED.getCode(), message, null)
        }

        /\*\*
         \* 未登录返回结果
         \*/
        fun  unauthorized(data: T): CommonResult {
            return CommonResult(ResultCode.UNAUTHORIZED.getCode(), ResultCode.UNAUTHORIZED.getMessage(), data)
        }

        /\*\*
         \* 未授权返回结果
         \*/
        fun  forbidden(data: T): CommonResult {
            return CommonResult(ResultCode.FORBIDDEN.getCode(), ResultCode.FORBIDDEN.getMessage(), data)
        }
    }
}
5.ResultCode 枚举
Java 版本
public enum ResultCode implements IErrorCode {
    SUCCESS(200, "操作成功"),
    FAILED(500, "操作失败"),
    VALIDATE\_FAILED(404, "参数检验失败"),
    UNAUTHORIZED(401, "暂未登录或token已经过期"),
    FORBIDDEN(403, "没有相关权限");
    private long code;
    private String message;

    private ResultCode(long code, String message) {
        this.code = code;
        this.message = message;
    }

    public long getCode() {
        return code;
    }

    public String getMessage() {
        return message;
    }
}
Kotlin 版本
enum class ResultCode(private val code: Long, private val message: String) : IErrorCode {
    SUCCESS(200, "操作成功"),
    FAILED(500, "操作失败"),
    VALIDATE\_FAILED(404, "参数检验失败"),
    UNAUTHORIZED(401, "暂未登录或token已经过期"),
    FORBIDDEN(403, "没有相关权限");

    override fun getCode(): Long {
        return code
    }

    override fun getMessage(): String {
        return message
    }
}
6.User 类
Java 版本
public class User {

    private int id;
    private String username;
    private String password;

    public int getId() {
        return id;
    }

    public void setId(int id) {
        this.id = id;
    }

    public String getUsername() {
        return username;
    }

    public void setUsername(String username) {
        this.username = username;
    }

    public String getPassword() {
        return password;
    }

    public void setPassword(String password) {
        this.password = password;
    }
}
Kotlin 版本
data class User(
        val id: Int,
        val username: String,
        val password: String)
7.LoginController 类
Java 版本
@RestController
public class LoginController {

    @RequestMapping(value = "/admin/login", method = RequestMethod.POST)
    public CommonResult login(@RequestBody User user) {
        if (user.getUsername().equals("admin") && user.getPassword().equals("123456"))
            return CommonResult.success("admin");
        else
            return CommonResult.validateFailed();
    }
}
Kotlin 版本
@RestController //此注解是 @ResponseBody 和 @Controller 的组合注解,可返回一个 JSON
class LoginController {

    @RequestMapping(value = \["/admin/login"\], method = \[RequestMethod.POST\])
    fun admin(@RequestBody user: User): CommonResult<\*> {
        return if (user.username == "admin" && user.password == "123456") {
            CommonResult.success("admin")
        } else {
            CommonResult.validateFailed()
        }
    }
}
启动两端程序
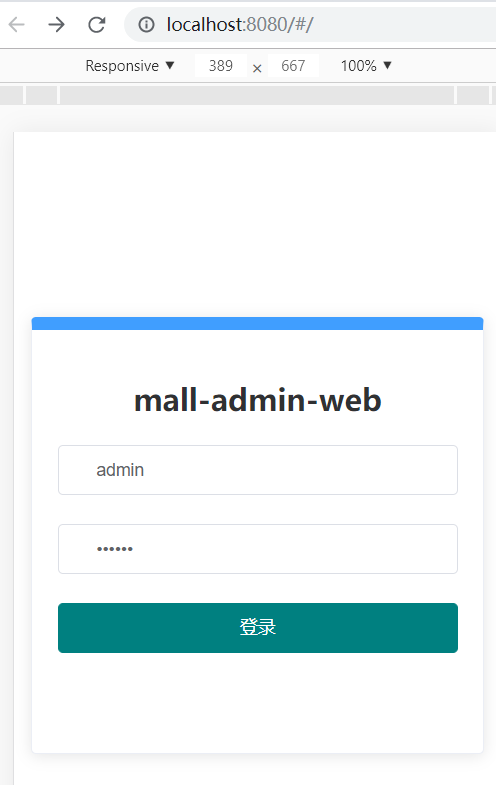
输入正确的账号密码
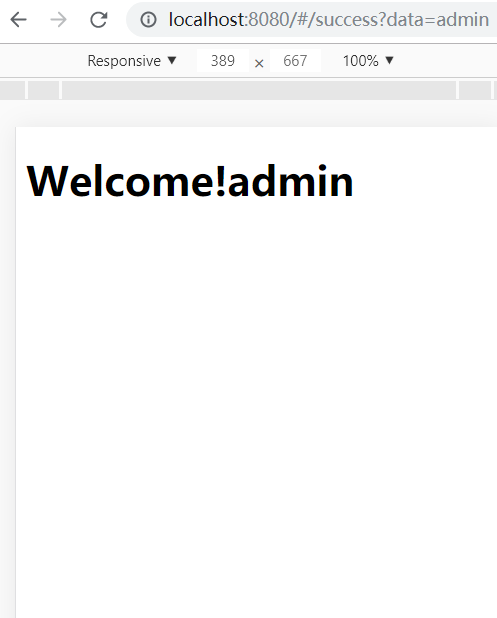
输入错误的账号密码
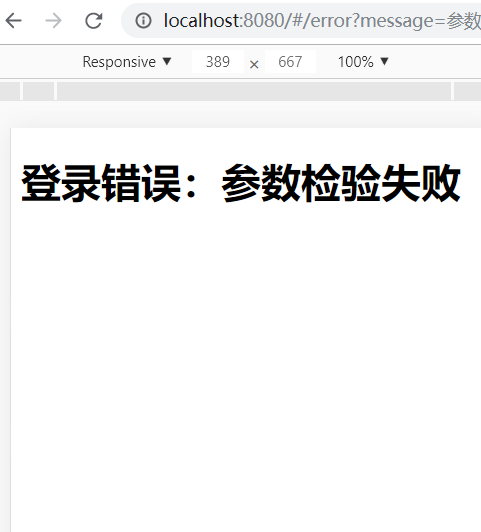
七、GitHub 源码地址
vue 端:https://github.com/xiaojinlai/vue-spring-login-summed
Java 端:https://github.com/xiaojinlai/vue-login-java
Java 端 - Kotlin 版本:https://github.com/xiaojinlai/vue-login-kotlin
注:Kotlin 版本只是我本人用习惯了 Kotlin,就功能而言与 Java 是一样的。大家如果不喜欢可以不用理会,如果有感兴趣的可以看看,Kotlin 是 Google 推出的一种简洁性语言,主推在 Android 上,用习惯后还是蛮喜欢的。学习起来也不难,内容也不多,推荐一个学习 Kotlin 的网址:https://www.kotlincn.net/docs/reference/
更多精彩推荐
☞ 外包程序员入职蚂蚁金服被质疑,网友:人生污点☞ 前后端分离三连问:为何分离?如何分离?分离后的接口规范?☞ 如何设计一个通用的权限管理系统☞ 去一家小公司从0到1搭建后端架构,做个总结!☞ 这应该是全网最全的Git分支开发规范手册~
最后,推荐给大家一个有趣有料的公众号:写代码的渣渣鹏,7年老程序员教你写bug,回复 面试或资源 送一你整套开发笔记 有惊喜哦

