用Transformer思想的分类器进行小样本分割
共 6787字,需浏览 14分钟
·
2022-05-28 19:25
文章目录
1 前言 2 CWT-for-FSS 整体架构 3 求解方法 4 实验结果分析 5 代码和可视化 6 总结 7 参考链接
1 前言

之前写了几篇医学图像分割相关的论文阅读笔记,这次打算开个小样本语义分割的新坑。这篇阅读笔记中介绍的论文也是很久之前读过的,接受在 ICCV 上,思路值得借鉴。代码也已经跑过了,但是一直没来得及整理,arXiv:https://arxiv.org/pdf/2108.03032.pdf 。
针对小样本语义分割问题,这篇论文提出一种更加简洁的元学习范式,即只对分类器进行元学习,对特征编码解码器采用常规分割模型训练方式。也就是说只对 Classifier Weight Transformer(后面都简称 CWT)进行元学习的训练,使得 CWT 可以动态地适应测试样本,从而提高分割准确率。
先来介绍下背景,传统的语义分割通常由三部分组成:一个 CNN 编码器,一个 CNN 解码器和一个区分前景像素与背景像素的简单的分类器。
当模型学习识别一个没见过的新类时,需要分别训练这三个部分进行元学习,如果新类别中图象太少,那么同时训练三个模块就十分困难。
在这篇文论文中, 提出一种新的训练方法,在面对新类时只关注模型中最简单的分类器。就像文中假设一个学习了大量图片和信息的传统分割网络已经能够从任何一张图片中捕捉到充分的,有利于区分背景和前景的信息,无论训练时是否遇到了同类的图。那么面对少样本的新类时,只要对分类器进行元学习即可。
这篇阅读笔记首先概述了 CWT-for-FSS 的整体结构,再介绍了训练方法,然后分析了实验结果,最后对代码训练做了简单的指南。
2 CWT-for-FSS 整体架构
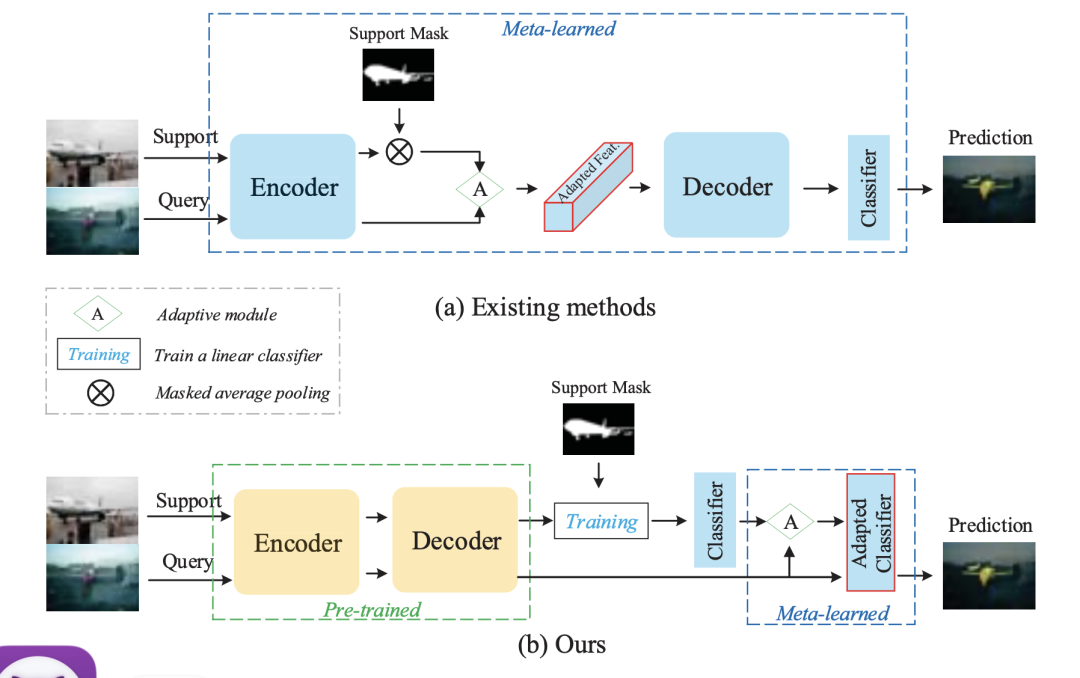
一个小样本分类系统一般由三部分构成:编码器,解码器和分类器。
其中,前两个模块模型比较复杂,最后一个分类器结构简单。小样本分类方法通常在元学习的过程中更新所有模块或者除编码器外的模块,而所利用更新模块的数据仅仅有几个样本。
在这样的情况下,模型更新的参数量相比于数据提供的信息量过多,从而不足以优化模型参数。基于此分析,文章中提出了一个全新的元学习训练范式,即只对分类器进行元学习。两种方式的对比,如下图:

值得注意的是,我们知道在 Support set 上迭代的模型往往不能很好地作用在 Query set 上,因为同类别的图像也可能存在差异。
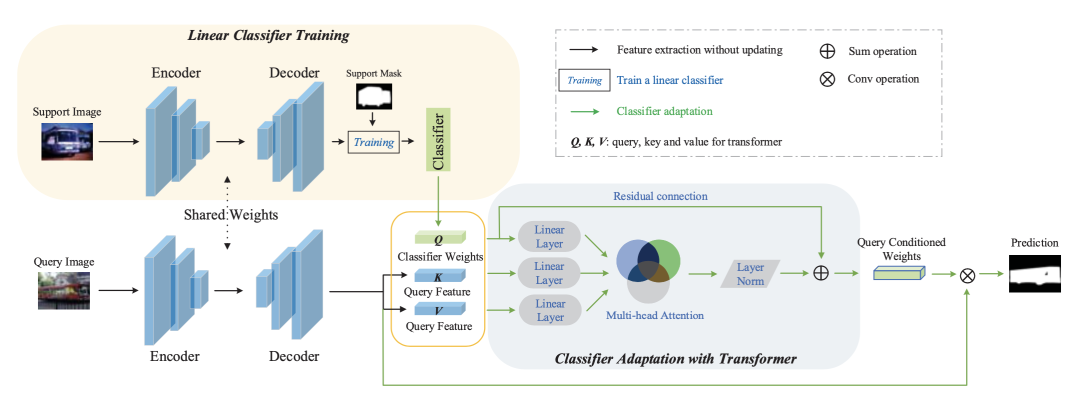
利用 CWT 来解决这个问题,就是这篇论文的重点。也就是说,可以动态地利用 Query set 的特征信息来进一步更新分类器,来提高分割的精准度。整体架构如下图:

借助 Transformer 的思想,将分类器权重转化为 Query,将 Query set 提取出来的特征转化为 Key 和 Value,然后根据这三个值调整分类器权重,最后通过残差连接,与原分类器参数求和。
3 求解方法
首先,对网络进行预训练,这里就不再赘述。然后就是对 CWT 进行元学习,分两步,第一步是内循环,和预训练一样,根据支持集上的图片和 mask 进行训练,不过只修改分类器参数。
当新类样本数够大时,只使用外循环,即只更新分类器,就能匹敌 SOTA,但是当面对小样本时,表现就不尽如人意。第二步是外循环,根据每一副查询图片,微调分类器参数。
微调后的参数只针对这一张查询图片,不能用于其他查询图象,也不覆盖修改原分类器参数。
假设一张查询图像,提取出的特征为F,形状为 n × d,n为单通道的像素数,d为通道数,则全连接分类器参数 w 形状为 2 × d。参照 Transformer,令 Query = w × Wq, Key = F × Wk, Value = F × Wv,其中 Wq、Wk 和Wv 均为可学习的 d × da 矩阵,d 为维度数,da 为人为规定的隐藏层维度数,本文将其设置为了 2048。根据这三个数,以及残差链接,可求得新分类器权重为:

其中,Ψ 是一个线性层,输入维度为 da,输出维度为 d。softmax 针对的维度为行。求出每一张查询集对应的权重后,只需要把特征 F 塞进 w* 就好。
4 实验结果分析
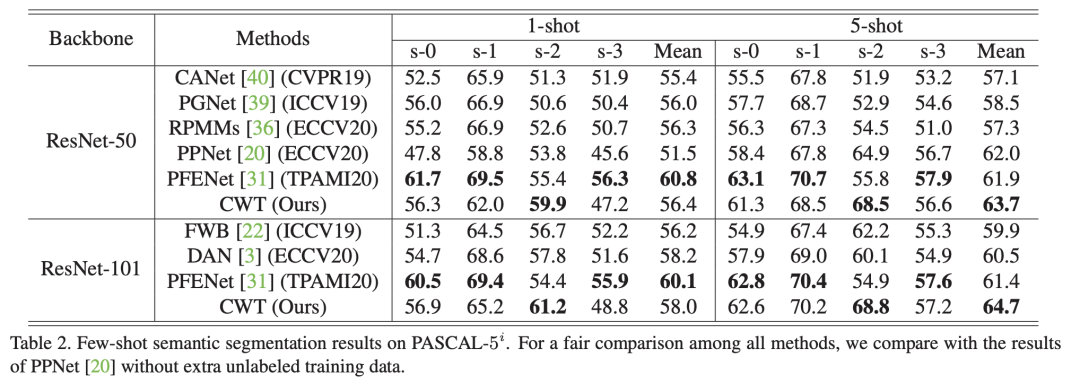
这部分展示论文中的实验结果,在两个标准小样本分割数据集 PASCAL 和 COCO 上,文中的方法在大多数情况下取得了最优的结果。


此外,文中实验在一种跨数据集的情景下测试了模型的性能,可以看出 CWT-for-FSS 方法具有了很好的鲁棒性。

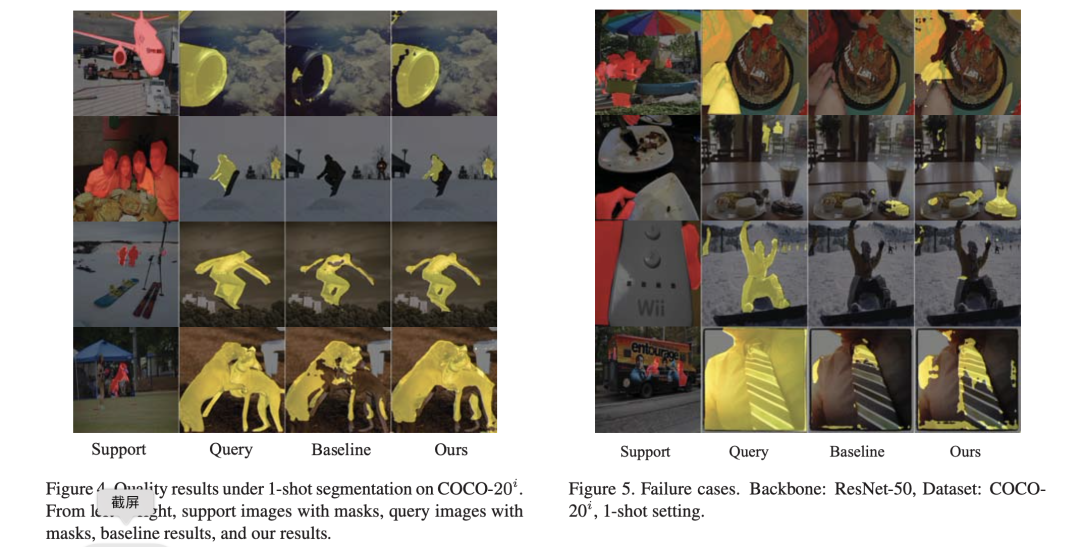
最后,可视化结果如下:

5 代码和可视化
代码已经开开源在 https://github.com/lixiang007666/CWT-for-FSS 上,最后我们简单看下如何使用。仓库提供了训练脚本:
sh scripts/train.sh pascal 0 [0] 50 1
后面几个参数依次为数据集指定、split 数、gpus、layers 和 k-shots。如果需要多卡训练,gpus 为[0,1,3,4,5,6,7],layers 除了 50 还可以指定为 101,说明 backbone 为 resnet101。对应的,测试的脚本为 scripts/test.sh。
此外,仓库中的代码并没有提供可视化脚本。如果需要可视化分割结果,可以参考下面的代码。首先将以下内容插入主 test.py 脚本(在 classes.append() 下方):
                logits_q[i] = pred_q.detach()
                gt_q[i, 0] = q_label
                classes.append([class_.item() for class_ in subcls])
                # Insert visualization routine here
                if args.visualize:
                    output = {}
                    output['query'], output['support'] = {}, {}
                    output['query']['gt'], output['query']['pred'] =     vis_res(qry_oris[0][0],      qry_oris[1], F.interpolate(pred_q, size=q_label.size()[1:], mode='bilinear', align_corners=True).squeeze().detach().cpu().numpy())
                    spprt_label = torch.cat(spprt_oris[1], 0)
                    output['support']['gt'], output['support']['pred'] = vis_res(spprt_oris[0][0][0],spprt_label, output_support.squeeze().detach().cpu().numpy())

                    save_image = np.concatenate((output['support']['gt'], output['query']['gt'], output['query']['pred']), 1)
                    cv2.imwrite('./analysis/' + qry_oris[0][0].split('/')[-1] ,   save_image)
主要可视化函数vis_res如下:
def resize_image_label(image, label, size = 473):
    import cv2
    def find_new_hw(ori_h, ori_w, test_size):
        if ori_h >= ori_w:
            ratio = test_size * 1.0 / ori_h
            new_h = test_size
            new_w = int(ori_w * ratio)
        elif ori_w > ori_h:
            ratio = test_size * 1.0 / ori_w
            new_h = int(ori_h * ratio)
            new_w = test_size

        if new_h % 8 != 0:
            new_h = (int(new_h / 8)) * 8
        else:
            new_h = new_h
        if new_w % 8 != 0:
            new_w = (int(new_w / 8)) * 8
        else:
            new_w = new_w
        return new_h, new_w

    # Step 1: resize while keeping the h/w ratio. The largest side (i.e height or width) is reduced to $size.
    #                                             The other is reduced accordingly
    test_size = size
    new_h, new_w = find_new_hw(image.shape[0], image.shape[1], test_size)

    image_crop = cv2.resize(image, dsize=(int(new_w), int(new_h)),
                            interpolation=cv2.INTER_LINEAR)

    # Step 2: Pad wtih 0 whatever needs to be padded to get a ($size, $size) image
    back_crop = np.zeros((test_size, test_size, 3))

    back_crop[:new_h, :new_w, :] = image_crop
    image = back_crop

    # Step 3: Do the same for the label (the padding is 255)
    s_mask = label
    new_h, new_w = find_new_hw(s_mask.shape[0], s_mask.shape[1], test_size)
    s_mask = cv2.resize(s_mask.astype(np.float32), dsize=(int(new_w), int(new_h)),
                        interpolation=cv2.INTER_NEAREST)
    back_crop_s_mask = np.ones((test_size, test_size)) * 255
    back_crop_s_mask[:new_h, :new_w] = s_mask
    label = back_crop_s_mask

    return image, label
def vis_res(image_path, label, pred):

    import cv2
    def read_image(path):
        image = cv2.imread(path, cv2.IMREAD_COLOR)
        image = cv2.cvtColor(image, cv2.COLOR_BGR2RGB)
        image = np.float32(image)
        return image

    def label_to_image(label):
        label = label == 1.
        label = np.float32(label) * 255.
        placeholder = np.zeros_like(label)
        label = np.concatenate((label, placeholder), 0)
        label = np.concatenate((label, placeholder), 0)
        label = np.transpose(label, (1,2,0))
        return label

    def blend_image_label(image, label):
        result = 0.5 * image + 0.5 * label
        result = np.float32(result)
        result = cv2.cvtColor(result, cv2.COLOR_BGR2RGB)

        return result

    def pred_to_image(label):
        label = np.float32(label) * 255.
        placeholder = np.zeros_like(label)
        placeholder = np.concatenate((placeholder, placeholder), 0)
        label = np.concatenate((placeholder, label), 0)
        label = np.transpose(label, (1,2,0))
        return label

    image = read_image(image_path)
    label = label.squeeze().detach().cpu().numpy()
    image, label = resize_image_label(image, label)
    label = label_to_image(np.expand_dims(label, 0))
    out_image_gt = blend_image_label(image, label)
    #cv2.imwrite('./analysis/' + image_path.split('/')[-1][:-4] +  '_gt.jpg',   out_image)

    pred  = np.argmax(pred, 0)
    pred = np.expand_dims(pred, 0)
    pred = pred_to_image(pred)
    out_image_pred = blend_image_label(image, pred)
    #cv2.imwrite('./analysis/' + image_path.split('/')[-1][:-4] +  '_pred.jpg',   out_image)

    return out_image_gt, out_image_pred
注意,是在每次测试迭代结束时可视化分割结果。
6 总结
这篇阅读笔记介绍了一种新的元学习训练范式来解决小样本语义分割问题。相比于现有的方法,这种方法更加简洁有效,只对分类器进行元学习。
重要的是,为了解决类内差异问题,提出 Classifier Weight Transformer 利用 Query 特征信息来迭代训练分类器,从而获得更加鲁棒和精准的分割效果。
7 参考链接
https://github.com/zhiheLu/CWT-for-FSS https://arxiv.org/pdf/2108.03032.pdf

