基于 Laravel 模型工厂快速生成后端接口测试数据

继续后续 Vue 教程之前,我们先将 Laravel 后端文章数据表创建出来,并填充测试数据,以方便后续教程更快捷地提供后端测试接口。
创建模型类和数据表
在 Laravel 项目中,创建基于 MySQL 数据库的 MVC 模板代码非常简单,前面视图文件我们已经提供了,这里只需要创建模型类、控制器和对应数据表迁移文件即可,我们可以通过下面这条 Artisan 命令一次性创建:
php artisan make:model -mc Post --resource

该命令会在 app/Models 目录下生成 Post 模型类,在 database/migrations 目录下生成 posts 表对应的数据库迁移文件,以及在 app/Http/Controllers 目录下生成一个资源控制器 PostController。
我们先来编辑数据表迁移文件,打开 component-practice/database/migrations/2020_10_24_140856_create_posts_table.php,在 up 方法中编写数据表字段如下:
<?php

use Illuminate\Database\Migrations\Migration;
use Illuminate\Database\Schema\Blueprint;
use Illuminate\Support\Facades\Schema;

class CreatePostsTable extends Migration
{
    /**
     * Run the migrations.
     *
     * @return void
     */
    public function up()
    {
        Schema::create('posts', function (Blueprint $table) {
            $table->id();
            $table->string('title');
            $table->text('content');
            $table->bigInteger('user_id')->unsigned()->index();
            $table->tinyInteger('status')->unsigned()->default(0);
            $table->timestamps();
        });
    }

    /**
     * Reverse the migrations.
     *
     * @return void
     */
    public function down()
    {
        Schema::dropIfExists('posts');
    }
}
然后运行 php artisan migrate 在数据库创建这张 posts 数据表。

编写模型工厂
创建完数据表后,就可以往里面填充测试数据了,在 Laravel 项目中,可以基于模型工厂快速填充测试数据,Laravel 8 完全重构了之前的模型工厂实现,下面学院君来简单演示下新版基于类的模型工厂的使用。
首先通过如下 Artisan 命令创建模型工厂类:
php artisan make:factory PostFactory
然后在打开新建的 database/factories/PostFactory.php 文件,在 definition 方法中定义针对 Post 模型工厂的测试数据生成策略(基于 Faker 对象伪造):
<?php

namespace Database\Factories;

use App\Models\Post;
use App\Models\User;
use Illuminate\Database\Eloquent\Factories\Factory;

class PostFactory extends Factory
{
    /**
     * The name of the factory's corresponding model.
     *
     * @var string
     */
    protected $model = Post::class;

    /**
     * Define the model's default state.
     *
     * @return array
     */
    public function definition()
    {
        return [
            'title' => $this->faker->sentence,
            'content' => $this->faker->text,
            'user_id' => User::factory(),
            'status' => rand(0, 1)
        ];
    }
}
这里由于 user_id 字段是与 User 模型类关联的外键,所以通过 User::factory() 映射到 User 模型工厂。当我们通过 Post 模型工厂创建文章实例的时候,也会顺便新建一个 User 对象实例并与这个 Post 对象实例关联。
定义 Post 与 User 的关联关系
接下来,打开 app/Models/Post.php,定义 Post 模型类如下:
<?php

namespace App\Models;

use Illuminate\Database\Eloquent\Factories\HasFactory;
use Illuminate\Database\Eloquent\Model;

class Post extends Model
{
    use HasFactory;

    protected $fillable = ['title', 'content'];

    public function author()
    {
        return $this->belongsTo(User::class, 'user_id');
    }
}
我们通过 author 关联方法定义了 User 与 Post 的一对多关联,相应的,在 User 模型类中,也定义了一个与之相对的 post 关联方法:
public function posts()
{
    return $this->hasMany(Post::class, 'user_id');
}
运行模型工厂
我们可以在填充器、测试类中运行模型工厂生成测试数据,也可以通过 Tinker 运行,下面我们在 Tinker 中通过 Post 模型工厂生成 30 条文章记录:

执行上述命令成功后,可以在数据库看到对应的文章记录:

同时也会创建 30 条用户记录。至此,我们的文章测试数据就准备好了。
编写资源控制器和路由
完成测试数据的准备工作后,我们打开 app/Http/Controllers/PostController.php,编写资源控制器方法作为路由处理器,这里我们仅实现 index、all、create、store 方法,:
<?php

namespace App\Http\Controllers;

use App\Models\Post;
use Illuminate\Http\Request;
use Illuminate\Support\Facades\Auth;

class PostController extends Controller
{
    public function __construct()
    {
        // 文章浏览无需认证
        $this->middleware('auth')->except('index', 'all', 'show');
    }

    /**
     * 文章列表视图
     *
     * @return \Illuminate\Http\Response
     */
    public function index()
    {
        return view('posts');
    }

    /**
     * 客户端通过 Axios 异步获取所有文章数据
     *
     * @return \Illuminate\Http\Response
     */
    public function all()
    {
        return Post::all();
    }

    /**
     * 渲染文章发布表单视图
     *
     * @return \Illuminate\Http\Response
     */
    public function create()
    {
        return view('form');
    }

    /**
     * 新发布文章保存操作
     *
     * @param  \Illuminate\Http\Request  $request
     * @return \Illuminate\Http\Response
     */
    public function store(Request $request)
    {
        $data = $request->validate([
            'title' => 'required',
            'author' => 'required',
            'content' => 'required'
        ]);

        $post = new Post();
        $post->fill($data);
        $post->status = 1;
        $post->user_id = Auth::user()->id;

        return $post->save();
    }

    ...
最后,我们打开路由文件 routes/web.php,将之前的文章路由处理改为通过 PostController 这个资源控制器提供的方法来处理:
use App\Http\Controllers\PostController;

Route::get('posts/all', [PostController::class, 'all']);
Route::resource('posts', PostController::class);
非常简单,不多做介绍了。至此,我们就完成了所有后端接口路由、测试数据的准备工作。
在前端验证返回测试数据的接口
由于获取所有文章的接口路由改了,所以我们需要修改 resources/js/components/PostList.vue 中的接口路径为 /posts/all:
mounted() {
    axios.get('/posts/all').then(resp => {
        this.posts = resp.data;
    }).catch(error => {
        console.log('从服务端加载文章数据失败');
    });
},
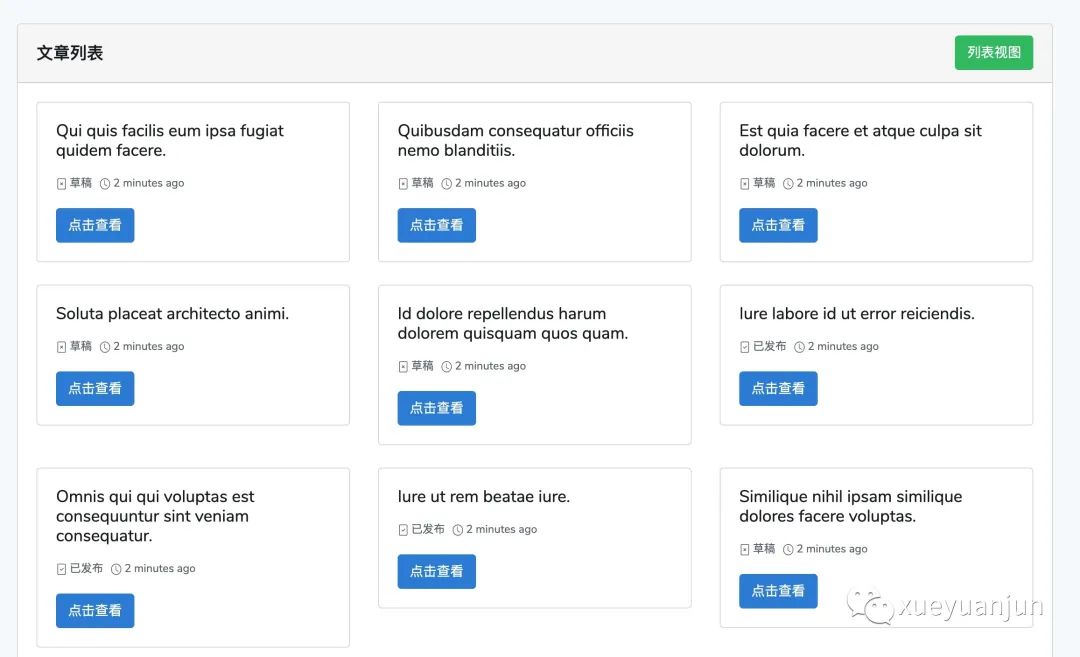
访问 posts 页面,对应的文章列表卡片视图渲染效果如下:

说明后端接口返回测试数据成功。
下篇教程,我们将调整发布文章表单组件,完成文章详情浏览和编辑功能,并借着这些功能穿插 Vue 组件动画和过渡效果实现的演示。
本系列教程首发在Laravel学院(laravelacademy.org),你可以点击页面左下角阅读原文链接查看最新更新的教程。
