
Python 自动化办公-玩转 Word
共 12813字,需浏览 26分钟
·
2021-07-19 16:37
只要是简单重复的工作,就想办法用 Python 来帮你解决吧,人生苦短,你需要 Python。
Word 是办公软件中使用频率非常高的软件之一了,假如你需要调整 100 个 Word 文档的格式保持统一,或者要把 100 个 Word 全部转换为 pdf,那么你就需要 Python 来帮忙了。
本文分享如何用 Python 来读取 Word、写入 Word、将 Word 转换为 pdf。学会之后,如果遇到大量 Word 文件需要处理的时候,就不慌了。
python-docx 库简介
python-docx 是一个可以对 Word 进行读写操作的第三方库,可以读取 Word 内容,可以为 Word 文档添加段落、表格、图片、标题,应用段落样式、粗体和斜体、字符样式。
执行如下安装命令即可完成安装:
pip install python-docx
官方文档: https://python-docx.readthedocs.io/
读取 Word
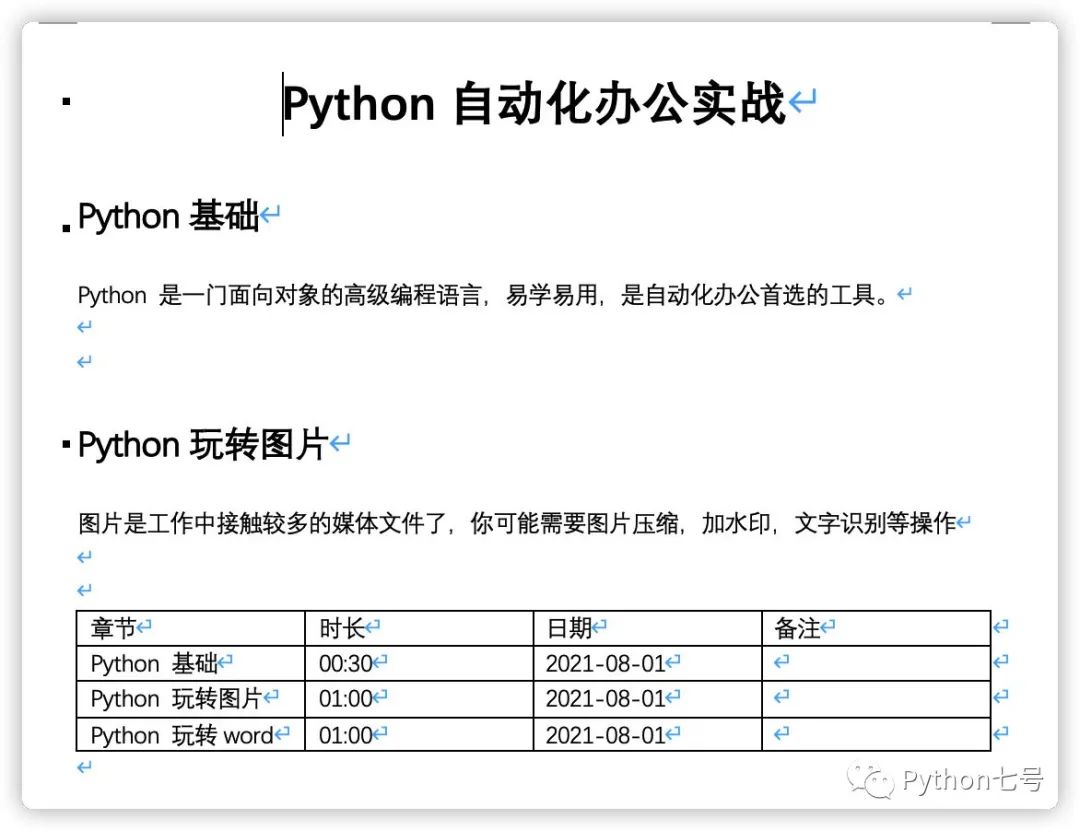
这里我先创建了一个样例,里面有标题、正文、表格:
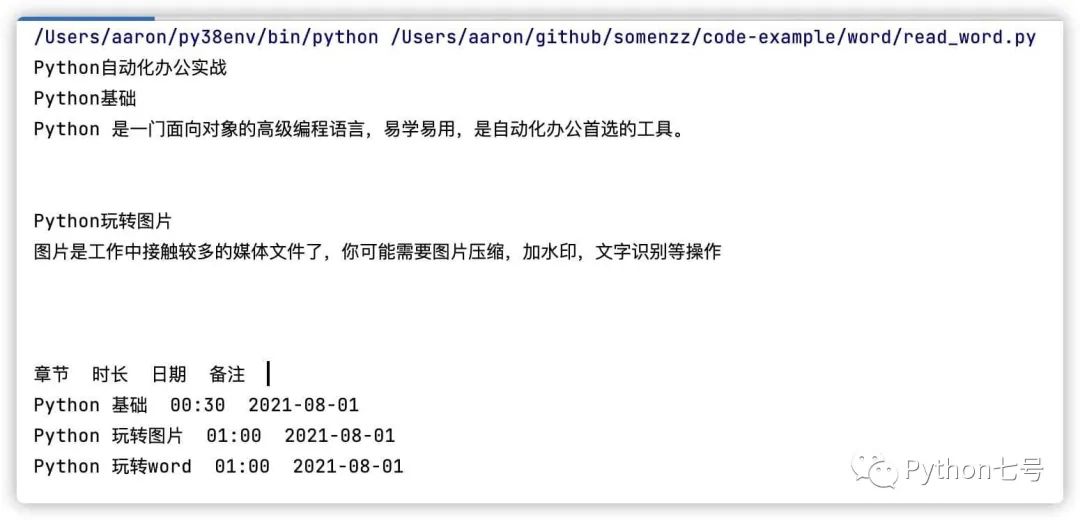
读取 Word 内容的代码如下:
from docx import Document

def view_docs(docx_file):
    # 打开文档1
    doc = Document(docx_file)
    # 读取每段内容
    pl = [ paragraph.text for paragraph in doc.paragraphs]
    # 输出读取到的内容
    for i in pl:
        print(i)


def view_docs_table(docx_file):
    # 打开文档1
    doc = Document(docx_file)
    # 读取每段内容
    tables = [table for table in doc.tables]
    for table in tables:
        for row in table.rows:
            for cell in row.cells:
                print(cell.text, end='  ')
            print()
        print('\n')


if __name__ == '__main__':
    view_docs("Python自动化办公实战课.docx")
    view_docs_table("Python自动化办公实战课.docx")
运行结果如下:
写入 Word
现在,用 Python 创建一个和刚才一样的 Word 文档:
from docx import Document
from docx.shared import Pt, RGBColor
from docx.oxml.ns import qn
from docx.enum.text import WD_PARAGRAPH_ALIGNMENT
from docx.table import _Cell
from docx.oxml import OxmlElement


def set_cell_border(cell: _Cell, **kwargs):
    """
    Set cell`s border
    Usage:
    set_cell_border(
        cell,
        top={"sz": 12, "val": "single", "color": "#FF0000", "space": "0"},
        bottom={"sz": 12, "color": "#00FF00", "val": "single"},
        start={"sz": 24, "val": "dashed", "shadow": "true"},
        end={"sz": 12, "val": "dashed"},
    )
    """
    tc = cell._tc
    tcPr = tc.get_or_add_tcPr()

    # check for tag existnace, if none found, then create one
    tcBorders = tcPr.first_child_found_in("w:tcBorders")
    if tcBorders is None:
        tcBorders = OxmlElement('w:tcBorders')
        tcPr.append(tcBorders)

    # list over all available tags
    for edge in ('start', 'top', 'end', 'bottom', 'insideH', 'insideV'):
        edge_data = kwargs.get(edge)
        if edge_data:
            tag = 'w:{}'.format(edge)

            # check for tag existnace, if none found, then create one
            element = tcBorders.find(qn(tag))
            if element is None:
                element = OxmlElement(tag)
                tcBorders.append(element)

            # looks like order of attributes is important
            for key in ["sz", "val", "color", "space", "shadow"]:
                if key in edge_data:
                    element.set(qn('w:{}'.format(key)), str(edge_data[key]))


document = Document()
document.styles['Normal'].font.name = u'宋体'
document.styles['Normal']._element.rPr.rFonts.set(qn('w:eastAsia'), u'宋体')


##标题

def add_header(text, level, align='center'):
    title_ = document.add_heading(level=level)
    if align == 'center':
        title_.alignment = WD_PARAGRAPH_ALIGNMENT.CENTER  # 标题居中
    elif align == 'right':
        title_.alignment = WD_PARAGRAPH_ALIGNMENT.RIGHT  # 标题居中
    title_run = title_.add_run(text)  # 添加标题内容
    # title_run.font.size = Pt(24)  # 设置标题字体大小
    title_run.font.name = 'Times New Roman'  # 设置标题西文字体
    title_run.font.color.rgb = RGBColor(0, 0, 0)  # 字体颜色
    title_run.element.rPr.rFonts.set(qn('w:eastAsia'), '微软雅黑')  # 设置标题中文字体


add_header(text='Python自动化办公实战', level=1)
add_header(text='Python基础', level=2, align='left')

document.add_paragraph('Python 是一门面向对象的高级编程语言,易学易用,是自动化办公首选的工具。')

add_header('Python玩转图片', level=2, align='left')

document.add_paragraph('图片是工作中接触较多的媒体文件了,你可能需要图片压缩,加水印,文字识别等操作')

records = (
    ('Python 基础', '00:30', '2021-08-01', ''),
    ('Python 玩转图片', '01:00', '2021-08-01', ''),
    ('Python 玩转 Word', '01:00', '2021-08-01', ''),
)

table = document.add_table(rows=1, cols=4)
hdr_cells = table.rows[0].cells
hdr_cells[0].text = '章节'
hdr_cells[1].text = '时长'
hdr_cells[2].text = '日期'
hdr_cells[3].text = '备注'

for cell in hdr_cells:
    set_cell_border(cell,
                    top={"sz": 12, "val": "single", "color": "#FF0000", "space": "0"},
                    bottom={"sz": 12, "val": "single", "color": "#FF0000", "space": "0"},
                    start={"sz": 12, "val": "single", "color": "#FF0000", "space": "0"},
                    end={"sz": 12, "val": "single", "color": "#FF0000", "space": "0"},
                    )

for chapter, time, date, note in records:
    row_cells = table.add_row().cells
    row_cells[0].text = chapter
    row_cells[1].text = time
    row_cells[2].text = date
    row_cells[3].text = note
    for cell in row_cells:
        set_cell_border(cell,
                        top={"sz": 12, "val": "single", "color": "#FF0000", "space": "0"},
                        bottom={"sz": 12, "val": "single", "color": "#FF0000", "space": "0"},
                        start={"sz": 12, "val": "single", "color": "#FF0000", "space": "0"},
                        end={"sz": 12, "val": "single", "color": "#FF0000", "space": "0"},
                        )
document.save('Python自动化办公实战.docx')
其中,为表格添加边框的代码由于比较复杂,单独做为一个函数来调用。
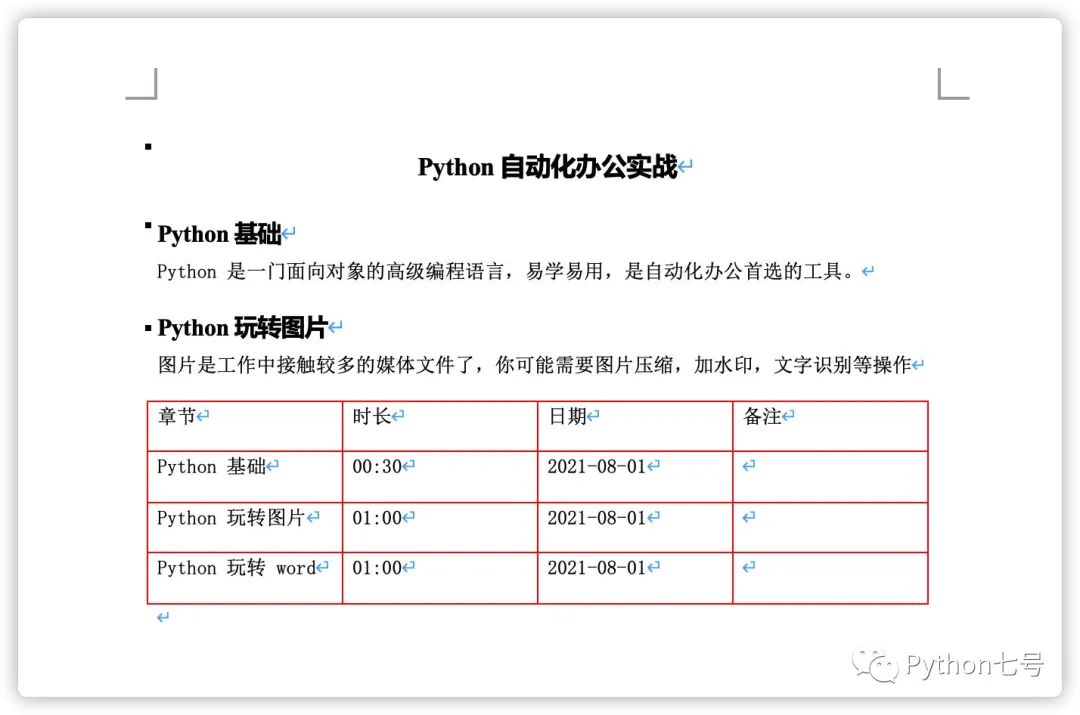
生成的 Word 文档如下所示,其中表格边框的颜色,标题的颜色,字体大小,样式都是可以设置的:
其他操作
添加分页符:
document.add_page_break()
添加图片:
document.add_picture('monty-truth.png', width=Inches(1.25))
设置表格的列宽和行高
'''
设置列宽
可以设置每个单元格的宽,同列单元格宽度相同,如果定义了不同的宽度将以最大值准
'''
table.cell(0,0).width=Cm(10)

#设置行高
table.rows[0].height=Cm(2)
表格字体的设定:
from docx.enum.text import WD_PARAGRAPH_ALIGNMENT

#设置整个表格字体属性
table.style.font.size=Pt(18)
table.style.font.color.rgb=RGBColor(255, 0, 0)
table.style.paragraph_format.alignment=WD_PARAGRAPH_ALIGNMENT.CENTER
合并单元格
cell_1=table.cell(1, 0)
cell_2=table.cell(2, 1)
cell_1.merge(cell_2)
修改文档字体:
from docx import Document
from docx.shared import Pt  #设置像素、缩进等
from docx.shared import RGBColor #设置字体颜色
from docx.oxml.ns import qn

doc = Document("xxx.docx")

for paragraph in doc.paragraphs:
    for run in paragraph.runs:
        run.font.bold = True
        run.font.italic = True
        run.font.underline = True
        run.font.strike = True
        run.font.shadow = True
        run.font.size = Pt(18)
        run.font.color.rgb = RGBColor(255,0,255)
        run.font.name = "黑体"

        # 设置像黑体这样的中文字体,必须添加下面 2 行代码
        r = run._element.rPr.rFonts
        r.set(qn("w:eastAsia"),"黑体")

doc.save("xxx.docx")
行间距调整:
paragraph.paragraph_format.line_spacing = 5.0
段前与段后间距调整:
#段前
paragraph.paragraph_format.space_before = Pt(12)

#段后
paragraph.paragraph_format.space_after = Pt(10)
Word 转 pdf
只需要两行代码就可以将 Word 转 pdf,这里使用的是三方库 docx2pdf 使用前先 pip install docx2pdf。
具体代码如下所示:
from docx2pdf import convert
convert("Python自动化办公实战.docx", "Python自动化办公实战.docx.pdf")
如果要对某个目录下的 Word 批量转换为 pdf,可以这样:
from docx2pdf import convert
convert("目录路径/")
批量转换为 pdf 时是否非常方便?
知道了这些小操作,就可以组装大操作,比如后面可以用 Python 将 Word 转换为 pdf 后作为附件发送邮件给其他人。
最后的话
本文分享了一种读写 Word 的方式,在日常工作中如果是重复性的 Word 操作,可考虑 Python 自动化,有问题请留言交流。阅读原文可以查看 gitee 上的代码。