Pytorch 利用mobilenet系列(v1,v2,v3)搭建yolov4目标检测平台
睿智的目标检测——Pytorch 利用mobilenet系列(v1,v2,v3)搭建yolov4目标检测平台
学习前言
一起来看看如何利用mobilenet系列搭建yolov4目标检测平台。
源码下载
https://github.com/bubbliiiing/mobilenet-yolov4-pytorch 喜欢的可以点个star噢。
网络替换实现思路
1、网络结构解析与替换思路解析
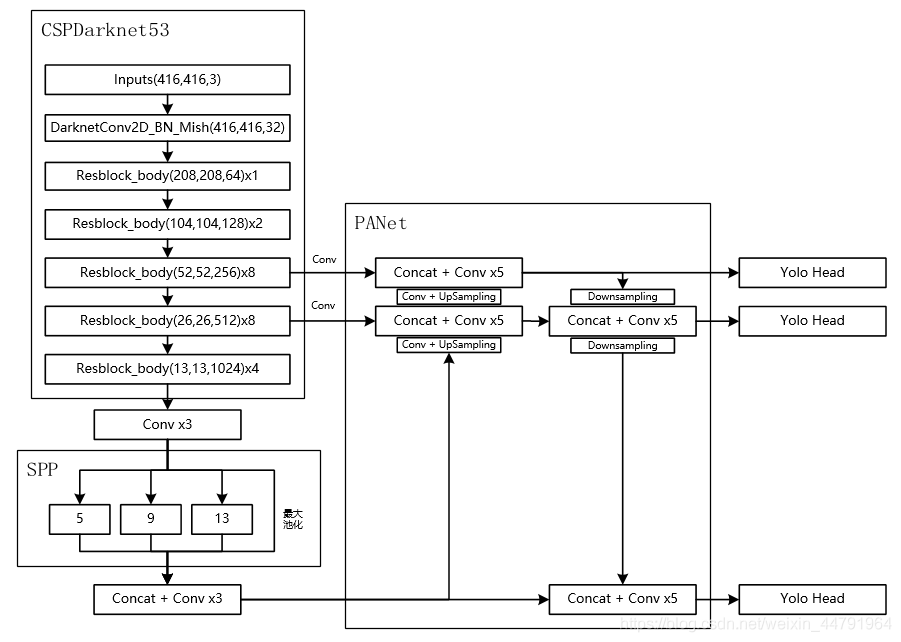 对于YoloV4而言,其整个网络结构可以分为三个部分。分别是:1、主干特征提取网络Backbone,对应图像上的CSPdarknet53 2、加强特征提取网络,对应图像上的SPP和PANet 3、预测网络YoloHead,利用获得到的特征进行预测
其中:第一部分主干特征提取网络的功能是进行初步的特征提取,利用主干特征提取网络,我们可以获得三个初步的有效特征层。第二部分加强特征提取网络的功能是进行加强的特征提取,利用加强特征提取网络,我们可以对三个初步的有效特征层进行特征融合,提取出更好的特征,获得三个更有效的有效特征层。第三部分预测网络的功能是利用更有效的有效特整层获得预测结果。
在这三部分中,第1部分和第2部分可以更容易去修改。第3部分可修改内容不大,毕竟本身也只是3x3卷积和1x1卷积的组合。
mobilenet系列网络可用于进行分类,其主干部分的作用是进行特征提取,我们可以使用mobilenet系列网络代替yolov4当中的CSPdarknet53进行特征提取,将三个初步的有效特征层相同shape的特征层进行加强特征提取,便可以将mobilenet系列替换进yolov4当中了。
2、mobilenet系列网络介绍
本文共用到三个主干特征提取网络,分别是mobilenetV1、mobilenetV2、mobilenetV3。
a、mobilenetV1介绍
MobileNet模型是Google针对手机等嵌入式设备提出的一种轻量级的深层神经网络,其使用的核心思想便是depthwise separable convolution(深度可分离卷积块)。
对于一个卷积点而言:假设有一个3×3大小的卷积层,其输入通道为16、输出通道为32。具体为,32个3×3大小的卷积核会遍历16个通道中的每个数据,最后可得到所需的32个输出通道,所需参数为16×32×3×3=4608个。
应用深度可分离卷积结构块,用16个3×3大小的卷积核分别遍历16通道的数据,得到了16个特征图谱。在融合操作之前,接着用32个1×1大小的卷积核遍历这16个特征图谱,所需参数为16×3×3+16×32×1×1=656个。 可以看出来depthwise separable convolution可以减少模型的参数。
如下这张图就是depthwise separable convolution的结构 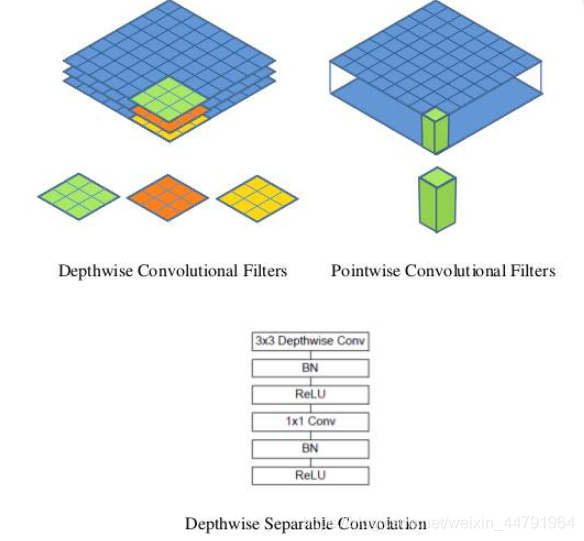 在建立模型的时候,可以将卷积group设置成in_filters层实现深度可分离卷积,然后再利用1x1卷积调整channels数。
通俗地理解就是3x3的卷积核厚度只有一层,然后在输入张量上一层一层地滑动,每一次卷积完生成一个输出通道,当卷积完成后,在利用1x1的卷积调整厚度。
如下就是MobileNet的结构,其中Conv dw就是分层卷积,在其之后都会接一个1x1的卷积进行通道处理, 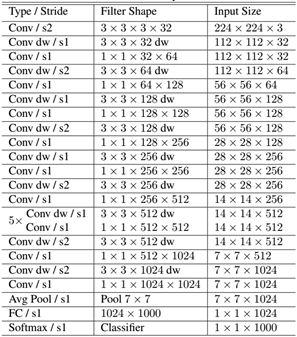 上图所示是的mobilenetV1-1的结构,由于我没有办法找到pytorch的mobilenetv1的权重资源,我只有mobilenetV1-0.25的权重,所以本文所使用的mobilenetV1版本就是mobilenetV1-0.25。
mobilenetV1-0.25是mobilenetV1-1通道数压缩为原来1/4的网络。对于yolov4来讲,我们需要取出它的最后三个shape的有效特征层进行加强特征提取。
在代码中,我们取出了out1、out2、out3。
import time
import torch
import torch.nn as nn
import torchvision.models._utils as _utils
import torchvision.models as models
import torch.nn.functional as F
from torch.autograd import Variable

def conv_bn(inp, oup, stride = 1):
    return nn.Sequential(
        nn.Conv2d(inp, oup, 3, stride, 1, bias=False),
        nn.BatchNorm2d(oup),
        nn.ReLU6(inplace=True)
    )

def conv_dw(inp, oup, stride = 1):
    return nn.Sequential(
        nn.Conv2d(inp, inp, 3, stride, 1, groups=inp, bias=False),
        nn.BatchNorm2d(inp),
        nn.ReLU6(inplace=True),

        nn.Conv2d(inp, oup, 1, 1, 0, bias=False),
        nn.BatchNorm2d(oup),
        nn.ReLU6(inplace=True),
    )

class MobileNetV1(nn.Module):
    def __init__(self):
        super(MobileNetV1, self).__init__()
        self.stage1 = nn.Sequential(
            # 640,640,3 -> 320,320,32
            conv_bn(3, 32, 2),
            # 320,320,32 -> 320,320,64
            conv_dw(32, 64, 1),

            # 320,320,64 -> 160,160,128
            conv_dw(64, 128, 2),
            conv_dw(128, 128, 1),

            # 160,160,128 -> 80,80,256
            conv_dw(128, 256, 2),
            conv_dw(256, 256, 1),
        )
            # 80,80,256 -> 40,40,512
        self.stage2 = nn.Sequential(
            conv_dw(256, 512, 2),
            conv_dw(512, 512, 1),
            conv_dw(512, 512, 1),
            conv_dw(512, 512, 1),
            conv_dw(512, 512, 1),
            conv_dw(512, 512, 1),
        )
            # 40,40,512 -> 20,20,1024
        self.stage3 = nn.Sequential(
            conv_dw(512, 1024, 2),
            conv_dw(1024, 1024, 1),
        )
        self.avg = nn.AdaptiveAvgPool2d((1,1))
        self.fc = nn.Linear(1024, 1000)

    def forward(self, x):
        x = self.stage1(x)
        x = self.stage2(x)
        x = self.stage3(x)
        x = self.avg(x)
        # x = self.model(x)
        x = x.view(-1, 1024)
        x = self.fc(x)
        return x

def mobilenet_v1(pretrained=False, progress=True):
    model = MobileNetV1()
    if pretrained:
        print("mobilenet_v1 has no pretrained model")
    return model

if __name__ == "__main__":
    import torch
    from torchsummary import summary

    # 需要使用device来指定网络在GPU还是CPU运行
    device = torch.device('cuda' if torch.cuda.is_available() else 'cpu')
    model = mobilenet_v1().to(device)
    summary(model, input_size=(3, 416, 416))
b、mobilenetV2介绍
MobileNetV2是MobileNet的升级版,它具有一个非常重要的特点就是使用了Inverted resblock,整个mobilenetv2都由Inverted resblock组成。
Inverted resblock可以分为两个部分:左边是主干部分,首先利用1x1卷积进行升维,然后利用3x3深度可分离卷积进行特征提取,然后再利用1x1卷积降维。右边是残差边部分,输入和输出直接相接。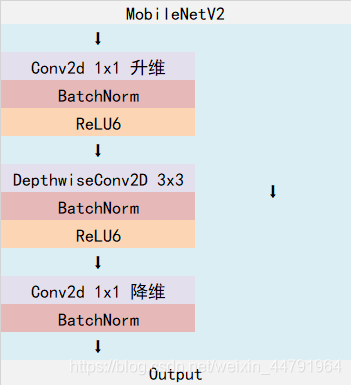
整体网络结构如下:(其中Inverted resblock进行的操作就是上述结构) 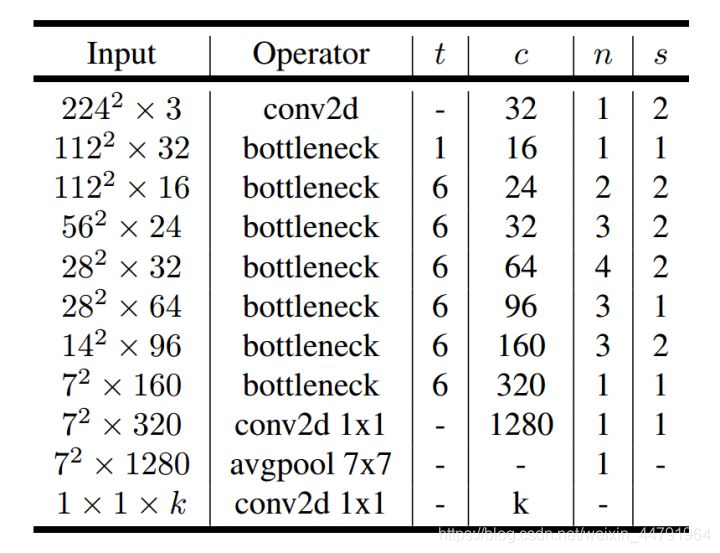 对于yolov4来讲,我们需要取出它的最后三个shape的有效特征层进行加强特征提取。
在代码中,我们取出了out1、out2、out3。
from torch import nn
from torchvision.models.utils import load_state_dict_from_url

model_urls = {
    'mobilenet_v2': 'https://download.pytorch.org/models/mobilenet_v2-b0353104.pth',
}


def _make_divisible(v, divisor, min_value=None):
    if min_value is None:
        min_value = divisor
    new_v = max(min_value, int(v + divisor / 2) // divisor * divisor)
    if new_v < 0.9 * v:
        new_v += divisor
    return new_v

class ConvBNReLU(nn.Sequential):
    def __init__(self, in_planes, out_planes, kernel_size=3, stride=1, groups=1):
        padding = (kernel_size - 1) // 2
        super(ConvBNReLU, self).__init__(
            nn.Conv2d(in_planes, out_planes, kernel_size, stride, padding, groups=groups, bias=False),
            nn.BatchNorm2d(out_planes),
            nn.ReLU6(inplace=True)
        )

class InvertedResidual(nn.Module):
    def __init__(self, inp, oup, stride, expand_ratio):
        super(InvertedResidual, self).__init__()
        self.stride = stride
        assert stride in [1, 2]

        hidden_dim = int(round(inp * expand_ratio))
        self.use_res_connect = self.stride == 1 and inp == oup

        layers = []
        if expand_ratio != 1:
            layers.append(ConvBNReLU(inp, hidden_dim, kernel_size=1))
        layers.extend([
            ConvBNReLU(hidden_dim, hidden_dim, stride=stride, groups=hidden_dim),
            nn.Conv2d(hidden_dim, oup, 1, 1, 0, bias=False),
            nn.BatchNorm2d(oup),
        ])
        self.conv = nn.Sequential(*layers)

    def forward(self, x):
        if self.use_res_connect:
            return x + self.conv(x)
        else:
            return self.conv(x)


class MobileNetV2(nn.Module):
    def __init__(self, num_classes=1000, width_mult=1.0, inverted_residual_setting=None, round_nearest=8):
        super(MobileNetV2, self).__init__()
        block = InvertedResidual
        input_channel = 32
        last_channel = 1280

        if inverted_residual_setting is None:
            inverted_residual_setting = [
                # t, c, n, s
                [1, 16, 1, 1],
                [6, 24, 2, 2],
                [6, 32, 3, 2],
                [6, 64, 4, 2],
                [6, 96, 3, 1],
                [6, 160, 3, 2],
                [6, 320, 1, 1],
            ]

        if len(inverted_residual_setting) == 0 or len(inverted_residual_setting[0]) != 4:
            raise ValueError("inverted_residual_setting should be non-empty "
                             "or a 4-element list, got {}".format(inverted_residual_setting))

        input_channel = _make_divisible(input_channel * width_mult, round_nearest)
        self.last_channel = _make_divisible(last_channel * max(1.0, width_mult), round_nearest)
        features = [ConvBNReLU(3, input_channel, stride=2)]

        for t, c, n, s in inverted_residual_setting:
            output_channel = _make_divisible(c * width_mult, round_nearest)
            for i in range(n):
                stride = s if i == 0 else 1
                features.append(block(input_channel, output_channel, stride, expand_ratio=t))
                input_channel = output_channel

        features.append(ConvBNReLU(input_channel, self.last_channel, kernel_size=1))
        self.features = nn.Sequential(*features)

        self.classifier = nn.Sequential(
            nn.Dropout(0.2),
            nn.Linear(self.last_channel, num_classes),
        )

        for m in self.modules():
            if isinstance(m, nn.Conv2d):
                nn.init.kaiming_normal_(m.weight, mode='fan_out')
                if m.bias is not None:
                    nn.init.zeros_(m.bias)
            elif isinstance(m, nn.BatchNorm2d):
                nn.init.ones_(m.weight)
                nn.init.zeros_(m.bias)
            elif isinstance(m, nn.Linear):
                nn.init.normal_(m.weight, 0, 0.01)
                nn.init.zeros_(m.bias)

    def forward(self, x):
        x = self.features(x)
        x = x.mean([2, 3])
        x = self.classifier(x)
        return x

def mobilenet_v2(pretrained=False, progress=True):
    model = MobileNetV2()
    if pretrained:
        state_dict = load_state_dict_from_url(model_urls['mobilenet_v2'], model_dir="model_data",
                                              progress=progress)
        model.load_state_dict(state_dict)

    return model

if __name__ == "__main__":
    print(mobilenet_v2())
c、mobilenetV3介绍
mobilenetV3使用了特殊的bneck结构。
bneck结构如下图所示: 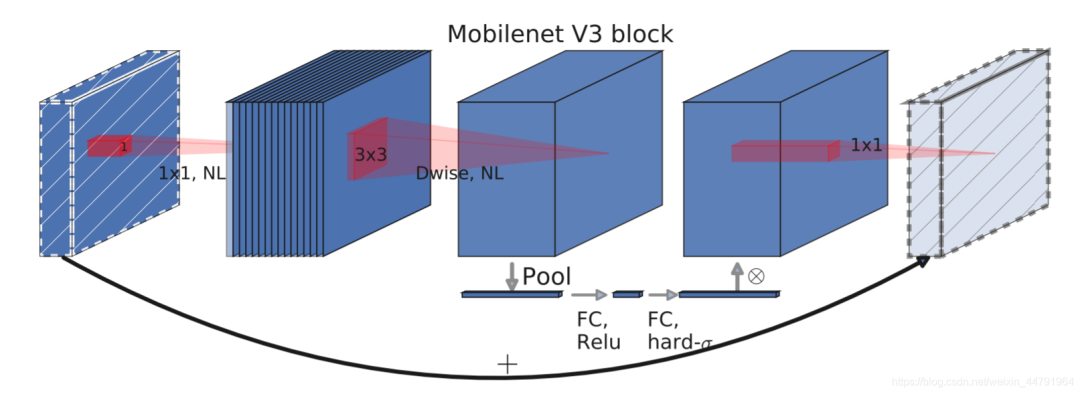 它综合了以下四个特点:a、MobileNetV2的具有线性瓶颈的逆残差结构(the inverted residual with linear bottleneck)。
 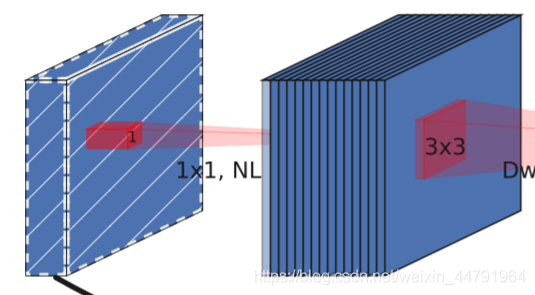 即先利用1x1卷积进行升维度,再进行下面的操作,并具有残差边。
b、MobileNetV1的深度可分离卷积(depthwise separable convolutions)。 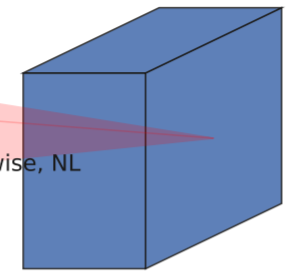 在输入1x1卷积进行升维度后,进行3x3深度可分离卷积。
c、轻量级的注意力模型。  这个注意力机制的作用方式是调整每个通道的权重。
d、利用h-swish代替swish函数。 在结构中使用了h-swishj激活函数,代替swish函数,减少运算量,提高性能。
下图为整个mobilenetV3的结构图: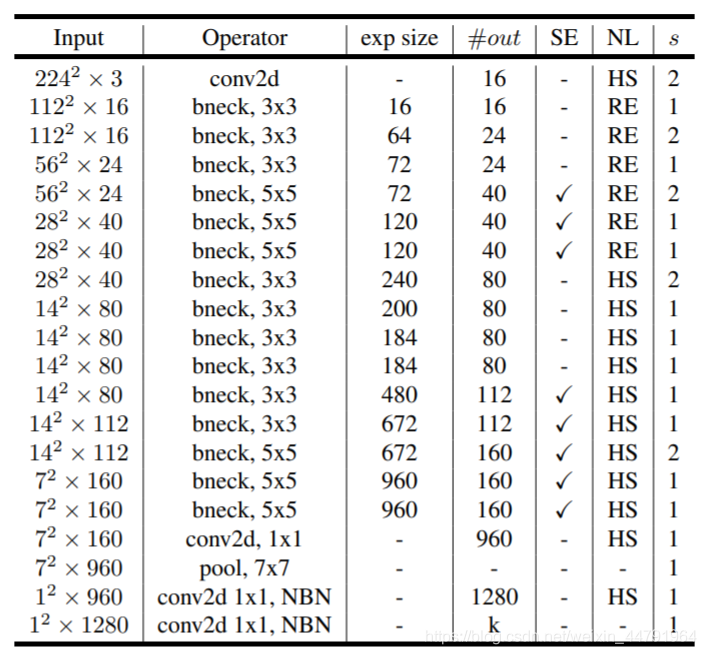 如何看懂这个表呢?我们从每一列出发:第一列Input代表mobilenetV3每个特征层的shape变化;第二列Operator代表每次特征层即将经历的block结构,我们可以看到在MobileNetV3中,特征提取经过了许多的bneck结构;第三、四列分别代表了bneck内逆残差结构上升后的通道数、输入到bneck时特征层的通道数。第五列SE代表了是否在这一层引入注意力机制。第六列NL代表了激活函数的种类,HS代表h-swish,RE代表RELU。第七列s代表了每一次block结构所用的步长。
对于yolov4来讲,我们需要取出它的最后三个shape的有效特征层进行加强特征提取。
在代码中,我们取出了out1、out2、out3。
import torch.nn as nn
import math
import torch
def _make_divisible(v, divisor, min_value=None):
    if min_value is None:
        min_value = divisor
    new_v = max(min_value, int(v + divisor / 2) // divisor * divisor)
    # Make sure that round down does not go down by more than 10%.
    if new_v < 0.9 * v:
        new_v += divisor
    return new_v

class h_sigmoid(nn.Module):
    def __init__(self, inplace=True):
        super(h_sigmoid, self).__init__()
        self.relu = nn.ReLU6(inplace=inplace)

    def forward(self, x):
        return self.relu(x + 3) / 6


class h_swish(nn.Module):
    def __init__(self, inplace=True):
        super(h_swish, self).__init__()
        self.sigmoid = h_sigmoid(inplace=inplace)

    def forward(self, x):
        return x * self.sigmoid(x)


class SELayer(nn.Module):
    def __init__(self, channel, reduction=4):
        super(SELayer, self).__init__()
        self.avg_pool = nn.AdaptiveAvgPool2d(1)
        self.fc = nn.Sequential(
                nn.Linear(channel, _make_divisible(channel // reduction, 8)),
                nn.ReLU(inplace=True),
                nn.Linear(_make_divisible(channel // reduction, 8), channel),
                h_sigmoid()
        )

    def forward(self, x):
        b, c, _, _ = x.size()
        y = self.avg_pool(x).view(b, c)
        y = self.fc(y).view(b, c, 1, 1)
        return x * y


def conv_3x3_bn(inp, oup, stride):
    return nn.Sequential(
        nn.Conv2d(inp, oup, 3, stride, 1, bias=False),
        nn.BatchNorm2d(oup),
        h_swish()
    )


def conv_1x1_bn(inp, oup):
    return nn.Sequential(
        nn.Conv2d(inp, oup, 1, 1, 0, bias=False),
        nn.BatchNorm2d(oup),
        h_swish()
    )


class InvertedResidual(nn.Module):
    def __init__(self, inp, hidden_dim, oup, kernel_size, stride, use_se, use_hs):
        super(InvertedResidual, self).__init__()
        assert stride in [1, 2]

        self.identity = stride == 1 and inp == oup

        if inp == hidden_dim:
            self.conv = nn.Sequential(
                # dw
                nn.Conv2d(hidden_dim, hidden_dim, kernel_size, stride, (kernel_size - 1) // 2, groups=hidden_dim, bias=False),
                nn.BatchNorm2d(hidden_dim),
                h_swish() if use_hs else nn.ReLU(inplace=True),
                # Squeeze-and-Excite
                SELayer(hidden_dim) if use_se else nn.Identity(),
                # pw-linear
                nn.Conv2d(hidden_dim, oup, 1, 1, 0, bias=False),
                nn.BatchNorm2d(oup),
            )
        else:
            self.conv = nn.Sequential(
                # pw
                nn.Conv2d(inp, hidden_dim, 1, 1, 0, bias=False),
                nn.BatchNorm2d(hidden_dim),
                h_swish() if use_hs else nn.ReLU(inplace=True),
                # dw
                nn.Conv2d(hidden_dim, hidden_dim, kernel_size, stride, (kernel_size - 1) // 2, groups=hidden_dim, bias=False),
                nn.BatchNorm2d(hidden_dim),
                # Squeeze-and-Excite
                SELayer(hidden_dim) if use_se else nn.Identity(),
                h_swish() if use_hs else nn.ReLU(inplace=True),
                # pw-linear
                nn.Conv2d(hidden_dim, oup, 1, 1, 0, bias=False),
                nn.BatchNorm2d(oup),
            )

    def forward(self, x):
        if self.identity:
            return x + self.conv(x)
        else:
            return self.conv(x)


class MobileNetV3(nn.Module):
    def __init__(self, num_classes=1000, width_mult=1.):
        super(MobileNetV3, self).__init__()
        # setting of inverted residual blocks
        self.cfgs = [
            #` k, t, c, SE, HS, s
            [3,   1,  16, 0, 0, 1],
            [3,   4,  24, 0, 0, 2],
            [3,   3,  24, 0, 0, 1],
            [5,   3,  40, 1, 0, 2],
            [5,   3,  40, 1, 0, 1],
            [5,   3,  40, 1, 0, 1],
            [3,   6,  80, 0, 1, 2],
            [3, 2.5,  80, 0, 1, 1],
            [3, 2.3,  80, 0, 1, 1],
            [3, 2.3,  80, 0, 1, 1],
            [3,   6, 112, 1, 1, 1],
            [3,   6, 112, 1, 1, 1],
            [5,   6, 160, 1, 1, 2],
            [5,   6, 160, 1, 1, 1],
            [5,   6, 160, 1, 1, 1]
        ]

        input_channel = _make_divisible(16 * width_mult, 8)
        layers = [conv_3x3_bn(3, input_channel, 2)]

        block = InvertedResidual
        for k, t, c, use_se, use_hs, s in self.cfgs:
            output_channel = _make_divisible(c * width_mult, 8)
            exp_size = _make_divisible(input_channel * t, 8)
            layers.append(block(input_channel, exp_size, output_channel, k, s, use_se, use_hs))
            input_channel = output_channel
        self.features = nn.Sequential(*layers)

        self.conv = conv_1x1_bn(input_channel, exp_size)
        self.avgpool = nn.AdaptiveAvgPool2d((1, 1))
        output_channel = _make_divisible(1280 * width_mult, 8) if width_mult > 1.0 else 1280
        self.classifier = nn.Sequential(
            nn.Linear(exp_size, output_channel),
            h_swish(),
            nn.Dropout(0.2),
            nn.Linear(output_channel, num_classes),
        )

        self._initialize_weights()

    def forward(self, x):
        x = self.features(x)
        x = self.conv(x)
        x = self.avgpool(x)
        x = x.view(x.size(0), -1)
        x = self.classifier(x)
        return x

    def _initialize_weights(self):
        for m in self.modules():
            if isinstance(m, nn.Conv2d):
                n = m.kernel_size[0] * m.kernel_size[1] * m.out_channels
                m.weight.data.normal_(0, math.sqrt(2. / n))
                if m.bias is not None:
                    m.bias.data.zero_()
            elif isinstance(m, nn.BatchNorm2d):
                m.weight.data.fill_(1)
                m.bias.data.zero_()
            elif isinstance(m, nn.Linear):
                n = m.weight.size(1)
                m.weight.data.normal_(0, 0.01)
                m.bias.data.zero_()

def mobilenet_v3(pretrained=False, **kwargs):
    model = MobileNetV3(**kwargs)
    if pretrained:
        state_dict = torch.load('./model_data/mobilenetv3-large-1cd25616.pth')
        model.load_state_dict(state_dict, strict=True)
    return model
3、将预测结果融入到yolov4网络当中
 对于yolov4来讲,我们需要利用主干特征提取网络获得的三个有效特征进行加强特征金字塔的构建。
利用上一步定义的MobilenetV1、MobilenetV2、MobilenetV3三个函数我们可以获得每个Mobilenet网络对应的三个有效特征层。
我们可以利用这三个有效特征层替换原来yolov4主干网络CSPdarknet53的有效特征层。
为了进一步减少参数量,我们可以使用深度可分离卷积代替yoloV3中用到的普通卷积。
实现代码如下:
import torch
import torch.nn as nn
from collections import OrderedDict
from nets.mobilenet_v1 import mobilenet_v1
from nets.mobilenet_v2 import mobilenet_v2
from nets.mobilenet_v3 import mobilenet_v3

class MobileNetV1(nn.Module):
    def __init__(self, pretrained = False):
        super(MobileNetV1, self).__init__()
        self.model = mobilenet_v1(pretrained=pretrained)

    def forward(self, x):
        out3 = self.model.stage1(x)
        out4 = self.model.stage2(out3)
        out5 = self.model.stage3(out4)
        return out3, out4, out5

class MobileNetV2(nn.Module):
    def __init__(self, pretrained = False):
        super(MobileNetV2, self).__init__()
        self.model = mobilenet_v2(pretrained=pretrained)

    def forward(self, x):
        out3 = self.model.features[:7](x)
        out4 = self.model.features[7:14](out3)
        out5 = self.model.features[14:18](out4)
        return out3, out4, out5

class MobileNetV3(nn.Module):
    def __init__(self, pretrained = False):
        super(MobileNetV3, self).__init__()
        self.model = mobilenet_v3(pretrained=pretrained)

    def forward(self, x):
        out3 = self.model.features[:7](x)
        out4 = self.model.features[7:13](out3)
        out5 = self.model.features[13:16](out4)
        return out3, out4, out5

def conv2d(filter_in, filter_out, kernel_size, groups=1, stride=1):
    pad = (kernel_size - 1) // 2 if kernel_size else 0
    return nn.Sequential(OrderedDict([
        ("conv", nn.Conv2d(filter_in, filter_out, kernel_size=kernel_size, stride=stride, padding=pad, groups=groups, bias=False)),
        ("bn", nn.BatchNorm2d(filter_out)),
        ("relu", nn.ReLU6(inplace=True)),
    ]))

def conv_dw(filter_in, filter_out, stride = 1):
    return nn.Sequential(
        nn.Conv2d(filter_in, filter_in, 3, stride, 1, groups=filter_in, bias=False),
        nn.BatchNorm2d(filter_in),
        nn.ReLU6(inplace=True),

        nn.Conv2d(filter_in, filter_out, 1, 1, 0, bias=False),
        nn.BatchNorm2d(filter_out),
        nn.ReLU6(inplace=True),
    )

#---------------------------------------------------#
#   SPP结构,利用不同大小的池化核进行池化
#   池化后堆叠
#---------------------------------------------------#
class SpatialPyramidPooling(nn.Module):
    def __init__(self, pool_sizes=[5, 9, 13]):
        super(SpatialPyramidPooling, self).__init__()

        self.maxpools = nn.ModuleList([nn.MaxPool2d(pool_size, 1, pool_size//2) for pool_size in pool_sizes])

    def forward(self, x):
        features = [maxpool(x) for maxpool in self.maxpools[::-1]]
        features = torch.cat(features + [x], dim=1)

        return features

#---------------------------------------------------#
#   卷积 + 上采样
#---------------------------------------------------#
class Upsample(nn.Module):
    def __init__(self, in_channels, out_channels):
        super(Upsample, self).__init__()

        self.upsample = nn.Sequential(
            conv2d(in_channels, out_channels, 1),
            nn.Upsample(scale_factor=2, mode='nearest')
        )

    def forward(self, x,):
        x = self.upsample(x)
        return x

#---------------------------------------------------#
#   三次卷积块
#---------------------------------------------------#
def make_three_conv(filters_list, in_filters):
    m = nn.Sequential(
        conv2d(in_filters, filters_list[0], 1),
        conv_dw(filters_list[0], filters_list[1]),
        conv2d(filters_list[1], filters_list[0], 1),
    )
    return m

#---------------------------------------------------#
#   五次卷积块
#---------------------------------------------------#
def make_five_conv(filters_list, in_filters):
    m = nn.Sequential(
        conv2d(in_filters, filters_list[0], 1),
        conv_dw(filters_list[0], filters_list[1]),
        conv2d(filters_list[1], filters_list[0], 1),
        conv_dw(filters_list[0], filters_list[1]),
        conv2d(filters_list[1], filters_list[0], 1),
    )
    return m

#---------------------------------------------------#
#   最后获得yolov4的输出
#---------------------------------------------------#
def yolo_head(filters_list, in_filters):
    m = nn.Sequential(
        conv_dw(in_filters, filters_list[0]),

        nn.Conv2d(filters_list[0], filters_list[1], 1),
    )
    return m

#---------------------------------------------------#
#   yolo_body
#---------------------------------------------------#
class YoloBody(nn.Module):
    def __init__(self, num_anchors, num_classes, backbone="mobilenetv2", pretrained=False):
        super(YoloBody, self).__init__()
        #  backbone
        if backbone == "mobilenetv1":
            self.backbone = MobileNetV1(pretrained=pretrained)
            alpha = 1
            in_filters = [256,512,1024]
        elif backbone == "mobilenetv2":
            self.backbone = MobileNetV2(pretrained=pretrained)
            alpha = 1
            in_filters = [32,96,320]
        elif backbone == "mobilenetv3":
            self.backbone = MobileNetV3(pretrained=pretrained)
            alpha = 1
            in_filters = [40,112,160]
        else:
            raise ValueError('Unsupported backbone - `{}`, Use mobilenetv1, mobilenetv2, mobilenetv3.'.format(backbone))

        self.conv1           = make_three_conv([int(512*alpha), int(1024*alpha)], in_filters[2])
        self.SPP             = SpatialPyramidPooling()
        self.conv2           = make_three_conv([int(512*alpha), int(1024*alpha)], int(2048*alpha))

        self.upsample1       = Upsample(int(512*alpha), int(256*alpha))
        self.conv_for_P4     = conv2d(in_filters[1], int(256*alpha),1)
        self.make_five_conv1 = make_five_conv([int(256*alpha), int(512*alpha)], int(512*alpha))

        self.upsample2       = Upsample(int(256*alpha), int(128*alpha))
        self.conv_for_P3     = conv2d(in_filters[0], int(128*alpha),1)
        self.make_five_conv2 = make_five_conv([ int(128*alpha), int(256*alpha)], int(256*alpha))
        # 3*(5+num_classes)=3*(5+20)=3*(4+1+20)=75
        # 4+1+num_classes
        final_out_filter2    = num_anchors * (5 + num_classes)
        self.yolo_head3      = yolo_head([int(256*alpha), final_out_filter2],int(128*alpha))

        self.down_sample1    = conv_dw(int(128*alpha), int(256*alpha),stride=2)
        self.make_five_conv3 = make_five_conv([int(256*alpha), int(512*alpha)],int(512*alpha))
        # 3*(5+num_classes)=3*(5+20)=3*(4+1+20)=75
        final_out_filter1    = num_anchors * (5 + num_classes)
        self.yolo_head2      = yolo_head([int(512*alpha), final_out_filter1], int(256*alpha))


        self.down_sample2    = conv_dw(int(256*alpha), int(512*alpha),stride=2)
        self.make_five_conv4 = make_five_conv([int(512*alpha), int(1024*alpha)], int(1024*alpha))
        # 3*(5+num_classes)=3*(5+20)=3*(4+1+20)=75
        final_out_filter0    = num_anchors * (5 + num_classes)
        self.yolo_head1      = yolo_head([int(1024*alpha), final_out_filter0], int(512*alpha))


    def forward(self, x):
        #  backbone
        x2, x1, x0 = self.backbone(x)

        P5 = self.conv1(x0)
        P5 = self.SPP(P5)
        P5 = self.conv2(P5)

        P5_upsample = self.upsample1(P5)
        P4 = self.conv_for_P4(x1)
        P4 = torch.cat([P4,P5_upsample],axis=1)
        P4 = self.make_five_conv1(P4)

        P4_upsample = self.upsample2(P4)
        P3 = self.conv_for_P3(x2)
        P3 = torch.cat([P3,P4_upsample],axis=1)
        P3 = self.make_five_conv2(P3)

        P3_downsample = self.down_sample1(P3)
        P4 = torch.cat([P3_downsample,P4],axis=1)
        P4 = self.make_five_conv3(P4)

        P4_downsample = self.down_sample2(P4)
        P5 = torch.cat([P4_downsample,P5],axis=1)
        P5 = self.make_five_conv4(P5)

        out2 = self.yolo_head3(P3)
        out1 = self.yolo_head2(P4)
        out0 = self.yolo_head1(P5)

        return out0, out1, out2
训练自己的YoloV4模型
首先前往Github下载对应的仓库,下载完后利用解压软件解压,之后用编程软件打开文件夹。注意打开的根目录必须正确,否则相对目录不正确的情况下,代码将无法运行。 一定要注意打开后的根目录是文件存放的目录。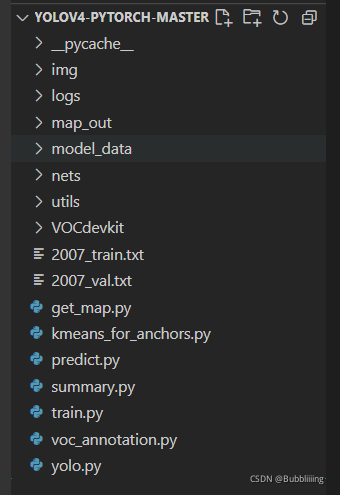
一、数据集的准备
本文使用VOC格式进行训练,训练前需要自己制作好数据集,如果没有自己的数据集,可以通过Github连接下载VOC12+07的数据集尝试下。 训练前将标签文件放在VOCdevkit文件夹下的VOC2007文件夹下的Annotation中。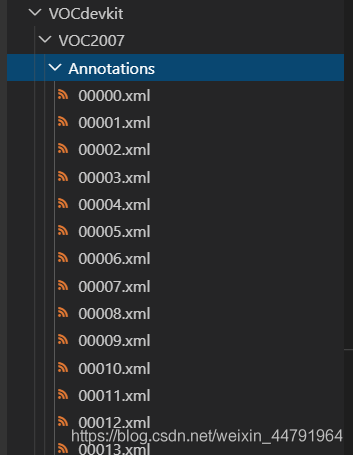 训练前将图片文件放在VOCdevkit文件夹下的VOC2007文件夹下的JPEGImages中。
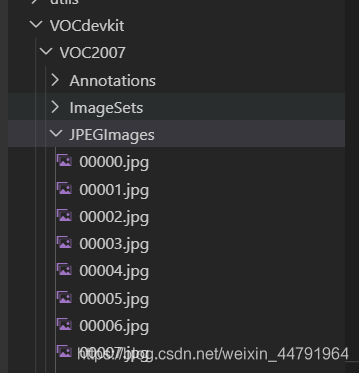 此时数据集的摆放已经结束。
二、数据集的处理
在完成数据集的摆放之后,我们需要对数据集进行下一步的处理,目的是获得训练用的2007_train.txt以及2007_val.txt,需要用到根目录下的voc_annotation.py。
voc_annotation.py里面有一些参数需要设置。分别是annotation_mode、classes_path、trainval_percent、train_percent、VOCdevkit_path,第一次训练可以仅修改classes_path
'''
annotation_mode用于指定该文件运行时计算的内容
annotation_mode为0代表整个标签处理过程,包括获得VOCdevkit/VOC2007/ImageSets里面的txt以及训练用的2007_train.txt、2007_val.txt
annotation_mode为1代表获得VOCdevkit/VOC2007/ImageSets里面的txt
annotation_mode为2代表获得训练用的2007_train.txt、2007_val.txt
'''
annotation_mode     = 0
'''
必须要修改,用于生成2007_train.txt、2007_val.txt的目标信息
与训练和预测所用的classes_path一致即可
如果生成的2007_train.txt里面没有目标信息
那么就是因为classes没有设定正确
仅在annotation_mode为0和2的时候有效
'''
classes_path        = 'model_data/voc_classes.txt'
'''
trainval_percent用于指定(训练集+验证集)与测试集的比例,默认情况下 (训练集+验证集):测试集 = 9:1
train_percent用于指定(训练集+验证集)中训练集与验证集的比例,默认情况下 训练集:验证集 = 9:1
仅在annotation_mode为0和1的时候有效
'''
trainval_percent    = 0.9
train_percent       = 0.9
'''
指向VOC数据集所在的文件夹
默认指向根目录下的VOC数据集
'''
VOCdevkit_path  = 'VOCdevkit'
classes_path用于指向检测类别所对应的txt,以voc数据集为例,我们用的txt为: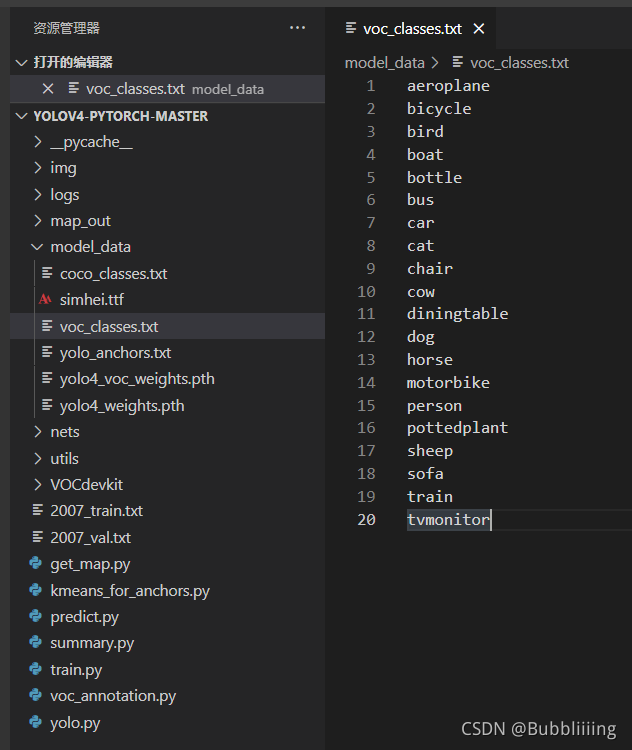 训练自己的数据集时,可以自己建立一个cls_classes.txt,里面写自己所需要区分的类别。
三、开始网络训练
通过voc_annotation.py我们已经生成了2007_train.txt以及2007_val.txt,此时我们可以开始训练了。训练的参数较多,大家可以在下载库后仔细看注释,其中最重要的部分依然是train.py里的classes_path。
classes_path用于指向检测类别所对应的txt,这个txt和voc_annotation.py里面的txt一样!训练自己的数据集必须要修改! 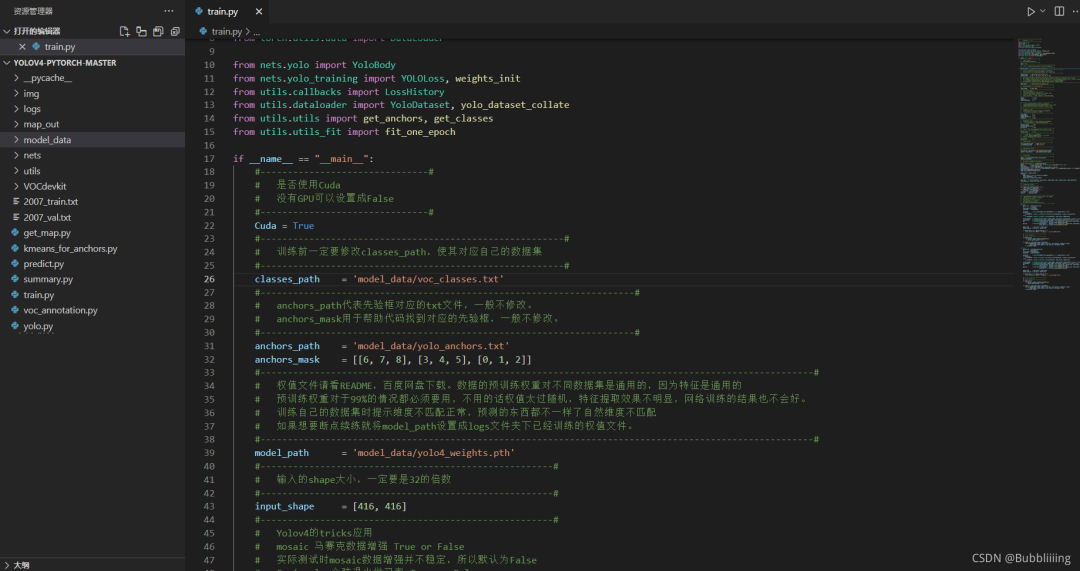 修改完classes_path后就可以运行train.py开始训练了,在训练多个epoch后,权值会生成在logs文件夹中。
另外,backbone参数用于指定所用的主干特征提取网络,可以在mobilenetv1, mobilenetv2, mobilenetv3中进行选择。
训练前需要注意所用mobilenet版本和预训练权重的对齐。
其它参数的作用如下:
#-------------------------------#
#   是否使用Cuda
#   没有GPU可以设置成False
#-------------------------------#
Cuda = True
#--------------------------------------------------------#
#   训练前一定要修改classes_path,使其对应自己的数据集
#--------------------------------------------------------#
classes_path    = 'model_data/voc_classes.txt'
#---------------------------------------------------------------------#
#   anchors_path代表先验框对应的txt文件,一般不修改。
#   anchors_mask用于帮助代码找到对应的先验框,一般不修改。
#---------------------------------------------------------------------#
anchors_path    = 'model_data/yolo_anchors.txt'
anchors_mask    = [[6, 7, 8], [3, 4, 5], [0, 1, 2]]
#------------------------------------------------------------------------------------------------------#
#   权值文件请看README,百度网盘下载。数据的预训练权重对不同数据集是通用的,因为特征是通用的
#   预训练权重对于99%的情况都必须要用,不用的话权值太过随机,特征提取效果不明显,网络训练的结果也不会好。
#   训练自己的数据集时提示维度不匹配正常,预测的东西都不一样了自然维度不匹配
#   如果想要断点续练就将model_path设置成logs文件夹下已经训练的权值文件。
#------------------------------------------------------------------------------------------------------#
model_path      = 'model_data/yolov4_mobilenet_v1_voc.pth'
#------------------------------------------------------#
#   输入的shape大小,一定要是32的倍数
#------------------------------------------------------#
input_shape     = [416, 416]
#-------------------------------#
#   所使用的主干特征提取网络
#   mobilenetv1
#   mobilenetv2
#   mobilenetv3
#   ghostnet
#-------------------------------#
backbone        = "mobilenetv1"
#----------------------------------#
#   是否使用主干网络的预训练权重
#   只包括主干部分,与model_path无关
#----------------------------------#
pretrained      = False
#------------------------------------------------------#
#   Yolov4的tricks应用
#   mosaic 马赛克数据增强 True or False
#   实际测试时mosaic数据增强并不稳定,所以默认为False
#   Cosine_scheduler 余弦退火学习率 True or False
#   label_smoothing 标签平滑 0.01以下一般 如0.01、0.005
#------------------------------------------------------#
mosaic              = False
Cosine_lr           = False
label_smoothing     = 0
四、训练结果预测
训练结果预测需要用到两个文件,分别是yolo.py和predict.py。我们首先需要去yolo.py里面修改model_path以及classes_path,这两个参数必须要修改。
另外,backbone参数用于指定所用的主干特征提取网络,可以在mobilenetv1, mobilenetv2, mobilenetv3中进行选择。
model_path指向训练好的权值文件,在logs文件夹里。classes_path指向检测类别所对应的txt。 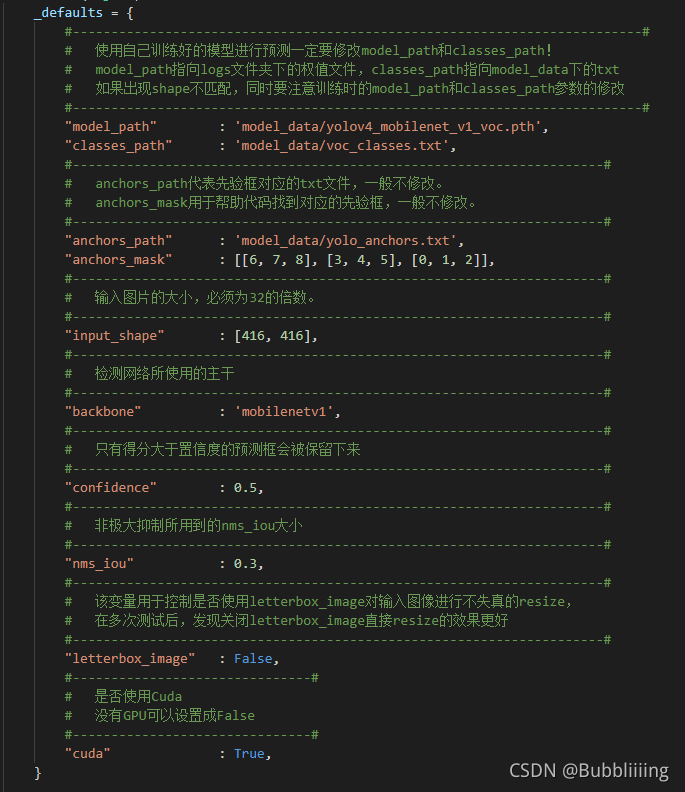 完成修改后就可以运行predict.py进行检测了。运行后输入图片路径即可检测。
